My Epson 4900 Starved to Death

4900-head-error
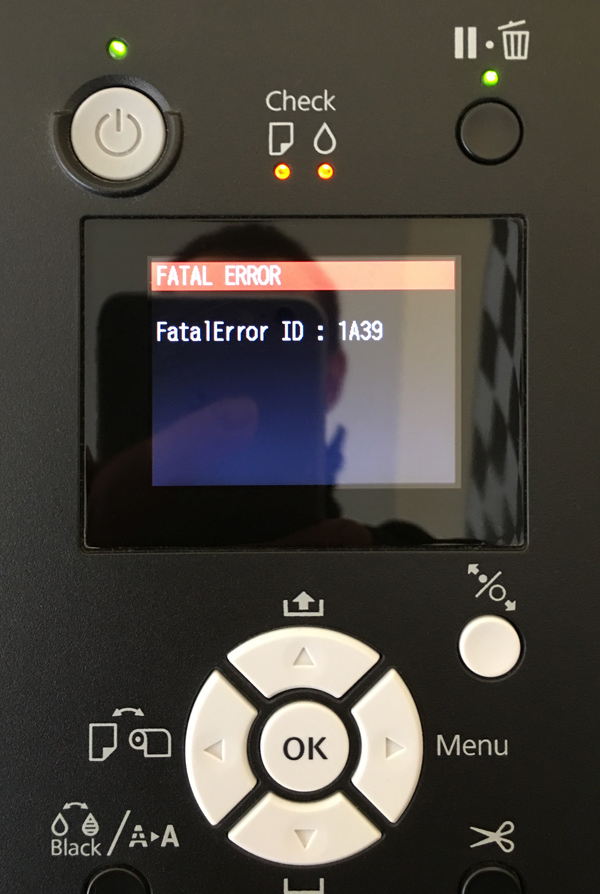
When I turned on my Epson Stylus Pro 4900 a few days ago to do the regular maintenance cycle, the dreaded fatal error 1A39 appeared on the LCD. Kudos to Epson for these descriptive error messages. Not.

A quick search on the net as well as phoning the service and I had a complete diagnosis: the print head went dead. Replacement (including the pump unit) would cost about 80% of a new printer. Oops.

This is the fourth occurrence of such a problem in my circles. The urban legend says that when left turned off for a while, ink dries up from the head and since it is also used for cooling, being inkless repeatedly (no cooling at startup) will fry something in the head assembly. This seems to affect Epson’s current TFP heads (used in the 4900/7900/9900 – those models me and my acquaintances had issues with). The legend also tells that in newer heads (the ones that you get if you go the replacement route or buy a x900 printer these days) had been redesigned and free of this problem.

This theory is somewhat supported by the fact that most of the printers having this problem were used sporadically. I had no issues with the 4900 during the 3 years I used it heavily, but during the last one and a half years it had been sitting mostly idle, only doing a small print every two to four weeks.

In other words, it’s been starved to death.

Since my printer already made much more profit than it’s cost, I’m just mildly irritated. But saying that it’s not irritating to run into a design flaw (in case the legend holds true) that costs me money would be a lie.

Anyway, I’ll need a new printer. My use in the future will continue to be light, so I’m not going the TFP route again. Yes, the legend says that this problem had been fixed in the new heads, but Epson also publicly stated several times that new printers are not susceptible to clogging – which was far from truth with the 4900. So no TFP, thank you.

I’m looking into two printers now: the 17″ Epson P800 (which uses the previous generation AMC head), and Canon’s 24″ iPF6450 PRO 2000. The 17″ PRO 1000 had been quickly ruled out by not having a straight paper path, not supporting some heavy media I use, and it’s ridiculous margin handling (I can’t print a 30×45 on an A3+ paper). Epson’s new P7000 was considered for a fleeting moment, but it uses a TFP head, so I stopped thinking about it.

Fortunately I’m not in a hurry to get a printer immediately, so I’ll have time to do some evaluation before making the decision. I’ll start with a first look on the P800 towards the end of next week.

But there’s a gift in every problem: since the only thing I used Windows for was printing, I could finally eliminate the very last (albeit virtual) Windows machine in the company! And man, this is a huge time saver. Based on this, I’ll take the opportunity to reimplement my printing workflow purely on OS X. I badly needed this, but there were always more excuses important things. Now I ran out of them.

Postscript: I’m selling the remaining consumables (inks, cutter blade, maintenance tank) as well as fully operational parts (roll spindle, roll unit, paper tray, or any other parts you may need) from the dead printer. Please let me know if you are interested.

  ☕ ☕ ☕

Did this post help you? Consider buying me a coffee if so.

Why ColorBase?

After my recent post about the new ColorBase version, a friend asked the question: “why is it better than factory calibration?” I though this could be interesting to other people, so here’s my (longish) answer.

Some background first. In the grand scheme of things, building a color profile for a device is a two-step process. The first step is calibration, which sets the basic operating parameters of the device to a well known (sometimes standardized) default. In case of monitors, calibration sets the black level, white luminance, color temperature and tone reproduction curve. In case of printers, it sets the relationship between color values and the actual amount of ink laid down to be linear – this is why this step is called linearization. The second step is the actual profiling. Here the software determines the color reproduction characteristics of the device and creates the profile.

On the low end, manufacturers tend to skip the calibration step, doing only the profiling. This is a nasty trick and the reason why I think that cheap colorimeter packages that can’t do the calibration step are downright dangerous and actually worth nothing. On the high end profile making is always preceded by calibration.

Speaking of printers: the lack of calibration (linearization) is less noticeable here, because profiling packages do a linearization step under the hood before starting to build the profile. This is not that accurate as the separate step, however (“true” linearization controls parameters in the rasterization process, whereas “simulated” plays with the color values). So basically it is more or less done for printer profiles.

My favorite example for showing color reproduction differences across devices is the TV department of your favorite electronics store. Almost every single one displays the same content differently. Consumer printers are the same. Take two Epson 2880s, and they will print different colors. In case of professional Epsons, all the devices are “factory calibrated” to be as identical as possible when they leave the factory. But this does not mean that they will not drift over time! And because of this drift (and inherent difference in consumer models) you’ll have to re-create all the profiles from time to time. Which could be a daunting task.

To be able to decide whether your device drifted out of tolerances, high end profiling packages provide a validation tool that measures the color reproduction accuracy of the calibrated/profiled device. This way you can check the status periodically and recalibrate/re-profile as needed – instead of doing this blindly every month or so.

Epson’s ColorBase is a software for both linearizing the printer driver and a validation tool for checking the linearization accuracy. A welcome extra is that it can do this for higher-end consumer printers. So one can utilize ColorBase in two different ways:

  • Use it to measure accuracy, and redo the complete linearization/profiling for each of the papers when the accuracy has drifted. This could still be daunting for several papers, but this provides the utmost precision.
  • Use it to measure accuracy, but only redo the linearization if the printer became out-of-spec. Because ColorBase returns the printer to the state it had been before creating the profiles, there are pretty good chances that the profiles will remain accurate.

I have been using the second method for five years with great success. And the longest period that the printer was in-spec reached 2 years with my late 4800. This demonstrates that we are talking more about peace of mind and process control here than visible results. This stuff is about to catch when something goes wrong before it ruins several prints.

And what’s the difference between factory calibration and ColorBase? Actually they are two different things. Factory calibration is for making sure that pro printers are identical when they leave the assembly line, whereas ColorBase is a tool for employing process control.

I must mention two glaring omissions in the package, however. Ink limiting and support for third party papers. You can control ink within the printer driver to some extent, but this should be done with the linearization step. Over-inking could be a serious problem using the driver with some papers. Not supporting third party papers could be worked around by linearizing the printer to the Epson paper selected as the media type for the third party paper (for example Velvet Fine Art in case of Hahnemühle Photo Rag). You will not have a linearization for Photo Rag (which would be the desirable), but at least you’ll be able to build its profile on a solid and consistent base.

If you need ink limiting and linearization for custom papers then moving to a RIP is the only solution these days.