Canon EF 24mm f/2.8 IS USM First Impressions

My sister bought my beloved 24mm f/2.8 lens a couple of months ago (and is making some pretty impressive images with it, this one being my favorite). My good old 400mm f/5.6L USM also have a new owner, so I was thinking about what new equipment should all this money fund.

The first idea was to buy a Fuji X100S, but after trying it I decided that it would require me to accept far more compromises than I’m willing to, so turned back to get some good Canon glass. The 24/2.8’s successor to be exact.

The lens arrived yesterday and just put it through the initial tests and autofocus microadjustment calibration with FoCal. Here are my initial observations.

Image quality

It’s pretty damn good – as was the old 24. A little more resolution (+), a little more distortion (-), but very similar looking images. The center is crazy sharp (much better than my TS-E 24mm). Corners aren’t that sharp, but are still very good. No surprises here. Autofocus consistency is a bit down from 99.1% to 98.6% – they are practically the same in field conditions.

What surprised me pleasantly is the aperture sharpness profile of the new lens (after the AFMA calibration I usually do a focus consistency test as well as an aperture sharpness test).

as-24-old

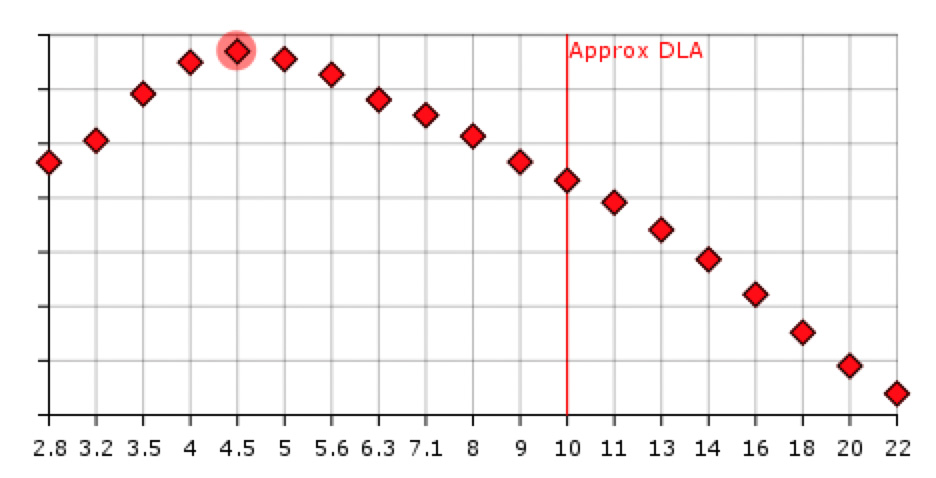
Aperture sharpness of the old 24/2.8

Above is the old lens’ profile. Numbers from the vertical scale were removed intentionally, as they can’t be used outside of a single measurement (to compare lenses).

And here is the new lens’ profile.

as-24-new

Aperture sharpness of the new lens

Much better at f/2.8, and the sharpness is more consistent through the entire aperture range I routinely use (up to f/11).

Build quality

There’s a night and day difference between the 25 years old design and the contemporary one. The 24 IS’ build quality is on par with my 135/2L. Both utilize engineering plastic as the outer shell, and are tough, but still lightweight. The focusing ring is smooth and well dampened. The lens hood is, well…

Canon does not ship a lens hood with it by default. So it’s a separate purchase. With a lens in the L territory in many aspects (image quality, build quality and and also price), it would be nice to include the hood in the box. Heck, they can even put a red ring on this lens!

The hood itself is the best design I’ve seen from Canon yet. The only drawback is that you can’t remove the lens cap when it’s attached. You have to remove the hood to access the cap. Again, for this price I would expect to get the new center-pinch lens cap. So I might finally pull the trigger and buy a bunch of center-pinch Mark II lens caps.

Image stabilization

The lens belongs to my “travel trio“, so it will be used mostly handheld, sometimes in marginal light. I routinely do landscapes in those conditions and need larger depth of field, so a larger (f/1.4 for example) aperture isn’t a solution for me. But image stabilization is!

Did a couple of low light tests last evening: with a bit of patience I was able to handhold the lens up to half a second! 1/4 second exposures were a piece of cake (the test was done with a 650D, but I expect similar results on my 5D3).

I should also mention that the IS is so silent that I have to put my ears close to the lens to hear it. Also there’s no jump in the viewfinder image when IS is engaged. Light years ahead of the IS systems in my older lenses.

Conclusion

This lens is a winner. If you are into landscapes and want a lightweight and great lens, do yourself a favor and try one. I bet you’ll be immediately hooked.

Recently Canon refreshed their short non-L prime range (24/28/35) with great lenses. I can hardly wait for a similar refresh in the normal/short telephoto range (50/85/100). And may I ask for an image stabilized 135/2L?

Canon WFT-E7 First Impressions

There are situations when you need remote camera control. No, I’m not speaking about the “let’s control the camera from an iPad two meters away” kind of pointless exercises, I’m talking about real needs. Think about cameras mounted on the roof of the stadium, situations where you would scare wildlife away with your presence, or downright dangerous places where you don’t want to spend more time than absolutely necessary.

I bought Canon’s Wireless File Transmitter WFT-E7(B) to assist in implementing some of my photographic ideas, and also to develop network (both wired and wireless) tethering support for Kuuvik Capture. While it’s clear that Canon’s transmitters are not standing in the forefront of today’s technology, if you could live with their quirks and limitations, then they could do the job well.

The Pricing Issue

Well, I paid 520 EUR (roughly $675, excluding taxes) for the WFT. Although this is some $175 less than the list price, it is pretty expensive. The bill of materials for this device is hardly more than $50, so this asking price is a bit irritating. As a comparison: an Apple Airport Extreme base station that packs comparable amount of software costs $179. Considering the functionality of the WFT, my opinion is that Canon could sell huge amounts of these at $199 or even at $299. But the $849 list price is simply unrealistic.

The bad news is if you need full, 100% USB-equivalent remote control functionality, then you have to swallow the price, and buy the device. There are some products, such as Camranger, that offer partial solutions, but you need a WFT for the whole thing.

Integrated Wi-Fi (and WFT software) on the 6D certainly points to a good direction, and I hope more cameras with integrated WFTs will follow. This is how it should be done in 2013.

The Hardware

When the first wireless transmitters had appeared for Canons, they were ugly bricks that connected to the camera with a cable, but in exchange they supported multiple cameras. Then Canon made their mind, and started to sell dedicated transmitters for each camera model (think 5D2 and 7D). With the WFT-E7, the ugly brick returns. In theory it will support future cameras, but I found no sign on the Net whether it works with anything except the 5D3. I plan to investigate this in the near future.

Its exterior finish acts like a dust magnet, and also files off small skin particles of your hand, so it’s a challenge to keep it clean.

Mounting the WFT is another challenge. I’m using Arca-Swiss compatible tripod heads/plates, so screwing the WFT under my camera is not an option. As a short term solution I simply attached a keyring to the supplied neoprene case, and hung the device on my tripod hook. In the long term the keyring will be replaced with a carabiner that will attach to that hole on the tripod base. Canon packages two cables with the device: one is too short and the other one is too long for me. This is why I reel up and velcro the longer cable to the case.

The good news is that the WFT is powered by the same LP-E6 battery that powers the 5D3.

Operating Modes

You can choose from the following operating modes (which are mutually exclusive):

  • Remote camera control (EOS Utility).
  • WFT Server, which is a web-based remote control facility.
  • You can upload your shots to an FTP server.
  • Show your images on a DLNA compatible TV set.
  • Can sync time between cameras.

The only mode that gives you full remote control is the EOS Utility mode. This is what I’m using, so will skip the others.

Network Configuration

This is the first quirk. For some unknown reason, the device can’t operate as an access point. So you either connect it to an existing network; bring your own access point (another box, batteries, etc); or create and use an ad-hoc Wi-Fi network (which can work only in “g” speed, and its WEP encryption isn’t something considered secure). This is a major oversight on a $675 device.

I won’t talk about basic network configuration, because you can find pretty good and detailed guides at Canon’s Digital Learning Center. I will, however, talk about another quirk: pairing.

Pairing

To control a WFT-equipped camera, you have to pair it to the computer and application you plan to use it from (I’ll call this computer/application pair an endpoint).

You must configure your networks settings on the 5D3 using the Connection wizard. No matter how experienced you are in IP network configuration, this is the only way you can get your WFT to do the pairing at the end.

Below is a screenshot of the network camera manager in the private beta version of Kuuvik Capture 1.1 showing my paired (and connected) 5D Mark III.

Network camera manger in Kuuvik Capture 1.1 beta

Network camera manager in Kuuvik Capture 1.1 beta

Working with the WFT

This is the best part: once paired and connected, you can forget about the WFT. Everything looks and works as if your camera was connected via USB. Yes, Wi-Fi can be slow (especially ad-hoc “g” speed networks), so large RAW file downloads can take a while. But otherwise the functionality is completely identical.

You only have to pair your WFT to Kuuvik Capture once, but you must watch for the connection sequence later on. WFTs advertise themselves on the network using Bonjour. When you turn on a paired WFT, it will advertise itself for a minute. During this time Kuuvik Capture (or another software) must connect to it. If the camera does not receive a connection request within a minute, it will shut down the WFT! From this point on things become pretty stochastic. Sometimes after a while the camera turn the WFT on again, sometimes you have to disable and re-enable EOS Utility mode on the camera to retry the connection.

The recommended sequence is:

  • Start Kuuvik Capture.
  • Turn on the paired camera. It might need half a minute or so to start advertising itself. When it appears in Bonjour, Kuuvik Capture will automatically connect to it.

Conclusion

During the last few weeks of testing the WFT-E7 worked as expected – offering stable, completely USB-equivalent connection. I don’t have a reason no to be satisfied with it. I just try not to think about its price.

Oh, I’m sure 6D owners will break into a smile seeing the ugly brick hanging under my tripod…

  ☕ ☕ ☕

Did you enjoy this post? Consider buying me a coffee if so.

Canon EOS-1D X and 6D Impressions

Many thanks to Canon Hungary for kindly supplying test cameras for our project!

From time to time a bunch of cameras arrive at my desk for measurements and software compatibility testing. This is a double-fun exercise: besides learning a lot about cameras I have the opportunity to try out and photograph with almost all of them. Among the recent group borrowed from Canon Hungary, there was two cameras I was eager to try out: the EOS-1D X and the EOS 6D. Fortunately the testing period included a weekend, so I had a little more time to go out and play with both, and to compare them with my 5D Mark III and 1D Mark II (which I still have because it can’t be sold at any sensible price).

First and foremost: I would be hard pressed if I had to choose between the 1DX, 5D3 and 6D based solely on image quality. All three are capable of producing great images. You can’t go wrong with any of these. You can also find several reviews on the web doing all the pixel-peeping. So I will concentrate on handling and usability – both playing an important role in my camera selection.

In General

I have been an EOS-1 user for almost a decade, and I immediately felt home with the 1D X. Sure, it is bigger and bulkier than recent models, but at 1550g it’s still 20g lighter than the 1D Mark II. For me this weight dictates the use of the E1 hand strap.

It seems that only the 1-series Canons are designed for people having a nose. Having anything than a small and flat nose is a recipe for discomfort and greased LCD on all non-1 Canons. The 1D X being thicker reduces the distance the viewfinder protrudes from the body, so it’s slightly less convenient than previous models. In comparison: the 5D Mark III is bearable, but the 6D is awful: I can’t see the entire image in the finder without risking to break my nose…

Switching between the 1DX and the 5D3 is effortless: I was able to instinctively find all the controls as they were where they should be. Not so with the 6D. I found the omission of the joystick, the inconvenient selection dial and mixing picture taking controls with playback controls so much frustrating to use that I put down the camera just after half an hour and decided against buying one, despite holding it still feels good. I understand that it’s a sacrifice one has to make for reduced size/weight/price, but I’m rather carrying/paying more for something that’s a joy to use. If I desperately need a cheap/light backup camera then I might buy one, but at the moment I don’t feel that need.

The CF compartment door on the 1D X I tested was loose and emitted a squeaking noise every time I squeezed the body – and you have to squeeze it to be able to pick it up. I don’t know if it’s a problem with this given demo unit, but it’s not something that I experienced with previous 1s and definitely not something I would accept on a $6800 camera. Even the 5D3’s CF door was better.

Features I Miss

Although the 5D3 and the 1DX are from the same mold, there are a couple of pretty useful 1-series features I miss on the 5D3: eyepiece shutter (the 5D3’s plastic thing is a joke), the ability to save the whole camera configuration to a card and load it later, and the ability to lock up the mirror for several shots (which is pretty useful if you do brackets).

On the other hand, the RATE button introduced on the 5D3 and the truly silent shutter of both the 5D3 and the 6D (the silent shutter on the 1DX is pretty useless) are features that could find a home the 1DX.

Things That Need to be Done Fast

All four cameras were pretty responsive, but I was especially interested in a few things. The first was buffer clear time. Lots of people talk about the buffer capacity, but I found the time needed to write all images to disk more important. Even a smaller buffer with faster clearing could be useful. In this comparison the 1D2 lost by huge margin: using a 16GB SanDisk Extreme Pro card it was capable of taking 19 shots (on average) in a burst and it took 15 seconds to clear the buffer. During the last decade it proved to be inadequate more than a couple of times. The 5D3, with a 32G Lexar Pro 1000x card was able to capture 37 images before starting to slow down and the buffer cleared in mere 2.5 seconds! The 1DX was able to capture 58 shots in a 12 fps burst, and wrote them to the same 32GB Lexar Pro 1000x card in 7 seconds. Even the 6D was better than the 1D2: it took 21 frames and wrote them in 8 seconds to a 32GB SanDisk Extreme Pro SD card. In terms of fast capture and fast card writing both the 1DX and the 5D3 are wonderful.

I was interested in how fast these cameras drive a long telephoto (without and with teleconverters). I made no numerical comparisons, just how fast they felt. Surprisingly the 1D2 was the candidate for the fastest lens drive medal, but it has to correct what it did in a second round several times. Maybe its NiMH batteries could provide more power to the lens? The 1DX drove the 500mm f/4L IS quickly and precisely, even with teleconverters attached, so the aforementioned medal went to the 1DX. Lens drive is not where the 5D3 AF system shines. However, my experience shows that its AF system is far better than the 1D2 for tracking birds – even if it drives lenses noticeably slower than its big brother. Here the 6D pleasantly surprised me: lens drive was faster than the 5D3’s! So I sincerely hope that Canon would be able to squeeze out a 6D-equivalent lens drive from the 5D3 with its upcoming firmware update.

The last thing I tried was low light focusing – with the center point only. The 6D is the clear winner here – it was able to focus on features I was barely seeing! The 5D3 took second place, with a bit of hesitation (read: several seconds) before grabbing focus at the same spot where the 6D focused instantly. The 1DX hesitated even more, but was able to grab focus, but the 1D2 was unable to achieve focus in any of my tests.

Conclusions

Let’s start with the easiest one: the 6D impressed me with its low light focusing ability and speedy focus drive, but it was not enough to outweigh its shortcomings in the handling department. So as I mentioned I decided to skip this body for now.

The old 1D Mark II held against the competition pretty well, despite its 9 years in service. I changed my mind about selling it: I would get less for it than a medium level Montblanc pen costs, but its still a pretty usable and capable camera – up to ISO 800. It stays until it dies.

And now the big question: 1DX or 5D3? I bought the 5D3 at the time when the 1DX had no f/8 focusing ability. Would Canon introduce the 1DX with this feature I would end up with that camera, no question about it. But the 5D3 will get that feature in April, so again a tie. Now I see four decision factors:

  • Action-stopping ability (high fps, focus tracking and focus drive). It you need this go with the 1D X.
  • Size/weight. I would take my 5D3 to a vacation paired with my beloved light primes without any hesitation. Would not even think about that with the 1D X (been there, done that with the 1D2 – not again).
  • You get 22% more pixels with the 5D3, which is important for landscapes/architecture. I will do some print comparison between the 1DX/5D3 files in the coming weeks to see how much they differ at 40×60 cm print size.
  • And, of course, price. At $6800 I feel the 1DX a bit overpriced. At the vicinity of $5000 it would be an instant get for many people I believe.

Nowadays I do more landscape and architecture photography than birding, so the 5D Mark III serves me well. Metering and the quality of its files are well above previous generations. The only advantage of the 1DX from my point of view is its action-stopping ability. In all other aspects the 5D3 is a better choice. Should I feel the need for more than 6 fps and slightly faster focus I will grab one.

Oh yes, one way to avoid the above decision is to own them both :)

  ☕ ☕ ☕

Did you enjoy this post? Consider buying me a coffee if so.

MacBook Pro with Retina Display

It took a month, but my machine finally arrived two days ago. I spent the whole yesterday on moving my digital life over to the new machine and set it up for work. This post is a collection of my initial impressions. I will not reiterate the specs that can be found in numerous online reviews. All of those I recommend watching just this one.

My configuration is the 2.6GHz machine with 16GB of RAM and a 500GB SSD.

Winner of Two Lotteries

You enter two “lotteries” when you buy an Apple notebook. The SSD lottery and the display lottery. The reason is that Apple sources these components from two vendors: Samsung and Toshiba for SSDs/flash memory (I will use the Solid State Disk term instead of Apple’s “flash memory” marketing talk from now on – because these are all SATA connected SSDs – although in different form factors) and Samsung and LG in case of displays. Unfortunately the non-Samsung options are vastly inferior to the Samsung ones.

For example, Samsung SSDs are using the great Samsung PM830 controller. The Toshiba one use a Sandforce SSD controller. Sandforce SSD controllers compress all the data before it gets written into the chips for an almost twofold throughput increase. But if you are like me, and use FileVault to encrypt your disk then this compression becomes useless: almost random data can’t be compressed. Which results in halved performance. Fortunately, for larger capacity drives Apple seems to be using the Samsung ones. So I ended up with an 500GB Samsung SSD. One win.

You might wonder why did I mention 500GB instead of the advertised 512GB. Because the 512GB is simply a lie. The drive actually measures 500GB (if you count 1,000,000 bytes as one GB – as the storage industry as well as Apple does) and 476GB if you count (1,048,576 bytes as one GB – which is how many bytes a GB truly is).

Regarding the display lottery, lots of LG manufactured panels are defective out of the box. Just execute the command in the linked article to show your display’s manufacturer. LP is for LG and LSN stands for Samsung. I have a Samsung panel. Another win.

Is the Lack of Upgradeability a True Problem?

Lots of people on the Internet fret about this. Frankly, in the last 15 years I can only mention two occasions when I upgraded memory in my machines. And CPUs were never changed. Disks are another story. Before SSDs I regularly went to faster disks as they became available. But since I’m using SSDs I don’t feel the need to upgrade yearly. I usually buy my machines maxed out with RAM and disk, and opt for the one-less-that-the-fastest CPU option (they cost way less and the performance difference is negligible). So the lack of upgradeability is not a problem for me.

And on the positive side, soldering RAM to the motherboard gives some huge performance benefits (read the section below the graph). Wow, 99.9% processor bandwidth utilization IS something!

Two Missing Pro Features

ECC memory and 30-bit display output capability. I know that ECC (Error Check and Correction) has disappeared from consumer machines and Intel only supports ECC with their Xeon processor line, but 16GB is a lot and for mission critical work (like huge CAD models) ECC is a must. So for situations where it is not acceptable that your memory can forget a few bits here and there, the Mac Pro is the way to go. For example I use a Xeon E3-based server machine with 16GB of ECC memory.

The other one is 30-bit color. This is available on all current high end graphics displays and NVIDIA makes mobile chips that support 30-bit. Usually these chips are completely identical to the consumers ones Apple is using, just high precision stuff is enabled in them (I remember those times when I hacked consumer NVIDIA cards to Quadro ones…). For a notebook at this price point, pro graphics should be the standard.

Needs a Thunberbolt Dock

On the left side of the machine I have:

  • The power cable.
  • A mini displayport to DVI adapter for my EIZO CG241W display.
  • A Thunderbolt to Gigabit Ethernet adapter.
  • An USB connection to the EIZO. Keyboard and mouse is attached to the EIZO’s hub.

Looks ugly. And plugging in all these when I use the machine as a desktop is a hassle. I can hardly wait for Matrox’s solution.

Usability

The machine is light (for such a powerhouse), fits neatly into the notebook pocket of my Lowepro Pro Trekker 400. Key travel is a bit short, but it’s not really a problem. I miss PageUp/PageDown and Home/End keys…

It gets a bit warm during use, but it’s bearable. As the majority of current applications are incapable of driving the four processor cores (with eight processing threads), so fans are spinning silently. Even if you can put some heavy load on the machine they produce an almost pleasant noise. Nothing disturbing (and believe me I’m overly sensitive to machine vibration and noise).

Battery life is rather short – I found it about 5 hours in my normal usage patters. This is way less than Apple’s advertised 7 hours, but there are reports that Mountain Lion causes this reduction. We’ll see.

Applications and the Retina Screen

The screen resolution is astonishing. Brightness uniformity is not on the same level as my EIZO (actually I would score this as pretty bad). The display calibrates very accurately (in one spot at least). I was surprised that it produced less deltaE2000 than the EIZO. If uniformity would be better, this could be a great graphics display. All in all I want this high resolution on my desktop graphics monitor! Hope that either EIZO or NEC will come out with a high resolution display like this.

I would also note that the Intel integrated graphics is not capable of handling such large amount of pixels. You can’t even watch a movie full screen using integrated graphics, so the machine uses the NVIDIA chip a lot.

The real problem is that most of the applications are not yet ready for supporting the HiDPI modes of the Retina display. These apps would really need the upgrade:

  • Photoshop
  • Lightroom (it displays UI text in high res, but everything else is pixel-doubled)
  • Capture One
  • Kindle

Others, like Parallels Dekstop and VLC, already support the display. It’s still a waiting game. And the display would only realize its full potential when these apps become ready.