Technical Camera provides there focusing modes: Continuous AF (the default), Single AF, and Manual Focusing.
In automatic modes focus is calculated for the AF point (the whitish circle, marked with 2 on the screen shot below), which you can move by tapping the screen at the desired position.

Focusing controls
In Continuous AF the app continuously updates focus. The focusing/focus lock key (indicated with 1 on the screen shot) displays FL in this case (as in Focus Lock). Tapping the function key will lock focus, which will be re-engaged again when the lock is turned off by tapping the key again.
In Single AF mode (which you activate by turning off the Continuous AF option in the menu) focusing is only engaged if you tap the screen to relocate the AF point; or tap the focusing/focus lock key (which changes its title to AF in this focusing mode).
You can hide the AF point when focusing is not in progress if the circle happens to interfere with your vision. Just set the Show AF Point preference in the menu to During AF Only.
Manual Focus is initiated by the vertical drag gesture. The gesture is described in the Exposure Control post, so if you haven’t done so, I recommend you to read it now. In Continuous AF mode it activates focus lock as soon as the beginning of the gesture is detected (that is you tap and hold the side of the screen assigned to manual focusing). You need to re-engage Continuous AF by turning the lock off.
There are two things that become active during the focusing vertical drag gesture: focus peaking and the focusing distance indicator. Both will turn off as soon as you lift your finger from the screen.
The screen shot above shows how the app looks during manual focusing. Black and white mode is also active, because it’s easier to see the colored peaking this way. In real life black and white mode is not turned on automatically during manual focusing.
You can choose the color of peaking via the menu, since no single color suits all situations. The available choices are green (the default), yellow, white and magenta. And of course peaking can be disabled completely.
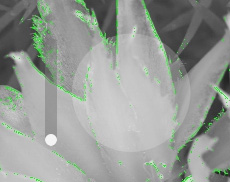 The focusing indicator is the vertical bar displayed on the left side of the AF point (see the magnified screen shot on the right).
The white dot in the track indicates the position: the higher the point the farther the camera is focusing. There’s no scale, though. Apple warns developers that the distance values iOS provides can’t be mapped to actual distances in meters or feet, so a scale is missing for this reason.
As parting tip, let me share how I use manual focusing. Lifting your finger from the screen might change the device’s position and thus the focusing distance. To avoid this situation, you can take a picture while your finger is on the screen during manual focusing. I usually do the focusing with my right index finger, and tap the shutter button with my left thumb.
 Today I practically finished the focus bracketing feature in
  We have also changed the maximum number of shots you can expose in other bracketing modes to 15. As you can see on the bracketing monitor, this number is usually more than the exposure range your camera is capable of, but some of you requested it, so we added it.


