The EOS R Diary : Kirk L Bracket

I use L brackets for basically every camera I have (the only exception is the 7D Mark II, because I haven’t found a bracket that isn’t unwieldy). The first one that became available for the EOS R was Kirk’s BL-R, so I ordered it immediately. Some 5 weeks later, in early January, the bracket finally arrived.

It is a lightweight and slim bracket, but I had to carry out a few modifications to fix its shortcomings. You can see the completed version on the following image.

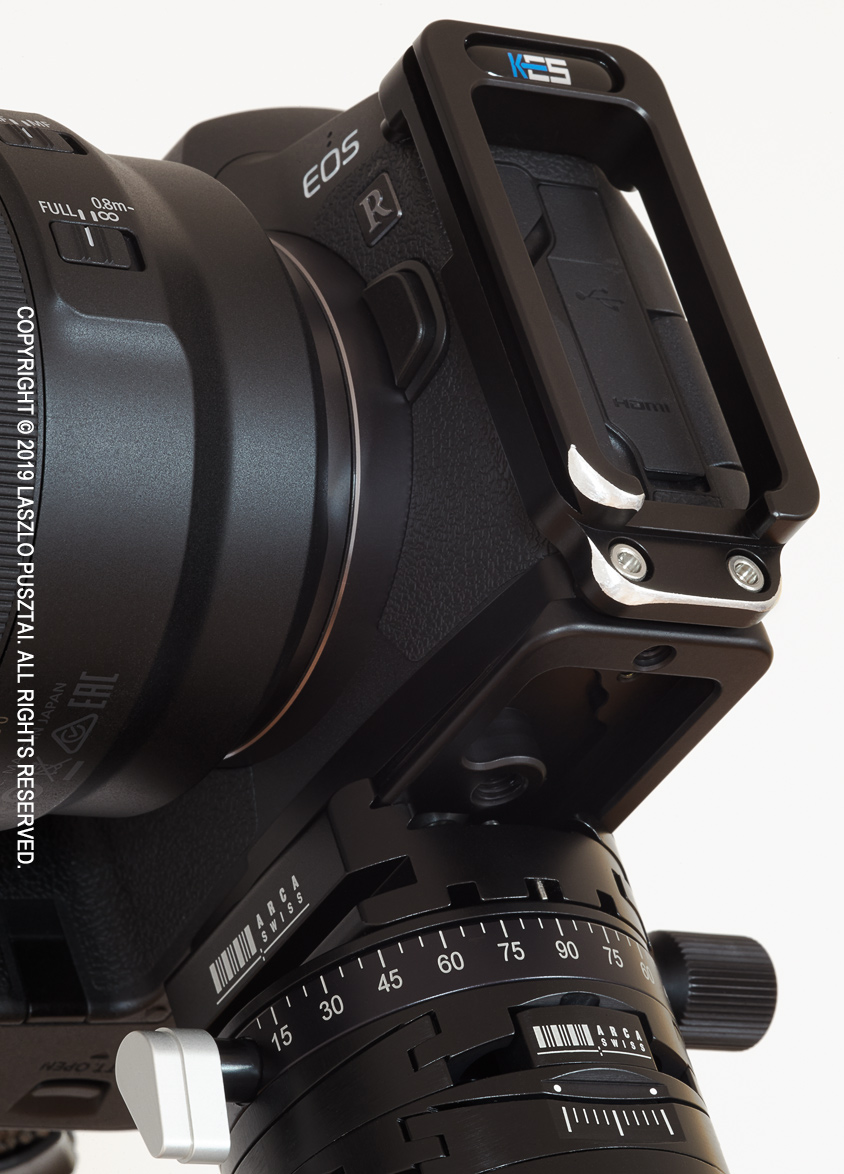
Customized Kirk BL-R bracket

First and foremost, had to round some corners that tend to punch a hole in your palm if you handhold the camera with the bracket installed. Once mounted, I almost never remove the bracket, so this is a big issue for me. It’s the same design flaw that plagues Kirk’s 5D3/5DS/5DSR bracket, and the very same fix: file off the offending sharp corners.

Another problem with the vertical arm is the posts designed to support the top of the bracket. Both of these posts supposed to touch the metal of the camera body, and I’m sure they will leave scuff marks. “Fortunately” one of them doesn’t even touch the metal (there’s a half mm gap). So I placed little gaffer tape pods on the end of both posts (more on the one that didn’t reach the camera). Now they do safely what they intended to do. I would expect Kirk to come up with a design where a large post rests on the rubber cover. There would be plenty of space for that, just above the port covers.

And lastly, removed the hex wrench and its holder mechanism from the base plate. I don’t see a point in including a wrench within a plate, but this seems to be the current “innovation”. This shaved off 9g, and the bracket now weighs a mere 82g. Almost half of the weight of my 5DS R bracket…

With these modifications in place, the BL-R performs very well. It adds a welcome weight to the camera, making it balance much better with the large and heavy RF 50/1.2 lens.

Speaking of large and heavy lenses. I expect upcoming high-end RF lenses also to be large and heavy, and would have loved to see a bracket with dual attachment points, just like Kirk’s 5D3/5DS/5DSR bracket. The bracket on my 5DS R is rock solid, with no movement of any kind, which cannot be said for any of the single attachment point brackets I’ve tried. Yes, the problem lies in the camera’s mounting screw, which allows for tiny little, but still noticeable movement. And I still have vivid memories of what happened when the tripod screw got ripped off from my 1D Mark II.

I would only recommend the BL-R bracket if Kirk fixes the aforementioned shortcomings. Or if you are willing to follow my path and fix them for yourself. For $120, the bracket isn’t expensive. But buying it for $120 and spending a few hours on making it usable turns it into an expensive piece of gear.

Long Lens Rig Weight Reduction

Equipment weight reduction is a continuous project for me: I’m always looking for solutions that can shave off a few hundred grams of my already heavy bag. The last step – reducing the weight of my birding setup – started with a tripod head change. I had been using a Really Right Stuff BH-55 ballhead with a Wimberley Sidekick to hold my 500 f/4 for six years or so. Last spring I noticed a problem with the BH-55: the panoramic base became loose so much that in some positions I was unable to lock it without significant play. I attributed this wear to the heavy use of the Sidekick on it. I also wanted to end the years long irritation coming from the BH-55’s tendency to creep when you tighten the main knob: it drove me nuts on several occasions when I tried to slightly change a composition with medium-tele lenses.

Last summer I replaced the BH-55 with an Arca-Swiss Z1sp Classic (that is the one with the screw operated clamp – I’m not a fan of lever release clamp mechanisms). This solved the creep issue, but not the excessive wear the Sidekick puts on the panoramic base. So I started to investigate other side-mount gimbal head options (the 500/4 isn’t that heavy to require full Wimberley style heads, and side-mount heads are much lighter).

The Head

I read about the Mongoose head a few year ago in Artie Morris’ Birds as Art blog. At $600 it costs $100 more than the Wimberley but weighs 2/3 of the WH-200-S (0.68 vs 1.04 kg). Actually it’s just 90 grams heavier than the Sidekick alone! What kept me from buying one immediately was the high shipping cost from the US to the EU. But recently Naturescapes.net offered a 10% discount on tripods and heads so I took that offer and ordered the latest incarnation of the Mongoose: the M3.6.

650D_1309_2457

4th Generation Designs Mongoose M3.6 head and lens foot with Canon 500 f/4 IS

This head is 0.67 kg lighter than the Z1 + Sidekick setup, or mere 90 grams heavier even if I decide to bring both heads. But weight saving does not stop here.

Replacement Lens Foot

I was able to shave off another 200 grams by replacing the original lens foot and Wimberley P-50 lens plate with 4GD’s lightweight lens foot. You can see the resulting setup on the above picture.

Lens Cap

This is the most weird part of the game: you can make your rig 1/4 kg lighter by replacing the big, heavy leather lens cap with a lightweight and strong Don Zeck cap. It is also easier to put on and remove, and can even protect your lens while the hood is in shooting position.

At the end I was able to reach 1.12 kg weight reduction – and even get more functionality! Let’s talk about these additional things.

Using the New Rig

Bad news first. You can only order the Mongoose with a lever-release clamp – no screw-in version. Ask me after a year how it behaves. Also, the mechanical quality of the head is not on the same level as Arca-Swiss or high precision German or Swiss gear. It is a notch below RRS and roughly on par with Wimberley head quality. I mean generous tolerances and play here and there. I was even unable to tighten the vertical axis knob enough to stop the lens from moving. But 4GD has a good solution for that – which brings us to the good stuff.

Long Lens Macro

Long Lens Macro

Deadbolts. You can use them to completely lock horizontal and/or vertical axes. This is great when you want to add an extender or carry the rig over your shoulder. No more need to over-tighten knobs (which will result is excessive wear over the years – it’s hard to tighten my Sidekick completely after all those years).

Despite the generous tolerances, the head provides a stable platform when both knobs are tightened. Lacking good birding opportunities during the last weekend I tried it with stationery subjects – where stability is even more important. The setup worked remarkably well.

I really like the construction of the replacement foot. Its low profile makes it fit under the lens hood! It is just long enough to cover the two extreme balance points: no extender and a lightweight body (5D3 in my case) and 2x extender plus 1D series body.

Forget about carrying the lens by this foot, however. Your fingers will not fit between the plate and the lens. I rarely want to carry the lens by the foot, so its not a huge issue for me. The lens either is on the tripod or in its Kinesis long lens case. But if you want to carry it, a Kirk Super Grip Handle is a useful accessory.

The foot sports a short double dovetail section, so I can use my Wimberley F-1 flash bracket on it. I prefer this bracket to other solutions because of its versatility. Note that the flash cannot be centered with the F-1, but I usually put it as off-center horizontally as possible, so this isn’t an issue for me.

All in all I’m satisfied with the setup. I can hardly wait for the birding season to begin and put these new toys through their paces.

  ☕ ☕ ☕

Did this post help you? Consider buying me a coffee if so.

Kirk L-Plate for the 5D Mark III

Got my Kirk BL-5DIII plate on Tuesday, and would like to share some thoughts about it. It’s a good design with some oversights.

Pros:

  • You can buy it right now. The RRS plate for the 5D3 is still backordered. Shipping to Hungary was also $27 less with this plate than it would be for the RRS. Both plates cost $140.
  • I really appreciate the second locking point at the strap loop. My 1D2 fell off from its RRS plate a few years back. The plate was on the 1D2 for a few years, and the thread in the tripod screw socket suddenly gave up. Fortunately the losses were just a remote switch and the EUR 70-80 repair cost of the socket. All in all, having a second mounting point could prevent this. This is a big plus.
  • It is light. Feels lighter than RRS plates.
  • I prefer its form factor compared to the RRS plate.

Cons:

  • The base of the plate around the screw does not fit flush against the camera body. There’s no precise locking point when you tighten the screw. I suspect that I could tear out the socket if I over-tighten. I definitely prefer RRS and Wimberley plates in this regard.
  • The front of the plate tends to punch a hole in your hand if you happen to handhold your camera. It is a major oversight! It was a painful discovery on my part, so I immediately reached for a file and rounded the offending corner. But this should be done by Kirk!

“Custom” Rounded Corner

Overall I’m satisfied with the plate, and would give it 3.5/5 stars.