Getting Rid of Photoshop’s Blue Share Button

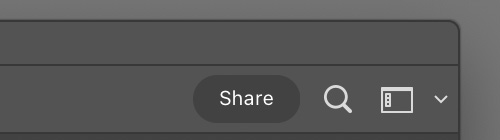
Some genius at Adobe recently came up with the idea that smacking imaging professionals, who typically prefer to work in a neutral environment to preserve color vision, in the face with a huge, non-removable, blue share button is good thing. For a function that most of us never ever uses…

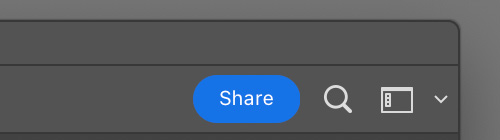
Then they added the Neutral Color Mode preference, which changes the button to an outlined gray one, but it still represents a huge visual mass and causes my eye to snap to the button. I suspect the reason behind this whole thing is aggressive cloud storage marketing… Fortunately there’s a way to change this mess into something that blends in nicely and won’t drive you nuts:

Here’s how to do it on your Mac.

First, quit Photoshop. Then start the Terminal app, and type the following command:

sudo nano "/Applications/Adobe Photoshop 2022/Adobe Photoshop 2022.app/
Contents/Required/UIColors.txt"

Make sure to remove the line break before “Contents” if you copy and paste from above. The entire command must be on a single line. You’ll have to enter your password for the command to complete.

Once the nano text editor appears with the file opened in it, press Ctrl+W, type ShareButton and press Enter. Replace the color codes in the ShareButton section with the following:

        ShareButton:
                [ 
                [ 219, 219, 219, 1.0 ],
                [ 163, 163, 163, 1.0 ],
                [ 66, 66, 66, 1.0 ],
                [ 38, 38, 38, 1.0 ]
                ],

Press Ctrl+O and Enter to save the file, then Ctrl+X to exit the editor.

And that’s it. The share button is now unobtrusive neutral gray in all color themes. Note that you have to do it again after updating Photoshop.

  ☕ ☕ ☕

Did this post help you? Consider buying me a coffee if so.

Canon EOS R3 is Supported in ShutterCount and Kuuvik Capture

I’ve been silent on this site for the last ten months. Suing Apple, developing exciting new features (that were released but I haven’t posted about), stealing a few hours for my knife hobby, and actually making some great images were what I spent most of my time on. Now I’m back, with some cool news to share.

Canon CPS was finally able to deliver our rental R3 (pretty much first in the country), so we did add support for the camera both in ShutterCount and Kuuvik Capture.

I haven’t purchased one for myself as I didn’t see any compelling reason to do so. This feeling was reinforced during the rental as I tried the camera for actual bird photography. I’m not going to replace my trusty 1D-X Mark III (or any DSLR for that matter) with the R3. But that is another story…

The camera’s firmware has a lot in common with the R5, R6 and 1D-X Mark III – including bugs and dumb solutions. So in Kuuvik Capture we had to apply the usual set of workarounds to shield you from the crap. For example our depth-of-field preview handling technique (disabling it when you move around in magnified live view, but restoring it automatically when you move to a marker) also applies here.

Note that you will have to upgrade your R3’s firmware to 1.1.1 or later to be able to use it with the app.

ShutterCount‘s support for the camera had also been elevated from basic to complete. The mechanical-only counter is now the default to be in sync with what you see in the camera’s menu, but the app also shows the electronic counter on the Distribution Chart. All extra features – like shutter life prediction, outdated firmware warning and the Network Connection Cheat Sheet in the Wizard – are available for the R3 as well.

Kuuvik Capture 5.9 and ShutterCount 5.1 are available for your Mac and mobile device in the respective App Store. These updates are free for existing customers.

Kuuvik Capture 5.6 : Memory Card Import

The eagle-eyed among you may have spotted “import” related stuff on the screen shots of my previous post. Yes, Kuuvik Capture 5.6 brings memory card import to the table. In fact, you can import folders and file from whatever source you like, but memory cards get a special treatment.

Actually this is a feature I made for myself. I prefer to cull the thousands of images from my bird shoots in Kuuvik Capture for its sheer speed, but bringing the images into the app was quite a bit of pain: download the files manually and run a script in Terminal to rename them before Kuuvik Capture is opened.

With the import feature you can download the images right into your open session. And the filename template is used, so you’ll have all the files named properly without any further intervention.

My Card Reader Setup

I’m using multiple cameras, and end up having images on both CompactFlash and CFexpress cards 99% of the time. So it’s important to me that the new import feature can import multiple cards in one go.

Personally I’m using ProGrade Digital readers (Thunderbolt 3 for CFexpress cards) and Apple’s Thunderbolt 3 cables to connect them to the right side Thunderbolt 3 ports of my 15″ MacBook Pro, as depicted above. These cables also work as USB3, and having two identical cables prevent the need to always check which one should go where.

Note that I’m illustrating the import feature with multiple cards. If you are importing a single card, then obviously you’ll select that single card only. All other aspects are the same.

To begin, open or create a session where you want your images to be placed. Then bring up the import panel by clicking Import Images… in the File menu (or press Ctrl+Command+I).

Selecting Multiple Cards for Import

The trick to import multiple cards is to select all of them under your “computer” location, which can be found at multiple places: on the Locations section of the sidebar, and on the drop down list at the top of the panel (mine is named triton on the screen shot above). If you formatted the cards in-camera (which I always highly recommend), then they will be named EOS_DIGITAL. Once all the cards are selected, just click Import.

Cards are imported one after another – not in parallel. If you have the Image Browser visible, you’ll see the new images popping into the session.

What if you just want to import a few images selectively? Go into the actual image folder on your card and select the desired files before clicking Import.

Now there’s another thing that’s a royal PITA when importing cards: ejecting them. Unless properly ejected, the card’s contents can be corrupted as you might pull it when a write operation is still in progress. To help with this, we have a new option called Eject memory cards after successful import on the session preferences page. This is off by default, but when activated, memory card from which you have imported images will be automatically ejected. This applies to whole card imports, or even if you imported just a handful of images. Cards will not be ejected if an error occurs during the import.

And that’s it. This feature already saved me tremendous amount of time, and I strongly think you’ll have the same experience.

Importing is only available in the Mac version of Kuuvik Capture.

The v5.6 update is free for existing Kuuvik Capture 5 users. We also offer an upgrade from 2.x-4.x to version 5. New users can buy the app in the respective App Store. Don’t forget that the Mac and iPad versions are sold together – buy any of them and you’ll get the other for free!

Kuuvik Capture 5.6 : The Filename Template

I’m using the same image file naming scheme for more than a decade, and always wanted Kuuvik Capture to generate file names fitting into this scheme automatically, avoiding a later renaming step. Finally I was able to allocate some time to make it happen: version 5.6 allows you to name captured files according to your liking.

This feature is off by default, you can activate it by turning the Name image files using template session preference on.

Kuuvik Capture 5.6 Session Preferences

The first time you click on the check box the app will bring up the template editor to actually set a template – which can be later modified by clicking the Edit… button.

The template is a simple text field where you can use tokens to insert different snippets of information. For example %Y will be replaced by the 4-digit year of the image’s date. We opted for this approach instead of a graphical drag & drop one so that you can copy and paste the template easily for backup purposes or for sending it to somebody else.

As you can see on the screen shot below, there are quite a few tokens to choose form.

The Filename Template Editor

Most tokens extract information from the image file (date, time and metadata tokens fall into this category). It is important to note that date/time tokens use the date/time in the image and not the Mac’s clock. Month and day names, as well as the AM/PM indicator, use names according to the current language setting of your Mac.

I recommend you to experiment with the different tokens, and watch in the Preview field what kind of filenames your template is going to produce. The preview uses the current date/time and metadata from a hypothetical 5DS R image, so you’ll always see the same metadata field contents there.

To avoid collisions, you want to create a template that generates unique names. Besides using a time with sub-second accuracy, you have two counter fields to ensure this. One of them is the last 4 digits of the original filename that the camera generated, and the other is a 4 digit capture counter.

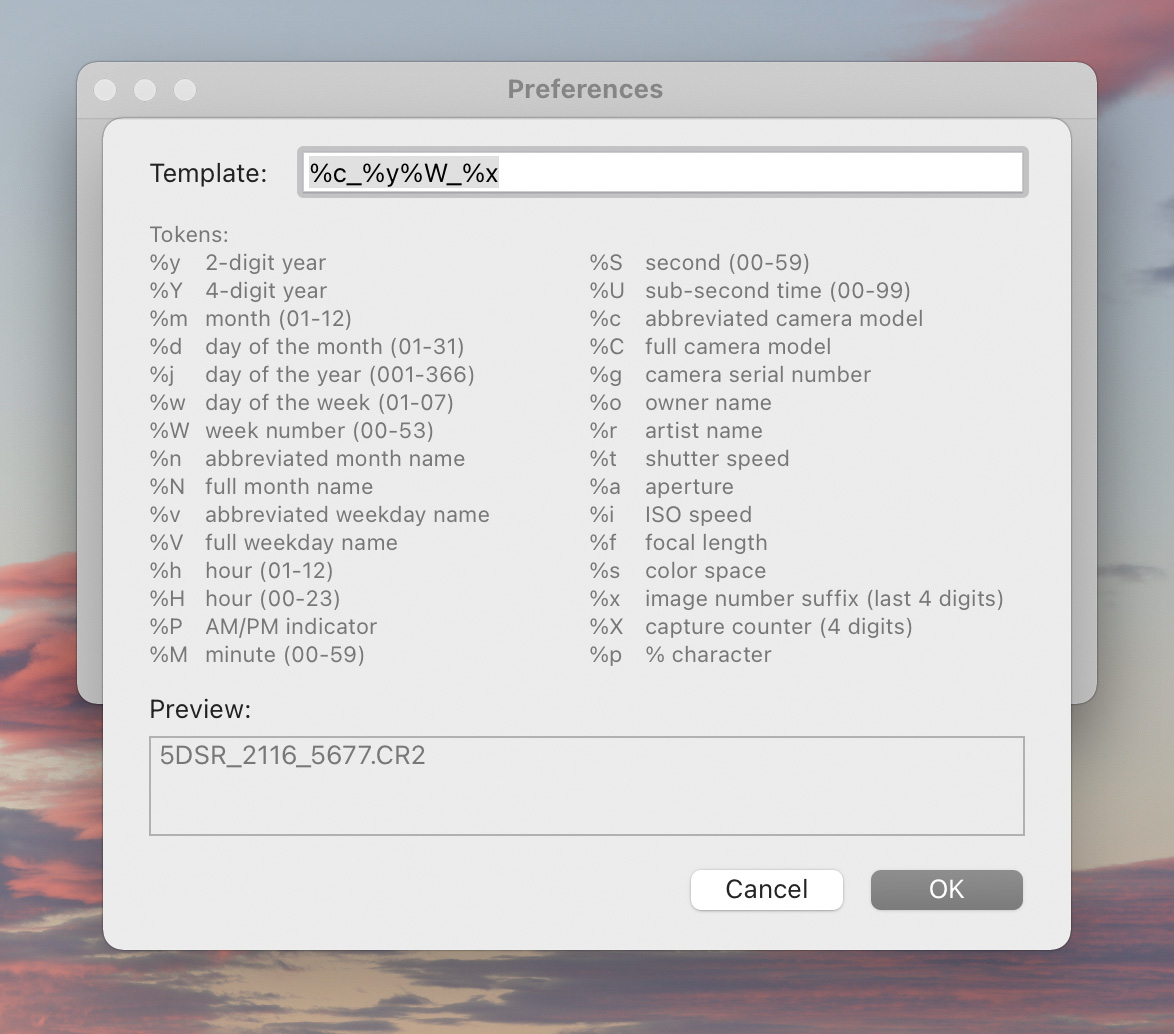
The capture counter starts from the number of images already in the currently open session, and is incremented with each capture. Note that shooting RAW+JPG pairs count as a single image.

Should you need to change the counter, simply use the Set Capture Counter… command in the File menu, or press Ctrl+Command+C.

The capture counter will wrap over from 9999 to 0000, in a similar fashion to the 4 digit suffix does in camera generated names.

Differences on iPad

On iPad you have the exact same functionality, but can be accessed a bit differently: all template-related settings can be manipulated from the File Naming page that opens from the Session tab of the menu.

File Naming Settings on iPad

In the template editor the iPad keyboard is also extended with function keys to be able to easily enter special characters, like the percent sign or the underscore.

Availability

The update is free for existing Kuuvik Capture 5 users. We also offer an upgrade from 2.x-4.x to version 5. New users can buy the app in the respective App Store. Don’t forget that the Mac and iPad versions are sold together – buy any of them and you’ll get the other for free!