Intel’s Video Drivers Kill Display Calibration

Since I had switched to Macs more than a year ago I spent really little time on managing my Lenovo X200s notebook. It was still running the original – Microsoft supplied – video driver. You know, if it ain’t broke, don’t fix it. I was really happy with its color, as I figured out how to set it up so that Windows loads display calibration properly. As you might guess, up until now…

Enter SP1

Windows 7 SP1 came out, and yesterday afternoon I had a little time to kill and decided to do the upgrade. There was also an Intel video driver upgrade available – and I decided to install it alongside the service pack. Everything looked OK util I had rebooted the machine. Then, just a split second after Windwos loaded the calibration curves, something swithced the monitor back to the uncalibrated state. First I thought that Microsoft screwed it up, but further investigation revealed the truth.

In my former article I blamed Microsoft for not understanding what color management is all about. Although they finally seem to catch up, there are a lot of hardware manufacturers who does not care about all this stuff.

Intel is among them.

Rant: I still do not understand why PC hardware manufacturers feel that they have to load a bunch of crappy software alongside their drivers. Start with a fresh Windows installation, download all the latest drivers and your machine is full of useless applications. I can’t remember a single event when I used any of them (and I used Windows PCs since the earliest days of Windows). That’s one of the reasons I’m using a Mac now.

Yes you’re right, one of the crappy apps Intel ships their Graphics Media Accelerator video driver with was that killed the calibration. The app is called “Persistence Module”. It’s name seems like a joke as it is THE module who does not allow calibrations to be presisted…

How to Remove Persistence Module?

There is a really handy tool, Autoruns, written by Mark Russinovich and Bryce Cogswell, which can be used to show the hordes of apps that Windows loads at startup – and more importantly to disable any of them.

When you download and run the app it will display something similar to what you see on the following screen shot.

To disable Persistence module, just click on the Logon tab, and find Persistence under the first “…\Run” list. Removing the checkmark in front of the name will disable this application, but you can completely remove this entry hitting Delete.

Note that I also disabled Logo Calibration Loader because this task is handled by Windows 7 correctly, as well as ProfileReminder because I don’t wand reminders about recalibration on my notebook (I’m usually recalibrating it before each major shoot).

Reboot your machine and it’ll be good again.

That’s it. Case closed for now. Until Intel comes out with another irritating innovation of course…

I do not use Windows any more, so not is a position to answer your Windows-related questions.

Stop Losing Display Calibration with Windows 7

When Windows 7 appeared on MSDN and Technet a few weeks ago, I was eager to download and install it to see whether Microsoft had fixed the losing display calibration issue that made Vista totally unacceptable for anyone in need for a software calibrated display. To cut the long story short, they’ve made it. There are a few quirks here and there, but basically it works. Besides this, 7’s performance is much better than Vista (in the same league as XP was), so I could finally begin replacing XP x64 on my workstation and notebook. But back to track and let’s first examine the issue that plagued Vista.

The Issue

Display calibration serves basically two purposes: 1) sets black level and luminance of the monitor and 2) sets color temperature. After calibration one could build a profile that color mangement aware applications will use for displaying correct colors. If you have a high-end graphics monitor (like the EIZO CE and CG series or the NEC SpectraView) calibration information will be stored in the monitor, so the computer will have nothing to do later on. But otherwise it needs to be split into two halves. Black level and luminance, set by the monitor’s brightness and contrast controls are stored in the monitor of course (you can read what these controls really mean here and here). Color tempreature setting is a different story, though. It could be partly stored in-monitor, or completely on the computer.

Each monitor has its natural color temperature (which is typically falling on the colder side in today’s LCDs) and gamma, which are rarely what one wants. What a photographer would like is something like 6500K and a gamma value of 2.2. To transform the monitor’s natural abilities into what one wants, red-green-blue channel intensities should be modified. Some monitors support rough, broad modifications of these by providing color temperature presets, gamma presets and color temperature controls. Using a monitor for photo editing needs a finer level of control, and that’s what a display calibration package provides. It fine tunes the RGB channels with curves to reach the desired color temperature and gamma.

The screenshot on the left was captured from X-Rite’s Eye-One Match application after calibrating my Lenovo X200s notebook’s display to 6500K and gamma 2.2.
The curves show that the blue channel needs quite a bit of lowering to compensate for the bluish LED backlighting of the display.

OK, we have calibration curves for each channel, but who will apply them? It’s the duty of the video card in the computer. There is special place for these curves, called the video look-up table (or LUT for short). Calibration software loads this LUT in part of the calibration process. But what happens if the computer is rebooted or turned off and on again on the next day? Unfortunately video card hardware and driver does not store and automatically re-apply calibration curves on startup. So the question remains: where to store them and who will reload them?

Apple invented a fairly obvious solution to answers this question: embed calibration curves into the display’s ICC profile. This way they could be handled together as a single entity. Because the ICC profile specification does not provide any storage space for calibration data, Apple had created a new profile tag, the infamous video card gamma table (VCGT). To complete their solution ColorSync loads these curves when needed. Calibration packages also support this by embedding newly computed calibration curves into the profiles they create

Microsoft on the other side, although supported assinging profiles to display devices since Windows 98, failed to load the VGCT. Was it some kind of pride denying to support Apple’s standard or just plain misunderstanding will remain a mystery… Regardless of Microsoft, calibration hardware and software makers had to do something. So they invented Gamma loaders and Calibration loaders. Tiny programs with only one purpose in life: grab the default ICC profile associated with a display, extract VCGT and load it into the video card LUT. Fortunately Microsoft provided the necessary programming interfaces for doing that.

Photographers and Windows lived in harmony for years, until Vista came along and caused endless hours of frustration. What it did was unbelievable for me when I first tracked down the cause of the problem. It removed calibration curves from the video LUT on several occasions: after logon, after my computer came up from standby, when the dreaded UAC consent screen appeared, when the secure desktop appeared… Yes, it removed the LUT (not just ignored it like some Intel display drivers screw it up – that happens without the knowledge of the operating system).

To overcome this issue one either had to turn off UAC and manually reload the calibration from time to time with the calibration loader installed with the given calibration package, or just go bact to XP which worked flawlessly for years. With Windows 7 it seems Microsoft had listened. At last…

The Windows 7 Solution

Although their soltuion is not as straightforward and easy to use as Apple’s in Mac OS X, it works as one would expect. In this section I will describe how to find the checkbox with which you can turn on LUT loading.

Note: Yes, it is turned off by default. Is there anyone who DOES NOT want correct behavior out of the box?!? My only fear is that this feature is a result of cloning a completely useless feature of OS X: display calibration “with your eyes” (what I used to call eye-o-meter). So the Windows color management team still might not get the idea…

First of all, you have to make a display profile. After doing this, I had noticed that LOGO Calibration Loader does not work on Windows 7 and does not load my calibration. Not a big deal, we’ll get rid of that program completely later on.

Note: I have an X-Rite i1 Photo SG package and had some issues with installing the accompanying Eye-One Match application. I’m sure X-Rite will fix it, but in the meantime you will need to read the sidebar “Windows 7 Needs Help to Recognize X-Rite Instruments” at the end of this article. Users of other instruments might or might not be affected.

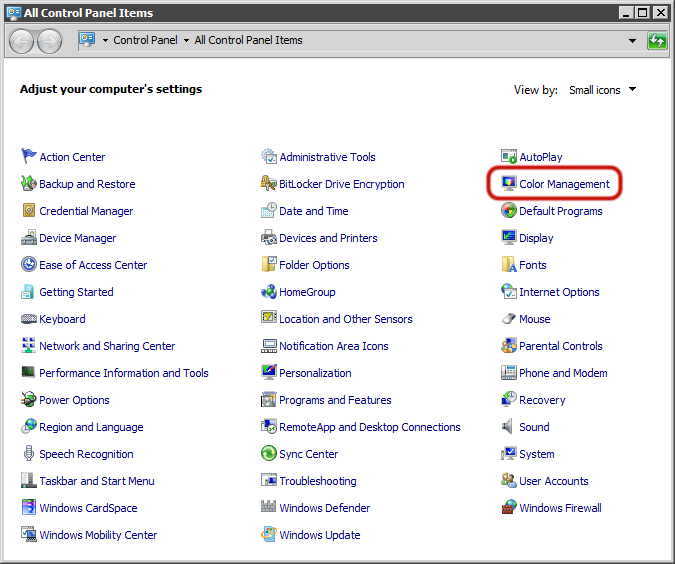
With your profile ready, open Control Panel and click on Color Management.

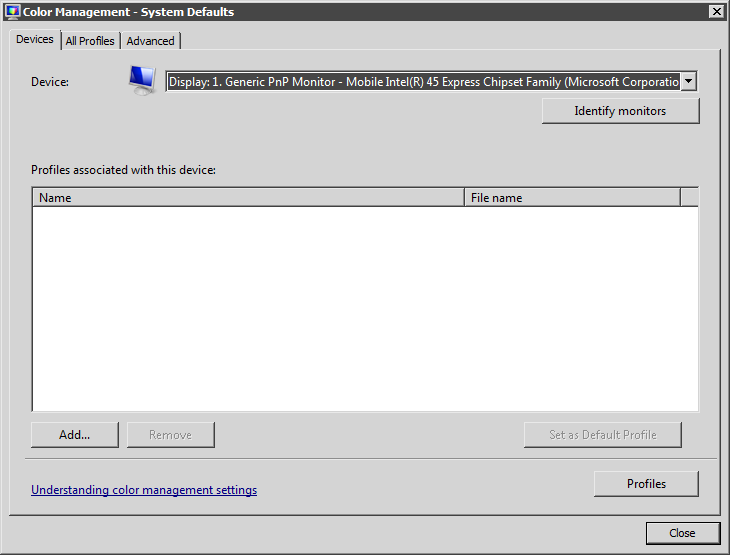
As the Color Management applet opens you should see the newly created profile associated with your monitor. Windows (since Vista) supports two levels where one could associate profiles with devices: system-wide and user level. Both level’s profiles are stored in the same place (unlike in OS X where profiles are stored in separate system and user folders), only the associations are divided this way. Eye-One Match creates a user level association, as you can see on the following dialog. It is also required that Use my settings for this device to be checked.

Click on the Advanced tab. The group box titled Display Calibration is what we are after. Clicking Calibrate Display will bring up the eye-o-meter, so do not disturb it. LUT loading is controlled by the Use Windows display calibration chechbox. You might realize with horror that it is grayed out. Don’t be afraid, it can be only controlled on system-wide level, so go there by clicking on Chage system defaults.

Which brings up the familiar profile association dialog – but at system level and with no profiles this time. We already made the association on user level, so do not touch anything here, just click on the Advanced tab.

Note: On the bottom left corner there’s a link to the help page that is intedned to explain all this stuff. To be honest, the introduction is quite correct, then there’s a big gap and some blah-blah about Canon’s Kyuanos color management system that Windows has (and nobody uses), and finally it says that Windows profile loading should only be used for “eye-o-meter” based calibrations. Ignore it. But nevertheless it’s a bad sign of misunderstading.

Finally our checkbox is enabled. Place a checkmark there, then close the dialog.

In the Color Management dialog you should see that the grayed out version is also checked now. If your calibration is not loaded up to this point, give it a try and click Reload current calibrations.

That’s it. LOGO Calibration Loader – or whatever your calibration loader is – can be removed from the Startup group in the Start Menu. Windows should load calibration from the display’s profile every time the LUT needs to be loaded. It will work even after recalibrating your monitor (of course it will use the new profile then).

I can only hope that in later service packs Microsoft will not create a “fix” that only allows eye-o-meter generated profiles to be loaded this way…

If your Windows 7 installation does not seem to recognize your X-Rite measurement device, make sure to read this post on how can you resolve the problem.

Update: If you happen to have an Intel integrated video card, read this post on how its drivers screw up display calibration and how can you make it work.

I do not use Windows any more, so not in a position to answer your Windows-related questions.

  ☕ ☕ ☕

Did this post help you? Consider buying me a coffee if so.

Windows 7 Does Not Recognize X-Rite Instruments

Installing Eye-One Match 3.6.2 failed to set up my i1 Pro spectrophotometer’s device driver. However, it is possible to install it manually (I heard the same from one of my friends using a ColorMunki).

Go to Computer Mangement, and from System Tools choose Device Manager. You should see your instrument under Other devices with a yellow sign on it.

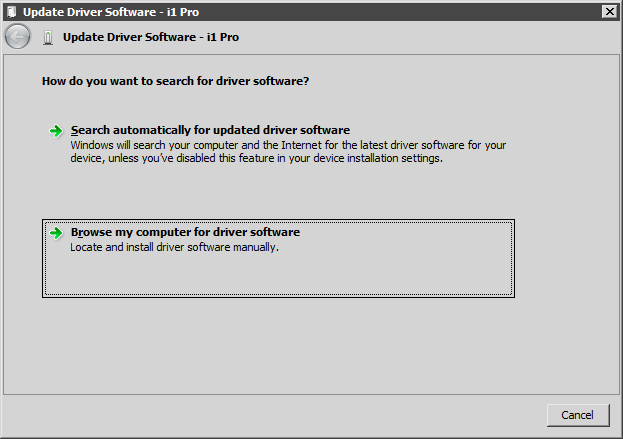
Right click it, and choose Update Driver Software. On the dialog that comes up, choose Browse my computer for driver software.

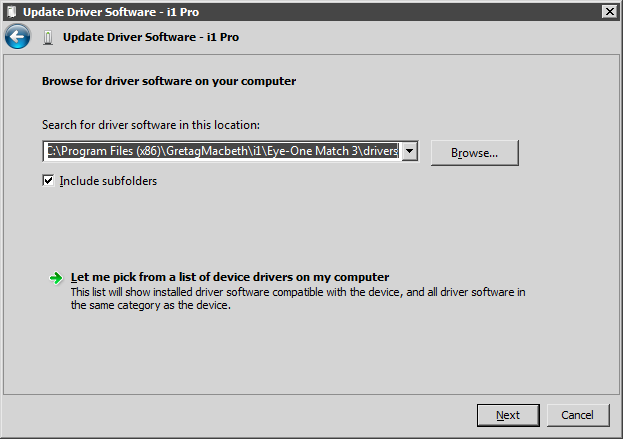
Browse to the path displayed below (I’m running on a 64-bit machine that’s why I have Eye-One Match installed in “Program Files (x86)” – On 32-bit machines it will be under the normal “Program Files” folder). If you use different software, browse it’s main folder and check Include subfolders.

Click Next and the driver will be installed.

You can verify correct installation in Device Manager: there should be an X-Rite Devices folder with i1 Pro underneath.