Archives for October 2012

Retina MacBook Pro – After 2 and a Half Months

The 15″ MacBook Pro with Retina Display is by far the best computer I had ever used, no question about it. And I had used great many – although only a handful made a deep impression (I mean a positive impression, because I came across several that made unforgettable bad impressions). These are heavy words from me. As you might have been noticed I’m really picky on everything I use (just browse the Hall of Shame section for rants about bad design and/or execution).

You can read my initial impressions about the machine here.

During the last months I had used the machine as a desktop for software development (both iOS and OS X) as well as studio work, and lugged it around the country as a field laptop to assist during my photo trips. Most of my first impressions are still valid, and I love the machine even more than I though at first. I would just like to add further observations.

Battery Life

In my initial post I wrote around 5 hours. Since then OS X 10.8.2 came out, which increased battery life substantially. Now I get something between 6 and 8+ hours, depending on the usage pattern (disabling Adobe Flash holds a great contribution to increased battery life, though).

Tethered Shooting
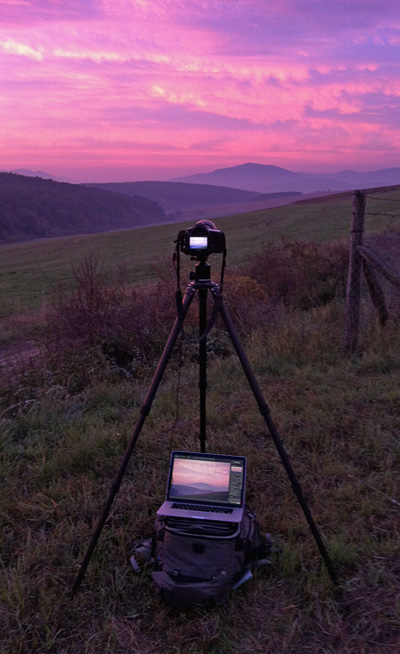
Working Tethered

I started working tethered for landscape shots immediately after receiving the MacBook, and the benefits far outweigh the inconvenience of lugging around a computer. Before the MacBook I had tried to use the Lenovo X200s for tethered work, but was not really satisfied with it and abandoned the idea until the MacBook arrived.

I like several things about this setup.

No time required for image sorting and selection later. I just bring home the keepers. This proved to be a huge time-saver!

I can make the first cut of the final processing in the field, using the same tools I use in the studio. This fits extremely well into my creative process. The high resolution and color-accurate display helps a lot in this. It’s like holding an A4 sized print in front of me. I even stitch panoramas made with the 24mm TS-E lens to check whether everything is good about the shot.

Images are immediately backed up, as the the tethering software saves images to both the memory card in the camera and onto the computer. (Which app? – you might ask. Don’t worry I’ll devote a few posts for that subject later.)

As I wrote in my first impressions piece, the machine fits perfectly into my Lowepro Pro Trekker 400AW. Fully loaded it’s now a back-breaking experience, but if I leave home stuff I don’t need for the shoot, then the full weight is around 15kg, which is bearable. I did several 2-3 hour hikes with the setup without any effects on my back and shoulders (did I mention that the Pro Trekker is a great backpack?).

Other Good Things

The notebook-as-the-desktop was really helpful during the August storms. I routinely power down and disconnect sensitive equipment during thunderstorms, as I saw quite a few over-voltage spikes in the past. But with the MacBook I can continue working during these hours. I really like thunderstorms and they put me in a creative mood, so it’s a big plus!

Last, but not least, no more copying or syncing or Dropboxing files between my desktop and field notebook! No more forgetting to copy something in the hurry before I leave! This saves me lot of time and the peace of mind that comes from the fact that I always have everything I need with me is priceless.

What I miss?

Thunderbolt docks. Matrox’s and Belkin’s solutions are both delayed. Plugging in all those cables (all the connectors of the machine are populated) in the morning really pisses me off. I’ll be first in the line for one of those docks!

Why ColorBase?

After my recent post about the new ColorBase version, a friend asked the question: “why is it better than factory calibration?” I though this could be interesting to other people, so here’s my (longish) answer.

Some background first. In the grand scheme of things, building a color profile for a device is a two-step process. The first step is calibration, which sets the basic operating parameters of the device to a well known (sometimes standardized) default. In case of monitors, calibration sets the black level, white luminance, color temperature and tone reproduction curve. In case of printers, it sets the relationship between color values and the actual amount of ink laid down to be linear – this is why this step is called linearization. The second step is the actual profiling. Here the software determines the color reproduction characteristics of the device and creates the profile.

On the low end, manufacturers tend to skip the calibration step, doing only the profiling. This is a nasty trick and the reason why I think that cheap colorimeter packages that can’t do the calibration step are downright dangerous and actually worth nothing. On the high end profile making is always preceded by calibration.

Speaking of printers: the lack of calibration (linearization) is less noticeable here, because profiling packages do a linearization step under the hood before starting to build the profile. This is not that accurate as the separate step, however (“true” linearization controls parameters in the rasterization process, whereas “simulated” plays with the color values). So basically it is more or less done for printer profiles.

My favorite example for showing color reproduction differences across devices is the TV department of your favorite electronics store. Almost every single one displays the same content differently. Consumer printers are the same. Take two Epson 2880s, and they will print different colors. In case of professional Epsons, all the devices are “factory calibrated” to be as identical as possible when they leave the factory. But this does not mean that they will not drift over time! And because of this drift (and inherent difference in consumer models) you’ll have to re-create all the profiles from time to time. Which could be a daunting task.

To be able to decide whether your device drifted out of tolerances, high end profiling packages provide a validation tool that measures the color reproduction accuracy of the calibrated/profiled device. This way you can check the status periodically and recalibrate/re-profile as needed – instead of doing this blindly every month or so.

Epson’s ColorBase is a software for both linearizing the printer driver and a validation tool for checking the linearization accuracy. A welcome extra is that it can do this for higher-end consumer printers. So one can utilize ColorBase in two different ways:

  • Use it to measure accuracy, and redo the complete linearization/profiling for each of the papers when the accuracy has drifted. This could still be daunting for several papers, but this provides the utmost precision.
  • Use it to measure accuracy, but only redo the linearization if the printer became out-of-spec. Because ColorBase returns the printer to the state it had been before creating the profiles, there are pretty good chances that the profiles will remain accurate.

I have been using the second method for five years with great success. And the longest period that the printer was in-spec reached 2 years with my late 4800. This demonstrates that we are talking more about peace of mind and process control here than visible results. This stuff is about to catch when something goes wrong before it ruins several prints.

And what’s the difference between factory calibration and ColorBase? Actually they are two different things. Factory calibration is for making sure that pro printers are identical when they leave the assembly line, whereas ColorBase is a tool for employing process control.

I must mention two glaring omissions in the package, however. Ink limiting and support for third party papers. You can control ink within the printer driver to some extent, but this should be done with the linearization step. Over-inking could be a serious problem using the driver with some papers. Not supporting third party papers could be worked around by linearizing the printer to the Epson paper selected as the media type for the third party paper (for example Velvet Fine Art in case of Hahnemühle Photo Rag). You will not have a linearization for Photo Rag (which would be the desirable), but at least you’ll be able to build its profile on a solid and consistent base.

If you need ink limiting and linearization for custom papers then moving to a RIP is the only solution these days.