Archives for July 2013

Making It Easier to Put Your Cap On

Manufacturers usually go for “good enough” solutions, even if they can make something significantly more usable with just a bit of more expense. Case in point: Canon rear lens and body caps (I’m citing Canon here, because I’m a Canon shooter, but it also applies to most other manufacturers).

If you ever shoot in marginal light (if you are a landscape or nature photographer, I bet you do it most of the time), then probably run into the hassle of putting your caps on. To comply with Murphy’s law, you’ll always try to attach it in the wrong position at the worst possible moment (I even have a cap at the bottom of Bryce Canyon because of this).

We have a red alignment dot on the lens mount and on lenses, but the stock caps only contain a small, shallow hole marking the attachment position – which is pretty hard to see. And the solution is pretty simple: fill that hole with white (or your color of choice) paint! It can be done in a few minutes for your entire lens collection (after you mastered the technique – I’m using a thin wire to put just a drop of paint there).

My lens cap mod

My lens cap mod

I’m using this trick for almost a decade and haven’t had any issues with putting on the caps since then.
Canon EF 24mm f/2.8 IS USM First Impressions

My sister bought my beloved 24mm f/2.8 lens a couple of months ago (and is making some pretty impressive images with it, this one being my favorite). My good old 400mm f/5.6L USM also have a new owner, so I was thinking about what new equipment should all this money fund.

The first idea was to buy a Fuji X100S, but after trying it I decided that it would require me to accept far more compromises than I’m willing to, so turned back to get some good Canon glass. The 24/2.8’s successor to be exact.

The lens arrived yesterday and just put it through the initial tests and autofocus microadjustment calibration with FoCal. Here are my initial observations.

Image quality

It’s pretty damn good – as was the old 24. A little more resolution (+), a little more distortion (-), but very similar looking images. The center is crazy sharp (much better than my TS-E 24mm). Corners aren’t that sharp, but are still very good. No surprises here. Autofocus consistency is a bit down from 99.1% to 98.6% – they are practically the same in field conditions.

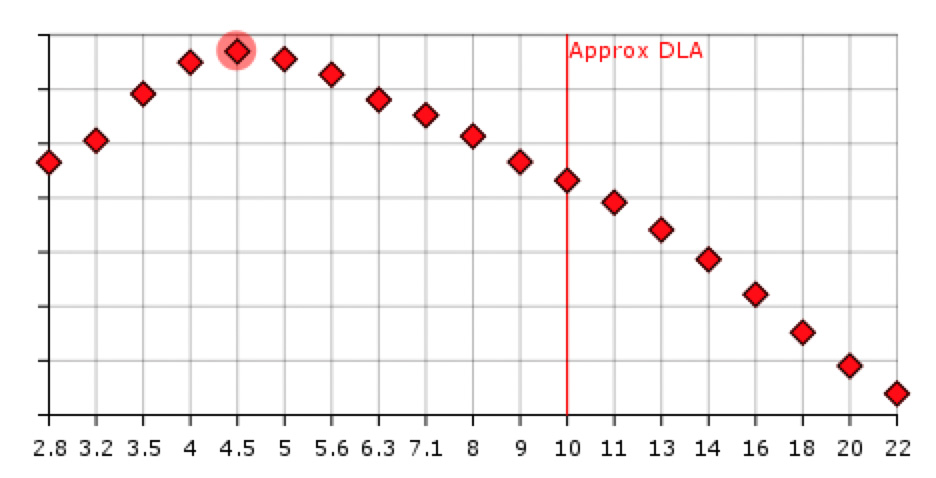
What surprised me pleasantly is the aperture sharpness profile of the new lens (after the AFMA calibration I usually do a focus consistency test as well as an aperture sharpness test).

as-24-old

Aperture sharpness of the old 24/2.8

Above is the old lens’ profile. Numbers from the vertical scale were removed intentionally, as they can’t be used outside of a single measurement (to compare lenses).

And here is the new lens’ profile.

as-24-new

Aperture sharpness of the new lens

Much better at f/2.8, and the sharpness is more consistent through the entire aperture range I routinely use (up to f/11).

Build quality

There’s a night and day difference between the 25 years old design and the contemporary one. The 24 IS’ build quality is on par with my 135/2L. Both utilize engineering plastic as the outer shell, and are tough, but still lightweight. The focusing ring is smooth and well dampened. The lens hood is, well…

Canon does not ship a lens hood with it by default. So it’s a separate purchase. With a lens in the L territory in many aspects (image quality, build quality and and also price), it would be nice to include the hood in the box. Heck, they can even put a red ring on this lens!

The hood itself is the best design I’ve seen from Canon yet. The only drawback is that you can’t remove the lens cap when it’s attached. You have to remove the hood to access the cap. Again, for this price I would expect to get the new center-pinch lens cap. So I might finally pull the trigger and buy a bunch of center-pinch Mark II lens caps.

Image stabilization

The lens belongs to my “travel trio“, so it will be used mostly handheld, sometimes in marginal light. I routinely do landscapes in those conditions and need larger depth of field, so a larger (f/1.4 for example) aperture isn’t a solution for me. But image stabilization is!

Did a couple of low light tests last evening: with a bit of patience I was able to handhold the lens up to half a second! 1/4 second exposures were a piece of cake (the test was done with a 650D, but I expect similar results on my 5D3).

I should also mention that the IS is so silent that I have to put my ears close to the lens to hear it. Also there’s no jump in the viewfinder image when IS is engaged. Light years ahead of the IS systems in my older lenses.

Conclusion

This lens is a winner. If you are into landscapes and want a lightweight and great lens, do yourself a favor and try one. I bet you’ll be immediately hooked.

Recently Canon refreshed their short non-L prime range (24/28/35) with great lenses. I can hardly wait for a similar refresh in the normal/short telephoto range (50/85/100). And may I ask for an image stabilized 135/2L?

DoF Conversion Factor – The Exercise

In my previous post I described how easy it is to calculate apertures to get equivalent depth of field on different formats. I presented there all the equations needed for DoF calculation, but left the actual “paperwork” to you.

In this post I’ll do these calculations for those of you who did not do the homework ;)

Our goal is to get the same amount of depth of field for two setups. Object distance is also the same, so we can simply work with hyperfocal distances.

\(H \approx \dfrac{f_F^2}{N_F c_F} \approx \dfrac {f_C^2}{N_C c_C} \)

Where the index \(F\) denotes full frame and the \(C\) index denotes crop sensor cameras.

We also know how the required full frame and crop factor focal lengths relate (\(X\) denotes the crop factor), so:

\(\dfrac{X^2 f_C^2}{N_F c_F} \approx \dfrac{f_C^2}{N_C c_C} \)

Now let’s see how the circle of confusion changes with the format. Having the exact same print dimensions, magnification will be higher for smaller formats.

\(m_C = X m_F \)

Viewing distance and your eye’s resolution are also the same, so:

\(c_C = \dfrac{\tan (\frac{\pi}{180 R_e}) D_v}{X m_F} \)

\(X c_C = \dfrac{\tan (\frac{\pi}{180 R_e}) D_v}{m_F} = c_F \)

To summarize what we have:

\(\dfrac{X^2 f_C^2}{N_F X c_C} \approx \dfrac{f_C^2}{N_C c_C} \)

Which after simplification leads to:

\(\dfrac{X}{N_F} \approx \dfrac{1}{N_C} \)

That is, we arrive to the result:

\(X N_C \approx N_F \text{.} \)

The Depth of Field Conversion Factor

It is widely known how sensor size influences angle of view (the value describing this called focal length conversion factor, or field of view conversion factor, or simply crop factor). But what about depth of field?

You won’t find too much literature on depth of field equivalence on different formats. This is possibly because the majority of DoF calculators are inherently flawed, and you can’t arrive at the correct result using them. More on this later – now let me ask you a question:

I photograph a scene with a full-frame 35mm camera using a 50mm lens. The lens is focused to 10m distance, and the aperture used is f/8. I will print the image at 30x45cm size. What lens and aperture should I use on an 1.6x crop factor APS-C sensor camera if I want the resulting print to look the same? By same I mean identical framing and identical depth of field. Of course both prints are viewed from the same distance.

Please spend a minute thinking about it before reading further.

:

Ok, now we can discuss the results!

The focal length part is easy: just divide the full-frame focal length by the crop factor.

\(50/1.6 = 31.25\)

I tell you the correct answer to the aperture part before delving into the the details. You should do the same: divide the full-frame aperture by the crop factor.

\(8/1.6 = 5\)

That is, you have to use a wider, 31.25mm lens and open up the aperture to f/5.

So the depth of field conversion factor is same as the crop factor. Frankly, this simplifies how one can quickly calculate it in the field.

The Math

I’ll let you do the actual calculations as an exercise (optionally you can read my solution here), but definitely want to talk about the correct way of calculating depth of field. We usually start with determining the hyperfocal distance \(H\).

\(H = \dfrac{f^2}{Nc} + f\)

Where \(f\) is the lens’ focal length and \(N\) is the F-number. As the focal length is negligible compared to the hyperfocal distance, in practice we can safely use:

\(H \approx \dfrac{f^2}{Nc}\)

The problem child is \(c\), which denotes the circle of confusion. No it’s not a group of photographers arguing about depth of field, this number represents the amount of blur on the sensor plane that is still perceived as sharp detail on the final print.

\(c = \dfrac{\tan (\frac{\pi}{180 R_e}) D_v}{m} \)

Where \(R_e\) is the resolution of the viewer’s eye expressed in cycles per degree, \(D_v\) is the viewing distance in millimeters, and \(m\) is the print’s magnification (calculated as the print’s linear dimension divided by the sensor’s linear dimension).

As you can see the circle of confusion depends on the print’s magnification, the viewing distance and the viewer’s eye condition. Any depth of field calculator that doesn’t let you input these values is just a waste of time. Actually those unusable calculators just take a fixed \(c\) for some smallish print size and less than 20/20 eye condition. But to arrive at the correct depth of field equivalence factor you have to begin with a correct \(c\).

Note that sensor resolution does not play a role in circle of confusion and thus depth of field. It limits maximum magnification (that still looks good), however.

From here the near and far depth of field is calculated with the following equations (or their approximations).

\(DoF_n = \dfrac{H s}{H + (s – f)} \approx \dfrac{H s}{H + s}\)

\(DoF_f = \dfrac{H s}{H – (s – f)} \approx \dfrac{H s}{H – s} \text{ for } s < H\)

Where \(s\) is the subject distance.

Interesting Consequences

Diffraction limited depth of field is the same for any two sensors having the same number of megapixels. Even if they have different diffraction limited apertures. That is, the diffraction limited aperture is an 1.6x smaller F-number for an 1.6x crop factor camera than for an equal megapixel full frame camera.

f/5.6 maximum aperture zoom lenses on APS-C cameras are a joke. Who would want to shoot with a f/9 lens on a full frame camera?!?

You need wider maximum aperture lenses on APS-C cameras than you would on full frame. The new Sigma 18-35 f/1.8 lens is a good step in this direction.

You can capture the exact same looking image on an APS-C crop sensor camera that you could on a full frame one. You’ll just need a wider, faster (and higher resolution and more expensive) lens.