Archives for November 2015

Tern Landing

Sometimes Fortuna smiles at you. This image was shot with the very last rays of the setting July Sun illuminating the tern. Even the 7D Mark II’s autofocus was struggling, and I was able to shoot just one frame.

Whiskered Tern Landing

Whiskered Tern Landing

But this one frame turned out to be my favorite from the day. Shutter speed at 1/500s was slow enough to let the bird’s wings go blurred, but luckily its head is tack sharp. A few clouds caused the background water and sky to go muted pastel, while the bird is burning in the setting Sun. No flash, just available light.

Zeiss Otus 1.4/55 ZE First Impressions

It’s both hard and easy to write about the Otus. Hard, because there are qualities in this lens that one has to witness in person. And easy at the same time, since there are so many good things about it. So many, that one tends to forget about all the minor glitches and imperfections.

I didn’t want to join the “crap shot with an Otus” gang you may find on different forums, so went out to catch the last days of fall. I have the 55 for about a month now, but had only a few days to work with it since its arrival (partly because natural reasons, but mostly because it went back to Zeiss after the first days – more on this later).

Image Quality

It’s among the best I’ve ever seen. And I don’t just mean its high resolution. Take the following image for example. I’ve shot this scene from my favorite port on Lake Tisza more than a couple of times.

Morning on the Lake

Morning on the Lake

None of the other images have this airy, three dimensional feeling that draws the viewer into the image. Some manufacturers refer to the residual aberrations in their products as the lens’ character. The character of the Otus is that it has no character. It was shocking when I noticed it with the Apo Sonnar 2/135, but the Otus 55 is the same. Even mundane subjects look good when photographed with these lenses. They render the scene almost as I see it.

I was in constant awe during the first morning with the Otus. I hadn’t had this feeling since the early days of digital photography. With the D60, 5D and 1D Mark II, L lenses were better than the cameras. But since the 5D Mark II and III arrived (not to mention the 5DS R), lens problems became more and more visible and partly ruined the game for me. It’s pretty devastating to shoot a great scene only to realize later that your lens is not up to the task. My recent move to an all-prime setup alleviated this problem to some degree, but only the Otus was able to evoke that feeling again. Even at 100%, all I see are gorgeous pixels.

No, it’s not completely, 100% free of all optical aberrations, but being an apochromat, the most annoying color errors are corrected to a very high degree. What remains is strong vignetting wide open, and barrel distortion. Neither of those is very hard to correct during post processing, it you want to correct them at all. Vignetting really helps the following image.

Late Fall Colors

Late Fall Colors

This was shot at f/1.4 and the quick transition from sharp to unsharp helps to attain three dimensionality. The lens is completely usable at f/1.4 without any restrictions. You don’t have to stop down for better image quality – this is huge creative freedom.

The only aberration that could be problematic is distortion. It’s clearly visible in some situations (think architecture), but I would strongly recommend leaving it uncorrected if possible, as distortion correction may kill the lovely micro-contrast of the Otus. Try to work around the distortion with your composition instead.

Speaking of contrast, the high contrast really insists black and white conversion, as you can see in my previous post.

Handling

I won’t talk about build quality, since it’s as good as one can wish for, so let’s move on to handling.

This is a large lens. I won’t say huge – huge is the word for the first generation Canon 600mm and 400mm IS lenses in my book. Its weight really helps to stabilize the camera if you must shoot handheld. In other words, it’s like a 24-70 zoom.

Small focusing ring rotation is a recipe to endless frustration when it comes to manual focus – and the Otus’ 245 degree rotation makes it easy and a joy to focus the lens. As you might already noticed, there’s no autofocus. But I would nevertheless recommend to calibrate your AF microadjustment value, because the AF sensor still works for focus confirmation – and precise focusing is crucial to extract the maximum attainable performance.

A sturdy tripod and a stable head is the real home of the Otus (especially on the 5DS R). I also prefer to shoot tethered to Kuuvik Capture for all the benefits the larger screen can bring.

The Glitch

otus-lint
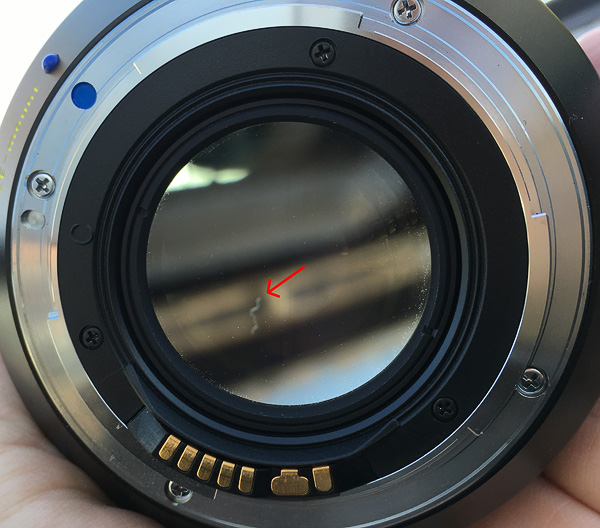
At the end of the very first morning I touched the rear lens element. And when I started to clean it, I noticed a long lint (thread? hair?) inside the lens. It was visible on the very first shots I made of the lens for the insurance company.

So it went back to Zeiss immediately (actually to the dealer and they sent it to Zeiss). I received the lens earlier today, lint removed and focal flange distance readjusted. Because it was “out of spec”. I’m talking about a brand new, premium lens here.

I don’t know, but there’s something terribly wrong with quality control these days. I received the first 5DS R completely dead, had to send back several iPads because of screen uniformity and color cast issues… It’s not only Zeiss, it’s the industry in general.

The question is not whether you’ll get a lemon, the question is when will you get a lemon. And how the dealer and/or the manufacturer handles the situation. Fortunately for me, all these problems were quickly and successfully solved by the dealer and/or the manufacturer. Free of charge. But I cannot stress enough the importance of buying from a reputable dealer… And the importance of inspecting/testing new gear.

Also note that even a lint this large rarely shows up on real world images. The two pictures above (and the black and white if you followed the link) were taken with the lint present – and you don’t see it. It reduces contrast and actually became visible on homogenous backgrounds only at some focusing distances.

Oh, and you can see on this image how hard is to keep the rear element clear. It’s not Canon’s fluorine coating. The rubber focusing ring is also a dust magnet. But a little extra cleaning work is acceptable in exchange for the lens’ superlative imaging qualities. I just hope that the large opening for the distance scale will not suck dust and dirt into the barrel.

Compared to the Sigma 50mm Art

Ok, but how it compares to the Sigma? This is a question you surely will ask when thinking about a high-grade normal lens. I bought a Sigma last year (my first impressions review is here) for the 5D Mark III. The 5DS R stirred the pot quite a bit, to a degree where I decided to spend the $4000 on the Otus and part with the Sigma.

Please note that we’re splitting hairs here – both lenses are vastly superior to what Canon or Nikon has to offer. The Sigma is a great lens, just not on the level of the Otus. It’s quite close, and if you don’t want to spend $4000 on a normal lens, the Sigma is an excellent choice. But the Otus is better…

The Otus has higher resolution in the corners. In the image center the Sigma is pretty close (on the 5DS R), but the corners are a different story – even at f/5.6. Color correction is much better in the Otus. I prefer the overall “look” from the Otus. It’s more natural, while the Sigma tends to be a little clinical. Distortion is visibly less on the Sigma – this may be a serious point if you are doing lots of architecture work. Haven’t compared vignetting, as neither bothered me too much.

Focusing is by far superior on the Otus. Although the Sigma is an AF lens, it’s implementation is quite inconsistent and I was unable to arrive at a working AF tuning setup that works both at infinity and close distances. So I consider the Sigma a manual focus lens. With live view focusing it’s bearable, but it’s way faster to focus the Otus.

Conclusion

As my better half says: “we love the Zeisses”. And as she continues: “there must be a significant difference if even I can notice it immediately”.

This is a kind of equipment that will actually make your images better. Partly because of the wonderful rendering, partly because it slows you down, and finally because you’ll find much more joy in making images with this lens.

Yes, a good photographer can make good images with crappy cameras, but a good photographer can make images that sing with the Otus.

If manual focusing and the normal lens fits your working style, working from a tripod or even tethered doesn’t scare you away, and actually print your images large – do yourself a favor. Rent an Otus. And if you have the funds – buy one. This may be the best investment in photo gear you ever made.

Viewfinder 4.4 with 3D Touch and iPad Pro Support

Version 4.4 of the Mark II Artist’s Viewfinder is now available on the App Store.

Besides the usual bunch of new wide converter profiles and cameras (detailed in the release notes), the two main new features are 3D Touch and iPad Pro support.

I already wrote about 3D Touch home screen Quick Actions in a sneak peek.

On the iPad Pro front, the app now takes advantage of the entire, huge screen. User interface elements remain the same size as on all full-sized iPads. This is to let the content occupy the majority of the screen real estate.

vf-ipad-pro

We also checked all the wide converters we have on the Pro, and were able to mount the Moment wide lens (both the iPad Air 2 and iPhone 5s clips fit). So this version adds support for the Moment wide lens/iPad Pro combination. More wide converters will be supported as their manufacturers come out with iPad Pro compatible versions.

Speaking of wide converters. Schneider is lagging behind again with iPhone 6s/6s+ support. We were able to use the 6 case on the 6s, so that’s in this release. But there’s no 6s Plus case yet.

Version 4.4 is a free update for existing Mark II Artist’s Viewfinder owners. Users of former Viewfinder Basic/Pro/Cine editions can upgrade for a reduced price.

Accessories to Get the Most Out of Your 5DS R

The Canon EOS 5DS R is indeed a great camera, rivaling or even surpassing medium format digital offerings. But to extract its capabilities to the last ounce, you’ll need the appropriate lenses, accessories and technique.

Let’s get the lens question out of the way first, before I move onto the accessories and gadgets – the real topic of this post. This camera ignited a complete revamp of my lens set. I’ve already replaced the 500mm with the Mark II because of the 7D Mark II, but the 5DS R made changes also necessary in the shorter focal lengths range. The first lens that got replaced was the 135mm – with the Zeiss Apo Sonnar 2/135 ZE replacing the Canon EF 135mm f/2L USM. The Canon was no slouch, but the Zeiss is in a completely different league. Next came the Sigma 50mm f/1.4 Art replaced with the Zeiss Otus 1.4/55 ZE (actually this change is in progress, as the first copy went back to Zeiss – more on it after the issue settles). On the wide end I’m about to acquire a Zeiss Otus 1.4/28 ZE (when it comes out next year) and a Zeiss 2.8/15 ZE.

It may look pricey at first, but these lenses are not comparable even to the Sigma Arts. With the Sigma 50, 5DS R images just look like regular 35mm DSLR images, albeit with slightly higher resolution. But they are still limited to 40×60 cm print sizes according to my standards. There’s a lot of empty magnification in those images. With the Otus 55, 60×90 cm is easily reachable. The images remind me of those I saw from Hasselblads. The Otus 55 costs around $4000, which is in line with medium format normal lens offerings priced between $3000 (Schneider) – $6000 (Leica). And the 5DS R is more than affordable compared to medium format cameras/backs.

With this said, it’s not surprising that you’ll need tripod stability and shooting discipline used with medium format gear. The setup I describe in the following sections was built slowly during the last couple of years to satisfy my landscape photography requirements. Removing “field frustrations” one by one.

As a quick overview, you can see my rig on the following picture.

Ready to shoot

Ready to shoot

Tripod and Head

I’m using a Gitzo 3532LS tripod for more than three years now. These legs proved to be versatile, have great torsional rigidity and dampen vibrations rather quickly. I prefer three legs sections for increased stability, and myself being 172 cm, this tripod gives me just the right height to work comfortably even on slopes.

On the head front, the Arca-Swiss d4 is my choice. I had been struggling with ballheads for a decade, and they became unbearable when I started to shoot tethered most of the time. I had to wait three months for the d4 to be delivered, but it well worth the wait. Now I can adjust the camera position with just one hand, while holding the MacBook Air in the other. Not to mention that sagging omnipresent even with the best ballheads is a thing of the past. I prefer the d4 compared to the Cube, because of the quick adjustment feature.

The third piece of the the support puzzle is the camera plate. I’ve relocated my Kirk plate from the 5D Mark III – it is 100% compatible. As I wrote in my Kirk plate first impressions piece, I really like its two attachment point fixing method. Together with the 5DS R’s reinforced base plate, it provides very stiff support. Note that no battery grips are used here – they just introduce another attachment point with possible flex and sag.

Filters and Lens Shading

I moved to the LEE filter system when I started shooting with primes only. Four different filter sizes were unmanageable – even with the two types of filters (ND and polarizer) that I use. Still don’t like graduated filters and the dark mountain tops you see so many times on photographs made with them, and my LEE filter set consists of just a 100x100mm polarizer, a 3 stop ND, plus the Little and the Big Stopper.

They beautifully solve the filter thread problem, but forget about stock lens shades. So I had to find a solution. Sometimes I used my hat to shade the lens front element, and that gave me the idea: get a piece of black paper/plastic, and figure out how can I hold it in place (remember, one hand for adjusting the head/camera/lens, another for the MacBook – there’s no third one for holding the shade). I ended up using a Wimberley Plamp as a third hand. Originally I had a piece of black cardboard in my bag as a shade, but recently switched to a piece of matte plastic named Shadepirate. You can’t see on the above picture, but I put a piece of Velcro under the clip of the Plamp to protect the tripod leg.

Tethering

Tethering became integral part of my workflow years ago. At the beginning I had been dragging a 15″ MacBook Pro around, but that turned out to be a bit heavy and problematic. For more than a year now, a 11″ MacBook Air serves as a field computer. It fits into the pocket of my Domke vest, weights as little as five or six 4×5″ film holders… Yes it’s a bit more than 1kg, but my backpack and tripod weighs around 20kg together, so that’s not a huge increase.

Of course I use my own software – Kuuvik Capture – on the MacBook for controlling the camera. But usually also keep a copy of Capture One open so that I can make critical decisions on the filed.

With the arrival of USB 3, cable quality became increasingly important. You need to have good signal integrity for a reliable connection. For this reason, I settled down with TetherTools’ TetherPro cables – currently the 15 feet (4.57m) orange one. As an interesting side note, we had a handful of Kuuvik Capture support incidents where changing the cheap cabling to a good one solved the issue.

Conclusion

For me, the 5DS R marks the end of the casual 35mm shooting era, but in exchange delivers image quality previously available only with much more expensive medium format systems. Even with expensive Zeiss glass, the complete system price/performance ratio remains on a uniquely high level.

Not to mention that the same camera can be used for birding with stellar results – a domain no medium format camera dare to enter.

  ☕ ☕ ☕

Did you enjoy this post? Consider buying me a coffee if so.