Archives for September 2017

Kuuvik Capture 3.2 : Other New Features

The Dual Histogram and JPG enhancements were discussed in my previous posts, but there are a few other noteworthy additions in Kuuvik Capture 3.2. Let’s see them!

Camera support

First the new cameras. The Canon EOS 6D Mark II and the 200D/Rebel SL2/Kiss X9 are completely supported. Either using USB or via their built-in Wi-Fi. From the older bunch, we’ve added the 1300D/Rebel T6/Kiss X80, as this camera is quite popular among our photomicrography users. We’ve also continued the rollout of multi-point live view and movie recording support. This time adding the 7D, 750D/Rebel T6i/Kiss X8i, 760D/Rebel T6s/8000D and 1200D/Rebel T5/Kiss X70.

Preferred editor

This was also high on the feature request list. The preferred editor is the RAW converter of your choice that you would like to use to quickly open any image from Kuuvik Capture. By pressing Cmd+E (or via the menus, but I bet that the keyboard shortcut will be used more often).

You can designate any app that is registered as an editor for CR2 or JPG files on your Mac as the preferred editor in Preferences.

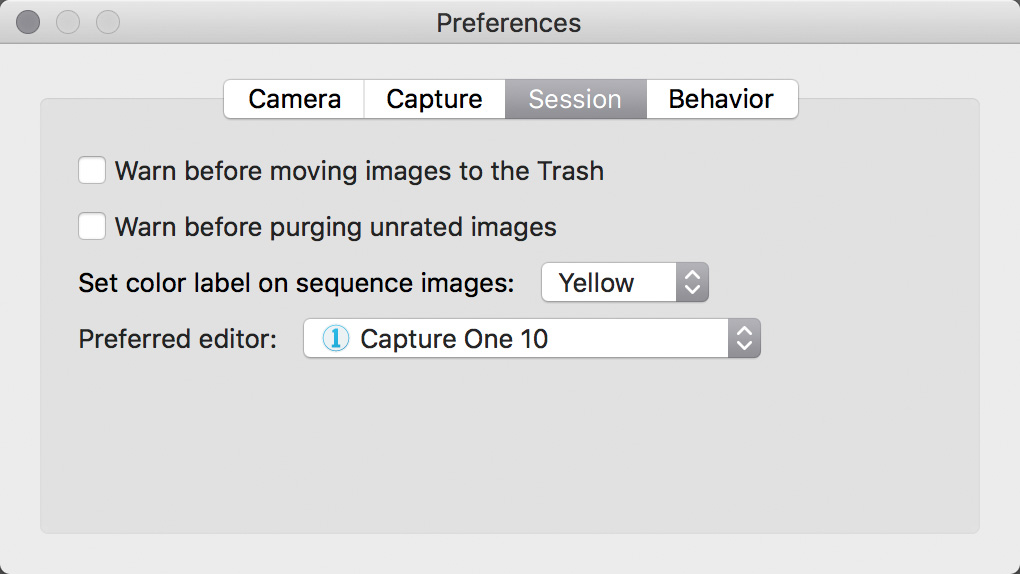
For me it’s Capture One, but Photoshop is what several people will undoubtedly use. As Lightroom is not registered as an editor, and is unable to open individual files without importing, you will not see it listed. If you use Lightroom, a hot folder should be set up in Lightroom for the Kuuvik Capture session folder, and it will automatically import images from there.

Drag & Drop

This is a huge time saver. I’m opening my previous shoots with Kuuvik Capture a lot, and going through File > Open Session was always a bit tedious. Now you can drag & drop any folder to the app (even to the icon on the Dock) and the app will immediately open it as a session. Simple and effective.

Under the hood

A lot of things are going on under the hood these days. I’ve mentioned updates to the JPG processing engine with huge performance gains in the Dual Histogram post. The Image Browser also got faster, more efficient, and now uses the image’s EXIF date/time when sorting by capture date (instead of the file’s date).

This release sees the first version of our new display engine. It enables the app to work on macOS 10.13 High Sierra, and also works around an acute NVidia display driver problem introduced in macOS 10.12. If you got an empty screen with 5DS/R files on your MacBook Pro you know what I’m talking about. It also paves the way for some pretty neat features coming in the near future.

Availability

Kuuvik Capture 3.2 is available now on the Mac App Store. It is a free update for users who purchased Kuuvik Capture from there. I’m also working on an update to my free eBook, Kuuvik Capture Inside Out, which will be available shortly.

For the complete list of new features and fixes, please refer to the release notes.

Kuuvik Capture 3.2 : JPG Enhancements

Kuuvik Capture was originally developed to foster a RAW-only workflow. But we received numerous requests for supporting JPG files. At first we introduced a RAW+JPG capture option (where JPG files remained on the memory card), and now in version 3.2 you can shoot as well as download JPG files alone. Capture preferences were changed to reflect this functionality.

Image quality controls whether you shoot RAW, RAW+JPG or a new choice, JPG. JPG files are large/fine ones, since we still want to keep image quality at the highest possible level. When you choose RAW+JPG, an option appears so that you can set whether the JPG files will remain on the card (by default), or downloaded along the RAWs. With the JPG image quality setting files are always downloaded of course.

There’s also a new option to force the native 3:2 image aspect ratio. We’ve added this because aspect ratio control is a complete mess on Canons. You have two settings to cope with, and sometimes get a cropped JPG file and other times a full resolution JPG with metadata to indicate the crop. To make things worse, RAW converters and Photoshop tend to change how they interpret cropping metadata from version to version. We simply don’t want to get involved in this messy situation. So by default Kuuvik Capture forces the camera default 3:2 aspect for all images. You have the option to turn it off, if you really really know what you are doing and need non-3:2 images. But you were warned.

Downloaded RAW+JPG pairs will be handled as a single package, but only the RAW file is used for display. Thumbnails in the Image Browser are marked with a “+” badge to indicate that a JPG is also present, while the file name will show just the RAW.

Deleting the package will delete both the RAW and the JPG.

For RAW+JPG (since the RAW is used for display) the Dual Histogram shows both RAW and processed data. For single JPGs only the processed histogram is available.

A bonus feature

Since a JPG is a JPG, you can use Kuuvik Capture to cull JPG images from any source. For example Agnes went through the majority of our family photo collection during the last few months with the app. This included everything from scanned images through iPhone photos to RAWs. Moreover, JPG previews are displayed from older Canon CR2 files (such as those from the 5D and 1D Mark II), as well as from Nikon NEF and Pentax DNG and PEF files produced by Nikon and Pentax cameras supported by our ShutterCount app. Yes, they share the same image decoder.

IMPORTANT: This is a bonus feature that may work for you, but not officially supported.

Availability

Kuuvik Capture 3.2 is available now on the Mac App Store. It is a free update for users who purchased Kuuvik Capture from the Mac App Store. I’m also working on an update to my free eBook, Kuuvik Capture Inside Out, which will be available shortly.

Kuuvik Capture 3.2 : The Dual Histogram

The very first Kuuvik Capture release introduced RAW histograms in an attempt to provide a tool for judging exposure more precisely than what regular histograms are capable of. I even wrote an article on the merits of having a RAW histogram. The conclusion of that article was that despite you have a RAW histogram, white balancing could clip channels in the converted image even if everything was fine with the RAW; so you need to see both the RAW and the processed histograms (preferably in your RAW converter) for the final decision on your exposure.

While my former article revolved around the white balance issue, other image processing parameters, like picture style and color space, also have heavy influence on histogram precision and usability. Making to see both histogram types a fundamental need. Not to mention that launching a RAW converter is not always convenient to do.

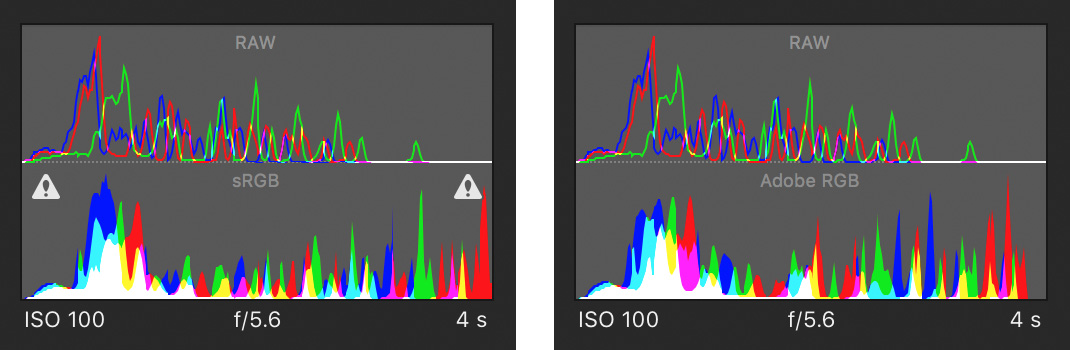
So version 3.2 sports a new Dual Histogram tool to show Kuuvik Capture’s RAW histogram along the usual one generated from processed data.

For images, the processed part is based on the JPG preview that every RAW image contains (this is what Kuuvik Capture displays, and this is the source of the histogram shown on the camera’s LCD). This represents how the image was processed by the camera. Your RAW converter will almost certainly convert it in a different way, so the final word on exposure still belongs to the converter. But the camera’s interpretation gives a solid starting point.

The processed histogram also indicates the image’s color space. Different color spaces have different clipping points – more on this later.

You can clearly see on the example how white balancing influenced things. You’d be in trouble having made a decision solely based on the RAW histogram in this case – the blue channel would be almost completely clipped. The example belongs to the original of the following photo (that is, before contrast stretching and other adjustments).

Ice Abstract

For live view and movie recording the camera always serves video frames in sRGB – even if you set your camera to Adobe RGB. But why is that important? Well, it’s time to talk about the effect of color space choice on histograms.

Color spaces vs. histograms

I made two photos of a regular ColorChecker chart. One with setting the camera to sRGB and another with setting it to Adobe RGB. Lighting and exposure were the same.

As you can see, there’s absolutely no clipping in the RAW data. And there’s no clipping when converted to Adobe RGB. But in sRGB both highlights and shadows are clipped! So live view (which is always in sRGB) may show some clipping while Adobe RGB not. And even a histogram from an Adobe RGB conversion might show clipping while there’s absolutely no clipping in the image when converted to ProPhoto RGB in Capture One.

I’d recommend to treat these processed histogram clipping warnings as different levels. The sRGB warning in live view goes off first, this should ring a bell in your head to watch more closely after taking the image, as there may be a problem. After taking a picture, if Adobe RGB shows clipping, then it’s time to either check it in your RAW converter or back off a little bit.

But RAW histogram clipping warnings are always hard facts: indicating unrecoverable data loss.

The above example explains why I recommend to set your camera to Adobe RGB: to prevent premature clipping in histograms displayed on the camera’s LCD.

A few words on JPG support

JPG files slowly become a first-class citizen in Kuuvik Capture. The JPG processing engine in version 3.2 is up to 5x faster than previous releases. This speedup is what allows efficient histogram generation and made Dual Histograms possible. JPG histogram display was also a requirement for a JPG-only workflow, which was high on our feature request list. And now it’s fully supported as you’ll see in my upcoming post.

Kuuvik Capture 3.2 is available on the Mac App Store. It is a free update for existing Kuuvik Capture 2.x and 3.x users.

Kuuvik Capture 3.2 Sneak Peek

The latest update to the ultimate Canon EOS tethering app, Kuuvik Capture, is around the corner, so I thought I’ll share the new home page image.

The eagle-eyed will surely spot one of the cool new features. Hint: look at the histogram area in the lower right corner.