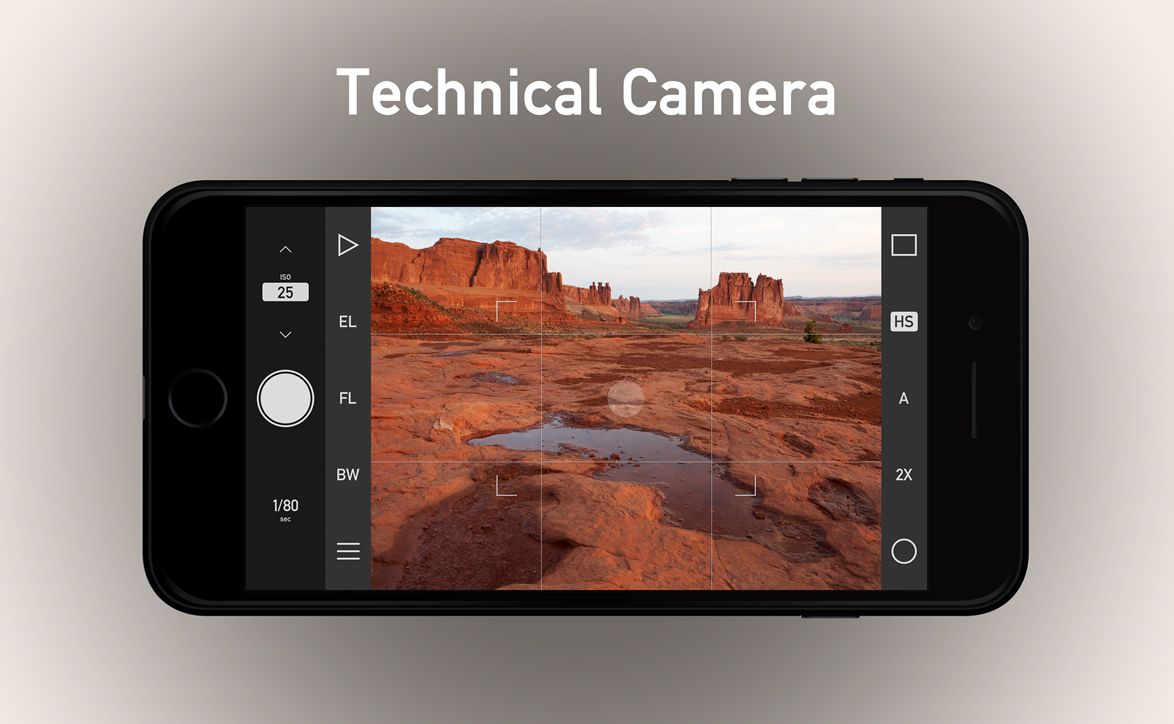
I’m pleased to introduce my newest app, called Technical Camera. It is a still camera app for the conscious image maker. Why another camera app? Well, the main image from the app’s site may contain some clues.
Motivation
The story of Technical Camera began in the fall of 2015 (in a post I briefly mentioned that I’m working on a photo app). In the following years I did experiment a lot with different apps and photo taking features of iOS, and to say that I was frustrated is an understatement.
While I saw that the phones themselves has potential, each and every app fell short in one or more ways. Let me list the most problematic points:
1) Cluttered screens. The image (both the live view and the ones during playback) on a camera is a sacred area. Putting buttons, icons, sliders and other distracting ornaments on the image itself is a cardinal sin in my book. Especially since the iPhone display is so large with wast empty spaces around the camera’s 4:3 aspect ratio image.
2) Photos stores everything in bulk, you have to manually move every image into its album (in a rather twisted and backward way). Organizing your stuff is a royal pain this way.
3) Nobody needs 12 megapixel images when taking a picture of an electricity or gas meter. Large images when a low resolution would be sufficient are just a waste of time and network bandwidth (that is, money) and en masse has unnecessary environmental impact.
4) Apps made by developers who aren’t working photographers. This results in all kind of clumsy to downright misleading solutions and user interfaces.
These aren’t just from a photographer’s perspective. My better half Agnes complained about 2) and 3) for a very long time, and her most frequent use case is visual note-taking.
Technical Camera solves all these problems and also borrows technologies from our other professional apps (like real-time distortion correction for wide converter lenses from the Mark II Artist’s Viewfinder), to make something rather unique.
I’m going to explain how these things are accomplished and how to utilize Technical Camera to its maximum potential in posts coming. So it’s worth keeping an eye on my blog if you are looking for an app that transforms the mobile photography experience.
What it isn’t
I feel it important to discuss upfront what’s not included. This is a still photography app. No videos. No selfies. No digital processing in-camera, like automatically stitched panoramas, or lighting simulation. No AI. These are left out because we either have opposing views, or because the main focus of the app is making great still images.
Availability
Technical Camera is available for pre-oreder now on the App Store, at a 30% discounted price. It will be released on June 12.
 Step 1/a : Cameras having either a Wireless communication settings or Built-in wireless settings menu, the Clear settings item is on that menu.
 Step 1/b : Older models hide the clear function in a different place: go into the Wi-Fi function menu and press the INFO key. The resulting General sett. screen will have it. Note that the camera’s network (MAC) address is also displayed here. If you use MAC address filtering on your Wi-Fi, you should enable access for this address.
 Step 2 : First choose Wi-Fi settings (or Wi-Fi/NFC settings) from the menu.
 Step 3 : Choose Enable to enable Wi-Fi support. Be aware that enabling Wi-Fi may disable the USB port on the camera, so if USB stops working after this, you need to come back here and disable Wi-Fi. NFC is not supported on Apple devices, so I recommend to turn it off when your camera has that option.
 Step 4 : The camera may ask for a nickname. There’s no other option here, but to confirm that you will provide one. It doesn’t matter what the actual nickname is. Our apps does not use it for anything at the moment. I usually recommend to accept what the camera offers.
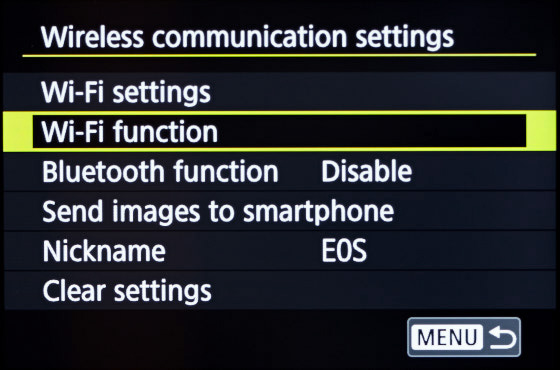 Step 5 : Choose Wi-Fi function to begin. Note that the location of the Wi-Fi function menu differs from camera generation to generation.
 Step 6 : You must choose Remote control (EOS Utility), even if the app is running on an iPhone or iPad. The camera will think it’s talking to EOS Utility, when in reality it will talk to our apps. Pressing the INFO button on this screen will show the network (MAC) address of your camera. If you use MAC address filtering on your Wi-Fi, you should enable access for this address.
 Step 7 : Newer devices will show you this screen. Since you are connecting for the first time, choose Register a device for connection. Later on, you can recall specific settings here to quickly re-connect with different apps on different devices (but that’s a topic for another post). If the screen is skipped by the camera, don’t worry.
 Step 8/a : On newer Canons, choose Switch network at this point.
 Step 8/b : Older models will present the Connection method screen, where you should choose the Select a network option. Even more older ones will call the Select a network option as Infrastructure mode. On these more older cameras you will also need to choose Find network on the subsequent screen.
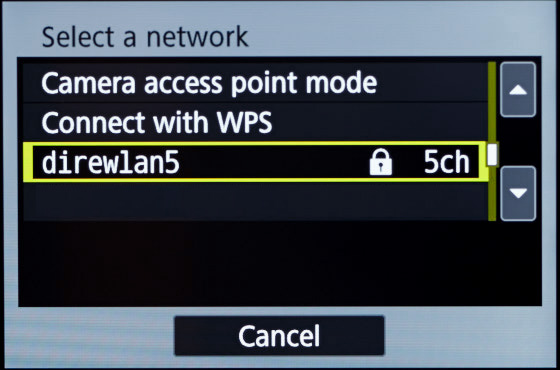 Step 9 : Choose your existing Wi-Fi in the next step. Forget about Camera access point mode (described just above) and WPS/PBC. Choose the network your iPhone, iPad or Mac is connected to. A word of caution though. Canon’s Wi-Fi implementation is unable to handle Wi-Fi roaming (that is when you have multiple Wi-Fi access points in the house). Each access point will appear as a different network here, and chances are that the camera will pick a wrong one even if you are selected the correct one. Try the pairing procedure close to each access point to see which one the camera sticks to if you experience connection issues.
 Step 10 : Older models will bother you with a question about the key format. I’ve never seen a Wi-Fi network in my entire career that hasn’t used a textual password, and Canon also realized the uselessness of this option and eliminated it from newer cameras. But you should choose Enter 8-63 ASCII characters if the camera insists.
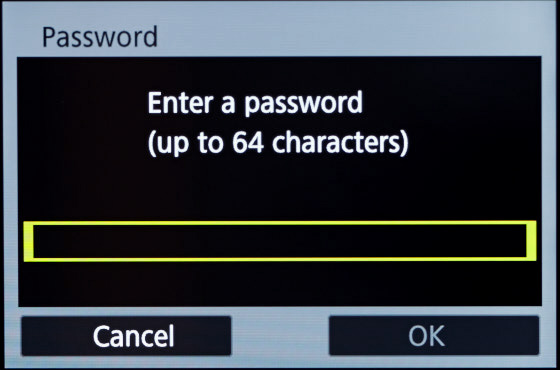 Step 11 : Enter the password for your Wi-Fi network. Again, if you use MAC address filtering, you will need to allow access for the camera’s MAC address, otherwise this screen will not appear or the password will not be accepted.
 Step 12 : Choose Auto setting to get the IP address (and other basic networking parameters) from your router automatically. Just line your phone does.
 Step 13 : This is a “this page is left blank intentionally” kind of screen… Choose OK.
 Step 14 : The camera now entered pairing mode. If you haven’t done so, put ShutterCount or Kuuvik Capture into pairing mode. Don’t let the message fool you, do not start EOS Utility – it’s not needed, and would just cause trouble. The camera will think that it talks to EOS Utility when it talks to our apps.
 Step 15 : This last screen confirms that the camera found the app. Choose OK and enjoy the app! Again, don’t let the message fool you. The camera seems to think that everything is a PC. If your camera prompts for saving the newly created Wi-Fi settings at this point, choose SET1.


