Archives for July 2018

Viewfinder Handbook Updated for Version 6.0

Just a quick notice, as promised: The Artist’s Viewfinder Handbook is updated to cover all the new features introduced in version 6.0 of the Mark II Artist’s Viewfinder.

As usual, it is available free of charge for existing as well as prospective Artist’s Viewfinder users from the app’s web site.

Enjoy!

Artist’s Viewfinder 6.0 Released

The latest update to the Mark II Artist’s Viewfinder is now available on the App Store. There’s a lot that changed under the hood, while the time-tested user interface remains the same.

Familiar on the surface, new beneath.

Version 6.0 inherits the FastPath imaging engine from my Technical Camera app. It handles live view, capture, encoding, decoding and display – with higher performance, less memory consumption, and extended metadata capabilities, like copyright information and GPS altitude. Previews embedded into RAW captures are now full resolution, as well as black & white and distortion corrected when you use those settings. And the DNG files support wide color and comply with the TIFF/EP specification (that is, have a full resolution preview and a low resolution thumbnail) for better integration into professional workflows.

Similarly, protective metering and our own auto-exposure calculation component makes an appearance here. The latter is responsible for the Auto ISO feature, which makes the Mark II Artist’s Viewfinder way more usable in low light conditions, landscape photographers usually find themselves in. Just flip the Allow Slower Speeds switch on.

Lastly from display related things, selectable frame rate (20/25/30Hz) is also available in the Mark II (it’s in the Advanced sub-menu). This replaces the former Power Saver display processing mode, 20Hz being recommended for power saving. 25Hz is here to avoid interference artifacts with indoor lighting running on 50Hz mains frequency.

On the usability and convenience front, Smart Function Key assignment is now available via a long tap on the button you want to assign. The album for auto-export can be selected from a list of existing albums, and the Catalog Viewer displays the last captured view. Haptic feedback (on devices having this feature) and sounds can be turned off, so that you can operate the app in complete silence. All these bring Artist’s Viewfinder in parity with the advancements we made in Technical Camera.

As usual, this release is full of new cameras, backs and wide converter profiles. You can find the complete lists in the release notes.

Version 6.0 is a free update for existing Mark II Artist’s Viewfinder owners. New user can purchase the app from the App Store. The app is also available in the Photographer’s Toolkit bundle, which contains the Mark II, Technical Camera and ShutterCount Mobile, for a price less than Artist’s Viewfinder and Technical Camera would cost purchased separately.

The updated Viewfinder Handbook is also available now.

Technical Camera : Focusing

Technical Camera provides there focusing modes: Continuous AF (the default), Single AF, and Manual Focusing.

In automatic modes focus is calculated for the AF point (the whitish circle, marked with 2 on the screen shot below), which you can move by tapping the screen at the desired position.

Focusing controls

In Continuous AF the app continuously updates focus. The focusing/focus lock key (indicated with 1 on the screen shot) displays FL in this case (as in Focus Lock). Tapping the function key will lock focus, which will be re-engaged again when the lock is turned off by tapping the key again.

In Single AF mode (which you activate by turning off the Continuous AF option in the menu) focusing is only engaged if you tap the screen to relocate the AF point; or tap the focusing/focus lock key (which changes its title to AF in this focusing mode).

You can hide the AF point when focusing is not in progress if the circle happens to interfere with your vision. Just set the Show AF Point preference in the menu to During AF Only.

Manual Focus is initiated by the vertical drag gesture. The gesture is described in the Exposure Control post, so if you haven’t done so, I recommend you to read it now. In Continuous AF mode it activates focus lock as soon as the beginning of the gesture is detected (that is you tap and hold the side of the screen assigned to manual focusing). You need to re-engage Continuous AF by turning the lock off.

There are two things that become active during the focusing vertical drag gesture: focus peaking and the focusing distance indicator. Both will turn off as soon as you lift your finger from the screen.

The screen shot above shows how the app looks during manual focusing. Black and white mode is also active, because it’s easier to see the colored peaking this way. In real life black and white mode is not turned on automatically during manual focusing.

You can choose the color of peaking via the menu, since no single color suits all situations. The available choices are green (the default), yellow, white and magenta. And of course peaking can be disabled completely.

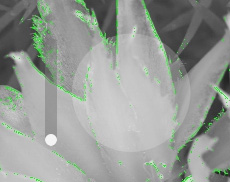
The focusing indicator is the vertical bar displayed on the left side of the AF point (see the magnified screen shot on the right).

The white dot in the track indicates the position: the higher the point the farther the camera is focusing. There’s no scale, though. Apple warns developers that the distance values iOS provides can’t be mapped to actual distances in meters or feet, so a scale is missing for this reason.

As parting tip, let me share how I use manual focusing. Lifting your finger from the screen might change the device’s position and thus the focusing distance. To avoid this situation, you can take a picture while your finger is on the screen during manual focusing. I usually do the focusing with my right index finger, and tap the shutter button with my left thumb.