Technical Camera 2.2 Released

The latest update to my Technical Camera app is now available on the App Store.

Just like in case of the Mark II Artist’s Viewfinder, it concludes the fall release cycle for the app, adding iOS/iPadOS 16 and new device support.

But there’s more that makes using Technical Camera faster and more efficient.

First, the app now returns to shooting when you switch to it, closing any screens that you may have left open the last time you used the app. This stems from my own usage pattern, where I tend to put the app into the background with an album page open. In the past I subsequently cursed the developer that I have to manually close the damn album when I want to shoot immediately.

But we don’t pull the rug from under your feet – don’t close the screen – when you’re doing any of the following: creating and configuring an album, editing copyright information or navigating with the album’s map.

Second, you can now close camera and screen options by tapping their gray background.

And last but not least, when you are in the album browser, tapping the album’s name lets you change the current album with no need to close the album screen, go into the menu to do the change, and navigate back.

You can check out what’s new this year’s 2.x versions in the release notes.

The update is free for existing users.

Viewfinder 7.2 Concludes the Fall Update Cycle

Each fall Apple releases new devices and operating systems that we have to add support for.

This year was no different, except that iOS/iPadOS 16 has changed some of the fundamental parts of the OS (device rotation support, to be exact), which caused some extra headache. We’ve started to roll out changes in September, and now the app is considered to be complete in this regard.

As you can see in the release notes, new device support was also added to support all models in this year’s iPhone 14 series – both in terms of new screen sizes and camera profiles.

Speaking of the latter, Apple screwed up iOS provided angle of views big time for the Pro phones, but fortunately we don’t trust their data (which is usually off by up to 10-15%) and our profiles are precise as usual.

Sadly, there’s one more iOS bug that you should be aware of when updating any of our apps this fall: the OS may fail to properly close the app before updating it, and subsequently, not knowing which one to run, greets users with a pitch black screen. The fix is quite easy: force quit and restart the app (both copies) to wipe corrupted state information. See our knowledge base article for detailed instructions.

We’ve added support for 20 new cameras this fall, a bunch of lenses, and new aspect ratios that users requested.

The Mark II Artist’s Viewfinder 7.2 update is free for existing users and is available on the App Store.

Introducing Kwiketta for Adobe Photoshop

Kwiketta is a new group of little utilities that launch their associated targets directly under Rosetta, the Intel processor emulation on Apple Silicon Macs. And while doing so, they pass all files dragged to their icons or passed to them other ways, like using the Open With menu item in Finder, to the target.

That is, a Kwiketta app works and acts exactly like its target, allowing you to selectively launch either the native, Apple Silicon version (using the target directly) or the Intel version (using Kwiketta) of the target.

Why is This a Big Deal?

I still rely on PhotoKit plugins for Adobe Photoshop. Unfortunately PixelGenius closed its business and ceased further product development years ago.

So, to be able to use these plugins, I have to launch the Intel version of Photoshop on my shiny new M1 Max Macbook Pro. There are two problems with that. First, I don’t always want the Intel version, because it’s slower, etc. Second, switching between the native Apple Silicon and Intel versions is a royal pain in the back: open the Get Info panel for Photoshop and toggle the Open using Rosetta checkbox.

I wanted a solution that, unlike fiddling with the aforementioned checkbox, doesn’t completely destroy my creative workflow. And this is why the first Kwiketta app, Kwiketta for Adobe Photoshop, was born.

How To Use

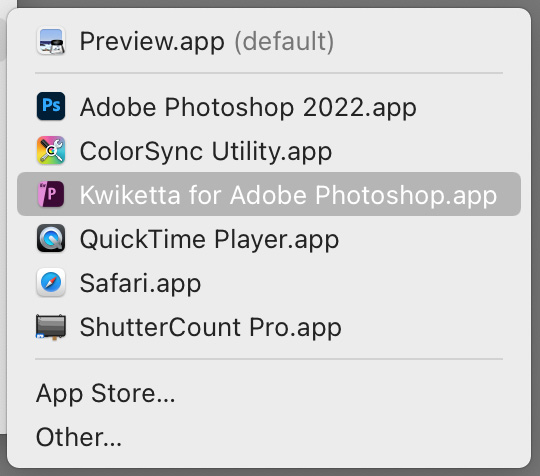
As you can see on the screen shot above, I put Kwiketta for Adobe Photoshop right next to Adobe Photoshop on my dock. If I click the Photoshop icon, the Apple Silicon Photoshop will launch. If I click the Kwiketta for Photoshop icon, then the Intel version of Photoshop will launch, complete with my Intel-only plugins. Simple as that.

Or you can drag files to the Kwiketta icon and they will pop into the Intel Photoshop. You got the idea.

A Kwiketta item also appears on Finder’s Open With menu of all file types that Photoshop supports.

You can use Kwiketta for Adobe Photoshop almost everywhere you would be able to use Adobe Photoshop. For example you can set it as an external editor in Lightroom Classic.

This is what I do because my regular export to web workflow relies heavily on Intel-only plugins, and this way I can initiate it right from Lightroom Classic.

Configuration

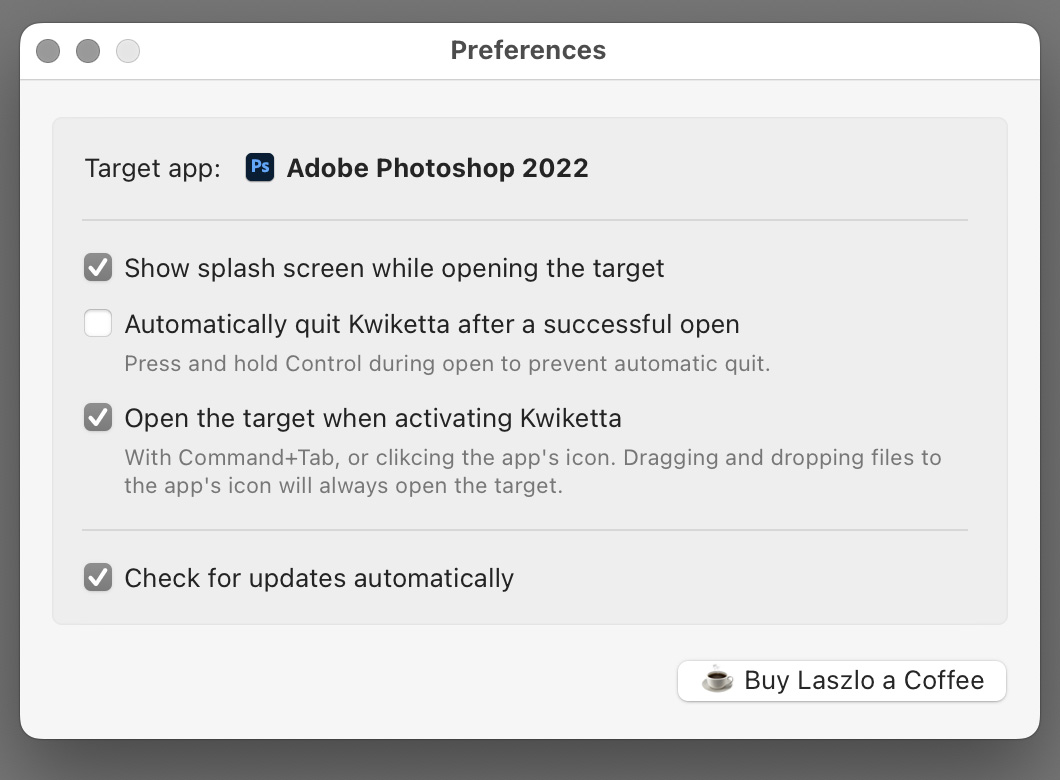
There are a few things you can set on the app’s Preferences dialog. The splash screen and automatic updates speak for themselves.

But I have to talk about the other two options.

Kwiketta can operate in two modes: it can remain running after the target has been launched (the default behavior out of the box), or it can automatically quit. The Automatically quit Kwiketta after a successful open option controls this.

In the default, remain running mode, Kwiketta will automatically relinquish control to Photoshop when you activate it. In my view this ensures a natural workflow (since the sole purpose of Kwiketta is to open the Intel target and the pass control to it). But if that bothers you, uncheck the Open the target when activating Kwiketta option.

You can always get into the Preferences dialog by right clicking the Kwiketta icon on your dock and choosing Preferences… from the menu.

Support for Apps Other Than Photoshop?

Photoshop was what I needed this app for, so naturally it was my first choice. But let us now what other app(s) would you like to get supported.

Availability

Kwiketta is available for free from DIRE Studio’s web site. You heard that right: it is free. DIRE Studio bears the costs associated with the app’s distribution.

But software does not grow on trees, and I had invested a lot of time into the development of this app. So consider honoring my work with buying me a coffee if Kwiketta helps you.

  ☕ ☕ ☕

Ultralight Tethering with Kuuvik Capture

With the release of Kuuvik Capture for iPad, a decade-old dream started to unfold: enjoying all the benefits of tethered shooting out in the field without the burden of carrying around a notebook.

Once the very first beta of the app was ready, a quest for the optimal iPad size and a lightweight mounting solution had begun. It took several weeks of research to arrive at a solution that I’m using for the last year.

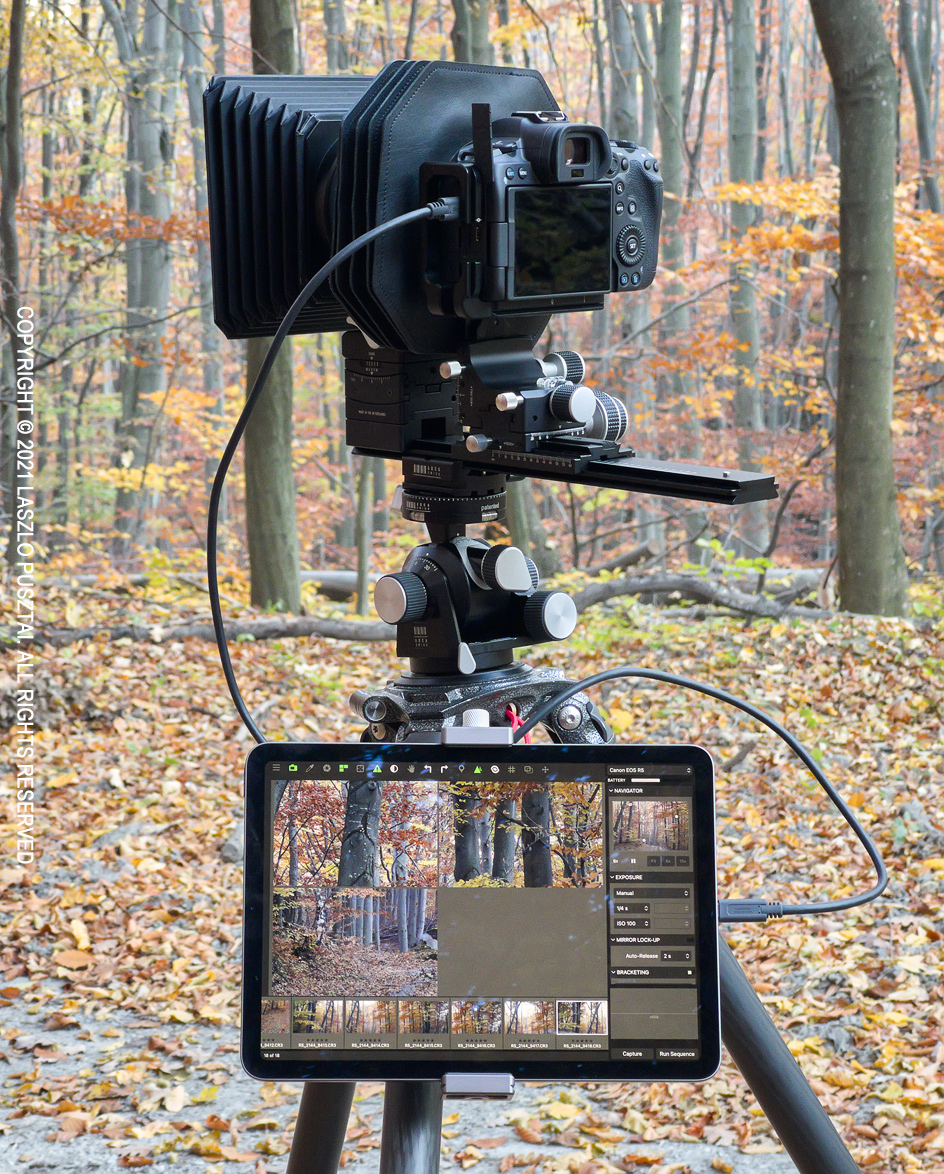
My Cambo Actus digital view camera with the Canon EOS R5 acting as the recording medium controlled by Kuuvik Capture running on an iPad Air 4. The image shows one of the app’s unique features: multi-point simultaneous live view.

The iPad had to have a USB-C port and large enough screen while keeping the weight down. Quite early during the development we’ve realized that the sweet spot is the ~11″ size. At the end I chose the Air 4 as it weighs a little less than the Pro, costs less, and for a dedicated tethering controller the Pro doesn’t provide anything worthwhile over it.

Storage-wise 64GB is plenty for me, especially since I don’t have to shoot a myriad of images to compensate for possible errors. With Kuuvik Capture I only keep the perfect ones. 64GB also turned out to be more than enough for a 5-hour Perseid shooting session, where I shot a ton of long exposure images.

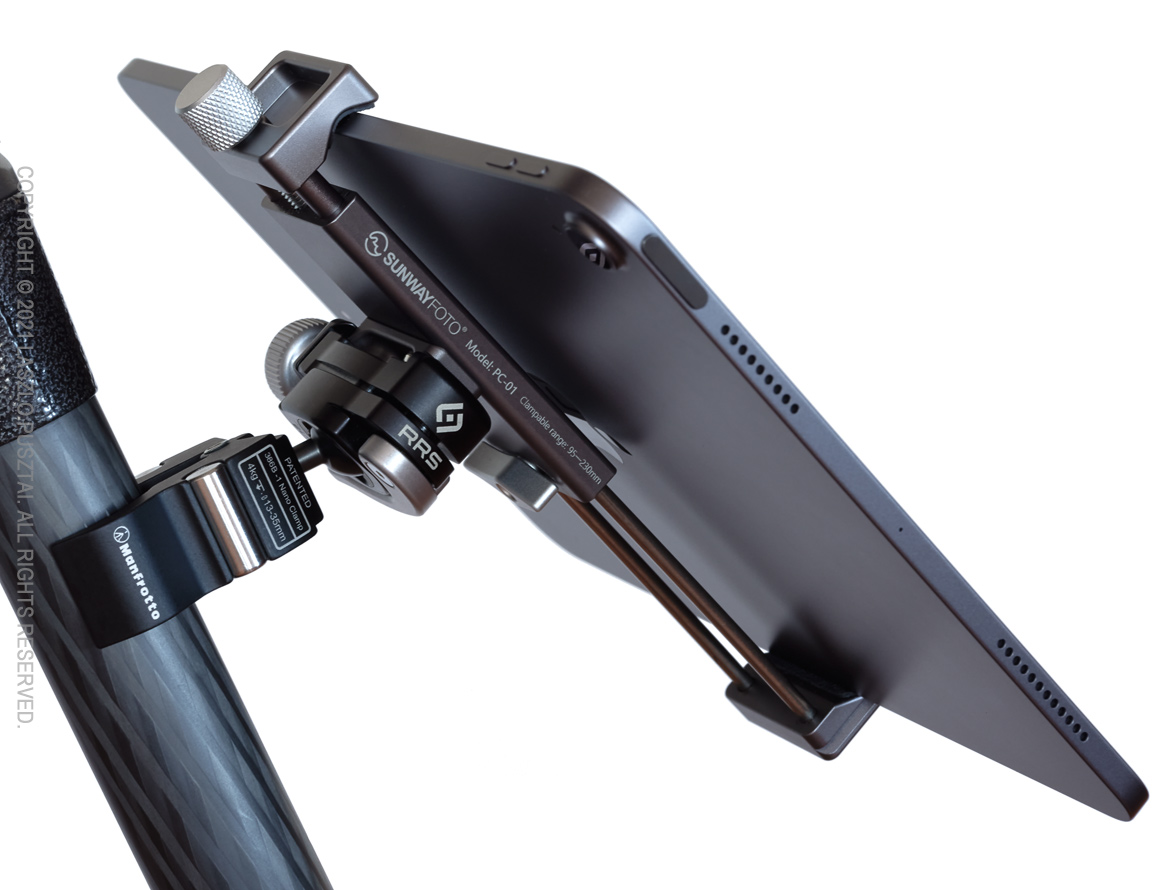
Mounting the iPad was a headache, though. Generally I’m not happy with buying stuff made by Chinese copycats, but it turned out that nobody else makes any competent iPad holder… So I ended up getting a Sunwayfoto PC-01 tablet bracket.

Attaching the iPad bracket to the tripod was an easier job to accomplish with products from reputable European and US manufacturers: my choices being the Manfrotto 386B-1 nano clamp and RRS’ BC-18 micro ball head.

You can see the completed mounting solution below.

The lightweight mounting solution.

The torque the whole iPad assembly exerts on the ball head’s screw is significant, and could easily loosen it from the Manfrotto clamp. So a drop of Vibra-Tite Blue 121 or Loctite Blue 242 removable threadlocker is highly recommended to avoid issues down the road.

You don’t want your iPad to land on a sharp rock after all…

Another possible source of inconvenient moments is the nano clamp itself. If you don’t tighten it enough. Or if it breaks… iPad meets a sharp rock situation again.

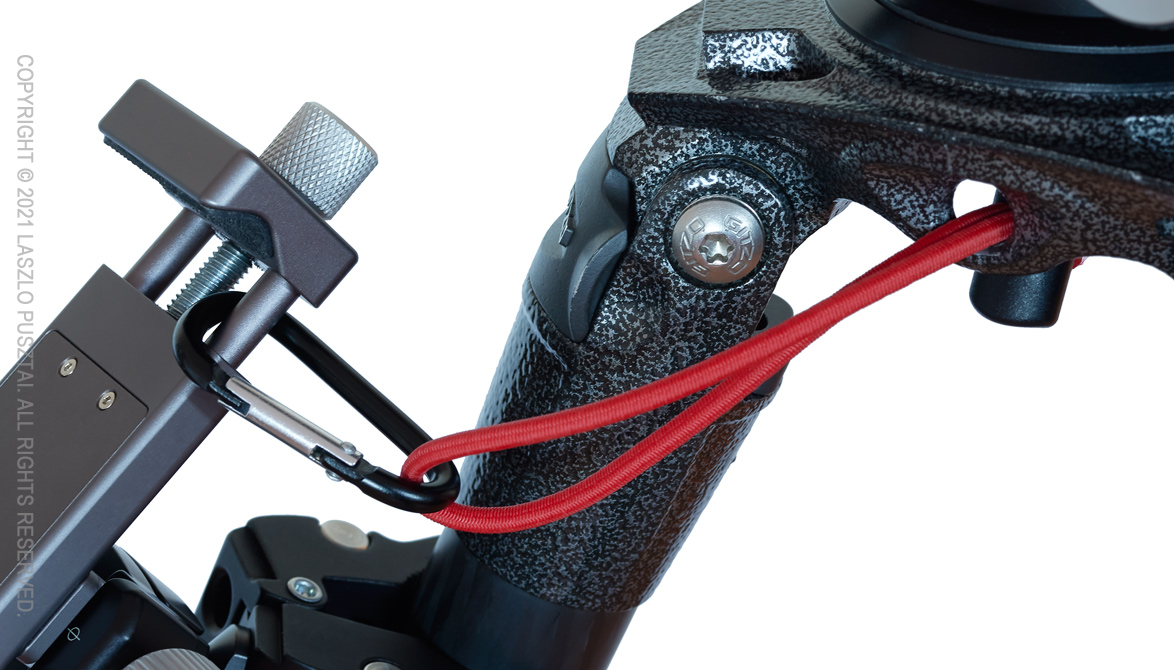
To mitigate this risk, I’m using a simple security tether between the tripod and the iPad bracket.

Security tether.

It is just a Think Tank Red Whip and a small carabiner.

Speaking of tethers, I have to talk about the cables that connect the iPad with my cameras. In plural, since I’m using a 5DS R and a R5 for tethered shooting, both having different USB connectors.

We learned through the years of supporting camera connectivity apps that you should avoid cheap Chinese junk cables and adapters. They are unreliable and most of the time do not work at all. We maintain a list of certified cables and adapters, and can’t stress enough the importance of high quality cabling.

With the R5 I’m using the cable that was included in the box, and with the 5DS R Cable Matter’s 1m long USB-C to Micro B 3.1 cable is my preferred choice.

Why not Wi-Fi? Well, Canon’s Wi-Fi connectivity implementation is a pain to use and is significantly slower than USB. Not to mention that I prefer not to be surrounded by Wi-Fi smog while enjoying nature.

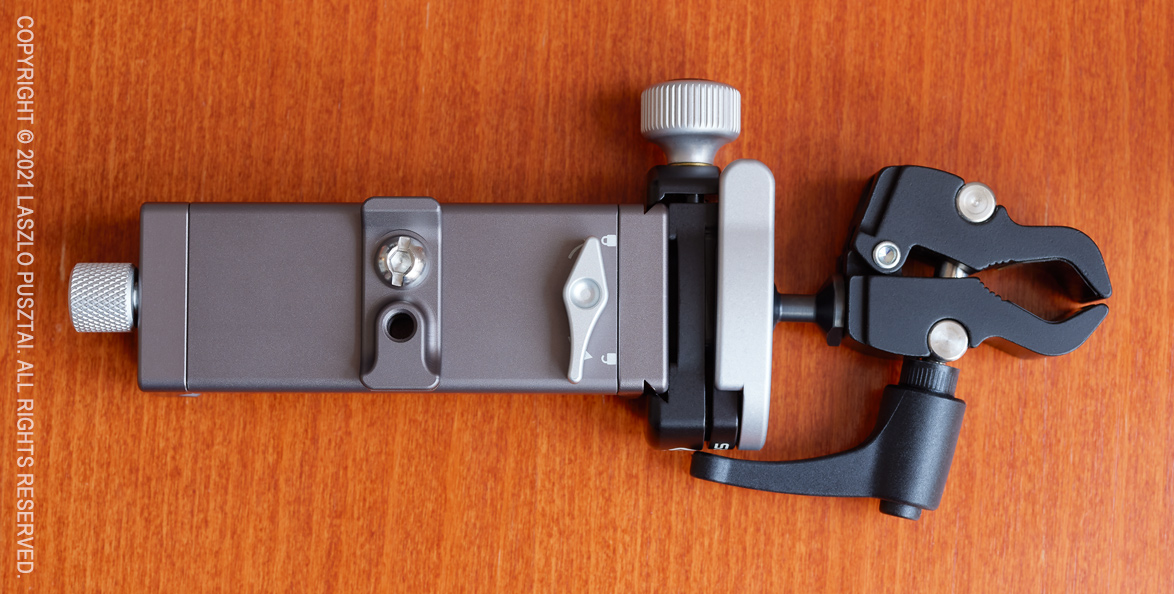
The whole mount packs relatively flat, which I can slip into an outer pocket of my backpack or shooting vest. Even the iPad fits easily into a side pocket of my old Domke vest.

iPad holder and mount packed flat.

How light it is?

The holder and the mount (as shown above) plus the security tether weighs 357 grams. Add 458g for the iPad Air 4 and 83g for the two cables. 898g in total. Not bad for a pro-level tethering solution.

You may have noticed, but I’d like to mention it explicitly: with Kuuvik Capture you don’t need additional boxes, batteries, etc. Just the iPad and a USB cable. Or the camera’s built-in Wi-Fi in case wireless floats your boat.

I’m really happy with this solution, which perfectly augments the app’s ease of use.

Honestly, I feel like I’m cheating when shooting with this rig. It’s so easy to accomplish previously complex tasks, such as obtaining perfect focus with high-megapixel cameras or exposure evaluation. Not to mention the sheer joy of seeing just-captured images on a large screen.

  ☕ ☕ ☕

Did you enjoy this post? Consider buying me a coffee if so.