Preventing Photos Auto-Start

If you are a photographer using anything but an iPhone for your work, chances are that the Photos app drives you nuts. I mean its aggressive nature to jump on any media or camera connected. Although you can disable this auto-start for cameras one by one, CF and SD cards are still an issue, as there’s no way to disable the auto-start for them on the user interface.

So here’s the trick: disable it globally. Open Terminal and copy & paste the following commands:

On OS X 10.10 (Yosemite):

defaults -currentHost write com.apple.ImageCapture2 HotPlugActionPath -string ""

defaults -currentHost write com.apple.ImageCapture2 LastHotPlugActionPath -string ""

On OS X 10.11 (El Capitan):

defaults -currentHost write com.apple.ImageCapture disableHotPlug -bool YES

You may need to log out and back on for the changes to take effect.

Creating a Wi-Fi Access Point on OS X

With Kuuvik Capture 2.2 around the corner, I’m going to post a few short tutorials on wireless “tethering” setups. Yes, the wireless connection option will make a return in version 2.2!

So let’s start with a solution to one of the most aching issues.

Imagine the following situation: you are out in the field, photographing an old castle. You want to place the camera on a crane to photograph from a high vantage point. The crane is higher than your longest USB cable can reach, so wireless connection would be the most appropriate solution.

First obstacle: all Canon Wireless File Transmitters (both built-in ones and external bricks) require an existing network to connect to in EOS Utility mode. Yes, it’s utterly stupid, since in other modes they can operate as an access point and create their own network. But other modes simply suck in terms of remote control features.

Back to our example: there’s no phone coverage (for the Personal Hotspot trick), there are no nearby networks of any kind to connect to. You could create an ad-hoc wireless network on your Mac, but setup is complicated and error prone (needs manual TCP/IP configuration on both the computer an on the camera), and in the last few versions of OS X there’s no way to create a secure Wi-Fi network (another utter stupidity). The lack of security is a total showstopper, so this isn’t the appropriate way to make the connection work.

There’s a neat trick, however. OS X has a built-in Internet Sharing feature that practically creates a Wi-Fi access point to share an existing network connection. The next obstacle is that you need the network you want to share to be in the “connected” state (think cable plugged in both to the computer and into a router). Unfortunately the built-in loopback interface (which is always connected and provides access to the local computer only) is not accessible from the Network preference pane in System Preferences (one more stupidity).

The key to the trick is to make the loopback interface appear in the Network pane. Actually, it’s pretty straightforward: launch the Terminal app and copy & paste the following two commands (working on both Yosemite and El Capitan):

sudo networksetup -createnetworkservice Loopback lo0
sudo networksetup -setmanual Loopback 172.20.42.42 255.255.255.255

Enter your password to allow these modifications if OS X asks for it.

Now your Network preference pane should list the brand new Loopback service:

network-loopback

It’s still listed as “not connected”, but don’t worry, that’s just a bug.

Side note: if you use multiple “network locations”, you need to repeat the above commands for each location. If you just use the Automatic location, then you can move to the next step.

Go to the Sharing preference pane, and on the list of services click Internet Sharing. If the service is already on, turn it off. Choose the Loopback service as the one you want to share your connection from. And share to computers using Wi-Fi.

sharing-1

You can set up the shared Wi-Fi network (the network we’ll connect the camera to) by clicking the Wi-Fi Options button. Here is the Wi-Fi Options screen:

sharing-2

The network name is your computer’s name by default, but I’d recommend to enter a simple alphanumeric name (containing no special characters), as Canon cameras have issues with displaying characters outside of the simple letters and numbers range.

All other options are the usual Wi-Fi setup options. A few notes though. Channels 1-11 use the 2.4 GHz band, while 36-48 use the 5 GHz band. Transmitters in the 70D and 6D only operate on the 2.4 GHz band, while the external WFT-E7 brick operates on both. The 5 GHz band is faster and generally has less interference from other networks and appliances operating in the crowded 2.4 GHz band. For security, choose WPA2 Personal (the other option is None, which is unacceptable).

Once the Wi-Fi options are entered, you can start the sharing service. To do it, click the check box in front of its name in the list. OS X may ask to turn on your Wi-Fi radio if it was off, and will ask your confirmation to start the sharing service. After the service has been successfully started you’ll see a screen similar to the one below:

sharing-3

IMPORTANT: due to an OS X bug, your selection in the share from list may change to another (random) network service. So you must check whether it still shows the Loopback service after each start!

The Wi-Fi icon on the menu bar will change to the sharing icon once the sharing service is ready to accept connections.

sharing-on

And that’s it! Your personal access point is now ready. The steps to configure your camera will be discusses in an upcoming post.

  ☕ ☕ ☕

Did this post help you? Consider buying me a coffee if so.

Fixing Extremely Slow rsync on OS X

Last night I moved out my photo collection from my MacBook Pro’s internal SSD to a neat little Samsung T1 USB3 SSD. And since Time Machine still can’t handle backing up external drives correctly (it removes the external drive’s contents from the backup when it is not connected), I created a small script to do the backup using the good old rsync.

Backup of the T1 goes to a dedicated AFP share on my FreeBSD server (shared using Netatalk). An Elgato Thunderbolt 2 Dock provides gigabit Ethernet connectivity for the MacBook Pro. I usually see file transfer rates in the 60MB/s – 110 MB/s range from this setup. So the 3MB/s average what rsync produced here was a bit shocking.

And the transfer rate jumped up to the usual range when I downloaded something from the Internet! And went down to 3 megs when the download finished…

It seems that the nine year old version of rsync included in OS X Yosemite can’t handle the OS’s network power management features correctly. When another app wakes up the net to full speed, it works fine, but rsync alone can’t do that.

The solution is embarrassingly simple: install rsync from the ports collection. Did that, updated my script, and presto, I suddenly get transfer speeds in the 50MB/s – 80MB/s range…

  ☕ ☕ ☕

Did this post help you? Consider buying me a coffee if so.

Keeping OS X Display Brightness Unchanged

In the previous installment in my monitor calibration series, I mentioned the need to keep monitor brightness unchanged after calibration – as any change to it invalidates the profile.

But what if I press the brightness control buttons on the Retina MacBook Pro (or on any other MacBook)? Should I immediately re-calibrate and re-profile? Well, there’s a slick trick.

MacBookBrightnessControl2MacBook display brightness is changed by default in whole unit steps using the brightness keys. But holding down Shift + Option while pressing the keys will change it to 1/4 unit steps – the same amount ColorEyes Display Pro (and other software) uses when controlling the display.

What I usually do after calibration and profiling is: increase the brightness by 1/4 unit, take note of the (previous) value, and immediately decrease it back to where the software set it. This way I could return the display to the calibrated state even if I had to change, or accidentally changed its brightness.

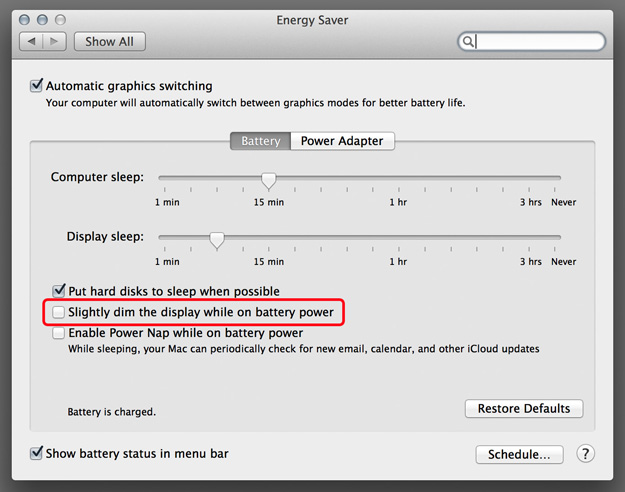
Another enemy of keeping the calibration intact is the display dimming preference of OS X – which tells the machine to slightly dim the display while running off of batteries. It might be useful for users not requiring color accuracy and consistency, but turn it off for calibrated displays (by default it’s on).

DisplayDimming2

In the next installment I’ll examine the differences between hardware and software calibration.