Canon EOS 7D Mark II First Impressions

When I first picked up the 7D Mark II at this year’s Photokina show, it struck me how similar it feels to the 5D Mark III. I thought that if image quality is there, I would definitely buy one. Due to this similarity with the 5D Mark III, I instantly knew that ergonomics and handling will be great. The only haunting question was image quality, but lacking any useful reviews, I had to place my order without knowing anything about it. My primary goal was to certify the camera for my ShutterCount app – and actually using it for photographing birds came as second. Purchasing blindly wasn’t that big risk, because if it somehow turns out to be something I don’t like, I would be able to easily sell it given the high demand.

And as you may guess, I really like the 7D Mark II. But being a perfectionist, I don’t think everything is as glorious as marketing materials may suggest. Some of my observations may look strange, or don’t even important to you and your style of photography, but this is what I think of the camera.

Handling

As I mentioned, handling is virtually identical to the 5D Mark III. I can switch between them effortlessly. The 7D is a tad smaller, and is on the edge of being comfortable in my large hands. Buttons and dials are almost the same on the two cameras, with two notable differences.

First is the lever around the joystick. This can be assigned to a few different functions. In my setup, it is used to switch AF point selection modes. This is a huge time and frustration saver, as I’m still unable to switch them with the M-Fn button without concentrating on what I’m doing. The problem on the 5D Mark III is that I have to press the AF point selection button, then use the M-Fn to switch the selection mode. There’s no way to toggle between those modes with M-Fn directly. But on the 7D Mark II the lever can be programmed to switch between these modes directly. This is a huge addition to the already great Canon user interface.

The other difference is not so great. On the 7D Mark II only the outer edge of the rear dial rotates, while on the 5D Mark III the whole dial (well, except the SET button) rotates. I find it way easier to handle the 5D Mark III style dial.

The use of LP-E6N (and LP-E6) batteries is a big plus. I have a total of four of those, and their small size as well as the small charger makes life much easier than with those giant 1-series batteries and chargers.

Firmware

While a well though out control layout is absolutely required to provide a good user experience, the software behind these controls is equally important. I generally like Canon’s modus operandi and menu structures, but find their cameras lacking in customization options. As a developer, I don’t get why they limit the set of assignable functions for some buttons…

The 7D Mark II is a combination of a step forward here and marketing bullshit there.

What is a step forward in my book is that you can program two buttons on the back of the camera to initiate AF. For example I generally use the AF-ON button in single point selection mode (or whatever seems appropriate at the moment), and the * button to initiate AF in automatic AF point selection mode with AI SERVO focusing. This is something I used extensively on the 1D Mark II a decade ago, and is a very welcome addition to the 7D Mark II. But here you can do even more: set AF customization parameters differently for the two buttons. This is a level of customization that I would expect in 2014. I wish that this feature will make its way to the 5D Mark III firmware in the future.

The other one is what seems to be designed by the marketing department. I’m talking about the intervalometer and the bulb timer. Nikons have built-in intervalometers for ages, and it’s great that Canon finally made a step in this direction, just the bad implementation renders it useless. You can’t use the bulb timer together with the intervalometer, and also can’t use mirror lock-up with the intervalometer. But I would only use the intervalometer in these modes… For example intervalometer and bulb timer together is required for executing astrophoto sequences. And I would love to use mirror lock-up and intervalometer together for taking all sort of exposure sequences. That is, the camera’s intervalometer implementation is totally unusable for me. It seems that I’ll have to use Kuuvik Capture‘s exposure sequencing features for the foreseeable future (well, as soon as Kuuvik Capture gets 7D Mark II support).

Image Quality

Let me begin with saying that I completely hate what the original 7D produces. Its images are soft, with a veil over the whole image. I had to massage 7D raws way too much to get results up to my standards. I have two other contemporary APS-C Canons, a 100D and a 650D, plus an older 50D. None of them is great in the image quality department. So I was very curious to see what the 7D Mark II can produce.

What delayed this first impressions post a few weeks is that I needed a version of Capture One 8 with 7D Mark II support. I downloaded Canon’s DPP, but I could cry from what I saw with that. Lifeless, flat, soft images. Even with 5D3 files. Lightroom was marginally better. Then Capture One 8.0.2 arrived and the smile returned to my face.

As a side note, if image quality is important to you, I would strongly recommend to check out Capture One.

I made a little test. Mounted my Sigma 50/1.4 DG HSM Art lens on both cameras, and shot an image at f/5 (to avoid diffraction effects on the 7D Mark II). I didn’t want to equalize angle of view and depth of field between the images, just pixel peep a bit. You can see crops of these below. Images are straight out of Capture One, with no tweaking of any kind.

5D3_1445_2822_crop

100% crop of the 5D Mark III image. Click the image for 100% view on non-retina displays.

Conditions were less than favorable. Flat light due to the thick cloud layer and strong backlighting above the road. Both cameras performed admirably. What surprised me are the rich and deep yellows from the 7D Mark II.

7D2_1445_0165_crop

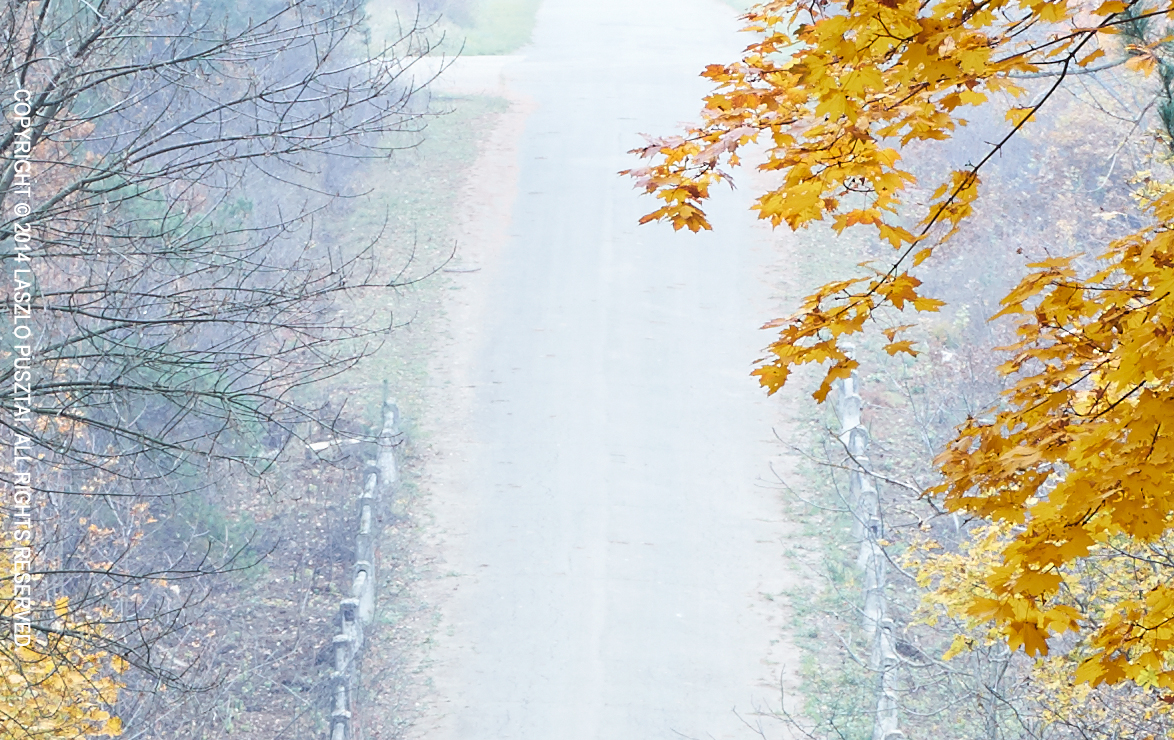
100% crop of the 7D Mark II image. Click the image for 100% view on non-retina displays.

No other surprises here though. The 20 megapixel resolution of the 7D Mark II is well above what top-of-the-line glass can resolve. You can see lots of empty magnification in the 7D image. The camera requires the very best glass available. I’m fortunate enough to carry some gems in my bag, but even with those lenses I would prefer a 15-16 megapixel resolution. Physics is physics, no matter how marketing folks want to bend reality. I would expect disappointing results with lower end glass.

This is a specialty camera. I plan to use it for birds and astrophotography. Both these genres need a wide open lens, so the very low diffraction limit (f/6.7 or so) is not an issue for me. It produces 1.6x more depth of field than the 5D Mark III at the same aperture, so I don’t have to waste light by stopping down for more DoF for birds up close. Not to mention that I can leave light-sapping teleconverters out of the equation most of the time.

Another thing I don’t understand is raving reviews about the camera’s high ISO capabilities. It’s a stop worse than the 5D Mark III, so ISO 1600 is the absolute maximum I would ever use. If I need ISO 3200, then the 5D3 comes out from the bag. The 7D2 shares the low ISO characteristics with other APS-C Canons, that is, ISO 200 has more dynamic range and bit depth than ISO 100. Speaking of dynamic range, it is a tad better on the 7D2 (11.2 stops @ ISO 200) than on the 5D3 (10.9 stops @ ISO 100). That is, you still have to watch your shadows.

In subjective evaluation, images from the 7D Mark II look markedly better to my eye than those from the 7D. They are also better than other APS-C Canons. But still, APS-C is APS-C, so A2 sized fine art prints are out of reach for this camera.

Closing Words

I haven’t touched AF performance and actual action use, because we are before the winter birding season. I’ll cover those as soon as I will have experience on the topic.

So, to summarize things: this is a very competent image making machine for action and bird photographers, where telephoto reach is at utmost importance. But forget it for landscapes, though. There are no surprises here that defy physics. The camera combines stunning handling with pretty usable image quality. While I would give an A to it as a camera (handling, AF and such), image quality only receives a B (because of the needlessly high resolution and its side effects).

Sigma 50mm F1.4 DG HSM Art First Impressions

I’m constantly looking for better lenses at my favorite focal lengths, and when Zeiss had announced that they are making an über 55mm lens, it immediately appeared on my shopping list. Its $4000 price while not prohibitive, I have very high expectations at that price point. And the Otus fails at two of them. I don’t think that the open distance scale is a good thing to have when I’m out in the field (except for generating trips to the service), and for $4000 I would expect 11-12 rounded aperture blades and perfectly circular aperture all the way down – like on cine lenses in this price class.

So I became very excited when Sigma’s new Otus competitor was recently announced. I read every possible review on the net (just to realize how shallow these became during the last years), and actually ordered the lens without having a solid idea how will it perform.

My copy finally arrived yesterday. I spent an afternoon on comparing it with my former 50mm lens of choice, Canon’s EF 50mm f/1.4 USM. Well, I can attest that most of the hype about the Sigma 50 Art is true.

Sigma50-5D3

Simga 50mm F1.4 DG HSM Art on the Canon 5D Mark III

I’m going to use this lens for landscapes as well as for astrophotography. While f/1.4 isn’t necessary for traditional landscapes, it definitely opens up new creative possibilities. And for astro, wider usable apertures are a must. The Canon 50/1.4 isn’t really usable until f/2.8. It’s a pretty solid performer at f/4 and up, but forget about making high quality images wide open.

The Sigma is in a different league wide open. At f/1.4 it’s a bit better than the Canon at f/2.8 – and while the difference becomes smaller, there’s an edge to the Sigma at every aperture. The Sigma is a pretty damn sharp lens. And this was one of the things I was looking for.

Its high contrast also increases apparent sharpness. But high contrast is not necessarily a good thing. It’s easy to increase contrast during post-processing, but plugged shadows and burnt highlights are not that easy to deal with. I read somewhere that the engineers sacrificed a little sharpness for increased contrast – personally I would be happier with a sharper and less contrasty optic. Given the shadow-challenged nature of Canon’s current sensors, I will need to keep an eye on the shadows constantly.

Color rendering is brutally different. Reds and especially greens come alive with the Sigma, where I needed substantial amount of work with the Canon during post. Shadows are also clean, no yellowish-brown tone to them. Overall colors are on the colder side – not something that can’t be corrected in post easily.

Except for the colder color, the 50mm Art reminds me to the magical Canon EF 135mm f/2L USM. That is, they are of similar size, similar weight, similar materials and build quality and produce similar superbly clean and detailed files. Yes, this isn’t your small and light 50mm – but are perfectly in line with other high quality primes in my bag (the 135 and the TS-E 24mm f/3.5L II). It’s not something I would bring to a vacation, however. The Canon 50/1.4 is a much better option for that.

I haven’t checked autofocus yet, as I plan to use Sigma in manual focus for 95% of the time. For manual focus, I would prefer a longer than 92 degree focus throw. I suspect that AF would be slowed down too much with longer throw.

What else could be improved on the 50 Art? Well, I would be happy to spend a few hundred more and get weather sealing. Rubber materials are a dust magnet on this lens, so a less dust attracting material would be great…

I’m very impressed with this lens. Something I didn’t feel since I got the Canon 135mm f/2L. At $950 it’s a steal (again, like the 135mm). If 50mm is something that makes your world go around, I highly recommend to give the Sigma 50mm Art a try.

Which Lenses Do You Recommend?

I get asked the above question quite often – only “which camera do you recommend?” being more popular.

Well, this piece isn’t the all too familiar “this is the best lens you must own, and here’s a link to buy it – which earns me a small commission” type. I’m not going to recommend any single lens here. But I will give you some tips on how to get an answer for this question from the only authentic source – yourself.

With freedom comes responsibility

The sheer amount of lenses available for a single mount could be overwhelming. For example Canon offers no less than 76 EF/EF-S lenses at the time of writing. And this does not include 3rd party offers from other manufacturers like Sigma and Zeiss.

The Canon lens lineup at the time of manufacturing the 100 millionth lens. Image courtesy of Canon.

The Canon lens lineup at the time of manufacturing the 100 millionth lens. Image courtesy of Canon.

There is a popular – but false – wisdom that you should cover every possible focal length. Just in case you need it. I must admit that as a newbie I fell into this trap too…

But why this trap exists in the first place? Because going this way is easy. It’s pretty damn easy to pick up two or three quality zooms and be “covered”. I’m not saying that zooms are inherently bad. There are situations (when your movement is restricted and/or you can’t change lenses) when they are indispensable. I’m just saying that picking up zooms on the idea of being “covered” is a bad method of choice.

Also zooms are great for my mom, but if you are serious about photography then you should be serious about angle of view – and thus lens – choice. That is, you should make informed decisions about the lenses you use. No, you shouldn’t trust and rely on information coming from the outside (blogs, friends, etc). You must check and evaluate your own work and yourself continuously and correct the mistakes along the way. Believe me, you will make lots of mistakes – but those will teach unforgettable lessons about your vision and your personality.

The goal is to find the glass that matches you vision. Both in angle of view and character. Yes, you’ll need to work and experiment a lot. But it will be fun!

Matchmaking tips

The following is a list of tips and techniques I found incredibly useful in evaluating my own work and vision. Chances are that they will also help you.

Borrow or rent. You have to see it yourself. You can’t trust reviews on the net. So instead of buying a given lens (which may or may not fit your vision) it is more economical to borrow one from a friend or rent it. But more important is to do some real work with it! Brick walls and pets doesn’t count (unless what moves your world is either brick walls or pets, of course). Use the lens for a handful of shoots. But do it at least in two sets, a few weeks apart. Evaluating the resulting images on the camera’s LCD also doesn’t count. Process them. Print them. Use them as you normally would use any of your images. If you can’t make a single good image with the lens, then it doesn’t match your vision, so it’s better to let the given focal length go. If you think that usability, max aperture, or any other aspect sucks, then look for an alternative with the desired parameters.

Simulate. Especially useful when you can’t borrow or rent a lens, or for first quick checks. If you have an iPhone/iPad/iPod, my Artist’s Viewfinder app lets you simulate viewing angles for tons of different camera and lens combinations. Or you can tape down the zoom ring on your existing zoom to simulate what it feels like to shoot with a prime. Or crop a wider image in Photoshop. With simulation you can get a feel, but don’t forget that it’s not the real thing. You should have the lens in hand to do a final check whether you match or not.

Check your existing work. This is a pretty powerful thing. As metadata in digital images record the focal length they were shot with, you can check your previous images whether you like or dislike a given focal length. Only finished work counts, however. You will have countless images with any given lens classified as crap. Don’t let them deteriorate the results. Also don’t forget to account for format differences! In my case, digging in Lightroom’s database revealed a (then) surprising fact: even if I used zooms, all my finished landscape images were clustered around three major focal lengths: 24, 50 and 135 mm (in full frame 35mm terms). It’s not a surprise now (four years later) that these are the focal lengths I always carry.

Buy the best you can afford. Great lenses will be with you for 10-20 years, or even more. They also tend to keep their value. But most importantly, they match your vision and style, and thus are vital to your work. Do yourself a favor and don’t be cheap! You’ll be grateful 20 years later…

Building an Astrophotography Rig

Building an astrophoto rig is like building a custom motorcycle: it’s expensive, time consuming and involves a lot of DIY. There are some outstanding parts available, but assembling them into a great tool isn’t trivial. You have to do lots of research. I decided to share my experiences along the way as I build my setup – and this is the first installment.

When I started this project, my goal was to be able to utilize the great primes in my existing lens collection and share the equipment to the greatest extent possible with my regular photography toolset. So there’s no telescope involved – I use my 500/4 instead for deep sky objects.

650D_1409_5103
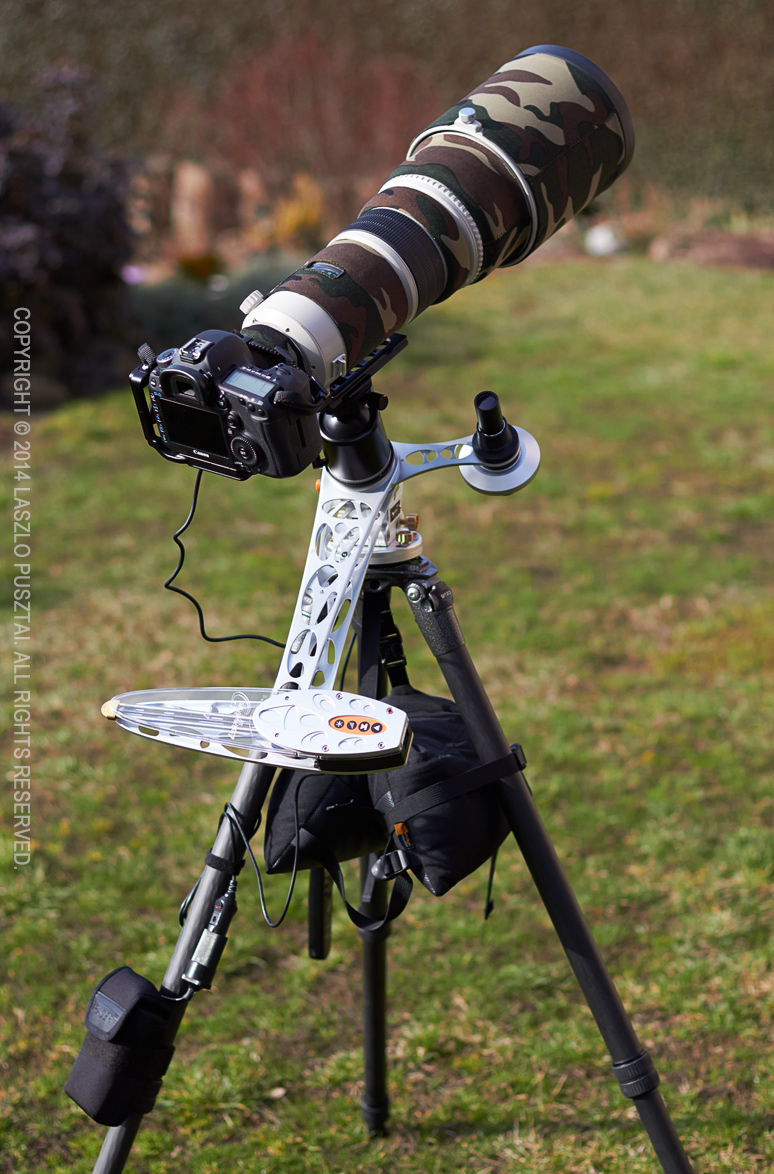
My current rig (with the 500 installed) is on the left. Let’s forget about the camera and lens for this post’s sake, and concentrate on what’s below them.

Basic Support

The central part of this setup is the tracking mount, which compensates for Earth’s rotation. This is a mandatory piece of equipment if you want to use anything other than wide angle lenses and short exposures.

I decided to go with the AstroTrac TT-320X-AG. This is a “barn door” type mount, where two arms open up like a scissors. This device is small and light, and provides the tracking accuracy of regular equatorial mounts weighing 20x as much or more.

Of course the AstroTrac is in equatorial arrangement: you have to align its rotation axis with Earth’s. To allow precise alignment you’ll need a geared head between the tripod and the tracker. A ball head won’t do it. AstroTrac also makes a head, called a wedge is astro parlance, the TW3100. This provides great controls for very precise adjustment and is lightweight.

A heavy-duty, stable tripod is essential. Fortunately it is not a new requirement for me – and I use a Gitzo 3532LS. This is a great tripod, and the ability to rotate the top plate is godsend for rough tracker alignment. To improve stability I extend only the upper (thicker) leg section and hang a beanbag on the top plate’s hook.

The top plate of the tracker is the home of my regular ball head, an Arca-Swiss Z1sp. With a breaking point somewhere around 50-60kg, this head can easily support even the 500mm lens. Just have to be careful with loosening the knob when the 500 is mounted.

Powering the AstroTrac

Well, this was the point where things started to look ugly. The AstroTrac mount needs 12V DC. They sell a very basic (read crap) AA battery holder, but using alkaline AAs is a no-go in my book. So I needed a rechargeable 12V power source. First though about using ten AA NiHM batteries (again, in a crappy holder), but charging lots of AAs is a pain in the butt. Another solution would be to use a 12V car battery. There are lots of car battery based astronomy targeted power sources around, but they weigh several kilograms – definitely not on the portable side.

Surfing the web for hours I ran into Tracer’s lithium polymer battery packs, and ordered the 4Ah model immediately. This is the block you see on the lower left corner of the above picture, Velcroed to the tripod. It sports a 12V cigar lighter plug, which connects with the AstroTrac’s fused cigar lighter cable.

This battery provides enough juice to run the tracker for up to 16 hours, and weighs just 330 grams. Problem solved.

Polar Alignment

To help in precise polar alignment, a polar scope is needed. And this is the weakest offering in AstroTrac’s product line. The tracker and the wedge are great, well built products, but their polar scope is a bad joke. It has an illuminated reticle on which you have to place three stars in marked positions. But this reticle is not collimated (centered) in the factory! To make things even worse, collimation can be done with three tiny grub screws – a totally unusable solution. Even after I replaced them with thumbscrews, I had to re-collimate it quite often. Another issue is that this scope is held in position with three tiny magnets. Just a small breeze, and the scope will fall. A small amount of pipe insulation around the scope solves this, but nevertheless this scope is sub-par. I had to look for a replacement.

650D_1409_5122And that was a competing tracker’s polar scope, from the Vixen Polarie.

Of course it won’t fit into the AstroTrac’s polar scope arm – the base of the Polarie scope is just 0.5mm wider that the hole on the polar scope arm.

My father machined a custom adapter that not only holds the scope in place, but I can screw it in securely.

Alignment with the Polarie scope is also easier. Much easier. Just set the current date, time and meridian offset on three dials, and place Polaris into the marked position on the reticle. Quick and easy.

The only downside is that the Vixen’s reticle is not illuminated, and you don’t see the markings by default. So I cannibalized the AstroTrac scope’s red LED illuminator, and shine on the front lens of the Vixen scope while doing the alignment. The background turns red, markings become visible, while I can still see Polaris well.

With the Polarie scope I can polar align the rig in just a few minutes – every time. It’s a difference like switching to a Mac from Windows.

Update 2/9/2015: now I’m using a much better solution with another Vixen polar scope.

Conclusion

I’m very happy with this rig. Polar alignment with the scope only is good enough for 2 minute exposures with the 500mm and the 5D Mark III – it might be good for even more, I just haven’t tried yet. For wide field work it’s more than enough. My only issue now is the number of clear, moonless nights…

  ☕ ☕ ☕

Did you enjoy this post? Consider buying me a coffee if so.

Thoughts on iDevice Wide Converters

Last week I added support for a bunch of iPhone/iPod wide converter lenses to the upcoming release of our Mark II Artist’s Viewfinder app. They were Schneider’s Series 2 super wide and wide iPro lenses as well as the wide lens in olloclip’s 4-in-1 offering. The picture below shows them: Schneiders on the left, olloclips on the right, and the ALPA ACAM in the middle. They are shown without their mounting cases (except for the olloclips).

A bunch of wide converters

A bunch of wide converters

While they are all suitable for viewfinder use, you can’t expect good optical performance from such lenses, period. Their manufacturers like to advertise them as “high quality”, “precision”, etc. Well, they might be high quality for someone who lo-fi filters the crap out of their smartphone images, but in my book they are not usable for real photography – even on smartphones.

They are all priced in the same range ($65-$100) with mounting hardware included. Schneiders usually occupying the higher end of this range.

Conversion factor and distortion

The bad news: advertised conversion factors can’t be used to compare these lenses. All super wide converters we measured exhibit huge (10% or more) barrel distortion. What gets in the marketing material is the magnification ratio with no distortion correction applied. That is, they count in the extreme edges, which will result in smaller factors.

But when distortion is removed, those extreme edges go away (as you can see in the first illustration in my previous post). The result: Schneider’s super wide lens that’s advertised as having a 0.45x conversion factor is a 0.5x lens is reality. ALPA’s lens, which is advertised as 0.5x (because I told them to) is a bit wider in reality than Schneider’s 0.45x.

The conversion factor also changes from device to device – and all the adapters I measured go wider when they are used on a device having a wider native field of view. For example, the ALPA is a 0.5x on an iPhone 4, but a 0.48x on an iPhone 5S.

ALPA ACAM mounted for measurement

ALPA ACAM mounted for measurement

If you look at conversion factors you’ll find out that there are two distinct classes: 0.5x and 0.65x. The Schneider super wide and the ALPA wide belongs to the first, and the Schneider wide and the olloclip belongs to the second. Is it important to note that the wide Schneider exhibits only a small amount of barrel distortion – and this lens would be usable even without correction. The olloclip is not, it has the same huge distortion as super-wides.

Sharpness

The sharpest is the Schneider super wide. The least sharp is the iPhone 4/4S variant of the olloclip – so much that I struggled for hours to find the checkerboard corners in the sea of blur and chromatic aberration.

Other aberrations

Schneiders are almost free of chromatic aberration. All others exhibit a huge amount of it in the corners. Centering is bad on all converters. The Schneider super wide also exhibits hard to correct mustache-like distortion. On the iPhone 5 for example this – together with bad centering – causes residual pincushion distortion on one side of the image after the barrel has been removed.

Mounting

Olloclips tend to slip off easily – except when you use it on an iPod, where a rubber inserts keeps the lens in place. Converters with cases are all solid, although I found Schneider’s iPhone 4/4S case too tight and hard to remove.

Mounting on the top of the camera (in the hot shoe for example) is another story. If you want to use the converter lens to compose stitched panoramas with the Mark II, you’ll need a holder that keeps the phone’s lens centered with the camera’s. This is to avoid parallax as much as possible. This is where things start to cost more. ALPA makes a holder that ships with the super wide converter lens and two cases. Other manufacturers, such as Cambo, also make holders (the Cambo includes a converter lens that the Mark II does not support yet). But be prepared to spend $800-$900 on these.

My favorites

I’m not a big fan of the Schneiders. I was confused about which case is compatible with which series lenses, and their site offers little help. Now I know that the series 1 cases can hold series 2 lenses, but not vice versa.

Actually I have two favorites. The ALPA rig (holder and such) is what I use. It offers the widest view, it’s easy to mount on my camera, has the sturdiest lens mount, and so on. All in all, highly recommended.

The other, the olloclip 4-in-1 on an iPod touch 5, was a surprise for me. I never thought how usable this combo could be. It’s lightweight, fast, and the rubber insert keeps the lens from falling. It can simulate lenses down to about 24mm (on full frame 35mm cameras). Not to mention that it’s the cheapest way to get into the wide converter world of the Mark II.

Wide Converters in Mark II Artist’s Viewfinder

Today we announced the beta of Mark II Artist’s Viewfinder. With the Mark II we took a new direction on how we handle wide converter lenses. In the past we just multiplied frame line positions with the wide conversion factor, not doing anything about the optical aberrations of the converter lenses. And believe me, they have many. Distortion, chromatic aberration, centering errors, you name it, the converter has it.

Most of these aberrations can be safely ignored as nobody takes real images with a viewfinder. One of them however, distortion to be exact, is a huge problem. It enlarges the center portion of the image and compresses the edges, making the effort of precise frame line positioning futile.

Given the immense power of today’s iPhone GPUs, we set out to get rid of wide converter distortion forever. And I’m pleased to tell you that we succeeded: the Mark II sports real-time distortion correction! Following is an example of its power.

Before and after distortion correction

Before and after distortion correction

ALPA’s ACAM Super Wide Converter exhibits about 11% barrel distortion (on the left). Which is completely eliminated in the Mark II (on the right). Yes, resolution suffers, but it is pretty much enough for viewfinder use. There’s also some darkening on the lower left corner (the converter vignettes heavily and asymmetrically on the iPhone 5s – which isn’t a big issue after the correction).

With the corrected view we can simulate super-wide lenses, which is a blessing for landscape and architecture photography. But I also regularly use the ALPA’s iPhone Holder together with the ACAM SWC as a viewfinder for my Canon TS-E 24 pano stitches. Here’s a screenshot I took on my old iPhone 4 while composing The Circle.

IMG_1631

Composing a stitched pano

Note that the iPhone 4 isn’t fast enough to do the correction at full Retina resolution – all other supported iPhones (4S/5/5S) are.

At launch we’ll support ALPA’s ACAM SWC, but the lab and the measurement technology is ready, and we’ll add adapter/device combinations as we measure them. On the device front, iPhone 4/4S/5/5S are supported.

So if you regularly shoot wide, or want to get a tool that allows you to visualize tilt/shift stitches, then head to the Mark II’s site and sign up for a beta. Seating is limited, so hurry! Then it’s time to order an ACAM SWC from ALPA.