One of the cornerstones – maybe the most important – of Technical Camera is its album handling. While the app still uses Photos for its image storage (keeping its iCloud sync and myriad other features), what is does is quite different from what you are used to. Instead of pouring everything into All Photos and require either you or artificial intelligence to navigate huge piles of accumulated images, Technical Camera always shoots into a well defined album. That is, the image captured is separated from the rest the very moment you press the shutter.
That well defined album is something you create for your specific purpose. Purposes could include different shooting locations, different projects you are working on (like a 4×4 build or your new garden), or – courtesy of my better half – the things you need in everyday household management: well-tried/favorite stuff, garage sale, recipes, meter readings, shopping list, and so on. I guess you grasped the idea by now.
The end-product of these purposes is quite different. For example I usually don’t want to reveal my home’s location in images uploaded to buy&sell forums, so in the past either had to manually disable location services before taking the image or manually remove the GPS coordinates later. And then there’s the question of high megapixel images. They are a blessing when you want a decent print, but are a curse when you need to transfer them quickly, for example via satellite line to your news agency. Similarly, wide color is a great thing until you encounter a photo printer that’s unable to handle it resulting in 1500 awful-looking vacation prints.
You can define your albums with the first few items of the app’s menu.
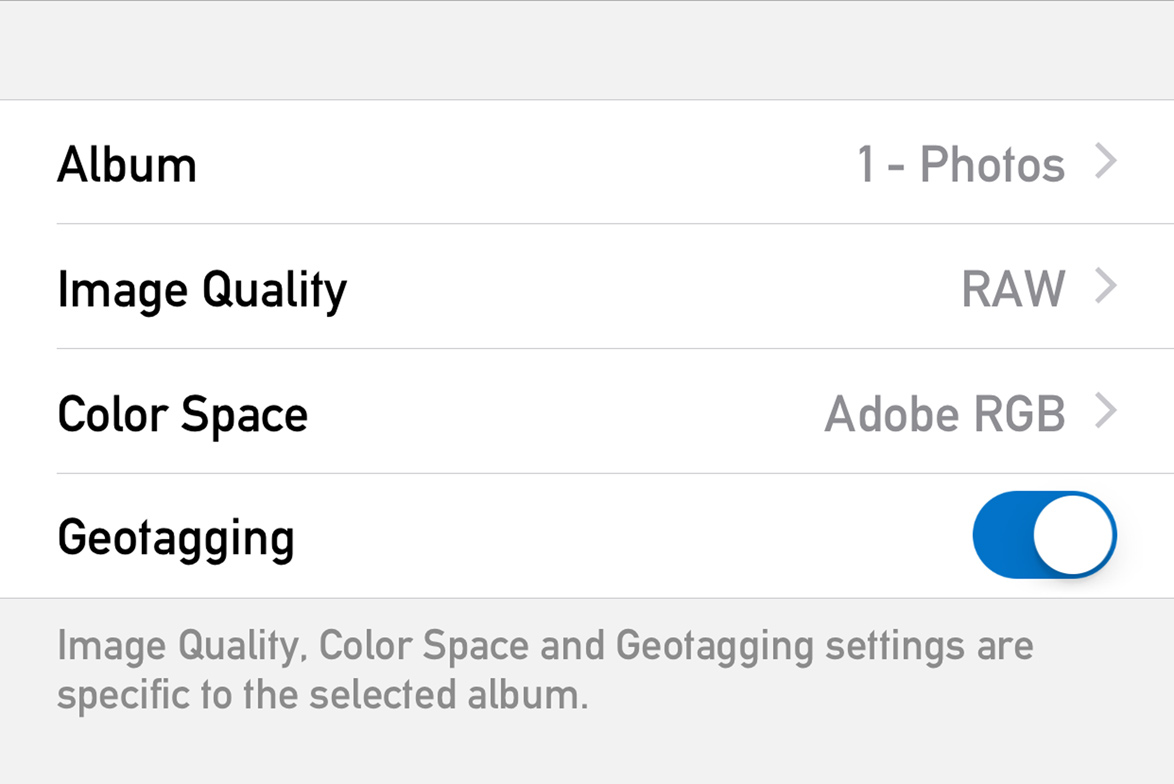
My album for RAW images
I tend to begin my most used album names with a number, so that they will be on the top of the (alphabetically ordered) album list. Here I set image quality to RAW, and want wide color capture, preserving the most information. Adobe’s DNG specification does not support Apple’s Display P3 color space, so use Adobe RGB here (more on this issue in a later post). Note that color space selection is available only on devices capable of shooting wide color images.

Super tiny 800×600 images for visual notes
Another album of mine is the visual notes. I need the smallest possible size for this purpose, with no geotagging and the smallest color space.
Stop here for a moment. These images are just 460k pixel, and in real life they tend to be up to 20x smaller in size than regular JPG files produced by the same device. Which equals to 20x less data going through your mobile connection if they are shared. That is, 20x less cost (for this part of your data usage). These tiny image go through quite fast even if you exhausted your data allowance and your transfer speed gets limited.
Or even the recipient of your image has limited bandwidth. I heard people complaining that their data allowance was completely used up by “friends” sending large unsolicited images…
So you have a bunch of albums created for your chosen purposes. How do you access them quickly? I almost always know the moment I pick up the phone to take a photo which album should be used. But since mind reading is not part of the iOS feature set, there needs to be a way to choose the album, preferably faster than going into the menu. Technical Camera has two features to facilitate the quick album switch.
One of them is the “A” Smart Function Key. It is part of the default Smart Function Key assignment. Tap it, tap the name of the album, and done. When Technical Camera starts it will display the name of the currently chosen album for a short time. Same in case of album changes, so you can always be sure where your images are going. The other is home screen quick actions.

Home screen quick actions
Here the app lists the three last recently used albums, plus you can go directly to the album chooser if the album you want ran off the list.
There’s one last thing I’d like to mention. The app creates an album named Technical Camera when you run it for the first time. It is safe to delete this album after you created your owns. You can delete an album from the Photos. You can even delete the Technical Camera album in Photos, but the app will re-create it if that was the last album you used. If you want to get rid of it, select another album in the app, then delete it. Please note that the Technical Camera album remains listed in the album chooser even if it’s not present in Photos any more. This is because it is a fallback/last resort album in case all others are deleted.
Technical Camera is available for pre-oreder now on the App Store, at a 30% discounted price. It will be released on June 12.
 Step 1/a : Cameras having either a Wireless communication settings or Built-in wireless settings menu, the Clear settings item is on that menu.
 Step 1/b : Older models hide the clear function in a different place: go into the Wi-Fi function menu and press the INFO key. The resulting General sett. screen will have it. Note that the camera’s network (MAC) address is also displayed here. If you use MAC address filtering on your Wi-Fi, you should enable access for this address.
 Step 2 : First choose Wi-Fi settings (or Wi-Fi/NFC settings) from the menu.
 Step 3 : Choose Enable to enable Wi-Fi support. Be aware that enabling Wi-Fi may disable the USB port on the camera, so if USB stops working after this, you need to come back here and disable Wi-Fi. NFC is not supported on Apple devices, so I recommend to turn it off when your camera has that option.
 Step 4 : The camera may ask for a nickname. There’s no other option here, but to confirm that you will provide one. It doesn’t matter what the actual nickname is. Our apps does not use it for anything at the moment. I usually recommend to accept what the camera offers.
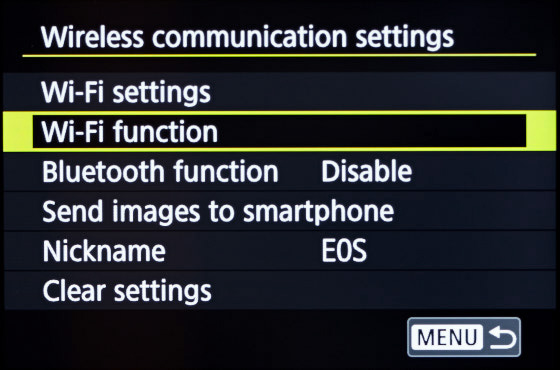 Step 5 : Choose Wi-Fi function to begin. Note that the location of the Wi-Fi function menu differs from camera generation to generation.
 Step 6 : You must choose Remote control (EOS Utility), even if the app is running on an iPhone or iPad. The camera will think it’s talking to EOS Utility, when in reality it will talk to our apps. Pressing the INFO button on this screen will show the network (MAC) address of your camera. If you use MAC address filtering on your Wi-Fi, you should enable access for this address.
 Step 7 : Newer devices will show you this screen. Since you are connecting for the first time, choose Register a device for connection. Later on, you can recall specific settings here to quickly re-connect with different apps on different devices (but that’s a topic for another post). If the screen is skipped by the camera, don’t worry.
 Step 8/a : On newer Canons, choose Switch network at this point.
 Step 8/b : Older models will present the Connection method screen, where you should choose the Select a network option. Even more older ones will call the Select a network option as Infrastructure mode. On these more older cameras you will also need to choose Find network on the subsequent screen.
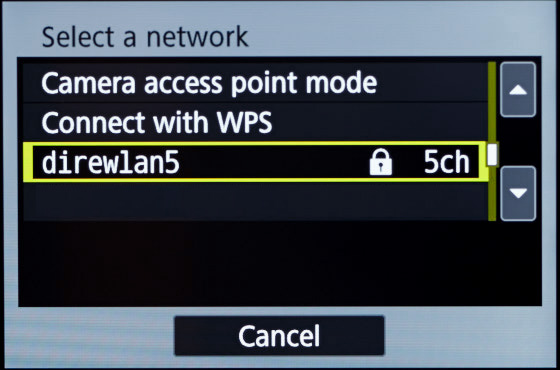 Step 9 : Choose your existing Wi-Fi in the next step. Forget about Camera access point mode (described just above) and WPS/PBC. Choose the network your iPhone, iPad or Mac is connected to. A word of caution though. Canon’s Wi-Fi implementation is unable to handle Wi-Fi roaming (that is when you have multiple Wi-Fi access points in the house). Each access point will appear as a different network here, and chances are that the camera will pick a wrong one even if you are selected the correct one. Try the pairing procedure close to each access point to see which one the camera sticks to if you experience connection issues.
 Step 10 : Older models will bother you with a question about the key format. I’ve never seen a Wi-Fi network in my entire career that hasn’t used a textual password, and Canon also realized the uselessness of this option and eliminated it from newer cameras. But you should choose Enter 8-63 ASCII characters if the camera insists.
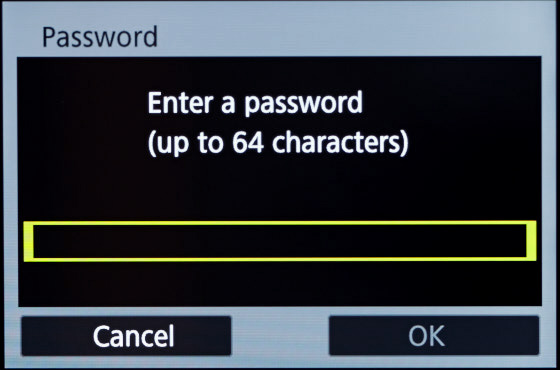 Step 11 : Enter the password for your Wi-Fi network. Again, if you use MAC address filtering, you will need to allow access for the camera’s MAC address, otherwise this screen will not appear or the password will not be accepted.
 Step 12 : Choose Auto setting to get the IP address (and other basic networking parameters) from your router automatically. Just line your phone does.
 Step 13 : This is a “this page is left blank intentionally” kind of screen… Choose OK.
 Step 14 : The camera now entered pairing mode. If you haven’t done so, put ShutterCount or Kuuvik Capture into pairing mode. Don’t let the message fool you, do not start EOS Utility – it’s not needed, and would just cause trouble. The camera will think that it talks to EOS Utility when it talks to our apps.
 Step 15 : This last screen confirms that the camera found the app. Choose OK and enjoy the app! Again, don’t let the message fool you. The camera seems to think that everything is a PC. If your camera prompts for saving the newly created Wi-Fi settings at this point, choose SET1.
 The app provides the three shortcuts you see on the screen shot.
 These enhancements are also allow us to detect when someone attempts pairing in the wrong pairing mode.


