iPhone 11 UWA Camera : Disturbing Discoveries

After just spending a day’s worth with the iPhone 11 Pro ultra wide angle camera, I’ve discovered a few things everyone should be aware of. I’m rather tired of Apple’s half-assed approach to everything photography related. This is not a whining of a 20-something reviewer. This is from someone who wasted months of his life to transform Apple’s incomplete, amateurish APIs to something suitable for professional photo apps, and wrote exposure calculation, image encoding/decoding/display and color space transformation code along the way.

To anyone reading this at Apple: I’m open to provide you with consultancy to help get your act together and make a truly pro-level camera device / API.

No RAW

Take a look on any JPG file from the ultra wide camera. You’ll see heavy smearing and exaggerated chromatic aberration as you approach the corners. These are telltale signs of distortion correction going on (I have quite a lot of experience in this since I wrote the world’s first wide angle converter real-time distortion correction code on iOS for the Mark II Artist’s Viewfinder six years ago).

Which means that the laws of physics still apply, and supports my suspicion that the ultra wide angle camera in fact has a pretty awful tiny lens, with huge amount of distortion. And Apple doesn’t want to advertise this, so rather turned RAW capture completely off for this camera. Why? Leica, Nikon, Panasonic all do software distortion correction for expensive lenses, and the photographer at least have the freedom to correct it or leave the distortion in place for artistic purposes. (That I would never buy a 5 grand lens that require distortion correction is a tale for another day.)

The professional approach would be to provide RAW capture, and include distortion correction data inside the DNG so that RAW converters could pick it up (with the WarpRectilinear opcode).

2-3 Stop Vignetting
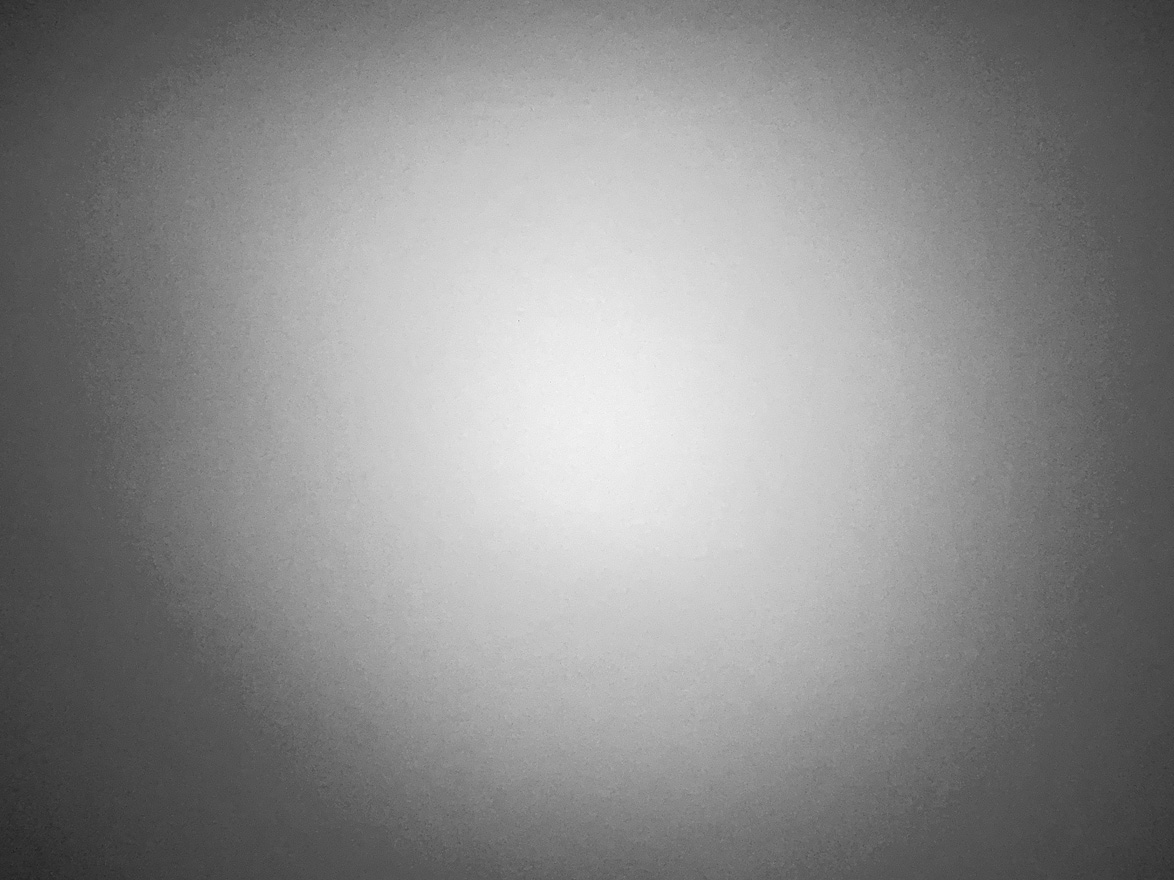
iPhone 11 Pro Max ultra wide camera vignetting

Now seriously. When one does distortion correction, why vignetting correction isn’t in place is beyond me. The above shot is just a wall shot under daylight, and not something suitable for exact measurements. I might do it later on, but currently this is enough to illustrate how much vignetting the image suffers from.

Again, the professional approach would be to correct this in JPG images and live video stream (or even better, provide an API to be able to control the correction), and include the necessary correction data inside the DNG files (FixVignetteRadial opcode).

No Focusing

This camera has a fixed focus lens. Read: no focusing of any kind. With such an ultra wide lens, the lack of focusing ability is mostly disguised by huge depth of field. But don’t expect to use it for ultra wide closeups.

Conclusion

Anyone touting this camera as a professional grade, DSLR (or even medium format) contender must live in a reality distortion field, powered by a huge marketing budget. Over-processed Apple JPGs suck. They always sucked. Not having proper RAW capture on the ultra wide camera is a huge drawback of the iPhone 11 series, hindering their usability for professional image capture.

  ☕ ☕ ☕

Did you enjoy this post? Consider buying me a coffee if so.

Kuuvik Capture 3.2 : The Dual Histogram

The very first Kuuvik Capture release introduced RAW histograms in an attempt to provide a tool for judging exposure more precisely than what regular histograms are capable of. I even wrote an article on the merits of having a RAW histogram. The conclusion of that article was that despite you have a RAW histogram, white balancing could clip channels in the converted image even if everything was fine with the RAW; so you need to see both the RAW and the processed histograms (preferably in your RAW converter) for the final decision on your exposure.

While my former article revolved around the white balance issue, other image processing parameters, like picture style and color space, also have heavy influence on histogram precision and usability. Making to see both histogram types a fundamental need. Not to mention that launching a RAW converter is not always convenient to do.

So version 3.2 sports a new Dual Histogram tool to show Kuuvik Capture’s RAW histogram along the usual one generated from processed data.

For images, the processed part is based on the JPG preview that every RAW image contains (this is what Kuuvik Capture displays, and this is the source of the histogram shown on the camera’s LCD). This represents how the image was processed by the camera. Your RAW converter will almost certainly convert it in a different way, so the final word on exposure still belongs to the converter. But the camera’s interpretation gives a solid starting point.

The processed histogram also indicates the image’s color space. Different color spaces have different clipping points – more on this later.

You can clearly see on the example how white balancing influenced things. You’d be in trouble having made a decision solely based on the RAW histogram in this case – the blue channel would be almost completely clipped. The example belongs to the original of the following photo (that is, before contrast stretching and other adjustments).

Ice Abstract

For live view and movie recording the camera always serves video frames in sRGB – even if you set your camera to Adobe RGB. But why is that important? Well, it’s time to talk about the effect of color space choice on histograms.

Color spaces vs. histograms

I made two photos of a regular ColorChecker chart. One with setting the camera to sRGB and another with setting it to Adobe RGB. Lighting and exposure were the same.

As you can see, there’s absolutely no clipping in the RAW data. And there’s no clipping when converted to Adobe RGB. But in sRGB both highlights and shadows are clipped! So live view (which is always in sRGB) may show some clipping while Adobe RGB not. And even a histogram from an Adobe RGB conversion might show clipping while there’s absolutely no clipping in the image when converted to ProPhoto RGB in Capture One.

I’d recommend to treat these processed histogram clipping warnings as different levels. The sRGB warning in live view goes off first, this should ring a bell in your head to watch more closely after taking the image, as there may be a problem. After taking a picture, if Adobe RGB shows clipping, then it’s time to either check it in your RAW converter or back off a little bit.

But RAW histogram clipping warnings are always hard facts: indicating unrecoverable data loss.

The above example explains why I recommend to set your camera to Adobe RGB: to prevent premature clipping in histograms displayed on the camera’s LCD.

A few words on JPG support

JPG files slowly become a first-class citizen in Kuuvik Capture. The JPG processing engine in version 3.2 is up to 5x faster than previous releases. This speedup is what allows efficient histogram generation and made Dual Histograms possible. JPG histogram display was also a requirement for a JPG-only workflow, which was high on our feature request list. And now it’s fully supported as you’ll see in my upcoming post.

Kuuvik Capture 3.2 is available on the Mac App Store. It is a free update for existing Kuuvik Capture 2.x and 3.x users.

Why iPhone RAW is a Big Deal

iOS 10 brought the capability to get the RAW image data from the camera and save it as a DNG file. It elevates the quality of iPhone images to a whole new level (for those who care). The following image tells it all.

Click the image for actual pixels display on non-Retina screens

Click the image for actual pixels display on non-Retina screens

On the left is how the iPhone renders the image, on the right my version converted from DNG and tweaked to taste in Capture One. Both show the actual pixels (100% magnification). Red areas are the overexposed parts. The images were captured as RAW+JPG in the upcoming Mark II Artist’s Viewfinder 5.0, so they represent the exact same moment.

With shooting RAWs you can avoid most of the pitfalls of iPhone image processing (I know them from experience):

  • Over-sharpening, which ruins images with already high contrast edges, such as tree branches against the clear sky.
  • Excessive noise reduction – usually on an unnecessary level, even at ISO 25. You know, the blotchy look at 100% which looks downright ugly.
  • Unrealistic color. Apple processes the images for punch, which is good for making your friends envious on social networking sites, but is a problem when you want to actually use them (the images, not your friends) as real photographs.
  • Sometimes overdone light falloff correction. You know, when the sky is brighter in the corners than in the center.

You also get more headroom for recovering overexposed areas (they are also better by default because of the lower contrast), but on the other hand you need to correct corner light falloff by hand.

To my eye the difference is so large that I won’t use JPGs any more when I’m photographing with the iPhone (which happens a lot, since it’s always in my pocket). No, they are not challenging DSLR (or even large sensor point and shoot) quality, but are way more usable than the JPGs.

Dual Pixel RAW and Kuuvik Capture

Dual Pixel RAW is Canon’s new invention that will see its first release with the EOS 5D Mark IV. There’s some vague marketing info floating around, but haven’t seen a concise description of these files yet. So while updating Kuuvik Capture’s (websitemy posts) RAW decoder to support the 5D Mark IV, I had a chance to dig deeper into Dual Pixel RAWs.

To understand the following discussion, you need to know how Canon’s Dual Pixel AF works, especially how these Dual Pixels are divided into two separate photodiodes. This article by Dave Etchells gives you a thorough explanation.

What is a Dual Pixel RAW file?

Normal CR2 files contain the following sections:

  • Metadata
  • Previews
  • RAW data

The DPRAW file is a CR2 file that contains one more additional section:

  • Metadata
  • Previews
  • RAW data
  • DPRAW data

This organization have a very important implication. Any RAW processing software that does support the normal 5D Mark IV files will be able to open DPRAWs. If the app is unable to interpret the DPRAW data part, it will simply ignore it and will work with the file as a normal RAW. There’s no risk or penalty in taking DPRAWs (besides the huge buffer drop from 21 to 7 frames).

The DPRAW file contains the normal RAW data section to make this compatibility possible, plus one side of each pixel in the DPRAW data section.

The RAW data section contains pixel values with the sum left and right sides of the photodiode, while the DPRAW section contains pixel values from just one side of each photodiode.

The RAW data section contains pixel values with the sum of left and right side photodiodes, while the DPRAW section contains pixel values from just one photodiode of the two.

But how do we get the other side of each pixel to let Dual Pixel aware processing apps do their tricks? It’s easy: since the RAW pixel value is the sum of left and right pixel sides, just subtract the DPRAW pixel value from the RAW pixel value.

This is an unusually clever implementation from Canon, where I’m used to see all kinds of inflexible hacks that look like as if they were designed in the 1980s.

Size-wise, DPRAW files are slightly less than double the size of normal RAWs (since metadata and preview images are stored only once).

How will Kuuvik Capture 2.5 handle DPRAWs?

Not being a RAW converter, Kuuvik Capture needs the RAW data for two purposes: the RAW histogram as well as shadow/highlight warnings (the image displayed on the screen comes from the preview embedded in each CR2 file). For these the RAW data section is totally sufficient, and the app will ignore the DPRAW data section if present in a CR2 file.

The app will display normal RAW and DPRAW files equally fast, but downloading DPRAW files from the camera will take almost twice as much time as normal RAW (because of their larger size).

I assume that there will be a possibility to switch the camera into DPRAW mode remotely (I can’t be sure until my rental unit arrives). If that is the case, then a new preference will let you specify whether you’d like to shoot RAWs or DPRAWs.