Introducing Kuuvik Capture

kc-IconLadies and gentlemen! It’s my pleasure to introduce something I have been developing for the past 15 months: Kuuvik Capture.

It’s simply the best tethering software for Canon that I’m aware of, sporting never before seen features like simultaneous magnified live view, a really usable raw histogram (that is, gamma corrected but with no white balancing applied), a highly useful bracketing monitor, and lots of other pretty neat stuff. The product entered public beta today, and I highly recommend you to visit the product’s homepage, sign up for the beta program and grab a copy – it’s completely free at the moment.

In the coming weeks I’ll publish a couple of technical posts about how the app works and will shed some light on a few controversial digital photography topics. So stay tuned!

kc-short-reshoot

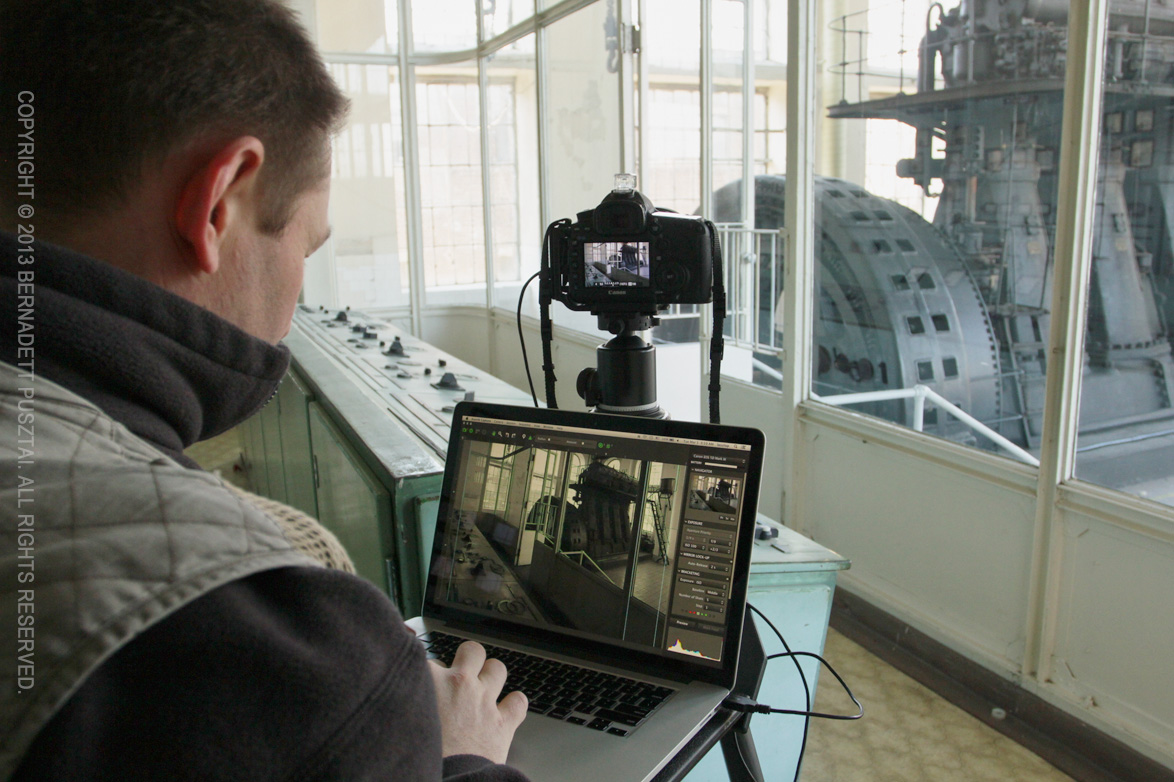
Me re-shooting Generator Seen from the Control Room with Kuuvik Capture

But for the remainder of this week, I’m going to relax a bit, celebrate my 40th, and play a little with my new Canon 135/2 – of course tethered to Kuuvik Capture.

Zooming Out – The Move to an All-Prime Setup

I have been shooting with Canon’s L series zoom lenses (the 17-40, 24-70 and 70-200 IS to be exact) for almost a decade. Everything seemed fine, I made several great images with them. The seduction began on a cold January night in Norway two years ago – I tried a friend’s TS-E 24. I was immediately sold. So much that I didn’t want to put the 24-70 on the camera any more. Bought a TS-E 24 later that year and the 24-70 started to collect dust.

Floors

Floors, 100mm f/2 on a 5D Mark II

The final nail in its coffin was a vacation in Sicily last year. To travel light and be able to enjoy the vacation itself besides shooting, I bought three primes. In addition to having image quality that puts the 24-70 into shame, I really loved to work with them.

There was something that inspired my creativity – maybe the discipline of not being able to easily change the shot’s angle of view and forcing me to move around, maybe the freedom from having to think about focal length choices. I don’t know, I just like the process and the results.

Last year I sold both the 17-40 and the 24-70 and just used the two 24s and the 50. And an interesting thing started to materialize: instead of thinking about which focal length should I use I started to see in 24mm and in 50mm. When I realized this I regularly threw the “travel 100” into my bag. And I preferred it to the 70-200.

The final decision to replace the 70-200 was born last weekend. After going through my former images and checking which look do I prefer on the long end I ended up with a conclusion I find shots in the 150-250mm range uninteresting, and that the 70-200 was more in line with my vision on cropped sensor bodies than on full frame. From here the decision was pretty straightforward: get a 135mm f/2L.

I ordered one on Saturday and selling my 70-200. The lens arrived yesterday (isn’t Amazon great?) and I’m waiting for an opportunity to put it through its paces. The cactus and palm house of my favorite botanic garden will open this weekend, and I’m planning a visit next week. I’ll post my experiences.

So my current setup consists of the 24/2.8, 50/1.4 and 100/2 travel trio and the TS-E 24 II, 50/1.4, 100/2, 135/2 quartet for regular use. I plan to add a TS-E 17 and a TS-E 90 instead of the 100/2 when Canon updates the current 90 (I don’t like the fixed placement of tilt/shift axes).

Unfortunately I start to find the 300mm focal length interesting again. And the only option there is the 300/2.8 IS II. Which is heavy and expensive… So I’m hesitant at the moment.

All in all, if you aren’t shooting in a rush, and can move around, I highly recommend to give a try to Canon’s relatively inexpensive and great fixed focal length lenses. They might shake up your vision and photography – just they did with mine.

Long Lens Rig Weight Reduction

Equipment weight reduction is a continuous project for me: I’m always looking for solutions that can shave off a few hundred grams of my already heavy bag. The last step – reducing the weight of my birding setup – started with a tripod head change. I had been using a Really Right Stuff BH-55 ballhead with a Wimberley Sidekick to hold my 500 f/4 for six years or so. Last spring I noticed a problem with the BH-55: the panoramic base became loose so much that in some positions I was unable to lock it without significant play. I attributed this wear to the heavy use of the Sidekick on it. I also wanted to end the years long irritation coming from the BH-55’s tendency to creep when you tighten the main knob: it drove me nuts on several occasions when I tried to slightly change a composition with medium-tele lenses.

Last summer I replaced the BH-55 with an Arca-Swiss Z1sp Classic (that is the one with the screw operated clamp – I’m not a fan of lever release clamp mechanisms). This solved the creep issue, but not the excessive wear the Sidekick puts on the panoramic base. So I started to investigate other side-mount gimbal head options (the 500/4 isn’t that heavy to require full Wimberley style heads, and side-mount heads are much lighter).

The Head

I read about the Mongoose head a few year ago in Artie Morris’ Birds as Art blog. At $600 it costs $100 more than the Wimberley but weighs 2/3 of the WH-200-S (0.68 vs 1.04 kg). Actually it’s just 90 grams heavier than the Sidekick alone! What kept me from buying one immediately was the high shipping cost from the US to the EU. But recently Naturescapes.net offered a 10% discount on tripods and heads so I took that offer and ordered the latest incarnation of the Mongoose: the M3.6.

650D_1309_2457

4th Generation Designs Mongoose M3.6 head and lens foot with Canon 500 f/4 IS

This head is 0.67 kg lighter than the Z1 + Sidekick setup, or mere 90 grams heavier even if I decide to bring both heads. But weight saving does not stop here.

Replacement Lens Foot

I was able to shave off another 200 grams by replacing the original lens foot and Wimberley P-50 lens plate with 4GD’s lightweight lens foot. You can see the resulting setup on the above picture.

Lens Cap

This is the most weird part of the game: you can make your rig 1/4 kg lighter by replacing the big, heavy leather lens cap with a lightweight and strong Don Zeck cap. It is also easier to put on and remove, and can even protect your lens while the hood is in shooting position.

At the end I was able to reach 1.12 kg weight reduction – and even get more functionality! Let’s talk about these additional things.

Using the New Rig

Bad news first. You can only order the Mongoose with a lever-release clamp – no screw-in version. Ask me after a year how it behaves. Also, the mechanical quality of the head is not on the same level as Arca-Swiss or high precision German or Swiss gear. It is a notch below RRS and roughly on par with Wimberley head quality. I mean generous tolerances and play here and there. I was even unable to tighten the vertical axis knob enough to stop the lens from moving. But 4GD has a good solution for that – which brings us to the good stuff.

Long Lens Macro

Long Lens Macro

Deadbolts. You can use them to completely lock horizontal and/or vertical axes. This is great when you want to add an extender or carry the rig over your shoulder. No more need to over-tighten knobs (which will result is excessive wear over the years – it’s hard to tighten my Sidekick completely after all those years).

Despite the generous tolerances, the head provides a stable platform when both knobs are tightened. Lacking good birding opportunities during the last weekend I tried it with stationery subjects – where stability is even more important. The setup worked remarkably well.

I really like the construction of the replacement foot. Its low profile makes it fit under the lens hood! It is just long enough to cover the two extreme balance points: no extender and a lightweight body (5D3 in my case) and 2x extender plus 1D series body.

Forget about carrying the lens by this foot, however. Your fingers will not fit between the plate and the lens. I rarely want to carry the lens by the foot, so its not a huge issue for me. The lens either is on the tripod or in its Kinesis long lens case. But if you want to carry it, a Kirk Super Grip Handle is a useful accessory.

The foot sports a short double dovetail section, so I can use my Wimberley F-1 flash bracket on it. I prefer this bracket to other solutions because of its versatility. Note that the flash cannot be centered with the F-1, but I usually put it as off-center horizontally as possible, so this isn’t an issue for me.

All in all I’m satisfied with the setup. I can hardly wait for the birding season to begin and put these new toys through their paces.

  ☕ ☕ ☕

Did this post help you? Consider buying me a coffee if so.

Downgrading AirPort Extreme to 7.6.1

I made a mistake last Thursday evening: upgraded my AirPort Extreme base station’s firmware to 7.6.3. Until Sunday afternoon WAN routing stopped three times (for which I first blamed our ISP), but when WiFi is also stopped last afternoon I decided to go back to the very well behaving 7.6.1.

But, to rephrase what Mr. Scott said: downgrading is easy, finding the file – that’s hard. Apple’s respective firmware page is an insult: it contains no link to the firmware update itself. Google turned up nothing, so I decided to go after a solution myself.

Note that I’m still using AirPort Utility 5.6. I consider 6.0 a huge step backward.

AirPort Utility stores the firmware files under the ~/Library/Application Support/Apple/AirPort/Firmware folder. You have a numbered subfolder for each model. My 4th generation AirPort Extreme’s number is 114. Here I found just one file: 7.6.3.basebinary.

So I knew that I had to look for 7.6.1.basebinary and put it into that folder. I also found a file named version.xml under the Firmware folder. Opening it quickly revealed that it contains actual download links for firmware images under the firmwareUpdates key (it’s actually an array of dictionaries, with each element corresponding to a firmware file). To find your file look for a dictionary containing your product number under the productID key, 7.6.1 under the version key, and you’ll get the download link in the location key, as you can see below:

<dict>
    <key>location</key>
    <string>http://apsu.apple.com/data/114/041-3395.20120130.Ka1Br/
        7.6.1.basebinary</string>
    <key>productID</key>
    <string>114</string>
    <key>version</key>
    <string>7.6.1</string>
    <key>sourceVersion</key>
    <string>76100.4</string>
    <key>sizeInBytes</key>
    <integer>6364116</integer>
</dict>

Also note that I had to download the firmware directly attaching the ADSL modem to my Mac, as at the end routing was so hectic that I was not able to do it via the AirPort Extreme. Having downloaded the file the actual downgrade procedure was seamless: put the file in the aforementioned folder and choose “Upload Firmware…” from the “Base Station” menu in AirPort Utility 5.6.

I also noticed a strange thing: while on 7.6.3 the Upload Firmware dialog only allowed me to upload 7.6.3 and nothing else. Now that I’m back on 7.6.1, it allows me to choose between 7.5.2, 7.6, 7.6.1 and 7.6.3.

All is well since then.

  ☕ ☕ ☕

Did this post help you? Consider buying me a coffee if so.

The Expendables: Canon 650D + 40/2.8 Pancake

I haven’t touched an APS-C Canon since 2006. After using a D60 for three years, I made its last image in 2005. I have been using full frame and APS-H since then. However, I bought a 350D in 2006, which I sold immediately after the first shoot – although image quality was good for the time, I really disliked everything else about the camera.

So why I have a 650D then? The answer is simple: we needed a cheap EOS for software testing. A camera that I won’t bemoan if we happen to kill its shutter after a year or so or amortize it any other way. The 500 EUR 650D seemed to fit the bill. And I bought a 40mm f/2.8 STM pancake lens with it – both for fun and for regular testing use.

Although I had no intention to use the camera for image making, I brought it to a Sunday walk last weekend. This post is about my impressions about both the camera and the lens.

The Camera

What touched me the most is the touch screen interface. It really helps to make an otherwise crippled and awkward physical interface usable. It really surprised me when I picked up a camera last fall how usable it is. Somehow I like it more than the 60D and the 6D. Touch controls are well implemented, but a dedicated graphics processor would help to make it iPhone-fluid. Some operations are low end Android-sluggish (like flipping through images and pinch zooming). It is self-explanatory and works quite intuitive. I only miss one feature: double-tap to switch between 100% and fit zoom levels. To tell you the truth I would love to see this touch interface on my 5D Mark III.

Frozen Forest

Image quality is not something to rave about: it is the usual contemporary, diffraction limited at f/7, but still usable up to 30×45 cm prints thing. Something I’m not really a fan of. But as I said, it’s still usable for making medium-sized prints.

I haven’t used a plastic camera body in years, and I can attest that magnesium alloy can be really cold in sub-zero environments. But I was able to carry the 650D around without a glove! It actually felt warm after hours of walking around in the winter forest. This was a positive surprise.

Another surprise was how it drives lenses. First I thought that something went wrong and the lens will fall apart… But I found these unusual noises to be normal with two copies of the model, as well as the 600D. I’m still in fear to put on my more expensive lenses.

Actually I quite like this small camera and will borrow it from testing for casual weekend walks. Who knows, it’s always good to have a camera with me.

The Lens

It is a gem. Small, light, inexpensive (at 150 EUR), and delivers great image quality. My first experience wasn’t so good, however. Just after picking it up right from the bag, the lens refused focusing. Some weird noise came from the AF mechanism, but no focusing. Removing and re-attaching the lens helped. Back at home I quickly checked the net about what the hell is going on here, and found that the lens needed a firmware update. Oh yeah, now you can upgrade lens firmware without bringing them to a Canon service center! This is good. But notice that you need a 650D, 5D3 or 1DX for this.

Wall at an Abandoned Rocket Base

Image quality is really good on the 650D, so I became interested in putting this small wonder on my 5D3 next time. Just to see whether its up to the quality of my favorite cheap prime trio.

The new stepping motor (STM) focusing is slow and noisy. Don’t expect something you used to with USM. But it seems accurate. Manual focusing is another story. I don’t like focus-by-wire lenses. Call me old school, but I prefer the physical connection between my hand and the focused distance. The focusing ring is also tiny, but the whole lens is tiny, so nobody can expect a huge ring here.

I will keep this lens in my bag most of the time. Weight is not an issue, and it delivers great images. Absolutely recommended for everyone.

Practical Limits of Enlargeability

I have been asked numerous times about how big a print can be made from a digital image. Up until recently, the answer was quite easy: one would need a 200 PPI or higher resolution image for matte papers and 210 PPI or higher for semigloss surfaces. Canvas is a much more forgiving medium, one could go much lower with careful processing. My biggest enlargement, from a 4.5 megapixel original, was printed on Hahnemühle FineArt Canvas in 36 x 100 cm size. This was shot with an 1D Mark II, so this is a 35x enlargement. The print was made at 90 PPI. Yes, this was a result of several hours of careful editing and a matching media choice.

This is a crop from a 8MP image. The biggest print that still looks great is 38×100 cm. But this is an exception in enlargeability, not the norm. Subject matter really helps here.

Of course high resolution is a must for hyper-realistic prints. Posters can be made at much lower resolutions. But I’m not interested in making posters at all. I even wrote an app (PrintCalc), that can calculate all this resolution requirement stuff for you.

To put it another way, digital prints were limited by the sensor’s resolution.

In these days, however, we face another limits. Diffraction, depth of field and lens quality. Let’s take a Canon 5D Mark III for example. The full frame sensor at 22MP starts to get diffraction limited below f/10. The 7D at 18MP is visibly diffraction limited at f/8. The problem is worsened if you want big prints. One often overlooked attribute of depth of field is that it gets shallower as you make bigger enlargements. But you can’t stop down to increase depth of field at your will, because diffraction kicks in. This might, or might not be a problem depending on subject matter.

For landscapes, diffraction puts an upper limit to practical enlargement ratio. You can only go larger if you use a bigger sensor. For other subjects, where you can shoot at wide apertures, this isn’t that big of a problem, so you are limited by the number of pixels. Speaking of the number of pixels: DxO’s new “perceptual megapixels” ranking is a good indicator what kind of resolution a lens can give you. You can increase sensor resolution, but the lens will still be a limiting factor. Think about this perceptual megapixel number as the one you can use as the basis of maximum print size calculations. Look at the best lest they tested to date: Canon’s EF 300mm f/2.8L IS II USM. It can fully utilize a 21MP sensor, but you’ll end up around 14MP on a 18MP APS-C sensor (the 7D).

So it’s easy to see that blindly increasing sensor resolution in any given format above lens capabilities and so much that is severely affects usable apertures is not the smartest thing.

What is that practical limit? I found that about 20 times enlargements (in linear dimensions) make great hyper-realistic prints, keeping ill-effects at a minimum. This translates to about 50 x 75 cm (20 x 30″) for full frame and 30 x 45 cm (12 x 18″) for APS-C. Regardless of megapixels. Of course you’ll need to hit the 200-210 PPI minimum, which is about 11-12 MP for APS-C and 23-24 MP for full frame. But increasing the sensor’s resolution beyond these points will only allow to reap the benefits of oversampling, and not really allow bigger prints at the same quality (not to mention increased storage requirements).

Want bigger? There’s only one way with today’s technology: increasing sensor surface. Basically we have to paths in pursuing bigger recording area:

  • Go medium format. Digital 645 will give you images that can be printed at 80 x 110 cm (30 x 40″) – from an 50 MP or larger file. This costs a lot.
  • Stitch several images together. I routinely use my TS-E 24mm lens to get images equivalent in size to a medium format sensor (36 x 48 mm). This is more work, but at the fraction of the cost of medium format.

20x enlargements are far better than you could achieve (in high quality) from film. This is actually at least one format size better (full frame 35mm beating 645). But remember that every technology has practical usage limits, and make them work for you – don’t blindly believe manufacturers’ marketing stuff.