Kuuvik Capture 3.2 : JPG Enhancements

Kuuvik Capture was originally developed to foster a RAW-only workflow. But we received numerous requests for supporting JPG files. At first we introduced a RAW+JPG capture option (where JPG files remained on the memory card), and now in version 3.2 you can shoot as well as download JPG files alone. Capture preferences were changed to reflect this functionality.

Image quality controls whether you shoot RAW, RAW+JPG or a new choice, JPG. JPG files are large/fine ones, since we still want to keep image quality at the highest possible level. When you choose RAW+JPG, an option appears so that you can set whether the JPG files will remain on the card (by default), or downloaded along the RAWs. With the JPG image quality setting files are always downloaded of course.

There’s also a new option to force the native 3:2 image aspect ratio. We’ve added this because aspect ratio control is a complete mess on Canons. You have two settings to cope with, and sometimes get a cropped JPG file and other times a full resolution JPG with metadata to indicate the crop. To make things worse, RAW converters and Photoshop tend to change how they interpret cropping metadata from version to version. We simply don’t want to get involved in this messy situation. So by default Kuuvik Capture forces the camera default 3:2 aspect for all images. You have the option to turn it off, if you really really know what you are doing and need non-3:2 images. But you were warned.

Downloaded RAW+JPG pairs will be handled as a single package, but only the RAW file is used for display. Thumbnails in the Image Browser are marked with a “+” badge to indicate that a JPG is also present, while the file name will show just the RAW.

Deleting the package will delete both the RAW and the JPG.

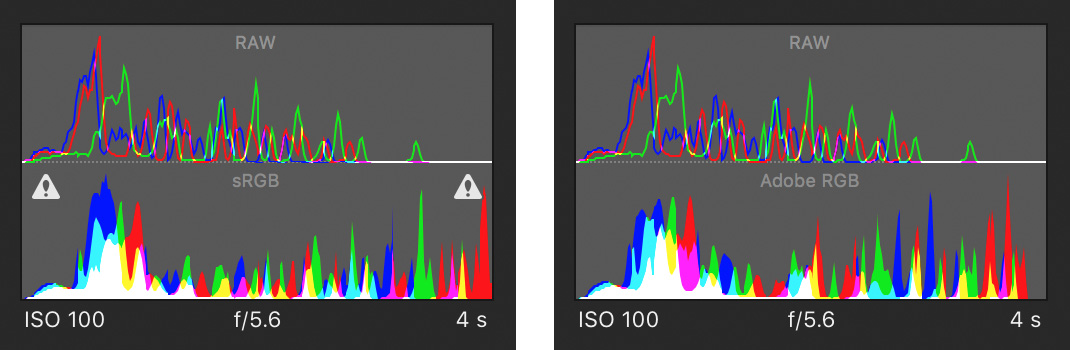
For RAW+JPG (since the RAW is used for display) the Dual Histogram shows both RAW and processed data. For single JPGs only the processed histogram is available.

A bonus feature

Since a JPG is a JPG, you can use Kuuvik Capture to cull JPG images from any source. For example Agnes went through the majority of our family photo collection during the last few months with the app. This included everything from scanned images through iPhone photos to RAWs. Moreover, JPG previews are displayed from older Canon CR2 files (such as those from the 5D and 1D Mark II), as well as from Nikon NEF and Pentax DNG and PEF files produced by Nikon and Pentax cameras supported by our ShutterCount app. Yes, they share the same image decoder.

IMPORTANT: This is a bonus feature that may work for you, but not officially supported.

Availability

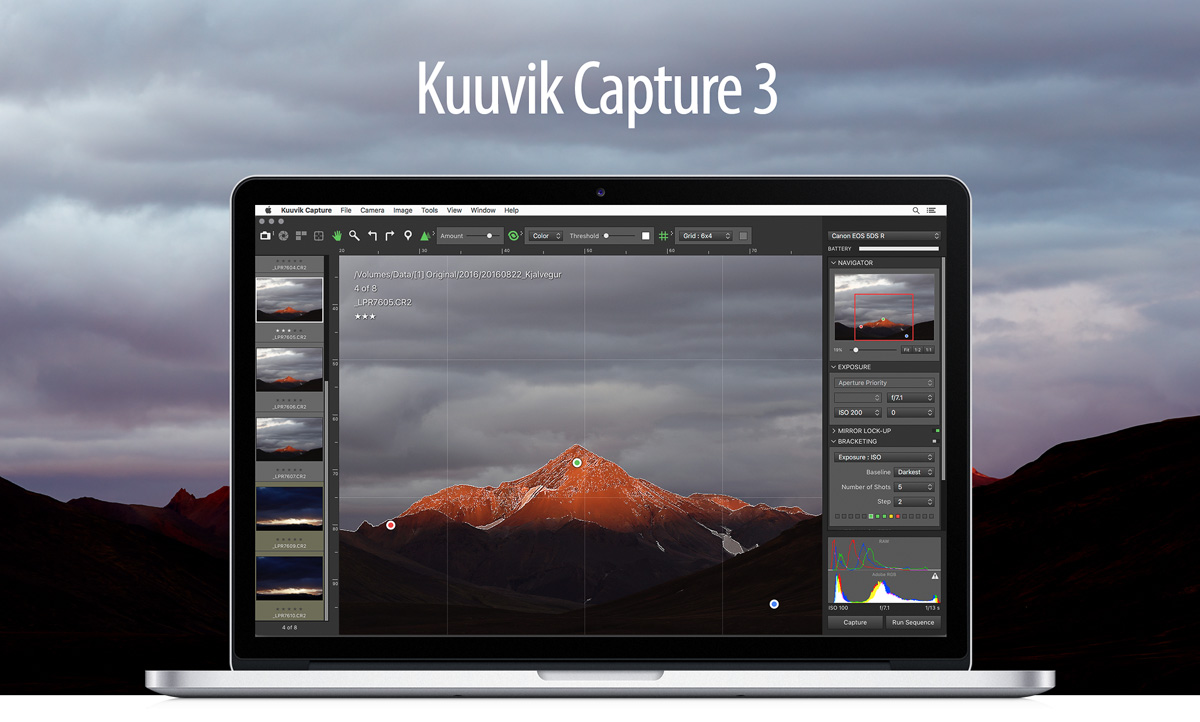
Kuuvik Capture 3.2 is available now on the Mac App Store. It is a free update for users who purchased Kuuvik Capture from the Mac App Store. I’m also working on an update to my free eBook, Kuuvik Capture Inside Out, which will be available shortly.

Kuuvik Capture 3.2 : The Dual Histogram

The very first Kuuvik Capture release introduced RAW histograms in an attempt to provide a tool for judging exposure more precisely than what regular histograms are capable of. I even wrote an article on the merits of having a RAW histogram. The conclusion of that article was that despite you have a RAW histogram, white balancing could clip channels in the converted image even if everything was fine with the RAW; so you need to see both the RAW and the processed histograms (preferably in your RAW converter) for the final decision on your exposure.

While my former article revolved around the white balance issue, other image processing parameters, like picture style and color space, also have heavy influence on histogram precision and usability. Making to see both histogram types a fundamental need. Not to mention that launching a RAW converter is not always convenient to do.

So version 3.2 sports a new Dual Histogram tool to show Kuuvik Capture’s RAW histogram along the usual one generated from processed data.

For images, the processed part is based on the JPG preview that every RAW image contains (this is what Kuuvik Capture displays, and this is the source of the histogram shown on the camera’s LCD). This represents how the image was processed by the camera. Your RAW converter will almost certainly convert it in a different way, so the final word on exposure still belongs to the converter. But the camera’s interpretation gives a solid starting point.

The processed histogram also indicates the image’s color space. Different color spaces have different clipping points – more on this later.

You can clearly see on the example how white balancing influenced things. You’d be in trouble having made a decision solely based on the RAW histogram in this case – the blue channel would be almost completely clipped. The example belongs to the original of the following photo (that is, before contrast stretching and other adjustments).

Ice Abstract

For live view and movie recording the camera always serves video frames in sRGB – even if you set your camera to Adobe RGB. But why is that important? Well, it’s time to talk about the effect of color space choice on histograms.

Color spaces vs. histograms

I made two photos of a regular ColorChecker chart. One with setting the camera to sRGB and another with setting it to Adobe RGB. Lighting and exposure were the same.

As you can see, there’s absolutely no clipping in the RAW data. And there’s no clipping when converted to Adobe RGB. But in sRGB both highlights and shadows are clipped! So live view (which is always in sRGB) may show some clipping while Adobe RGB not. And even a histogram from an Adobe RGB conversion might show clipping while there’s absolutely no clipping in the image when converted to ProPhoto RGB in Capture One.

I’d recommend to treat these processed histogram clipping warnings as different levels. The sRGB warning in live view goes off first, this should ring a bell in your head to watch more closely after taking the image, as there may be a problem. After taking a picture, if Adobe RGB shows clipping, then it’s time to either check it in your RAW converter or back off a little bit.

But RAW histogram clipping warnings are always hard facts: indicating unrecoverable data loss.

The above example explains why I recommend to set your camera to Adobe RGB: to prevent premature clipping in histograms displayed on the camera’s LCD.

A few words on JPG support

JPG files slowly become a first-class citizen in Kuuvik Capture. The JPG processing engine in version 3.2 is up to 5x faster than previous releases. This speedup is what allows efficient histogram generation and made Dual Histograms possible. JPG histogram display was also a requirement for a JPG-only workflow, which was high on our feature request list. And now it’s fully supported as you’ll see in my upcoming post.

Kuuvik Capture 3.2 is available on the Mac App Store. It is a free update for existing Kuuvik Capture 2.x and 3.x users.

Kuuvik Capture 3.2 Sneak Peek

The latest update to the ultimate Canon EOS tethering app, Kuuvik Capture, is around the corner, so I thought I’ll share the new home page image.

The eagle-eyed will surely spot one of the cool new features. Hint: look at the histogram area in the lower right corner.

6D II and 200D/SL2 Support in ShutterCount 3.1

ShutterCountIcon2x
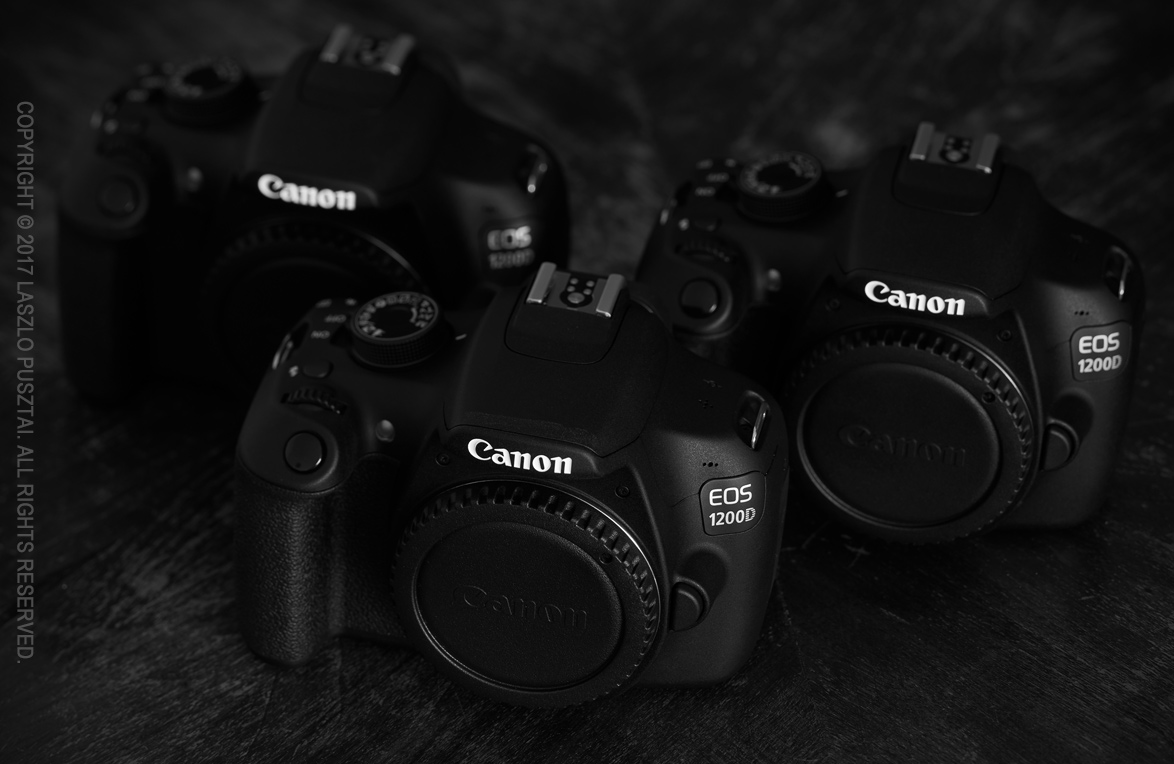
The brand new Canon EOS 6D Mark II and 200D (aka Rebel SL2 / Kiss X9) are supported in version 3.1 of ShutterCount on macOS and iOS.

As of today, ShutterCount is the ONLY Mac and iPhone/iPad app that can read the shutter counter from these and other post-2014 Canon cameras (like the 5D Mark IV, 5DS R, 80D, etc). In addition to the basic “number of pictures taken”, detailed live view counters are available for these cameras when you purchase the Live View Pack – another unique feature of ShutterCount.

File Mode is also improved in this release. Memory cards are scanned automatically as soon as you insert them into the Mac (or a card reader connected to your Mac). Plus you are warned if you accidentally connect your Nikon or Pentax camera via USB.

In the iOS version, History and Graph tabs are now synchronized to show data for the same camera, and they will show previous readings as well as the graph for the connected camera by default (if any). This is the same behavior the Mac version implements.

Version 3.1 is a free update for existing users on both operating systems. New users can purchase the app in the respective App Store. Live View Pack and Plus Pack are available as in-app purchases.

File Mode in ShutterCount 3

We had received numerous requests to support non-Canon (mostly Nikon) cameras with the app. I thought that since Nikons store the shutter counter in image files it’s easy to get the current value and postponed the project a couple of times. Well, I was wrong.

As soon as I started researching the subject I had to realize that existing methods either require you to install some non-digitally-signed software on the Mac (a major no go in these days), or wants you to upload image files with a host of potentially personally identifying information, such as the camera’s serial number, onto web a site with no privacy and/or data handling policies at all. Even digging out the information with a safe solution (the Mac’s built-in Preview app) is far from being fast and easy – and Nikon only.

Now I totally understand the need for a simple and quick solution.

Enter ShutterCount File Mode

Take a picture with your camera. Pull the memory card and place it into a card reader connected to your Mac (the built-in SD card slot will do). Once the memory card icon appears on your desktop, drag and drop it onto ShutterCount (either the running app or onto its icon). The app automatically scans the card, finds the latest image on it (by date) and displays the result.

The result for my rarely used Nikon D7100. Note that the shutter count and the file number differs – that’s why you can’t use the file number as an “odometer”.

Or if you don’t want to drag & drop, just use File > Scan Memory Card in the menu. Or drop an image file onto the app. Or open an image file with File > Open. ShutterCount adapts to your preferred way of bringing the file into the app.

And you can use any image format your camera can record: NEF or JPG for Nikons, and PEF or DNG or JPG for Pentax models.

Pretty fast and simple, isn’t it?

Nikon and Pentax cameras do not store the owner’s name. So the display changes to “Artist Name”. But other that this, the app behaves exactly as is does for USB or Wi-Fi connected Canons. Even the Plus Pack‘s graphing is available (forecasting is not available only with some models, please consult the Tech Specs for details).

An added bonus: older 1-series Canons

Once I had an improved metadata parser with shutter count reading capability for Nikon and Pentax cameras, it was minimal effort to also add older Canon 1-series models. Actually I had been using a 1D Mark II for 8 years, and became curious…

The very last show made with my Canon EOS-1D Mark II.

There are a few caveats, though. The 1D II (N) and 1Ds II might ruin the counter when restoring camera settings from a memory card (I never did that for my 1D II). And the 1D II and 1Ds III may reset the counter when using auto-reset image numbering (or even under some other circumstances – I’m not surprised since these cameras have Canon’s worst-ever firmware).

So if it works for your oldie 1D, be happy. If it doesn’t, then sorry, we haven’t got the powers to go back in time and fix what Canon messed up in the past.

A fun experiment

My curiosity with the good old 1D II didn’t stop there. So I’ve read the first image of every month during the camera’s service period. Don’t even had to do it in order of taking, since ShutterCount automatically sorts the history by date in File Mode.

8 years of shooting with the 1D Mark II.

Availability

File Mode is included in the base ShutterCount 3 app on macOS. So it is free for existing users. New users can purchase the app in the Mac App Store. For the complete list of certified cameras please refer to the Tech Specs page.

ShutterCount Supports New Canons and More

“I’ve seen things you people wouldn’t believe. Attack ships on fire off the shoulder of Orion. I watched C-beams glitter in the dark near the Tannhäuser Gate…”

– Rutger Hauer in Blade Runner

Shutter count for new Canons

When you spend years on reverse engineering Canon cameras, you are bound to see things… Know things that only a few knows. Things that most people wouldn’t believe. As my better half used to joke: I know more about Canons than what would be healthy… On the other hand this knowledge paves the way for neat things.

Almost exactly two years ago, when I added support to our apps for the 5DS R, I had to realize that Canon did something to the camera’s shutter counter. That something rendered the way ShutterCount used to query the counter useless. We immediately started a research side project to determine what’s going on and to find a way around.

Since I wasn’t comfortable navigating uncharted waters with my 5DS R (and later 1D X II), we bought three 1200Ds for the purpose. So let me introduce the Suicide Squad – these cameras contributed a great deal in bringing you ShutterCount 3.

Cameras in the Suicide Squad (a.k.a. “The Kamikaze”) were ready to sacrifice their lives for the project. All three cameras survived with no damage at all.

It took two years, but I can proudly tell you that all those sleepless nights and hard work weren’t for nothing: not only we can read the shutter counter on all new Canon EOS DSLRs, but ShutterCount 3.0 does something never seen and done before.

Let me show you the camera summary screen in its full glory first. I mean including all the information the app is capable of displaying (total number of shutter actuations including live view related ones, plus the percentage where the camera’s shutter stands relative to its rated number of actuations).

My 5DS R’s info shown in ShutterCount 3.0. Both the Live View Pack (to show live view related actuations) and the Plus Pack (for the shutter rating percentage) are active.

That’s fine, but the app goes further than this. The new Distribution Chart shows a detailed breakdown of shutter actuation sources (you can also hover the cursor over the shutter count value on the summary screen for a textual breakdown).

The Distribution Chart showing the three different shutter actuation sources.

Cameras with electronic first curtain shutter (basically all Canons released after 2014, with the exception of the 1300D) are capable of providing separate numbers for photos taken through the viewfinder, for photos taken while in live view and for live view sessions. A live view session starts when you engage live view and stops when live view is turned off. Movies are part of the session number (no matter how many clips you record during a session it will count as one since the shutter only opens and closes once).

This detailed breakdown is a world’s first.

Older cameras behave a little differently. They only provide two counters: one for photos, and another one for all live view actuations.

The Distribution Chart for non-EFCS cameras (my 7D Mark II in particular).

Live view on non-EFCS cameras has a great impact on the shutter. When you take a shot in live view, the following happens:

  • The shutter opens when you start live view.
  • The shutter closes immediately before you take the picture, since the mechanical first curtain must be used.
  • The shutter opens and closes for the shot itself.
  • The shutter opens again after the shot has been taken to re-enter live view.
  • The shutter closes when you stop live view.

That is, a single shot in live view generates two shutter actuations for the shot, plus one for the session. One of these is counted in the “photos” number, the extra two in the “live view actuations” number. Took two shots in a session? The shutter was actuated 2 + 2 + 1 = 5 times. 2 of these is counted in “photos”, 3 in “live view actuations”. And so on. Movie recording is simpler – the shutter only opens at the beginning of the session and closes at the end, so “live view actuations” increases by one for each session.

Which means that it is really important to know the number of live view related actuations, since it can contribute a lot the shutter’s wear. It may make a huge difference to the camera’s selling price. But at least you can get a more precise picture.

Speaking of precision. I’ve seen things… And my opinion is that the cameras’ internal counters are precise at the scale of hundreds  (that is, 4200 or 4300 or 4400 shots is a difference, but 4210 and 4212 may not be). Unfortunately I can’t publicly discuss the exact details on why, so you need to take my word on it. And don’t stress about less than 100 differences. In one point I was even considering to show the counters only in increments of 100 – Canon does this in increments of 1000 in the 1D X II for this reason. In practice it doesn’t really matter if your camera has 51890 or 51906 shutter actuations, but it does matter whether it’s 51800 or 68900.

File Mode for Nikon and Pentax (and some old 1D models)

ShutterCount 3.0 for the Mac also introduces the File Mode. As the name implies, it uses image files taken with the camera to determine the shutter count – for cameras that actually record the number in the files. It was requested by lots of Nikon and older 1D(s) II/III users, so we added it.

File Mode is a largish topic in itself, so I’ll dedicate a separate post for it during the next days.

Availability

ShutterCount 3.0 is available on macOS and iOS, and supports all new Canon cameras (released after 2014) in the base app price. The Mac version also supports File Mode. Version 3.0 is a free update for existing users. New users can purchase it in the respective App Store. For the complete list of certified cameras please refer to the Tech Specs page.

We tested and certified the app with all the cameras on the Tech Specs page. In other words, we are completely sure that it works. But please, pretty please, check the supported camera list before purchasing.

Live view counters and the Distribution Chart are available when the optional Live View Pack add-on is purchased. For the list of supported cameras please refer to the app’s Tech Specs page. The Live View Pack is available as an in-app purchase. On a Mac, click the ShutterCount > Store menu item, on an iPhone or iPad tap More on the tab bar and tap Store in the menu.