Canon EOS-1D X Mark II Review – Part 1

The Canon EOS-1D X Mark II is a huge topic, so I decided to slice the review. I also don’t want to reiterate specs or things that you can find on popular photography sites, instead I’m going to talk about aspects that are important to me.

So first of all let me put all I’m going to write into context.

I buy cameras for two purposes: as development and test hardware for my Kuuvik Capture and ShutterCount apps, and of course to take pictures. While I have two bodies in my bag, three or four additional cameras are sitting on the shelf to cover each and every firmware variant and operation paradigm Canon produced since 2008. Well, who said developing software is a cheap undertaking?

This gives me a great freedom to try different bodies and put those into the bag that fit my photographic needs the best possible way. But at the end of the day I make a living using these cameras, this way or that, so all of them should contribute to the bottom line.

There was only one missing piece in this set: a 1-series camera. I loved and used a 1D Mark II for 8 years or so, but skipped the following generations. The Mark III generation because of the autofocus issue, and because I still think they are the worst digital EOS-1 bodies ever made (you may disagree, but I’m sure you haven’t spent any time developing for them in this case). Just mentioning the 1Ds Mark III gives my better half the shivers… And the Mark IV because we needed funding for other things that time.

Then the 5D Mark III came along, and I haven’t felt the urge to purchase a 1D X for myself. For neither purpose. We started using loaner and rental units for development and testing. As time passed, things started to look less rosy: arranging rentals and loaners could be time consuming and costly (not to mention that they almost always screw up our schedule), so the decision to get a 1D X Mark II was made well before even the camera was announced. We just didn’t want to invest in outgoing technology and waited.

On the photography front, my main interests are landscapes and birds, with a bit of architecture and product photography spread along the way. My photographs either end up in commercial use or in large fine art prints, and high resolution is an advantage in both cases.

My A camera is an EOS 5DS R, which I found to be a great choice for everything I photograph. Yes, I could use a few more frames per second and faster buffer write speeds, but the camera proved to be perfectly usable even for action. Before the 1D X Mark II arrived, the B camera was a 7D Mark II. But because the images coming out of the 5DS R are way better, I haven’t used the 7D for months. Now the 1D X Mark II is the B camera, and I’m curious how it performs.

Ok, with this background let me begin discussing the 1D X Mark II.

Oh, one more thing. Since I have no financial interest in talking you into buying a camera (unlike most of the review sites), I’ll be honest. Just like with a friend talking about the 1D X Mark II over a drink.

TL; DR

It is a good camera, image quality is among the best I’ve seen from Canon (surpassed only by the 5DS R). There are some quirks and stuff that bugs me, though. Some of them can be worked around, but you’ll need to live with others. As always, if you fancy buying this beast, I’d recommend to rent it first to see whether it fits your working style and needs.

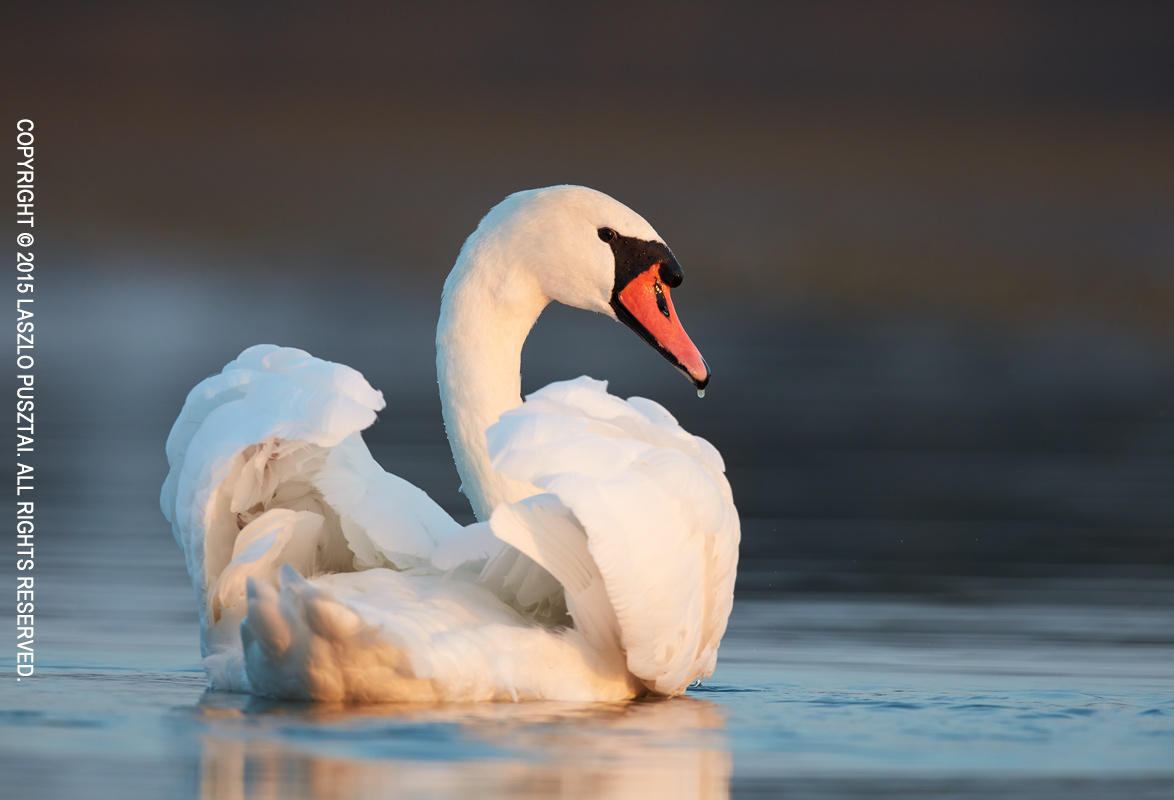
Lovely colors – even at higher ISOs

This is something you’ll notice even on the camera’s LCD (on which all images look disturbingly soft in 100% magnification, just like they did with the 1D Mark II).

Long Lens Landscape. 1D X Mark II with 500mm f/4L IS II + 1.4x III

Long Lens Landscape. 1D X Mark II with 500mm f/4L IS II + 1.4x III.

The image above was shot at ISO 1600, and it looks gorgeous on a wide gamut monitor. Sadly, part of the depth and brilliance of colors was lost when I converted it to sRGB for web display.

CFast 2.0 is really fast

You really want to use a CFast card with this camera. But be sure to get a fast one. I’m using a 64GB Lexar Professional 3500x card. Not because of the capacity (32GB would be my preferred choice for a 20 megapixel camera), but because of the 445 MB/s write speed. Smaller cards (including the 64GB SanDisk bundled with the camera) usually have lower write speeds around 240 MB/s. This is hugely important: with the faster cards you have virtually no buffer limit when shooting RAW. The 170 frames limit mentioned in the tech specs is what you get with the slower cards.

But be aware that moving images at this speed generates a lot of heat. The card, and even the camera’s grip becomes hot after extended use.

Being a young technology, CFast 2.0 could cause some compatibility headaches. I selected the 3500x card based on Lexar’s compatibility chart – while the 1D X Mark II is not listed explicitly at the time of writing, it seems that only 3500x cards are compatible with Canon cameras. For downloading images, I use Lexar’s Professional Workflow CR2 CFast reader (the one that has a Thunderbolt port in addition to USB3).

$650 for a power supply and coupler?!?

Someone at Canon has clearly lost his medicine. The AC adapter sells for $400 and the dummy battery for additional $250. To put you in perspective: you can buy a good laboratory-grade power supply for $400. And asking $250 for a dummy battery is outright arrogant. While writing my apps, I prefer to power the cameras from AC power, but these prices are simply unacceptable. Fortunately the good old ACK-E4 adapter made for previous 1-series cameras (around $95) works perfectly. The only downside is that you are limited to 8 fps.

The return of red AF point illumination

For this camera Canon (almost) returned to their former AF point illumination system, where AF points are red, while all other information in the viewfinder is black. You may remember my post about the irritating and unusable illumination system found in the 1DX/5D3/7D2/5DSR, so this is a big relief for me.

But the system is still far from being perfect. The red illumination is too bright (no option to make it dimmer, only brighter), which is rather distracting in some situations. And the inability to switch it back to black is something beyond me.

Cleaner shadows

I’m not the kind of guy who tries to fix badly underexposed images in post with an 5-stop push, but you know, sometimes I screw up. And having the ability to rescue otherwise good images is always appreciated. The image below was a grab shot of a purple heron flying overhead, without paying attention to compensate for the bleak sky – resulting in an underexposed bird.

Purple heron. 1D X Mark II with 500mm f/4L IS II and 1.4x III teleconverter. ISO 400, pushed 3 stops.

Purple Heron. 1D X Mark II with 500mm f/4L IS II + 1.4x III. ISO 400, pushed 3 stops.

A 3-stop push was used, and there is no visible color deterioration and noise even in the dark parts under the wings and body – something that was a stretch for older Canons. It was shot at ISO 400 (my base birding ISO).

A few missing functions

There’s no intervalometer and bulb timer. The shutter count feature is also missing from the external interface (although it’s available in the system information menu). And you can’t set bracketing from the menu. With the exception of the shutter count feature I can’t understand why Canon left these out, despite all their current cameras have them.

Well, you can use Kuuvik Capture for executing exposure sequences and bulb timer, in a more user friendly and effective way than Canon was ever able to implement these, so I’m not really complaining.

Remote release socket on the “right” side

Finally! This is something I wanted for more than a decade. I tend to use L brackets on all my cameras, and the N3 socket is something that needed to be worked around with these brackets – resulting in unwieldy left sides. Unfortunately both Kirk and RRS sell the same 1DX plate for the Mark I and II, but I still hope that some company will make a sleek bracket for the Mark II.

Since the tripod screw was ripped out from my 1D Mark II, I don’t trust single point bracket attachments. Kirk’s two-point attachment for their 5D Mark III/S/SR plate (reviewed here) is way better. Unfortunately there’s no such thing as a sleek 1DX plate with two attachment points, so I’m sticking with a normal plate. Especially because this is a B/wildlife/action camera and not planned to be routinely used tripod mounted with heavy lenses like the Otus 1.4/28 – with the 500mm it’s going to be mounted by the lens.

The USB sleep bug

This is a serious issue if you are planning to use the camera tethered.

If your computer goes to sleep while the camera is plugged in, you’ll permanently lose the connection – until the camera is powered off and back on. This happens with each and every tethering app. And there’s no workaround. Hopefully the bug is in the firmware and not in the USB hardware. All previous EOS cameras I used to date work as expected in this regard.

Continue to Part 2

1D X II, 5DS R and 7D II AF Drive Speed Compared

I’m currently waiting for Capture One to support the Canon EOS-1D X Mark II. RAW converter options available at the moment (Canon DPP and Photoshop/Lightroom) do not cut it. Their output is seriously underwhelming compared to Capture One, so I’m trying to avoid to check the camera’s image quality now. That leaves other operational aspects to examine.

My current main camera is the EOS 5DS R – it will definitely remain in this position even with the 1D X Mark II at hand. I highly doubt that the 1D X will be able to challenge its superlative image quality. On the other hand, slow frame rate and especially the small buffer are a headache from time to time.

Swan

Swan – 5DS R with the 500/4 IS II and 1.4x III teleconverter

That’s why I had been carrying a 7D Mark II in my bag for the last year and a half. But now the 1D X Mark II casts a shadow on the 7D Mark II’s future…

Today I did a little test to compare the AF drive speed of these three cameras with my Canon EF 500mm f/4L IS II USM – naked lens, as well as with the 1.4x III and 2x III teleconverters.

The measurement was simple: recorded a video of the focus distance scale during a full stroke “infinity to minimum focusing distance to infinity” focus drive operation, and then counted how many frames the operation took.

It took a tad less than 0.8 seconds for the 1D X Mark II to execute this operation regardless of whether a converter was attached or not. What surprised me is that the 5DS R produced the exact same result. I must conclude that stories about the 1D’s more powerful battery in connection with the AF drive speed are marketing bullshit. The 5DS R with a weaker battery can do the same. Even with a teleconverter attached.

The 7D Mark II is a different story, though. The naked lens produced the same 0.8 seconds result, but extenders took their toll. The 1.4x slowed focusing time by some 17%, and with the 2x the full stroke took twice as much time as with the naked lens.

In today’s test the 1D X Mark II scored a win against the 7D Mark II, but the true winner for me is the 5DS R… I expected 7D Mark II level performance from the camera, and being on par with the 1D X just makes me to admire it even more.

Kuuvik Capture 2.4 Released

The latest update to Kuuvik Capture is now available on the Mac App Store. First and foremost, we’ve added support for the brand new Canon EOS-1D X Mark II. This seems to be a great camera with a few quirks – more on the camera itself in a later post. You can connect it to Kuuvik Capture with USB, using the built-in Ethernet connection or via the WFT-E6 or WFT-E8 Wi-Fi transmitters.

We also changed the way shadow and highlight clipping warnings look. In the past we had a hatched pattern that become denser as more channels got outside the exposure range of the camera. The problem was severe moiré and aliasing when you zoomed in and out. Beginning this version the exposure warnings are solid colored, getting more opaque as more channels are affected.

Multi-channel highlight clipping warning

This is an image from last fall, and shows how channels get clipped towards the sun in the frame. First green (the largest patch), then blue and finally red. The more channels are overexposed the less chance to do effective highlight recovery.

Last but not least, I’ve continued the multi-platform code removal process (mentioned in my former post), which brings performance improvements (and battery usage improvements) here and there. For example loading 20 megapixel images from the 7D Mark II got up to 0.1 seconds faster on a 11″ MacBook Air. And overall camera communication is a bit faster and smoother.

The update is free for existing Kuuvik Capture 2 customers. New users can download Kuuvik Capture 2 from the Mac App Store.

For more information about the app, please visit it’s microsite, or check out my posts.

Kuuvik Capture 2.3 Released

kc2icon@2xVersion 2.3, bringing Canon EOS 80D support to Kuuvik Capture 2 is now available on the Mac App Store.

Since Canon introduced quite a few changes with this body, I had to update both the camera control and the RAW decoder in my Digital Camera Library.

And at this point let me add a few personal comments on the 80D.

While the improved low ISO dynamic range is a welcome addition, this camera is a step back in a few regards. First, it’s not fast enough to support multi-point live view (formerly known as split view). It’s an unfortunate trend with Canon’s newest mid-range cameras: both the 70D and 700D were multi-point live view capable, and none of their replacements/successors are.

Second, the removal of the shutter count feature (it does not affect Kuuvik Capture per se, but indeed affects my ShutterCount app).

Third, Wi-Fi is still on the verge of being unusable. I’ve already mentioned sub-par 70D/6D Wi-Fi transfer speeds in the version 2.2 release announcement post. With the 80D, I was enthusiastic about the Easy Connection option, that is designed to create the camera’s own access point, and to allow using EOS Utility mode with no existing network needed. The idea is something you would expect in 2016, but the implementation is crap. And I’m not talking about the inability to specify a password for this network, but the extremely slow transfer speed. I measured speeds south of 30mps – which is half of the already slow speeds of the mid-range bodies.

Thus, I recommend to stick with using an existing Wi-Fi network and to avoid the Easy Connection option completely. Fortunately using an existing network is not slower than the 70D was (but it’s not faster either).

I took over Kuuvik Capture last year, and decided that I will not release a Windows version. This allowed me to remove former platform independent code and to do Apple-specific optimizations and speed up the app considerably. The code base is large, so this optimization process is still in progress – and this release also includes a few. They are not user visible, but you might notice them here and there. (For the technically inclined – I had eliminated a bunch of memory copy operations between the Digital Camera Library and the user interface.)

On the user-visible changes front, Split View had been renamed to Multi-Point Live View. I think it’s more clear what the feature does this way, plus Apple introduced a completely different Split View into OS X – and wanted to avoid any confusion.

The update is free for existing Kuuvik Capture 2 customers. New users can download Kuuvik Capture 2 from the Mac App Store.

For more information about the app, please visit it’s microsite, or check out my posts.

Focus Stacking with the Otus 1.4/28

Last weekend I had a little time to play with the Otus 1.4/28. I was at Lake Tisza, but the light was suboptimal to put it mildly. So I decided to make a test shot to check how focus stacking will work with the Otus 28.

Why would you need focus stacking in the first place with such a wide angle? Well, if you have a brutal 50 megapixel sensor, with a lens that’s sharper in the corners than most lenses in the center, you don’t want to throw that resolution away by stopping down below the diffraction limit.

For this test I ended up using f/6.3 and taking 6 slices.

Early Spring Pier, Lake Tisza

Early Spring Pier, Lake Tisza

It was a quite a bit windy, and I wanted to smooth out the waves using the 10-stop LEE Big Stopper. I had to realize that I ran out of gaffer tape (unfortunately the Big Stopper on the Otus 28 leaves quite a gap at the sides), so I used my heavy cotton dark cloth to keep unwanted light from hitting the front element.

The dark cloth covered the entire camera, but it was quite easy to focus on the 11″ screen of my MacBook Air using Kuuvik Capture. The images were focus stacked in Photoshop CC.

And the result? Perfect front-to-back, corner-to-corner sharpness. It’s simply amazing.

Kuuvik Capture 2.2 Released with Wi-Fi Support

The latest update to my Kuuvik Capture camera remote control app went online earlier today. Although it looks like a small update on the surface, there’s a huge change under the hood. This version contains the 3rd generation of my digital camera library – with full Wi-Fi and Ethernet connection support.

You may remember that we had dropped the network camera option during the beta, because Apple’s PTP-IP (the protocol used to talk to the camera over Wi-Fi and Ethernet) implementation turned out to be unreliable under heavy load. Not to mention the side effect that Image Capture started every time we connected a camera.

So I took the challenge and developed a completely new PTP-IP transport component, debuting in Kuuvik Capture 2.2. If you think that it’ll appear in other apps in the future, then you’re on the right track… But let’s concentrate on Kuuvik Capture now.

Connecting your camera via Wi-Fi (or Ethernet)

First of all, you’ll need either a Wi-Fi equipped camera (6D, 70D), a built-in Ethernet socket (1D X, 1D C) or a separate Wireless File Transmitter (5D Mark III, 5DS, 5DS R, 7D Mark II, 1D X, 1D C) for this to work. Only Canon’s transmitters are supported, third party Wi-Fi remote control boxes will not work. Please check the tech specs for the full list of compatible equipment.

Canon cameras provide connectivity in several ways. The most complete is the EOS Utility connection mode. For this mode a camera needs to be paired to a given app on a given computer. Using two apps on the same computer? You need to pair the camera to them separately, and only one can be active at a time.

The computer side of this pairing process is dramatically simplified in Kuuvik Capture 2 compared to both version 1 and Canon’s EOS Utility.

Kuuvik Capture now needs to be “pairing mode” to accept a pairing request coming from the camera. This mode is accessible through a new menu item (or by pressing F2).

networkPairing

Pairing can be initiated from the menu.

Kuuvik Capture displays the pairing window (shown below) while in pairing mode. This window also shows your computer’s name, which will appear on the camera’s LCD during the last pairing step, so you can double-check that you are pairing to the computer you were intended to.

networkPairingWindow

The pairing window. Kuuvik Capture is ready to accept pairing request only when this window is displayed.

And that’s all you need to do on the Mac.

Once in discoverable state, you can start the configuration process on your camera. The process consists of three large steps:

  1. Choose a connection mode.
  2. Configure your network.
  3. Do the actual pairing.

They are documented in your camera’s or wireless transmitter’s user manual, but there are a few important points to consider.

First, please don’t start any Canon app that may be mentioned in the manual. You are now pairing to Kuuvik Capture, and not to Canon’s apps.

For step 1, you must use the Connection Wizard on cameras where it’s available (e.g. 5-series, 7-series with the external brick), otherwise you won’t be able to complete step 3. On the 6D and 70D choose the Remote Control (EOS Utility) mode. On other cameras choose EOS Utility mode in the Connection Wizard.

In step 2, the camera will ask for network specific parameters (whether it’s wired or wireless, plus various options and a password specific to your network). This is the most complicated part of the entire process, but Wi-Fi setup is such a thing… I’d recommend to study the camera/transmitter manual beforehand.

Out in the field with no network to connect to? My previous post shows you how to create a fast and secure Wi-Fi network on your Mac!

The last step is the actual pairing. As the LCD indicates, this is your last chance to put Kuuvik Capture into pairing mode. It may take up to 1.5 minutes for the camera and your Mac to find each other.

camerapairing1

This is how the camera’s LCD will look like as soon as they found each other:

camerapairing2

Pairing should be done once (unless in the meantime you paired your camera to another app, another computer, or used another network). To deal with these different scenarios, the very last screen in the process (after clicking that OK button) lets you save up to 5 (3 for 6D/70D) setups into your camera’s memory. But if nothing has changed, Kuuvik Capture will find your camera automatically the next time you turn it on and connect to the network, so the pairing is not necessary every time you want to use a Wi-Fi or Ethernet connection.

When pairing has successfully completed, the camera’s LCD will turn black, the pairing window will disappear, and the camera’s name will show up in Kuuvik Capture’s camera selector.

Notes on Wi-Fi speed

It seems that Canon implements one of the lowest speed classes for each of their Wi-Fi implementations. This is 150mbps for the external 802.11n bricks (using only one spatial stream), and a shockingly low 60mbps for the 6D and 70D (despite they advertise it as 150). So don’t expect miracles and be prepared for 12-15 second downloads on these slower cameras. On the other hand, the external bricks are fast enough to be perfectly usable when the network signal is good.

Well, speaking of bad, flaky networks. While I absolutely hate to add new configuration options (one more thing for you to deal with), this time it was a must.

Wi-Fi networks can become unbeliveably slow (think longer distances and/or interference), causing the camera to disappear from Kuuvik Capture. A longer network timeout (a longer time allowance for intermittent network errors to clear) may solve this, but at the expense of delaying the detection of actual issues (such as when the battery dies). So the Preferences window now has an option to control this.

ntoPreference

The default is 10 seconds, which we found to be suitable for most Wi-Fi networks. You can go as low as 5 seconds or as high as 30 seconds. My personal preference is to go with the lowest number, and raise it in the presence of connectivity issues.

Other new features

There are two of them. Customers have asked for more, longer time options for mirror lock-up auto-release. So we’ve added 8s, 10s and 15s to the palette. Also the new white priority white balance mode introduced with the 5DS/R is now available on the white balance control.

Availability

The update is free for existing Kuuvik Capture 2 customers. New users can download Kuuvik Capture 2 from the Mac App Store.

For more information about the app, please visit it’s microsite, or check out my posts.