Photographing Grebes with the 5DS R

The 5DS R became my main camera the instant I got my hands on it. Honestly, I thought that it will somehow augment either the 7D Mark II or the 5D Mark III as a high-res landscape camera, while one of those will remain my wildlife camera. I was wrong.

The 5DS R has so many seductive qualities that I tend to forget all its shortcomings and difficulties (more on those later).

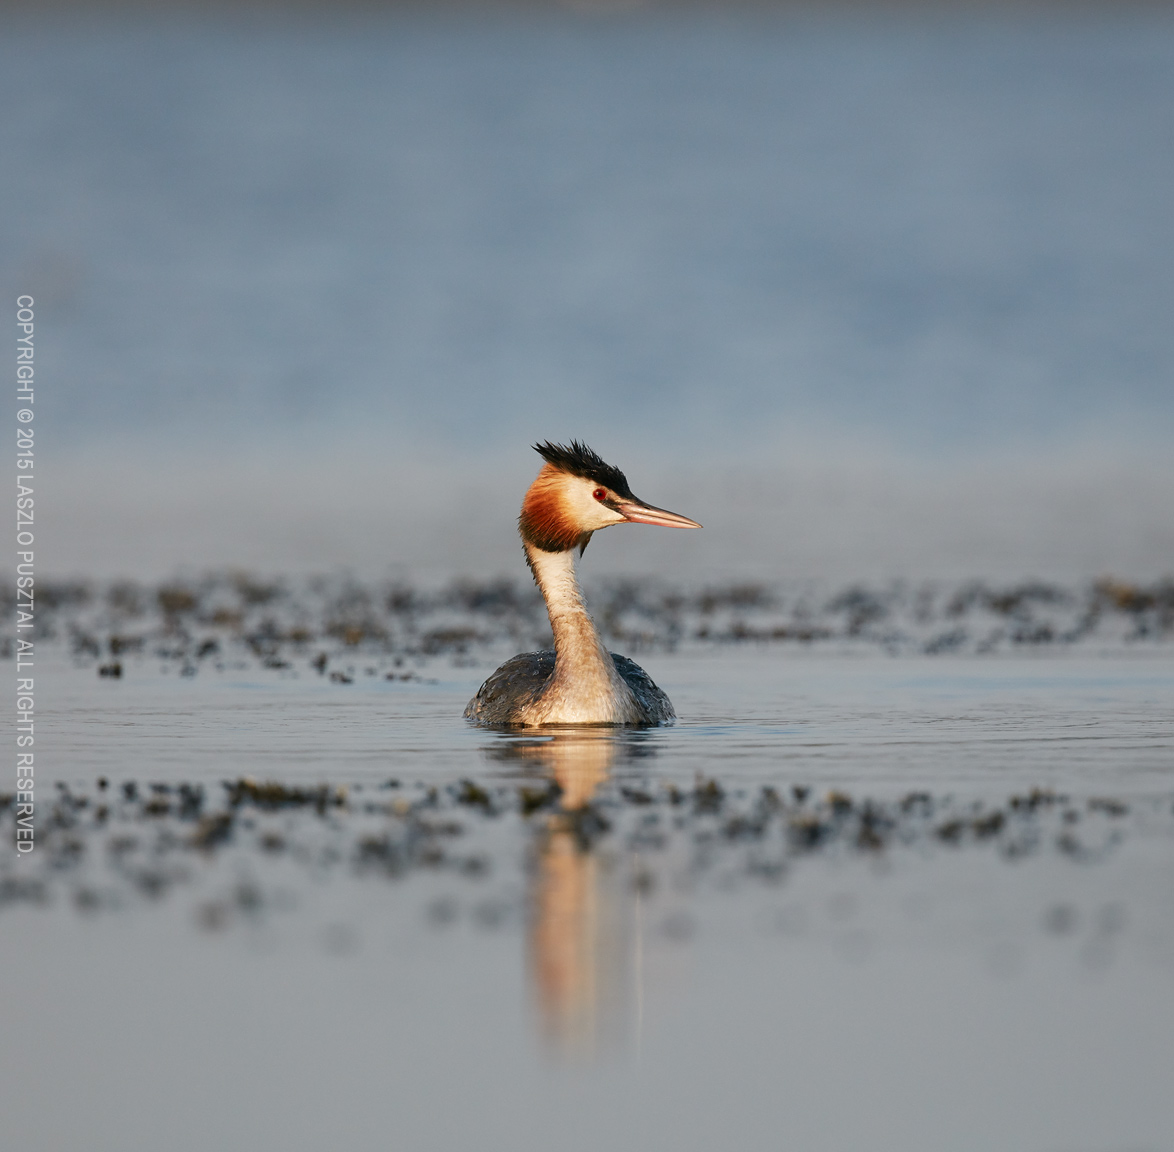
Colors are bold and thanks to the anti-aliasing cancellation filter it can produce lovely crisp images. Such as the following one.

aaa

A moment before diving

It was taken in early morning light with the Canon 500/4 IS II lens and the 1.4x III teleconverter. It’s a moderate crop of about 26 megapixels – still enough for a 40×60 cm print. Yes, you can crop the hell out of these files, and still retain a huge amount of details due to the lack of AA filtering.

Some of my former grebe images are 6-8 megapixels from the 1D Mark II… So its a huge increase in usage flexibility.

Of course those huge files have a few consequences you have to live with. First, the 5DS R feels like a medium format camera. From the sound of the mirror to the time it needs to display an image on the LCD. It feels like you travel a decade back in time… Press the play button and wait… Also I haven’t experienced buffer full issues since the 1D Mark II – but run into that quite a lot even using 1066x Lexar CF cards.

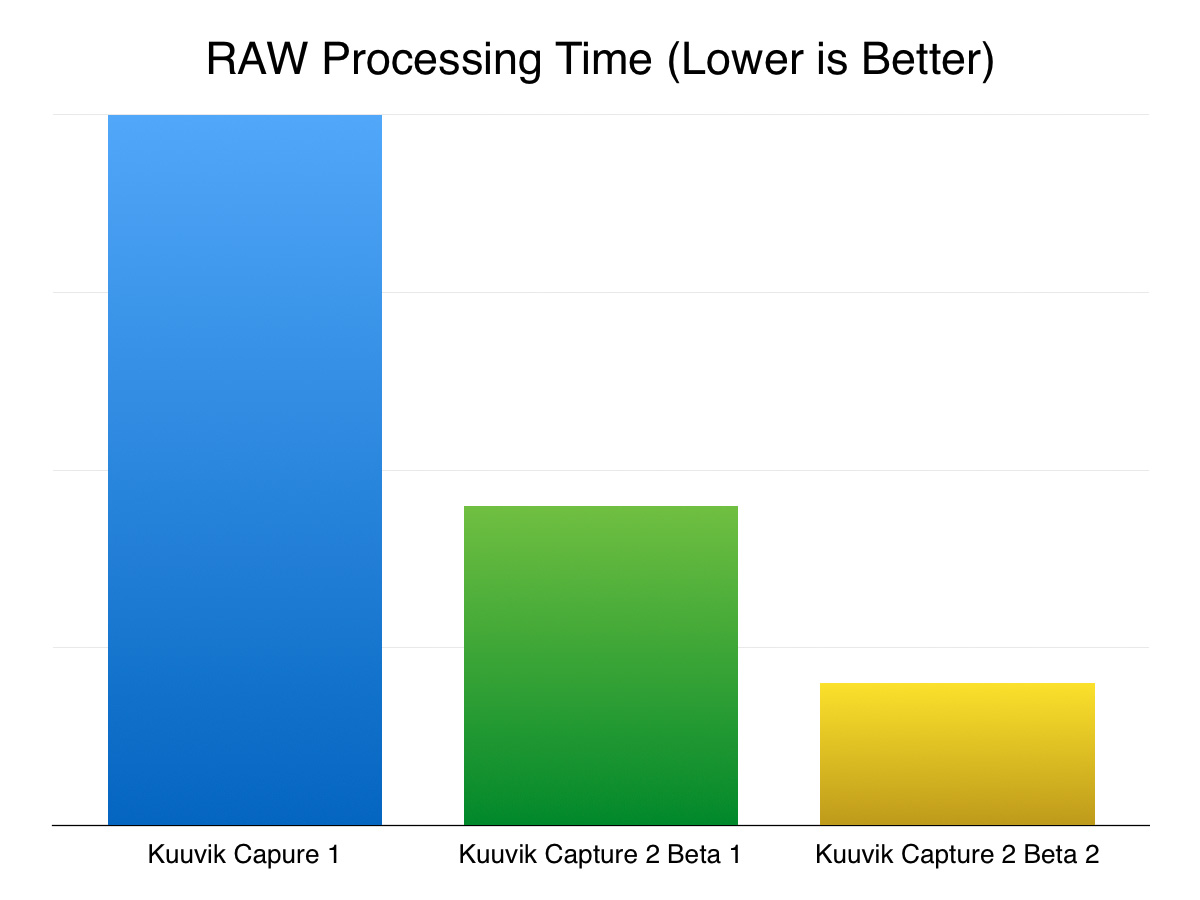
You also need more time to cull a shoot. Fortunately I have an app for that: with Kuuvik Capture 2 I can sift the daily crop of 1500-2000 images pretty quickly. An old friend of mine was sitting besides me last morning and was surprised how fast the app deals with 50 MP files (and this was on a 1.4GHz 11″ MacBook Air I use as a field computer).

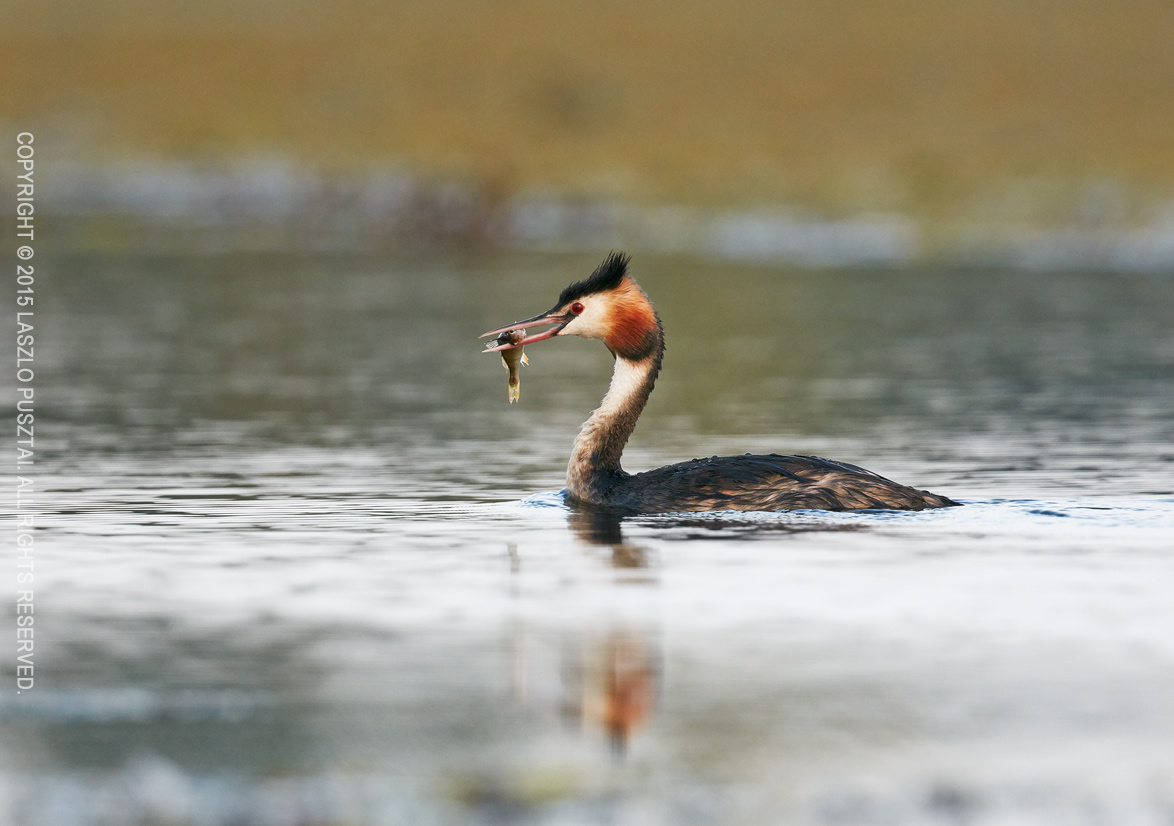
The next one is cropped from the sides for the rectangular composition. Same lens and converter combo. I stop down to f/6.3 with this combination, which is a bit below the f/6.7 diffraction limit of the camera. So unlike landscapes, one doesn’t have to deal with the depth of field versus diffraction issues here.

bbb

Curious visitor

Surprisingly, I found ISO 800 images a bit sharper than ISO 400 ones, so all of these were made on 800. I’ll have to investigate this further before I can draw serious conclusions. But until then, ISO 800 seems to be perfectly usable with no need for extra noise reduction.

The images in this post are the tranquil ones (the action shots are saved for another post). The 5 fps maximum speed turned out to be usable with a little anticipation of what’s going to happen (which also helps your photographs and in the understanding of the behavior of the species you are photographing). But for fast paced action I still reach for the 7D Mark II.

I tend to like to include a bit of the bird’s habitat in my images (maybe I should call them birdscapes), for which the full frame sensor is a real boon. And I can crop the surroundings away if a tight composition is what I’m after.

ccc

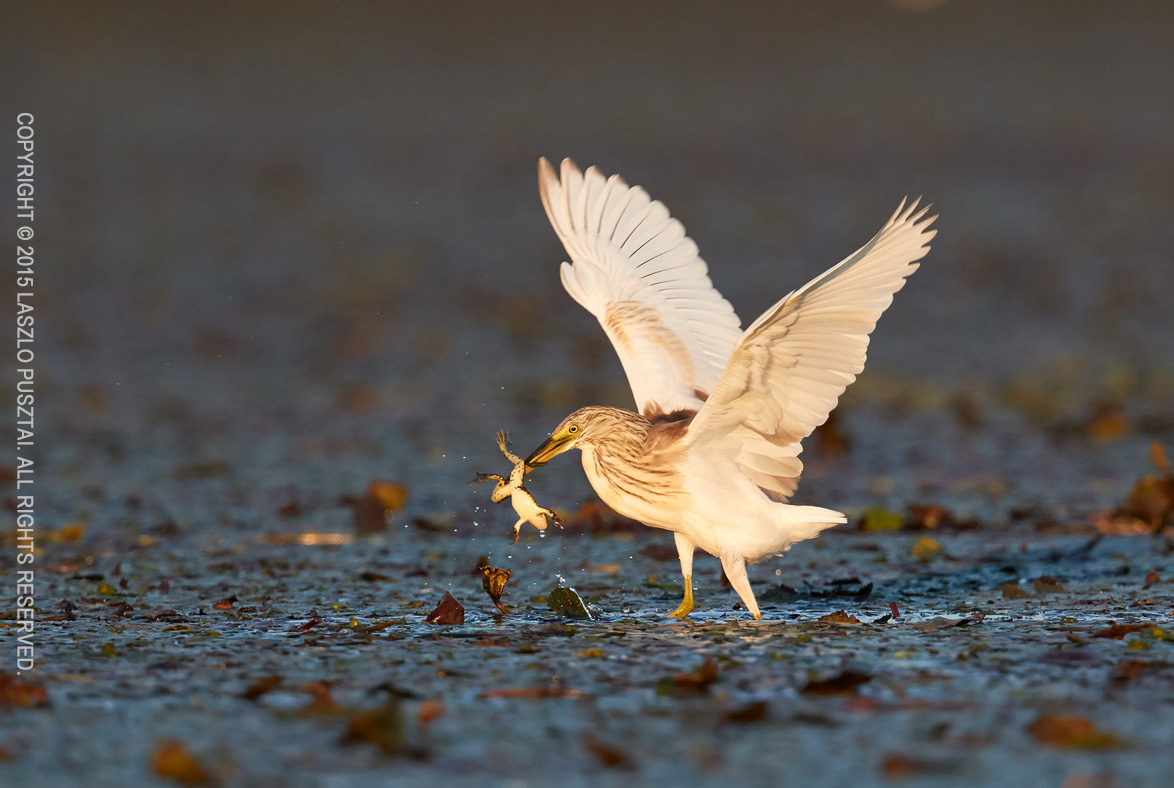
Breakfast for the nestlings

AF is superb. The best I’ve ever found on a Canon camera (excluding the 1D X, because of it’s faster focus driving speed). The only thing I miss is the AF mode selection lever of the 7D Mark II. I find myself reaching for the lever and cursing who’s responsible for this omission quite often.

A hot topic is the dynamic range of current Canon sensors. Well, while sometimes I would need more (maybe a handful of times during the last 12 years), what the 5DS R offers usually pretty much enough. Especially that I print my images where I have just 6 or 7 stops, and usually expose my images properly with no need to recover from the shadows. Also I like to utilize clipped highlights and shadows as artistic tools… So I’m not complaining on this front.

ddd

Good night!

As you may already think, I really like the 5DS R. It’s not the absolute fastest and the most suitable camera for bird photography, but those limitations are igniting my creativity and are not in the way of image making. It’s an exceptional tool for making the kind of photographs I have in mind.

Fall Colors – A Different Kind

Fall is the premier photography season for me. You get everything from bold colors, through creamy pastels, to the special atmosphere that morning and evening fog brings.

This year’s summer storms on Lake Tisza had wiped out lots of nests and birds are working a bit overtime to raise their nestlings. For me this provides great opportunities to combine fall colors into my bird photography.

sdf

Squacco Heron Catching Frog

As the water starts to get clear and water chestnuts are dying, you get these metallic blues everywhere – even at places where you only see vast water chestnut carpets summertime. The golds and browns of Squacco herons provide dramatic contrast against the water – so much that I had to lower saturation significantly on the above image (made in warm evening light).

Photographed with a Canon 7D Mark II and the astonishingly wonderful EF 500mm f/4L IS II USM lens (plus a 1.4x III teleconverter). I’m using the 500/4 II for about 5 months now, and planning to post my review soon.

Kuuvik Capture 2 Available on the Mac App Store

kc2icon@2xI’m proud to announce that Kuuvik Capture 2 is now available on the Mac App Store!

I’ve added a few features since the Beta 2 (see my previous post about the Beta 2 feature list):

  • Open in Application command to directly open the CR2 files in your favorite RAW converter.
  • Ratings in the CR2 files (set in the camera) are now honored.
  • Added clipping display control menu items to the image area’s context menu.
  • Added ability to work with Canon EOS 5DS and 5DS R images on computers that lack the GPU resources needed to display these images. Images are now downsized to 24 megapixels for display in this case (RAW files remain in their full resolution).
  • Added support for Canon EOS-1Ds Mark III, EOS 750D / Rebel T6i / Kiss X8i, EOS 760D / Rebel T6s / 8000D and EOS 1200D / Rebel T5 / Kiss X70 cameras.

You can download Kuuvik Capture 2 from the Mac App Store for a discounted price until the end of August. This discount serves as an upgrade price for existing users as well as an introductory price.

For the complete list of compatible cameras and computers please visit the tech specs page.

Kuuvik Capture 2 Beta 2 Released

We’ve come a long way since the Beta 1, with some significant departures from how Kuuvik Capture worked in the past. I bet you’ll spot the single most important new feature on the screen shot below.

kc2b2-with-ib

Graphical Image Browser

Session management has been completely rewritten for this beta. It became way simpler, as sessions are now just simple folders. And Kuuvik Capture now lets you quickly browse the contents of the session folder with the help of the Image Browser. You can rate the images with 1 to 5 stars, color label them, and sort according to your preference. Industry-standard XMP metadata files provide workflow integration with XMP-aware RAW converter apps, such as Adobe Lightroom and Capture One. (Well, in theory it should work with Capture One, but my fellow colleagues at Phase One screwed up their XMP parser and 99% of the time can’t load a well-formed XMP. Either ours or Lightroom’s. Even worse, if you enable Full Sync in Capture One, it would corrupt the XMP file… So Capture One is declared incompatible until they fix this.)

As a side effect, Kuuvik Capture can now be used to quickly cull a large number of images. Actually, this was one of the motivations to create the Image Browser. I want Kuuvik Capture to fully and seamlessly support my workflow.

I usually have a mix of images taken with Kuuvik Capture and my cameras alone, so I needed the ability to work on them together. When I’m birding, it’s now uncommon that I return with 2000 images from a single afternoon shoot – 90% of which goes to the trash. But culling with full-featured RAW converters was slow and painful. Now I can sweep through those 2000 images in roughly 1.5 hours – with all the help of the usual Kuuvik Capture tools like sharpening and focus peaking!

Positive Selection Culling

Contrary to the usual “throw out the bad ones one-by-one”, Kuuvik Capture sports a “mark the best & ditch the rest” concept of image culling. During the years, I found the negative approach (throwing out the bad ones) impact my creative process in a very bad way: I’ve been concentrating on the bad images, instead of the standouts. It was a kind of mental torture for me (not surprisingly, I had a huge pile of un-culled or partly culled shoots).

With Kuuvik Capture, I just give stars to the best images, to those that I really like (and those whose technical properties are also good). Then ask the app to trash the others. You also have the option to decrease star rating of remaining images (and start the process all over again). It’s simple, intuitive, and fosters positive thinking about the good images.

Multi-Touch Gestures

This beta also introduces a host of multi-touch gestures. Besides the usual, standard zooming and panning of images, we now support 90 degree image rotation with the flick-rotate gesture (it’s like trying to quickly rotate the image, and Kuuvik Capture detects the direction and rotates the image by 90 degrees).

In live view you can also flick-zoom (both in and out).

Built for the Canon EOS 5DS and 5DS R

The app has been designed and optimized to work with the huge images from the new 50-megapixel bodies. While it’s fast working with them, it became lightning fast on smaller (22 or less megapixel) images. The long delay between beta 1 and beta 2 is partly attributable to this process, as I had to replace a few slow, leaking and generally problematic frameworks with my own implementations. So the complete display engine is new, including the sharpening and peaking filters that now work properly on Retina displays.

Other New Features from the Beta 1

  • Streamlined user interface to give more screen space to your images and to support the new MacBook.
  • New raw decoding engine which is up to 5x faster than the open source library used previously. And consumes way less memory in the process.
  • Improved image display quality.
  • Improved focus peaking visibility in some situations.
  • Exposure information for the currently displayed image below the histogram.
  • RAW label to show when the histogram is generated from raw data (instead of white balanced ‘jpeg’ data).
  • Session information can be overlaid on the displayed image.
  • 11 new guide templates, including golden ratio, a dense 30×20 grid and several aspect ratio lines, such as 1:1, 5:4, 16:9.
  • Selectable guideline color.
  • Color pickers for both peaking and guides allow you to set the opacity.
  • A new menu item and hot key to cycle peaking color presets (yellow, white, green, magenta). Cycling also include your chosen custom peaking color if there’s one.
  • All panels (not just the Navigator) can be quickly revealed.
  • Event Log to notify you about problems that may influence your shoot (such as inability to write to the download folder or interference with other concurrently running remote control apps).

What’s Not In There?

Due to the sheer amount of change in the most basic parts of the app (camera communication, display, sessions), we had to drop two features from version 2.0. First, testing revealed that OS X’s PTP-IP implementation (that was used to drive the cameras through WiFi and Ethernet after dropping Canon’s SDK) tends to corrupt data under heavy load. So I removed network camera support until I roll out my own PTP-IP code.

Second, support for the 1Ds Mark III has been removed as it needs to be operated completely different from modern cameras. We will re-add support as we can put our hands on a 1Ds Mark III for a few days, and only if there’s demand for it (given the limited feature set that camera supports). The 1Ds Mark III is supported in the final release.

Availability

Beta 2 will be released to registered beta testers during the next day. This beta represents the final feature set for version 2.0, and if everything goes as planned, it will be released in the Mac App Store as soon as Apple approves it.

Kuuvik Capture 2 Beta 2: Performance

As Beta 2 of Kuuvik Capture 2 is nearing completion, I felt it’s time to talk about the incredible performance improvements of the product.

Beta 2 switches away from Canon’s EOS SDK in favor of my EOS Extensions library. EOS Extensions powers ShutterCount since its first day, and now Kuuvik Capture uses a heavily expanded version.

This change brings several improvements to the app. It is now 64-bit, sports a more fluid WiFi pairing experience, and occupies less than 10% of the disk space needed for Beta 1. But the most prominent improvements are in the energy consumption and processing speed areas.

Let’s jump right in. The following chart shows the relative energy consumption of the Beta 1 and the Beta 2 (as well as Canon’s EOS Utility for reference) while running live view. The Beta 1 figure is roughly the same as Kuuvik Capture 1 was.

All performance figures are calculated from measurements done on my 2012 15″ Retina MacBook Pro, and may change in the final product – but I think they are pretty much indicative of what you could expect.

kc2b2-energyimpact

Even the previous Kuuvik Capture incarnations were no slouch, but the improvement in Beta 2 is huge. It’s energy impact (which is a number OS X calculates mostly based on CPU utilization) is a tad less than 40% of EOS Utility! Actual energy consumption may be a little different as other parts of the system also draw power, but I would realistically expect 2x longer battery life on my MacBook than what’s possible with EOS Utility.

Also take into account that Beta 2 does a lot more number chrunching during live view than even the pervious beta: it’s output is visually better and now always color manages the live view stream. Because of the latter, the color management section has been removed from Preferences.

I mentioned that Kuuvik Capture 2 ditched libraw (an open-source RAW processing library), and now uses my own code. I cited some 2.2x processing speed improvements then. I’ve hand-optimized the RAW decoder in EOS Extensions, and image processing is now up to 5x faster than Kuuvik Capture 1.

kc2b2-processingtime

In other words, the Beta 2 loads and processes a huge 5DS R file on my MacBook Pro in about 1.6 seconds.

Yes, Kuuvik Capture 2 will support the 5DS and 5DS R. Raw decoding support is complete, and the cameras will be characterized and enabled as soon as my 5DS R arrives.

We have a few places left in the Kuuvik Capture 2 beta program. If you would like to participate, please download and complete the Beta Application and NDA form, and send it back to beta@direstudio.com. If your application is accepted, you will receive download instructions within a couple of days.

Kuuvik Capture 2 Beta Available

The first beta build of Kuuvik Capture 2 is now available. If you would like to participate in the beta, please download and complete the Beta Application and NDA form, and send it back to beta@direstudio.com.

Seating is limited, so we can’t guarantee that every applicant will be chosen as a beta tester. If your application is accepted, you will receive download instructions within a couple of days.

kc2-2

The above screen shot shows the updated black & white peaking mode. What’s new here is the way black & white conversion is done. It handles reds significantly better. For the technically inclined, we are now using HDTV-like luminance calculation, while the old version used SDTV-like calculation.

For the complete list of what’s new in version 2, please refer to my former post.