Building an Astrophotography Rig

Building an astrophoto rig is like building a custom motorcycle: it’s expensive, time consuming and involves a lot of DIY. There are some outstanding parts available, but assembling them into a great tool isn’t trivial. You have to do lots of research. I decided to share my experiences along the way as I build my setup – and this is the first installment.

When I started this project, my goal was to be able to utilize the great primes in my existing lens collection and share the equipment to the greatest extent possible with my regular photography toolset. So there’s no telescope involved – I use my 500/4 instead for deep sky objects.

650D_1409_5103
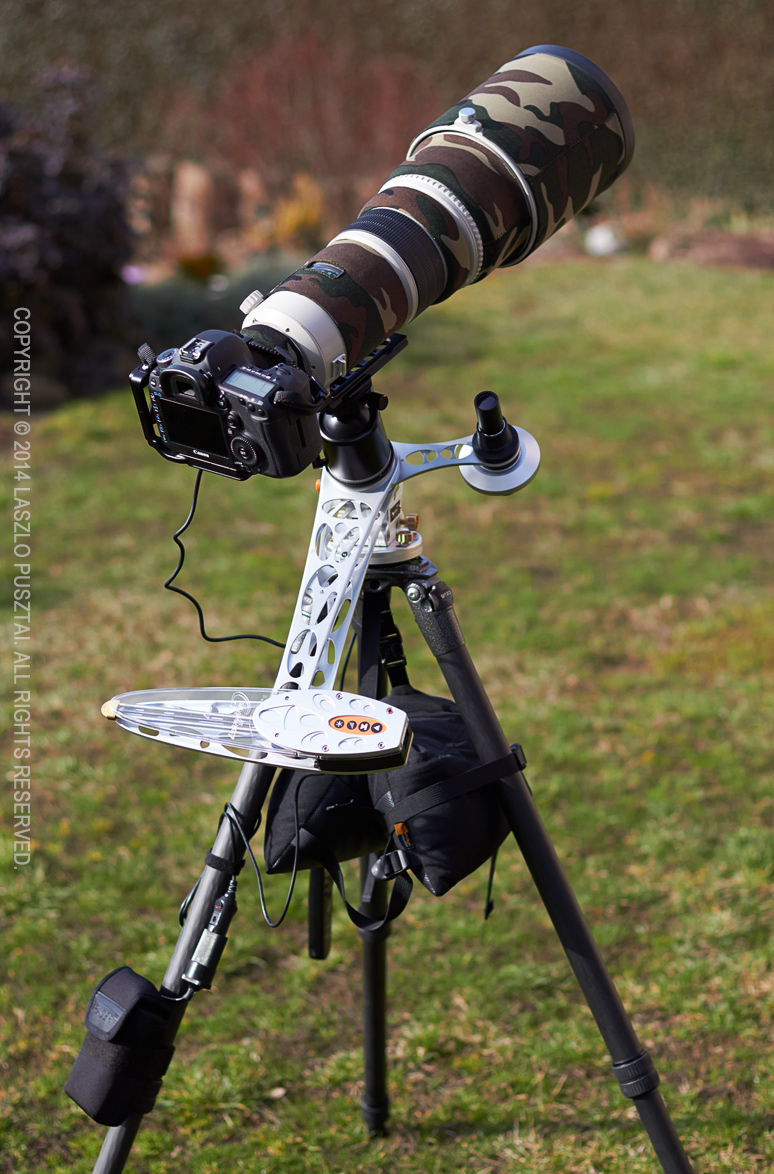
My current rig (with the 500 installed) is on the left. Let’s forget about the camera and lens for this post’s sake, and concentrate on what’s below them.

Basic Support

The central part of this setup is the tracking mount, which compensates for Earth’s rotation. This is a mandatory piece of equipment if you want to use anything other than wide angle lenses and short exposures.

I decided to go with the AstroTrac TT-320X-AG. This is a “barn door” type mount, where two arms open up like a scissors. This device is small and light, and provides the tracking accuracy of regular equatorial mounts weighing 20x as much or more.

Of course the AstroTrac is in equatorial arrangement: you have to align its rotation axis with Earth’s. To allow precise alignment you’ll need a geared head between the tripod and the tracker. A ball head won’t do it. AstroTrac also makes a head, called a wedge is astro parlance, the TW3100. This provides great controls for very precise adjustment and is lightweight.

A heavy-duty, stable tripod is essential. Fortunately it is not a new requirement for me – and I use a Gitzo 3532LS. This is a great tripod, and the ability to rotate the top plate is godsend for rough tracker alignment. To improve stability I extend only the upper (thicker) leg section and hang a beanbag on the top plate’s hook.

The top plate of the tracker is the home of my regular ball head, an Arca-Swiss Z1sp. With a breaking point somewhere around 50-60kg, this head can easily support even the 500mm lens. Just have to be careful with loosening the knob when the 500 is mounted.

Powering the AstroTrac

Well, this was the point where things started to look ugly. The AstroTrac mount needs 12V DC. They sell a very basic (read crap) AA battery holder, but using alkaline AAs is a no-go in my book. So I needed a rechargeable 12V power source. First though about using ten AA NiHM batteries (again, in a crappy holder), but charging lots of AAs is a pain in the butt. Another solution would be to use a 12V car battery. There are lots of car battery based astronomy targeted power sources around, but they weigh several kilograms – definitely not on the portable side.

Surfing the web for hours I ran into Tracer’s lithium polymer battery packs, and ordered the 4Ah model immediately. This is the block you see on the lower left corner of the above picture, Velcroed to the tripod. It sports a 12V cigar lighter plug, which connects with the AstroTrac’s fused cigar lighter cable.

This battery provides enough juice to run the tracker for up to 16 hours, and weighs just 330 grams. Problem solved.

Polar Alignment

To help in precise polar alignment, a polar scope is needed. And this is the weakest offering in AstroTrac’s product line. The tracker and the wedge are great, well built products, but their polar scope is a bad joke. It has an illuminated reticle on which you have to place three stars in marked positions. But this reticle is not collimated (centered) in the factory! To make things even worse, collimation can be done with three tiny grub screws – a totally unusable solution. Even after I replaced them with thumbscrews, I had to re-collimate it quite often. Another issue is that this scope is held in position with three tiny magnets. Just a small breeze, and the scope will fall. A small amount of pipe insulation around the scope solves this, but nevertheless this scope is sub-par. I had to look for a replacement.

650D_1409_5122And that was a competing tracker’s polar scope, from the Vixen Polarie.

Of course it won’t fit into the AstroTrac’s polar scope arm – the base of the Polarie scope is just 0.5mm wider that the hole on the polar scope arm.

My father machined a custom adapter that not only holds the scope in place, but I can screw it in securely.

Alignment with the Polarie scope is also easier. Much easier. Just set the current date, time and meridian offset on three dials, and place Polaris into the marked position on the reticle. Quick and easy.

The only downside is that the Vixen’s reticle is not illuminated, and you don’t see the markings by default. So I cannibalized the AstroTrac scope’s red LED illuminator, and shine on the front lens of the Vixen scope while doing the alignment. The background turns red, markings become visible, while I can still see Polaris well.

With the Polarie scope I can polar align the rig in just a few minutes – every time. It’s a difference like switching to a Mac from Windows.

Update 2/9/2015: now I’m using a much better solution with another Vixen polar scope.

Conclusion

I’m very happy with this rig. Polar alignment with the scope only is good enough for 2 minute exposures with the 500mm and the 5D Mark III – it might be good for even more, I just haven’t tried yet. For wide field work it’s more than enough. My only issue now is the number of clear, moonless nights…

  ☕ ☕ ☕

Did you enjoy this post? Consider buying me a coffee if so.

ShutterCount 1.1 with New Camera Support

ShutterCountIcon2xShutterCount 1.1 is now available on the Mac App Store.

In this release we have added support for Canon EOS-1D Mark IV, EOS 50D and EOS 550D / Rebel T2i / Kiss X4 cameras.

The complete list of supported cameras is available on the product page.

Also new is a FAQ page, which is available from the app’s help menu, or directly by clicking here.

ShutterCount for the Mac Released

My newest Mac app, ShutterCount displays the number of shutter actuations (the shutter count) of your Canon EOS digital camera. The shutter count is read directly from a USB-connected camera, and thus provides accurate numbers that are not attainable with simple EXIF-based methods.

ShutterCount

Simple is that. You can skip the trip to Canon for a reading, and you don’t have to pay every single time you want to check the count. Note however, that video clips recorded are not included in the number. For a separate mirror movement reading (that includes videos) you should still have to visit a Canon service center.

Speaking of money, you can grab the app at a special introductory price from the Mac App Store. This promotion runs until the end of October.

Supported cameras are the following:

  • Canon EOS-1D X
  • Canon EOS 5D Mark II
  • Canon EOS 5D Mark III
  • Canon EOS 6D
  • Canon EOS 7D
  • Canon EOS 60D
  • Canon EOS 70D
  • Canon EOS 100D / Rebel SL1 / Kiss X7
  • Canon EOS 600D / Rebel T3i / Kiss X5
  • Canon EOS 650D / Rebel T4i / Kiss X6i
  • Canon EOS 700D / Rebel T5i / Kiss X7i
  • Canon EOS 1100D / Rebel T3 / Kiss X50

Making It Easier to Put Your Cap On

Manufacturers usually go for “good enough” solutions, even if they can make something significantly more usable with just a bit of more expense. Case in point: Canon rear lens and body caps (I’m citing Canon here, because I’m a Canon shooter, but it also applies to most other manufacturers).

If you ever shoot in marginal light (if you are a landscape or nature photographer, I bet you do it most of the time), then probably run into the hassle of putting your caps on. To comply with Murphy’s law, you’ll always try to attach it in the wrong position at the worst possible moment (I even have a cap at the bottom of Bryce Canyon because of this).

We have a red alignment dot on the lens mount and on lenses, but the stock caps only contain a small, shallow hole marking the attachment position – which is pretty hard to see. And the solution is pretty simple: fill that hole with white (or your color of choice) paint! It can be done in a few minutes for your entire lens collection (after you mastered the technique – I’m using a thin wire to put just a drop of paint there).

My lens cap mod

My lens cap mod

I’m using this trick for almost a decade and haven’t had any issues with putting on the caps since then.

Canon EF 24mm f/2.8 IS USM First Impressions

My sister bought my beloved 24mm f/2.8 lens a couple of months ago (and is making some pretty impressive images with it, this one being my favorite). My good old 400mm f/5.6L USM also have a new owner, so I was thinking about what new equipment should all this money fund.

The first idea was to buy a Fuji X100S, but after trying it I decided that it would require me to accept far more compromises than I’m willing to, so turned back to get some good Canon glass. The 24/2.8’s successor to be exact.

The lens arrived yesterday and just put it through the initial tests and autofocus microadjustment calibration with FoCal. Here are my initial observations.

Image quality

It’s pretty damn good – as was the old 24. A little more resolution (+), a little more distortion (-), but very similar looking images. The center is crazy sharp (much better than my TS-E 24mm). Corners aren’t that sharp, but are still very good. No surprises here. Autofocus consistency is a bit down from 99.1% to 98.6% – they are practically the same in field conditions.

What surprised me pleasantly is the aperture sharpness profile of the new lens (after the AFMA calibration I usually do a focus consistency test as well as an aperture sharpness test).

as-24-old

Aperture sharpness of the old 24/2.8

Above is the old lens’ profile. Numbers from the vertical scale were removed intentionally, as they can’t be used outside of a single measurement (to compare lenses).

And here is the new lens’ profile.

as-24-new

Aperture sharpness of the new lens

Much better at f/2.8, and the sharpness is more consistent through the entire aperture range I routinely use (up to f/11).

Build quality

There’s a night and day difference between the 25 years old design and the contemporary one. The 24 IS’ build quality is on par with my 135/2L. Both utilize engineering plastic as the outer shell, and are tough, but still lightweight. The focusing ring is smooth and well dampened. The lens hood is, well…

Canon does not ship a lens hood with it by default. So it’s a separate purchase. With a lens in the L territory in many aspects (image quality, build quality and and also price), it would be nice to include the hood in the box. Heck, they can even put a red ring on this lens!

The hood itself is the best design I’ve seen from Canon yet. The only drawback is that you can’t remove the lens cap when it’s attached. You have to remove the hood to access the cap. Again, for this price I would expect to get the new center-pinch lens cap. So I might finally pull the trigger and buy a bunch of center-pinch Mark II lens caps.

Image stabilization

The lens belongs to my “travel trio“, so it will be used mostly handheld, sometimes in marginal light. I routinely do landscapes in those conditions and need larger depth of field, so a larger (f/1.4 for example) aperture isn’t a solution for me. But image stabilization is!

Did a couple of low light tests last evening: with a bit of patience I was able to handhold the lens up to half a second! 1/4 second exposures were a piece of cake (the test was done with a 650D, but I expect similar results on my 5D3).

I should also mention that the IS is so silent that I have to put my ears close to the lens to hear it. Also there’s no jump in the viewfinder image when IS is engaged. Light years ahead of the IS systems in my older lenses.

Conclusion

This lens is a winner. If you are into landscapes and want a lightweight and great lens, do yourself a favor and try one. I bet you’ll be immediately hooked.

Recently Canon refreshed their short non-L prime range (24/28/35) with great lenses. I can hardly wait for a similar refresh in the normal/short telephoto range (50/85/100). And may I ask for an image stabilized 135/2L?

RAW File Bit Depth Changes with ISO

Let’s begin with the fact. The usable bit depth of your RAW file depends on the ISO used to shoot the image.

I discovered this while working on the RAW histogram feature in Kuuvik Capture. To make the RAW histogram usable, we have to scale the data coming from the RAW file. This scaling ensures that the left side of the histogram represents pure black and the right side represents pure white. Technically scaling is done by first subtracting the black level from each pixel, then mapping pixel data from the [0, white saturation] interval into the [0, 1] interval.

Black level is the value your sensor emits when no photons reach a given pixel. This is calculated utilizing a black masked area along the edges of the sensor (see my former post on this).

White saturation is the value from the given pixel when it’s completely full – that is more photons reaching the pixel will not generate a higher value. This depends on physical attributes of the sensor. We do a series of measurements for each sensor to determine its value. The higher the white saturation the more tones your RAW file contains.

What surprised me during the initial white saturation measurements is that with most of Canon’s cameras this value changed as I changed the ISO. Some cameras even present different white saturation in different exposure modes (Av and M for example).

The following graph shows the result from these measurements converted into usable bit depth for four cameras up to ISO 6400.

bit-depth-vs-iso-2For the mathematically inclined, usable bit depth is calculated with the formula:

\(\log_2 (w – b)\)

Where \(w\) is the white saturation and \(b\) is the black level.

The roughly 0.3 bit difference between the lowest and highest values doesn’t seem that large at first sight, but this means that you lose 15% of the tones at ISO 640 compared to ISO 800. To put it another way it’s a 1/3 stop difference.

Implications

Avoid non-full-stop ISOs.

The truth is that both ISO 500 and ISO 320 are exposed at ISO 400, putting a 1/3 stop “digital exposure compensation” value into the RAW file. For the ISO 320 setting this produces an overexposed image, which should be pulled down 1/3 stop. The downside is that you lose 1/3 stop of both tonal and dynamic range. The upside is that there will be less perceived noise, which can be helpful in some situations (and which is the basis of lots of false myths)

Avoid ISOs < 200 on crop-sensor Canons.

As you can see on the graph above, bit depth on these machines are less below ISO 200 than on or above it.

What about the 1D X?

Some of the 1-series bodies are not prone to the 1/3 stop bit depth loss. For example the 1D X starts to show this behavior at ISO 12800. The 1Ds Mark III produces the exact same bit depth at each ISO. And the 1D Mark IV works like the 5D Mark III.

So my practice is to use just full-stop ISOs and forget about ISO 100 on crop-sensor bodies.