Technical Camera 2.6 : Ultra Wide Zooming, Camera Button, Highlight Alert

The latest update to our Technical Camera app had been released about a month ago. Besides the usual device support updates (for new iPhones and iPads) and iOS 18 related stuff (dark mode icons and so on), there are a couple of things I’d like to talk about.

Ultra Wide Zooming

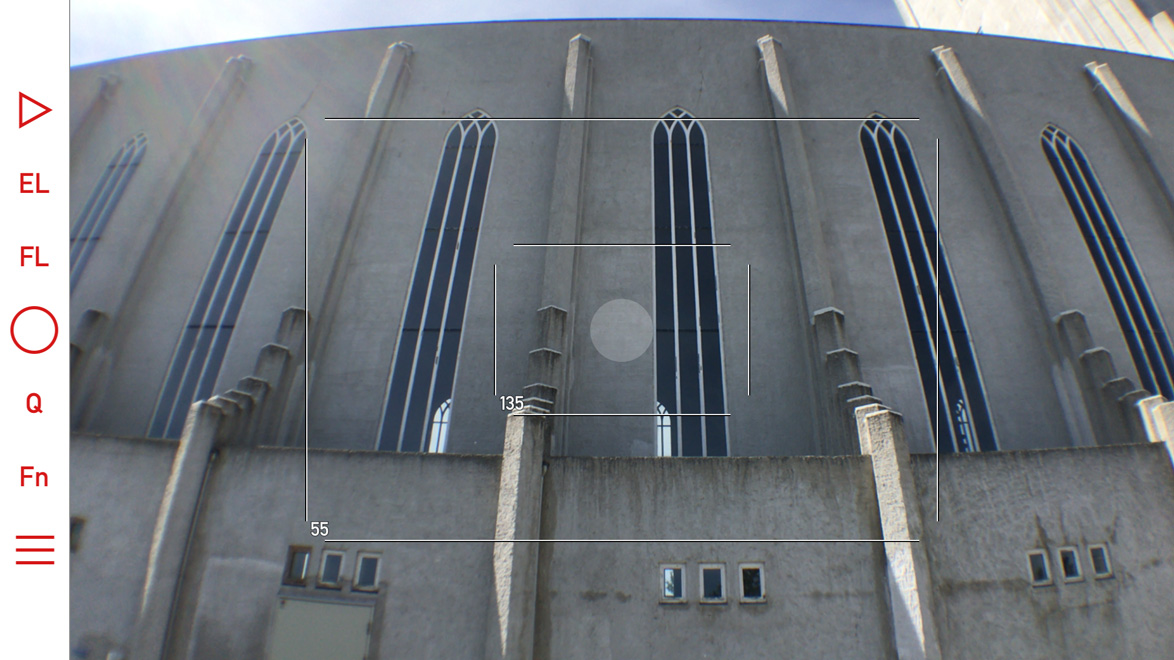
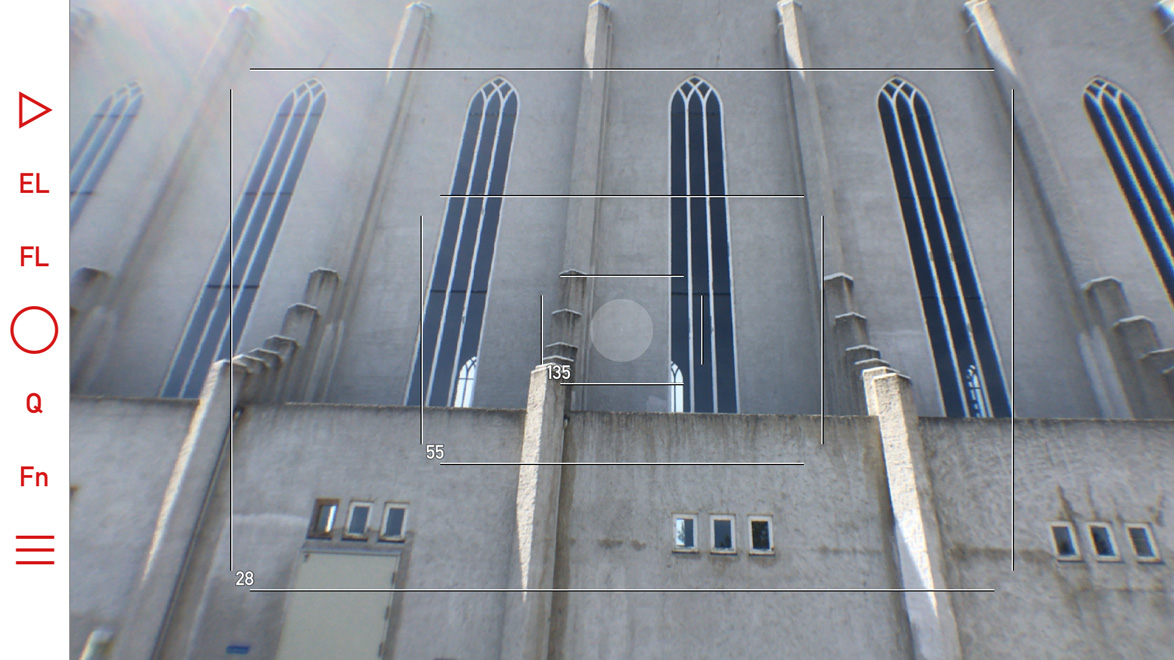
We use our own ultra wide camera distortion correction solution as it is far superior to Apple’s built in correction. For one, it allows precise simulation required in the Mark II Artist’s Viewfinder, and is behind the Framing Previsor in Tech Camera.

There is one limitation with the better correction, however: if the device’s ultra wide camera is way too distorted, then we can’t do the correction when one zooms in.

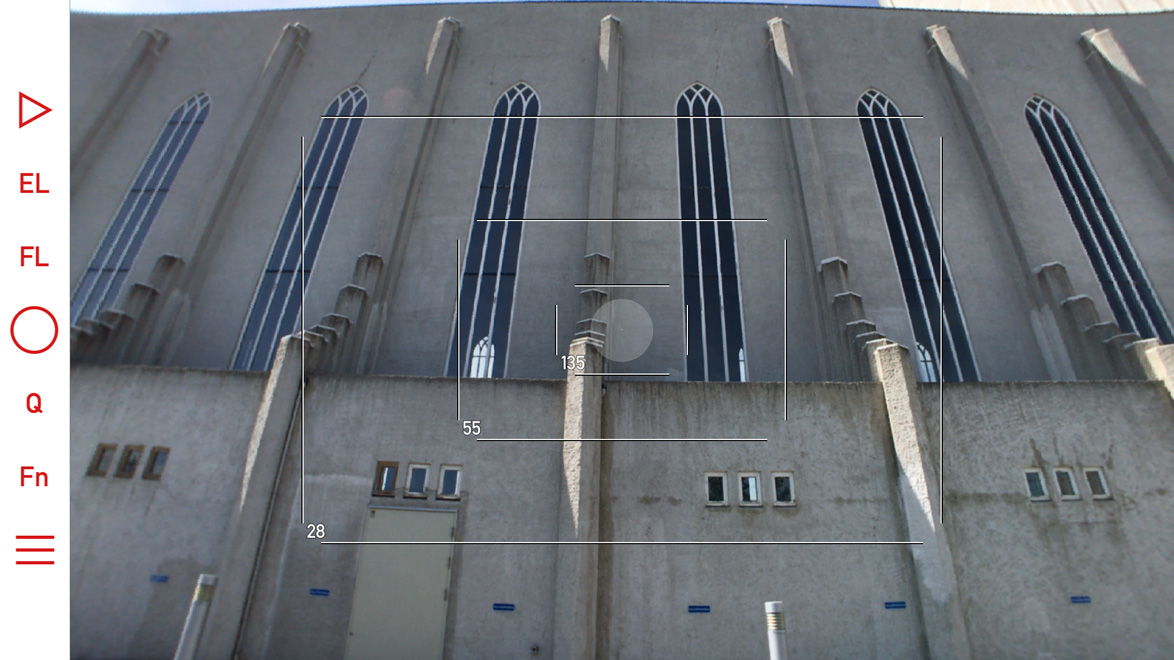
Fortunately the latest incarnation of Apple’s ultra wide cameras (in the iPhone 14 Pro, 14 Pro Max, 15 Pro, 15 Pro Max, 16, 16 Plus, 16 Pro and 16 Pro Max) are much better in this regard and thus we can do distortion correction when you zoom in.

Given the very short minimum focusing distance of these ultra wide cameras, this makes a formidable macro shooting solution.

Note however, that zooming is only available with JPG captures. For RAWs, you’ll have to crop afterwards manually.

Camera and Action Button Support

iPhone 16 models introduced the Camera button, which I honestly regard as a marketing gimmick. It reminds me of the Canon EOS R’s ill-designed touch bar… Since we have much better user interface solutions for camera control than this, we are not going to support it except for one thing: capturing images.

Speaking of initiating captures with hardware buttons, if you run iOS 17.2 or later, the Action button can also be used for this purpose. The only requirement is that you must assign the “Open Technical Camera” shortcut to it. But with this assignment, the Action button can be used to launch the app, and subsequently take pictures – without lifting your finger from the button. Pretty neat.

Highlight Alert Adjustment

There is a significant step back with recent iOS versions regarding non-HDR captures: the system lowers the dynamic range by about 10%… For no reason… It just stared to happen with newer iOS versions on more and more devices.

So since this is the new norm, we adjusted the highlight alert’s cutoff point to reflect the lower maximum. It’s sad enough that non-HDR dynamic range is reduced by iOS, but at least you can now see where will the system prematurely blow the highlights.

Capture Button Bonuses

One more thing. There are two minor, but nice things regarding the on-screen capture button. First, it has haptic feedback in case you enabled haptic feedback in both the app’s menu and on your phone in general.

Plus, try what happens if you disable Other Sounds in the app’s menu! Yes, you no longer have to put your phone or iPad into silent mode to avoid the ugly iOS shutter sound. Well, unless you live in Japan, where this feature is not available.

Kuuvik Capture 6.5 : Unaligned RAWs

There’s a serious disease spreading across the photographic industry, and unfortunately Canon also got infected recently. I’m talking about mandatory lens distortion correction. That is, when a manufacturer instead of doing proper optical correction, decides to make it in software. Well, the lens will get smaller and cheaper to manufacture, but micro contrast and resolution will suffer heavily. I do recommend checking out Bryan Carnathan’s distortion test images and reviews for more information. He did a groundbreaking job with publishing this information. For example this is how the RF 16mm f/2.8 looks.

Note that the RAW data in RAW files is not corrected. Only JPGs – and the JPG previews embedded into RAWs. And here lies the problem. Imagine the lack of alignment between a heavily distorted RAW data and the corrected rectilinear preview on images taken with the RF 16mm f/2.8 – and how unaligned Kuuvik Capture’s RAW clipping warning layers will become thanks to this.

To add insult to injury, Canon does not put distortion correction metadata into the RAW files, so there’s no chance to correct RAW clipping warning layers in the app.

You may ask: “You have distortion correction technology in your other apps, why don’t you profile and correct the lenses yourself?” Well, even if we did, the correction we apply would not precisely match what Canon does with the embedded preview JPGs. The only solution would be to expand Kuuvik Capture into a full-blown RAW converter and ignore embedded previews. This doesn’t seem to bet a good value proposition right now…

Since I have tons of experience with software distortion correction and its negative effects on image quality, I would never buy a lens requiring software distortion correction for professional use. And recommend you to stay away from those as well.

How can you check that a lens requires mandatory correction? Go into the Lens aberration correction menu on your camera and if the Distortion correction item is set to ON and grayed out, then you’re dealing with mandatory correction.

Canon’s distortion correction setting

For RAW shooters I highly recommend to turn ALL corrections off here. You want the embedded preview to reflect what’s contained in the RAW data as much as possible, so these are all working against you.

Beginning with version 6.5, Kuuvik Capture will not load RAW data by default if it detects a distortion corrected embedded preview. It will display a warning message instead so you can know about the situation.

Of course you can override this and load RAW data regardless. There are a lot of lenses where this correction have slight effects. Or you might forgot to turn distortion correction off on your camera and still want to have a RAW histogram. The choice is yours. But you can make an informed choice.

If RAW data is loaded for an image having distortion correction, the RAW histogram will be labeled Unaligned RAW so you can be aware of that RAW clipping warning layers may not be properly aligned.

You could have a situation where you have a bunch of images with in-camera distortion correction applied, and it would be a pain to override the new loading behavior manually for each one.

So we added a new preference to control RAW data loading behavior. Instead of the former checkbox, you now have three choices: Always, Aligned Only and Never. The default is Aligned Only. Choosing Always will restore the previous app behavior and load RAW data if present regardless of the preview’s distortion correction.

RAW loading behavior setting in Kuuvik Capture 6.5

List of lenses with mandatory distortion correction

As of 1/10/2024, I’m aware of the following Canon RF lenses requiring mandatory software distortion correction. Most of them exhibiting an extreme level of barrel distortion.

  • RF 16mm f/2.8 STM
  • RF 24mm f/1.8 Macro IS STM
  • RF 28mm f/2.8 STM
  • RF 10-20mm f/4L IS STM
  • RF 14-35mm f/4L IS USM
  • RF 15-30mm f/4.5-6.3 IS STM
  • RF 24-50mm f/4.5-6.3 IS STM
  • RF 24-105mm f/2.8L IS USM Z
  • RF 24-105mm f/4-7.1 IS STM
  • RF 24-240mm f/4-6.3 IS USM
  • RF-S 10-18mm f/4.5-6.3 IS STM
  • RF-S 18-45mm f/4.5-6.3 IS STM

This is brutal. Even L lenses are affected. That’s it about the “RF mount enables higher quality optical designs” promise. Oh yes, may I mention the over-the-top focus breathing of Canon’s RF lenses? Not a surprise that I’m not remotely a fan of the RF mount.

With the unaligned RAW warning, Kuuvik Capture 6.5 helps you to be aware of one more nasty reality of today’s “digital world”. A little aid for professionals striving to make informed decisions.

Artist’s Viewfinder 6.5 Released with iPhone 11 Ultra Wide Camera Support

Version 6.5 of the Mark II Artist’s Viewfinder is now available on the App Store. This release brings long-awaited iPhone 11 ultra wide camera support.

We did face two serious challenges with the new phones.

First, despite being ordered on September 13, our iPhone 11 Pro and 11 Pro Max was delivered only on October 16. At first, the estimated delivery date was October 1, which had suddenly slipped to October 25.

After a series of rather angry phone calls, we finally got the devices on the 16th. As I mentioned earlier, Apple doesn’t treat developers equally in each country, putting us at serious competitive disadvantage, and causing excess costs. This is an ongoing issue since we started this business a decade ago, and I’m not going to dissemble it any more.

Second, the ultra wide camera “out of the box” turned out to be grossly inadequate for the task. To begin with, its angle of view differs between live view and taken pictures. And to add insult to injury, Apple’s distortion correction leaves heavy barrel distortion. Unacceptable things for a precision instrument like Artist’s Viewfinder.

Fortunately we have proven, mature distortion correction technology since 2013, so disabling Apple’s stuff and rolling out our own resolved the issue. But at this point we had to buy an iPhone 11 too, just to profile the ultra wide camera…

So after two and a half weeks of hard work the app is ready, and I’m pleased with the results. The ultra wide camera works like a 0.5x-class converter lens and can simulate a 15mm lens on the 35mm format (a 14mm is slightly clipped), or the Rodenstock HR Digaron-S 23mm f/5.6 with a 40x54mm back.

Marketing folks tend to live in an alternate universe where math is distorted. Apple markets the iPhone 11 as having a 13mm and 26mm equivalent (in 35mm terms) camera. The reality is that in 35mm terms, the horizontal (longer side) angles are equivalent to 14.5mm and 28mm lenses. Maybe they are comparing the diagonal angles, which although let them show shorter focal lengths because of the aspect ratio difference (2:3 vs 3:4), is misleading. It’s just like when Canon marketed a 6000×4000 pixel camera having 24.3 megapixels… Where the hell that 0.3 megapixels are coming from? (Well, maybe from the inactive sensor area being included in the megapixels number, but its still cheesy.)

Sorry, I had to vent… Now back on track.

Just like a regular wide converter, the ultra wide camera can be activated with the WIDE icon on the Quick Control Screen or via the Toggle Wide Mode function assigned to a Smart Function Key.

RAW capture, optical image stabilization and focusing is not available with the ultra wide camera due to hardware limitations.

Using external accessory lenses with iPhone 11 models is not supported. You don’t need one, just mention it for the sake of completeness.

The Viewfinder Handbook was also updated to reflect the new features.

This update is free for existing users. New users can purchase the app in the App Store.

Technical Camera 1.6 : The Ultra Wide Camera

The most heavily touted feature of the iPhone 11 series is the ultra wide camera. Don’t get me wrong, it is a useful tool, but disappointment is guaranteed if you blindly believe the marketing spiel.

Why? Because the ultra wide camera isn’t a first class citizen on the iPhone. It can’t shoot RAW, doesn’t have optical image stabilization, has no focusing of any kind and has severe distortion that is only partially corrected by iOS. You may wish to read my former post for more details.

It was a real challenge to make this thing live up to the quality demands of Technical Camera and to the high expectations of its users. There are a few aspect we can’t change, because hardware is given. But fortunately, I’m a seasoned expert in the correction of the most annoying of its properties: distortion.

Time to show off…

Technical Camera distortion correction compared

There’s no need to talk a lot about it. Technical Camera can give you a well corrected, almost perfectly rectilinear image, while the built-in camera app – and most others – simply can’t. This is where six and a half years of experience shows. So if you shoot buildings, interiors, or anything else where barrel distortion is a problem, then you will appreciate my app.

The apparent image quality difference which comes through even at this small size is partly attributable to the ability to use manual ISO in Technical Camera. The above image was shot at ISO 200, while Apple’s Camera app used ISO 1250.

Live view in Technical Camera shows you exactly what you get in the final picture, so you can frame your shot precisely. Apple’s camera app captures a little wider (and more distorted) image than its live view shows.

On the positive side, the ultra wide camera provides better image quality than any wide converter accessory lens I’ve ever created a distortion correction profile for. You still get corner smearing, so I do recommend to use a lower resolution image quality setting, such as JPG Quarter HQ with this camera.

Speaking of image quality settings…

If you happen to use an album that has RAW set as the image quality, and subsequently switch to the ultra wide camera, the app will warn you that since that camera can’t shoot RAW, JPG will be used instead. You can also choose to hide this warning. But don’t worry, it can be restored with the Warnings screen in the menu.

OK, but how do you switch to the ultra wide camera? There are two ways. You can use the WIDE icon on the Camera Options screen (which can be displayed by tapping the circle icon in the corner of the main screen). Tap the WIDE icon again to return to the default wide angle camera. Alternatively, you can set up a Smart Function Key with the Toggle Wide Mode function (the exact same way you do with a wide converter accessory lens). The latter method is what I use personally.

Version 1.6 is a free update for existing Technical Camera owners. New users can purchase the app in the App Store.

iPhone 11 UWA Camera : Disturbing Discoveries

After just spending a day’s worth with the iPhone 11 Pro ultra wide angle camera, I’ve discovered a few things everyone should be aware of. I’m rather tired of Apple’s half-assed approach to everything photography related. This is not a whining of a 20-something reviewer. This is from someone who wasted months of his life to transform Apple’s incomplete, amateurish APIs to something suitable for professional photo apps, and wrote exposure calculation, image encoding/decoding/display and color space transformation code along the way.

To anyone reading this at Apple: I’m open to provide you with consultancy to help get your act together and make a truly pro-level camera device / API.

No RAW

Take a look on any JPG file from the ultra wide camera. You’ll see heavy smearing and exaggerated chromatic aberration as you approach the corners. These are telltale signs of distortion correction going on (I have quite a lot of experience in this since I wrote the world’s first wide angle converter real-time distortion correction code on iOS for the Mark II Artist’s Viewfinder six years ago).

Which means that the laws of physics still apply, and supports my suspicion that the ultra wide angle camera in fact has a pretty awful tiny lens, with huge amount of distortion. And Apple doesn’t want to advertise this, so rather turned RAW capture completely off for this camera. Why? Leica, Nikon, Panasonic all do software distortion correction for expensive lenses, and the photographer at least have the freedom to correct it or leave the distortion in place for artistic purposes. (That I would never buy a 5 grand lens that require distortion correction is a tale for another day.)

The professional approach would be to provide RAW capture, and include distortion correction data inside the DNG so that RAW converters could pick it up (with the WarpRectilinear opcode).

2-3 Stop Vignetting

iPhone 11 Pro Max ultra wide camera vignetting

Now seriously. When one does distortion correction, why vignetting correction isn’t in place is beyond me. The above shot is just a wall shot under daylight, and not something suitable for exact measurements. I might do it later on, but currently this is enough to illustrate how much vignetting the image suffers from.

Again, the professional approach would be to correct this in JPG images and live video stream (or even better, provide an API to be able to control the correction), and include the necessary correction data inside the DNG files (FixVignetteRadial opcode).

No Focusing

This camera has a fixed focus lens. Read: no focusing of any kind. With such an ultra wide lens, the lack of focusing ability is mostly disguised by huge depth of field. But don’t expect to use it for ultra wide closeups.

Conclusion

Anyone touting this camera as a professional grade, DSLR (or even medium format) contender must live in a reality distortion field, powered by a huge marketing budget. Over-processed Apple JPGs suck. They always sucked. Not having proper RAW capture on the ultra wide camera is a huge drawback of the iPhone 11 series, hindering their usability for professional image capture.

  ☕ ☕ ☕

Did you enjoy this post? Consider buying me a coffee if so.

Custom Wide Converters in Viewfinder 4.7

My Mark II Artist’s Viewfinder app has a unique feature from day one. Something that no competitor managed to copy: real-time distortion correction for wide converter lenses. In the past distortion correction was available through the profiles we made for all the wide converter and device combinations the app supports. Creating these profiles involves tedious measurements, and of course a purchase of each and every converter lens and iPhone/iPad we support.

The profile approach was good a few years ago with a limited set of converters on the market, but these days you can find at least a dozen different converter lenses at online retailers. This, together with the product lineup splits Apple already implemented with the Plus phones and Pro iPads, renders the previous modus operandi financially unsustainable.

So we decided to address this situation in a way that is beneficial for both our users as well ourselves: by allowing users to create a custom wide converter. And of course we do support simple distortion correction with this! Being a simple correction, it does not always produce the almost perfect results the profile-based approach is capable of, but as you’ll se in the examples later on, very capable nevertheless.

We’ll continue to support the profile-based approach for existing combinations, but will add new profiles only if:

  • we already have the converter and the device in the lab, or
  • we receive several customer requests to support a converter – as it was the case with the Moment Wide lens, or
  • we cooperate with the converter’s manufacturer.

OK, with all that said, let’s see how it works. Once you select Custom for the wide converter, a new menu item – Custom Converter Setup – will appear on the menu.

cwc-setup
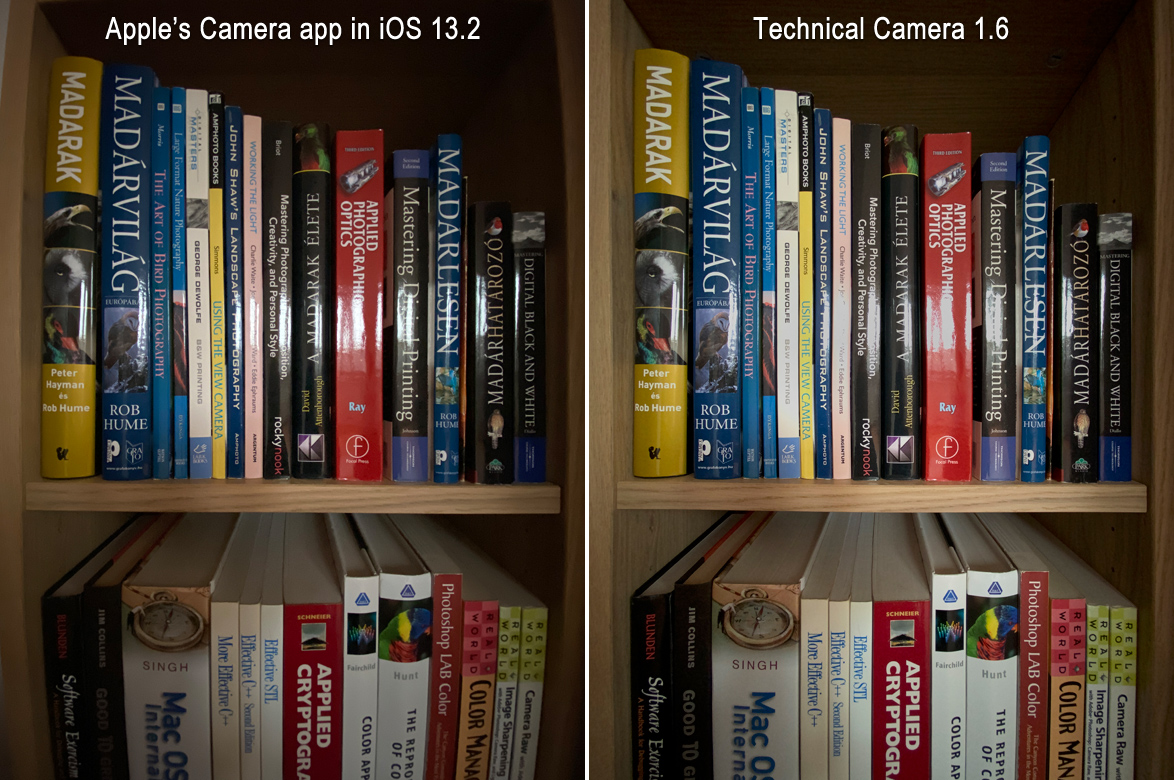
Tapping it will bring up the converter setup screen that you can see on the left.

You can set the converter lens’ actual conversion factor with the first slider. Since this is almost always different from what the manufacturer says, you’ll definitely need to fine tune it for your actual phone (since the conversion factor also depends on the phone’s lens as well as the distortion correction amount – be prepared for a little trial and error). We support converters with factors between 0.45 and 0.7.

The second slider is used to specify how much distortion the converter lens has. It is an arbitrary scale from 0 to 30, zero meaning that you will not want to correct the distortion (suitable for well-corrected lenses such as the Moment Wide).

The setup procedure

Here’s how I recommend to do the setup. Set distortion correction first (if needed at all). I’d recommend 15 as the starting point for 0.65x-class lenses and 20 for 0.5x-class lenses. Check how the main screen looks, and watch for overcorrection in the corners. In case you still have barrel distortion, go back to the menu, and increase correction. If the corners are overcorrected, back off a little. A tiled wall, a window or a tall building are good test targets.

Once you’re happy with the correction, mount the phone steadily, turn off Wide Mode, and set the main screen so that you have some objects or markings at the edges of frame lines. Now turn on Wide Mode and check whether the objects/markings are still at the frame lines. Go into the menu and adjust the conversion factor if not. Repeat until you are satisfied with the result.

You can create only one custom wide converter, so it is advised to take note of the parameters in case you need to restore them later.

Correction examples

Walked up to Hallgrímskirja in Reykjavík to make some examples with my iPhone 6s Plus and two olloclip converters. Here is how the 4-IN-1 Wide lens looks with no correction.

olloclip 4-IN-1 Wide on iPhone 6s Plus - No Distortion Correction

olloclip 4-IN-1 Wide on iPhone 6s Plus – No distortion correction

As you can see below, this lens has a simple spherical distortion, which can be corrected almost perfectly with the custom converter setup. My experience is that most 0.65x lenses behave the same way and would only marginally benefit from a profile. Note that I set the conversion factor ad-hoc in these examples, so you may see some discrepancy in frame line positions.

olloclip 4-IN-1 Wide on iPhone 6s Plus - Custom wide converter with distortion setting 13

olloclip 4-IN-1 Wide on iPhone 6s Plus – Custom wide converter with distortion setting 13

Now to the olloclip Ultra Wide. Distortion is huge, and without correction renders the lens pretty much unusable for viewfinder purposes.

olloclip Active Ultra Wide on iPhone 6s Plus - No distortion correction

olloclip Active Ultra Wide on iPhone 6s Plus – No distortion correction

And this is how it looks with the custom wide converter’s correction. You see some mustache-like corners as the simple correction is not able to eliminate complex distortions (which profiles can do), but the lens becomes usable.

olloclip Active Ultra Wide on iPhone 6s Plus - Custom wide converter with distortion setting 22

olloclip Active Ultra Wide on iPhone 6s Plus – Custom wide converter with distortion setting 22

Just like with profiles, the simple distortion correction works only with wide and ultra wide lenses – not with fisheyes.

When will this be available? The feature is currently in testing in version 4.7, and is planned to be released later this summer. In the meantime, comments are welcome.

The updated app is now available for download.