What’s New in ShutterCount 4.0

ShutterCount 4 for both Mac and iPhone/iPad is available now on the respective App Store. This major new release brings a host of under-the hood enhancements that will serve as a basis for exciting new features. But as always, new camera support (EOS RP and new DSLRs) is part of the package.

The first installment of these new feature (owner name editing, the copyright information template and IPTC export/import) is available for users who purchased the Plus Pack or have the Pro edition and is shared with Kuuvik Capture. Please read my former post on them before continuing.

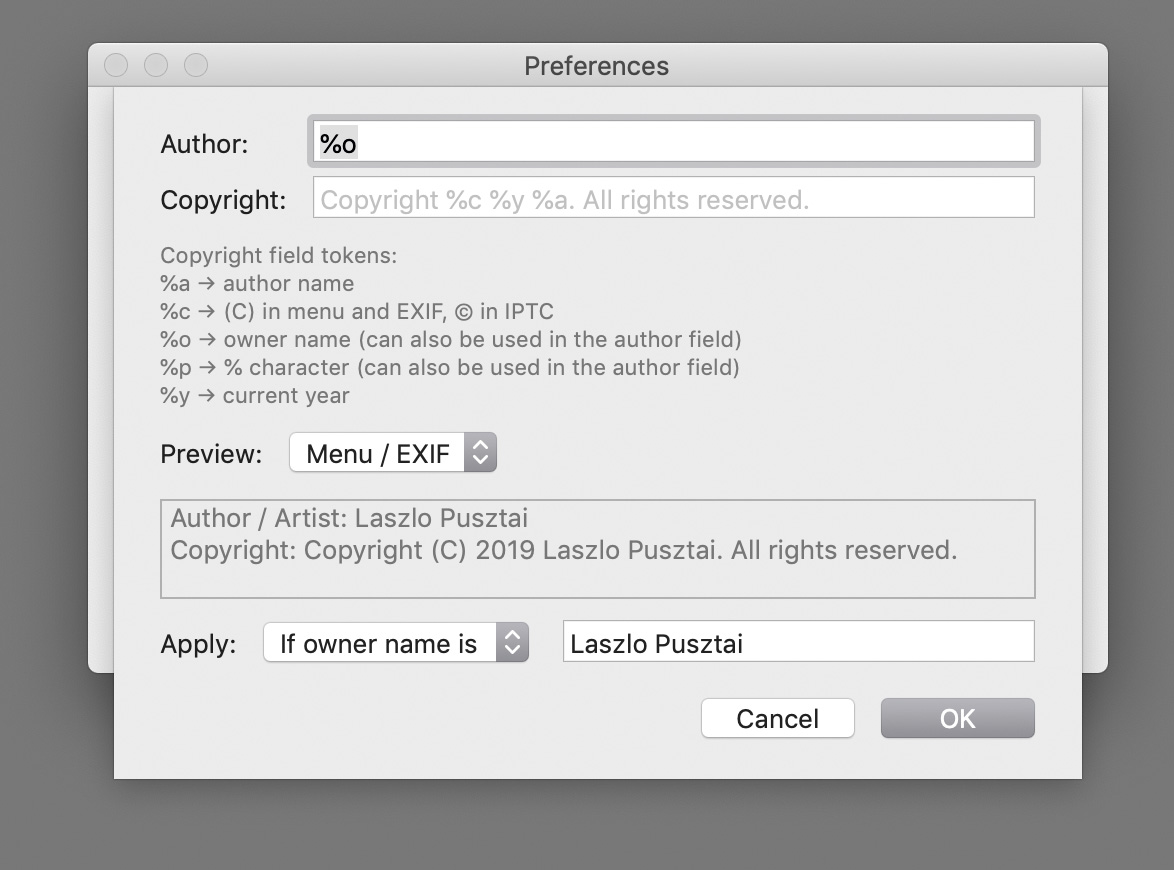
There are a few differences from Kuuvik Capture on a Mac, though. While the copyright information template is available from the Preferences dialog for both apps, owner name editing and IPTC export / import is directly under the Camera menu for ShutterCount (that is, no sub-menu). You can also click the Owner Name title on the Camera Summary tab to edit the owner name.

On iOS things are laid out a bit differently. Owner name editing and IPTC export / import can be found under Camera Settings on the More tab. And the copyright information template editor is also accessible from the More tab, via the Copyright Information item. You can also tap the Owner Name title on the Summary tab as a shortcut for editing the owner name.

As you can see on the screen shot, Prevent Auto Power Off makes an appearance in ShutterCount. Formerly camera connections were terminated when the camara powered itself off. But since you can now edit stuff, it wouldn’t be a great idea to let the camera go (in the worst imaginable moment, of course). So the default is to prevent auto power off. You can disable it if you want to, but we don’t recommend doing so.

Auto power off prevention is available in all editions.

Interference Detection

Canon cameras do not tolerate when multiple apps connect to them, despite the PTP standard would allow it. And instead of a clear error message, they just start to behave erratically. So apps, whose developers believe that every camera manufacturer respects the standard, could inadvertently kick Canon-specific apps in the stomach.

To avoid this, we had a technology to detect interference (that is, when some other app is already connected to and using a camera) since the early days of ShutterCount. Unfortunately Apple decided to kill this technology with the release of macOS 10.12 (and to add insult to injury, introduced a nasty bug in 10.12 that may ruin 5D Mark IV connections – see the end of Q5 in our FAQ).

So we ended up in a situation that’s a nightmare from product support standpoint. This was a high priority issue to solve.

I’m proud to announce that version 4.0 brings back the interference detection on macOS 10.12 and later (ShutterCount on iOS is not affected)! The only difference from the former implementation is that we are no longer able to pinpoint the impostor (the app already using the camera), but can detect the fact that there’s such an app. At the end of the day this is a much better situation, because we at least know for sure that this is the cause of the communication problem and could effectively help people in finding the culprit.

Speaking of these impostors, Photos is number one by far. We already knew it is, and since it pops up a window, it’s something easy to identify. But just hours after the release of 4.0, we got a few support requests complaining about the Another app is also using the camera error message, while there were seemingly no such app running.

Seemingly. You probably don’t know that not all such apps have a visible window. The investigation we carried out after these support requests discovered that the cause is… Dropbox.

Dropbox have a feature that allows you to upload every image when a camera connects. But it locks to all connected cameras regardless if you turn this feature off. This is a major oversight from Dropbox, and we already filed a bug report with them. I’ll let you know how it proceeds. But until they fix it, you should quit Dropbox when you want to use ShutterCount (and the same applies to Kuuvik Capture as well as other camera control apps).

Availability

Version 4 is a free update for existing users on both operating systems. New users can purchase the app in the respective App Store by following links on ShutterCount’s homepage.

Kuuvik Capture 4.3 Released

The latest update to Kuuvik Capture is now available on the Mac App Store. First and foremost, version 4.3 brings support for all recent Canon EOS cameras: EOS RP, 250D aka Rebel SL3/Kiss X20/250D II, 4000D aka Rebel T100/3000D and the previously forgotten X90. (I agree, Canon went completely insane with camera naming…)

There’s more, though. Camera info management (should I say housekeeping?) was always a pain in the back for me. Setting the owner’s name for new cameras, updating copyright information each year (not to mention updating the copyright part of IPTC metadata) was a tedious process. Since I want to keep metadata in my cameras up to date (so that all images could carry the proper one from the beginning), it’s something mandatory for me.

Previous Kuuvik Capture (as well as ShutterCount) versions brought automated date/time/daylight savings time setting, and now we’ve extended it to copyright metadata. But let’s talks about the owner name first.

Setting the Owner Name

The camera owner’s name cannot be set from the camera itself, its only available to tethering/remote control apps. Why? Because if your camera gets lost (or stolen), chances are that the new “owner” had no chance to change it. So the device could be identified. This name is also embedded into all the images made with the camera, extending the ability to identify the original owner. It is not a perfect anti-theft measure, but might be helpful when recovering your lost property.

It’s pretty straightforward to set or change the owner name in Kuuvik Capture. Connect your camera, and click Camera > Settings > Edit Owner Name… in the menu.

The Copyright Information Template

While you can set both the author (aka artist in EXIF) and copyright properties from the camera, keeping the copyright info up to date when a new year comes takes some time. If you ever noticed a previous year’s copyright notice only when exporting the image from Photoshop – then this feature will be golden for you.

I always set the author to my name, and the copyright notice is something like:

Copyright (C) 2019 Laszlo Pusztai. All rights reserved.

This satisfies the requirements of several countries (some require the copyright symbol, others the “copyright” word to be present in the notice, and even some require to declare that you reserve your rights) and is something I have been using for decades. As you can see, the problem is keeping the year current.

The copyright information template can set both the author property and the copyright notice in new cameras, as well as keep the notice updated when a new year comes. You just have to connect your camera and it’s done automatically.

But you have to create a template first and instruct the app to apply it when a camera is connected. To create your template, bring up Preferences, and click Edit after the check box titled Apply copyright information template on the Camera tab. If you turn on the check box on for the first time it will automatically display the editor. Here’s how my template looks in the editor.

The Copyright Information Template Editor

The easiest way to set up your copyright info is to type your name in the Author field and click OK. The defaults will take care of creating the appropriate copyright notice in the format shown above. But you can also customize it.

One of the several tokens you can use is %o, which will be replaced with the owner name currently set in the camera. That is, I prefer to set the author to be the same as the camera owner (me). I leave the copyright field at its default. But if you have a long name, you may need to change it, as Canon cameras have a limit on how long the copyright notice could be. Jean-Baptiste Emanuel Zorg will definitely need to use a customized template… The Preview section will give you a live preview of how the expanded template will appear in the camera.

If your camera is IPTC capable (EOS R, 5D Mark IV, 1D X Mark II), then the app will also set up and activate IPTC metadata in the camera.

Let me stop here for a second. IPTC information you set must be separately activated with turning Add IPTC information on in the camera’s menu. Kuuvik Capture does it for you. But it always activates IPTC, and if you don’t want this, then you have to turn off applying the copyright information template.

If you already have IPTC metadata in place, then the creator and copyright fields will be updated. You can see how the IPTC fields will look like by changing the preview type to IPTC (instead of Menu / EXIF). The most important difference is that you can use accented characters in IPTC fields, but only ASCII is allowed for the camera menus (that will be written as EXIF fields into files). The app will automatically convert any non-ASCII characters entered into the author and copyright fields for the menu, including the copyright symbol itself. But will keep the accented ones in IPTC fields.

The template can be applied to all cameras unconditionally, or you can set up a filter limiting the application of the template to camera having a matching owner or artist name field. In case you regularly connect other people’s cameras and don’t want to mess up their copyright info. So I limit the template to my own cameras (where my name is the owner name). With this template, if I have a new camera, then only set the owner name, and the copyright info template takes care of everything else.

IPTC Export/Import

Speaking of IPTC info, you have the ability to export and import IPTC information from/to the camera. This function uses the same XMP files EOS Utility uses for its similar function, so you can freely mix and match the two apps to manage IPTC information. There’s an addition in Kuuvik Capture, though. While importing IPTC info, the copyright information template is applied to the imported file if the Apply copyright information template preference is set. So you can’t inadvertently import copyright info that’s inconsistent with the template.

The export and import functions are available under the Camera > Settings sub-menu.

I have a “default” IPTC info file, one that sets contact information in addition to the copyright related fields. I import this file to each new IPTC capable camera, and let the copyright info template take over after that.

Focus Bracketing with the EOS RP

The EOS RP introduced in-camera focus bracketing. Kuuvik Capture handles it as another type of camera controlled bracket. The camera’s focus bracketing settings are displayed in the app, but you can change them only on the camera. When camera controlled focus bracketing is active, hitting the Capture button will run the entire bracketing sequence. Note that the images are captured with electronic shutter, that is, they are prone to severe rolling shutter effect.

But since Kuuvik Capture has real, proper focus bracketing, I’d highly recommend to use that instead.

Availability

The update is free for existing Kuuvik Capture users. New users can purchase it in the Mac App Store.

I’ve also updated the eBook, which is available free of charge.

IMPORTANT: Please update to version 4.3.1 to resolve camera connection problems you may encounter with the original 4.3 release.

Canon EOS RP : My New Toy Camera

Previously held by the Canon EOS 100D (aka Rebel SL1), the toy camera is a special position in my photographic arsenal. The toy camera has to be small, light, relatively inexpensive, but simultaneously required to be a full featured camera, with at least decent image quality, suitable for a minimum of 30x45cm print size. And it must be a camera that’s a joy to shoot with.

The toy camera slots below my travel camera. I reach for it when even a lightweight travel system is too much. It’s always used in a no tripod, single lens configuration (I’ll refer to that single lens as the toy lens). It comes with me on short trips and sometimes on daily walks. When I anticipate good opportunities and want something significantly better than a smartphone camera.

For a very long time there weren’t any serious contenders for this position. But the RP took over quickly and effortlessly.

The EOS RP with the smallest and lightest “RF” lens: the EF 40mm f/2.8 STM on the EF-RF adapter

Originally I had been quite reluctant to get one, and honestly, I would completely ignore this camera if we hadn’t needed one for software development purposes. Then, as usual, I brought it with me on a few shoots, and the unexpected happened. I realized that:

The RP is an interface design masterpiece

Saint-Exupéry phrased what I consider one of the most important ideas every designer should internalize:

“Perfection is achieved, not when there is nothing more to add, but when there is nothing left to take away.”

Being a perfectionist, I strive to live along this line. This is not just reflected in our apps, but we also constantly in the process of slimming down our daily lives, cutting the unnecessary. The unnecessary, which only bogs you down in the long run.

Being a perfectionist requires effort and courage. It’s much easier to litter a camera with tons of stuff (customizable buttons for example) fearing what some half-educated reviewer or user might say. The designer has to analyze what’s really needed, and be brave to leave the unnecessary out. All the while keeping an eye on important things, because taking too much away could seriously impair usability.

I leave it to the reader as an exercise to analyze contemporary camera designs and decide which ones are littered with an overly huge number of (mostly customizable) controls and which ones are practically useless because the designer went too far with removing stuff. Canon does it mostly right (that’s one of the reasons I still shoot Canon), with occasional bad moves (like the direct print button, Wi-Fi button and the M-Fn bar) that tend to die out quickly.

The RP is one quick control dial closer to perfection for its use case (light travel/all around camera) than the 100D was, and also one M-Fn bar closer than the R.

Higher end Canons have two control dials (the main dials and the quick control dial). Lower end (Rebel) Canons have one dial (the main dial) and a button to switch the dial between two modes. They also either have a joystick or a 4/8-way controller, but never both. Since the joystick and the n-way controller have pretty much equivalent functionality, I agree with this approach. Adding a joystick along an n-way controller just increases ambiguity, and I consider it a bad choice. Yet so many people whine about the absence of a joystick on the EOS R…

The RP inherited the extensive (but not over the top) pro level customization capabilities of the EOS R, so it was pretty easy to configure everything the way I like. No button or dial left unused, and no function I need left unassigned. It’s pretty much perfect. The only difference from the R’s configuration is the AF point selection button. On the R it cycles focusing modes, but on the RP this function isn’t assignable to the button. So I left it on default, meaning that the AF point selection button is the entry point for both focusing mode selection and live view zooming. A little more button presses, but still not a big deal, as they are both infrequently used functions.

Both the control layout and the body shape contribute to great ergonomics and comfort, outclassing the 6D Mark II easily. I’m not a fan of the combined quick control dial/n-way controller solution on the mid-range Canons, and the RP definitely feels to be in a league above the mid-range offerings.

Build quality

Strong plastic over a metal core (sensor chamber). It’s rigid enough where precision counts, and the plastic shell guarantees that your fingers will not freeze onto the camera on cold November dawns. It’s also not the squeaky plastic that you may be familiar with on the 5D Mark II or M50. This was a really pleasant surprise.

I suspect that this construction is more than enough to dissipate the heat generated by still capture. Video might be different. But as I mentioned numerous times, I don’t shoot video, and if I did, I would get a real, proper video camera. And not blame an otherwise great $1300 full frame still camera that it can’t cook my dinner and can’t record cinema-grade 4k footage for hours in the summer heat.

The shutter button was another surprise. I grown to hate clicky shutter buttons (featured on all entry level Canons). So when I pressed the shutter on the RP for the first time, I started smiling. Both the half and full press positions are detected with a Hall effect sensor (or similar), so there’s no clicky noise, just like on my 1/5/7 series cameras, and on the EOS R.

Not all is rosy though. You notice the first sign of cost cutting with the fold-out LCD. The hinge is rather wobbly, noticeably so even in the fully closed position. And lacking any sealing gaskets, the battery/card door is clicking. This is caused by the tiny play (0.2mm or so) in the door’s lock and the spring that pops the door open. I might get used to it.

What bothers me the most is the image quality on the back LCD. For some reason, the edges of characters and icons are not solid, but have a pixelated/jagged appearance. I did notice this on the M50 for the first time, and now on the RP. It only affects the back LCD, the viewfinder is fine. Moreover, the screen looks gorgeous during firmware updates, so it’s not a hardware issue. Whether its just a marketing tactic to make the camera look and feel cheaper, or have a real technological reason behind it (some sort of power saving and/or heat dissipation technique) is unknown at this point. I’m not an expert in LCD drivers, so if anyone have a clue, please let me know.

Battery life

Well, power saving techniques are a question of life and death when you have a large sensor and a tiny battery. The RP performs a tad better than the M50, with a considerably larger sensor and a fractionally larger battery.

Eco mode is highly recommended, though. I did a few 4-hour sessions, with Eco mode on, and the battery indicator after 200-250 frames still reported full (meaning it was more than 50%) in each session. I did recharge the battery after each session. Nevertheless, I consider a second battery a must.

To be continued…

I had a pessimistic point of view when I started working with the camera. But the RP managed to get more attention and love. The transition happened after opening a few files in Photoshop, and seeing what this tiny little thing is capable of. For less than $1500 (including the EF 40mm f/2.8 pancake).

I know that the sensor is from the 6D Mark II (with slightly modified microlenses), the LCD is shared with several models, and the viewfinder is the same as the M50’s, but still, it’s hard to believe that Canon makes any direct profit on this camera. I sincerely hope it does.

In the right hands the RP is significantly more capable than the price, the spec sheet, a few reviews, and the cat & dog (not to mention New Orleans cemetery) pictures on some online outlets would suggest.

As soon as Capture One starts supporting the RP I will be in a position to comment on image quality of the toy camera + toy lens system, which I’m sure most of you are interested in. I did a few comparisons with Adobe Camera Raw converted files, and they look roughly as one would expect. Day and night better than what the 100D (and even the much newer M50 + EF-M 22/2 combo) produced, but far from what you get with an 5DS R + Zeiss/Rodenstock combination.

Fun tip: downsized to 6.5 megapixels (1/4 size), you get gorgeous, lively images…

I would not buy the RP as a serious main camera. And it’s totally unsuitable for sports/action/birding. There are much better options for those. But as a take everywhere and enjoy playing with camera, whose images can print nicely at 40x60cm, it’s absolutely great. Assuming that you pair it with appropriate lenses. But that’s a topic of another discussion.