Technical Camera : Highlight & Shadow Alert

Highlight and shadow alert is a very straightforward feature of Technical Camera. As the name implies, it warns you when highlights are going to be blown and shadows are about to go detail-less black.

Highlight alert in action

For example, the red highlight alert indicates that the Sun in blown on the image above. I also used Black & White mode as the alert is more visible this way, but of course the feature works with color images. The shadow alert’s color is blue. Both alerts operate on the luminance information of the image.

You can turn these alerts on and off either via screen options (tap the rectangle in the corner, then use the exclamation mark icon – shown in this post), or by assigning the Toggle Highlight & Shadow Alert (HS) function to a Smart Function Key and using the function key.

Of course the warnings are displayed on the live viewfinder image only, they are not saved into final images.

I find these alerts indispensable for shooting on an iPhone, because it tends to overexpose images and blow highlights.

Technical Camera is available now on the App Store, at a 30% discounted price until June 14, 9:00AM CEST.

Technical Camera : Auto ISO

Technical Camera features auto ISO capabilities usually found on higher-end cameras, and are unique in a mobile photography app. Auto ISO is active during fully automatic exposure and even when you set the shutter speed manually.

The following screen shot shows its configuration screen.

Auto ISO Configuration

You specify the allowed range with Minimum ISO and Maximum ISO. The range for minimum is 25-400 plus Lowest, and for maximum it is 50-1600 plus Highest. Both in whole stop increments. But wait, what Lowest and Highest means?

Let’s take my iPhone 7 Plus for example. The native ISO range for the wide angle camera is 22-1760, for the telephoto 20-1210. These values do not fall onto whole stop boundaries. Lowest and Highest are a way to use the ends of the native ISO range. So if you set minimum to Lowest on the 7 Plus, then the auto ISO algorithm will use ISO 22 as minimum for the wide camera and ISO 20 for the telephoto. This gives a slight quality advantage over using the whole stop ISO 25 value.

Speaking of the auto ISO algorithm, it is different for fully automatic and manual shutter speed modes. In the latter, it simply keeps the ISO value within the specified range. But in fully automatic mode two additional settings come into play. With Minimum Shutter Speed you can specify the preferred slowest shutter speed. The app will begin increasing ISO from the minimum when light is low and this shutter speed is reached. If there’s enough light to work at minimum ISO, then we’ll begin to increase the shutter speed. That is, the algorithm maintains the lowest ISO possible (to avoid higher ISO noise). The range for the shutter speed minimum is 1/20 – 1/4000 seconds, in full stop increments. Given the very short focal length of the iPhone /iPad lenses, 1/20s is hand-holdable without an issue.

But why isn’t that minimum even lower? The answer is screen refresh rate. With an 1/5s exposure you can’t keep a 20-30fps refresh rate, it will drop to 1/5s. And not just that, but exposure calculation and response to lighting changes also becomes slower. That’s why we chose the 1/20s default – as a good practical balance.

There’s a trick, however. By turning on Allow Slower Speeds the app will lengthen exposures beyond 1/20s in case the maximum ISO is reached. This could be very handy in low light situations.

Don’t be afraid to experiment with these settings, since you can always reset them to factory defaults with Reset to Defaults.

Technical Camera is available for pre-oreder now on the App Store, at a 30% discounted price. It will be released on June 12.

Technical Camera : Exposure Control

Technical Camera supports a wide range of exposure control tools, covering everything from full auto to full manual.  In this post I’m going to explain all of them, plus the preferences that alter how these controls behave.

Auto Exposure with Compensation

By default the app is in full automatic exposure mode. Technical Camera determines the ISO and shutter speed to use based on its Auto ISO settings (which is an extensive topic in itself, and thus a subject of another post – for now treat it as a black box that automagically sets your exposure).

But even in this automatic mode, you have the option to override the result of the exposure calculation and brighten or darken the image using exposure compensation.

Exposure compensation is one of the two functions that utilizes the vertical drag gesture. That is, tap and hold, then move up or down. Do the vertical drag on the left side of the screen, and you’ll control compensation. Do it on the right side, and you’ll control manual focus.

Vertical Drag Areas

These areas are orientation sensitive, so the left side always refers to the left half of the screen.

The Vertical Drag preference in the menu allows you to switch the sides (so that manual focus is on the left), or designate the whole screen solely for compensation or focus (but you’ll lose the other function in these cases).

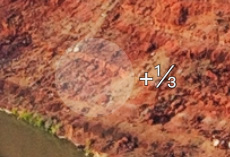
A number reflecting the current exposure compensation value is displayed next to the AF point. The number is dimmed when the drag gesture ends. Compensation range is +/-5 stops, in 1/3 stop increments.

To quickly reset compensation back to 0, press and hold the screen on the exposure compensation area for a second.

Exposure Lock

Tapping the EL key immediately locks the exposure at the current value. Auto exposure calculation will not take place while the lock is active, but changing compensation is allowed

The EL Locks WB preference in the menu controls whether white balance is also locked with the exposure.

Manual Parameter Setting

You can set the ISO and shutter speed manually if you wish. Aperture is fixed on all iOS devices at the time of writing, so there’s no way to change that. Technical Camera will continue to calculate exposure if you set one of the parameters to a fixed value (that is, it will calculate the other one automatically). You’ll have full manual exposure if you set both parameters manually.

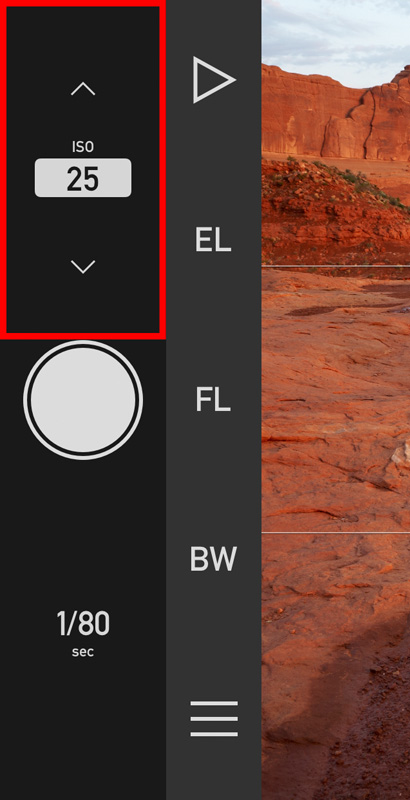
The app continuously displays the metered ISO and shutter speed value next to the shutter button. Tap the displayed number, and you’ll enter manual setting mode for that. For example manual ISO setting is shown on the left.

Manual setting generally happens in 1/3 stop values. The current value is rounded to a 1/3 stop value at the time you enter manual setting mode. I said generally, because in case of ISO some devices have lowest and highest values that does not fall onto 1/3 stops. For example ISO 22 on the low end. In this case these values will be also available.

Tap the displayed number again to turn off manual setting mode for that parameter. Automatic exposure calculation will take over immediately.

The arrows next to the number can be used to increase or decrease it. Tapping the arrow above (or on the right side in portrait orientation) of the ISO control will increase the ISO. Tapping the arrow below (or on the left side) will decrease it.

But there’s a neater way to accomplish this. The entire area around the number (marked with a red rectangle on the screen shot) acts as a touch pad: tap and drag on this area to change it continuously. On iPhone 7/7+ or newer you’ll even have haptic feedback so it feels like operating a real dial. Since the number is under your finger in this case, the app also displays it in the middle of the screen.

The shutter speed “dial” is a bit different. The reason is that there are two kind of people: those who prefer that the shutter speed dial increase the shutter speed in the up/right direction, and those who prefer that it should add more light in the up/right direction. Having the wrong behavior usually drives people nuts. So Technical Camera lets you choose between them with the Shutter Speed Direction preference in the menu.

Availability

Technical Camera is available for pre-oreder now on the App Store, at a 30% discounted price. It will be released on June 12.