Hardware vs Software Monitor Calibration

Monitor calibration produces a set of curves, one for each of the three color channels. These curves are responsible for bending and twisting the device’s native color to reach our calibration goal. Where these curves are stored is a main differentiator between regular and so-called “hardware-calibrated” monitors.

Regular monitors depend on the computer’s video chip to store the curves. Hardware-calibrated monitors store the curves inside the monitor’s look-up table (LUT).

MonitorVsVideoLUTs

Above are the calibration curves for my current setup as shown by the ColorEyes Display Pro calibration software. On the left are the curves for my Retina MacBook Pro’s internal display; while on the right are the curves for the EIZO CG241W monitor. Note that this software puts the curves either in the video LUT or in the monitor LUT – but not both. Other packages, such as basICColor Display tend to utilize both for hardware-calibrated monitors.

While the video card stores these curves at 8-bit, my EIZO’s internal curves are at 12-bit. At higher bit depth calibration is more precise and virtually eliminates color banding and seepage. Hardware-calibrated monitors also store the curves permanently (of course until the next calibration).

Calibration software loads the video LUT as part of the calibration process. But what happens if the computer is rebooted or turned off and on again on the next day? Unfortunately video card hardware does not store and automatically re-apply calibration curves on startup. So the question remains: where to store them and who will reload them?

Apple invented a fairly obvious solution to answer this question: embed calibration curves into the display’s ICC profile. This way they could be handled together as a single entity. Because the ICC profile specification does not provide any storage space for calibration data, Apple had created a new profile tag, the infamous video card gamma table (VCGT). To complete their solution ColorSync loads these curves when needed. Calibration packages also support this by embedding newly computed calibration curves into the profiles they create.

Windows 7 and above also sports a video card LUT auto-loading feature, but it isn’t as obvious as on a Mac. I would recommend reading my old post about the topic.

In the next installment of my monitor calibration series I’ll talk about what can one reasonably expect from proper calibration and profiling.

  ☕ ☕ ☕

Did this post help you? Consider buying me a coffee if so.

Keeping OS X Display Brightness Unchanged

In the previous installment in my monitor calibration series, I mentioned the need to keep monitor brightness unchanged after calibration – as any change to it invalidates the profile.

But what if I press the brightness control buttons on the Retina MacBook Pro (or on any other MacBook)? Should I immediately re-calibrate and re-profile? Well, there’s a slick trick.

MacBookBrightnessControl2MacBook display brightness is changed by default in whole unit steps using the brightness keys. But holding down Shift + Option while pressing the keys will change it to 1/4 unit steps – the same amount ColorEyes Display Pro (and other software) uses when controlling the display.
What I usually do after calibration and profiling is: increase the brightness by 1/4 unit, take note of the (previous) value, and immediately decrease it back to where the software set it. This way I could return the display to the calibrated state even if I had to change, or accidentally changed its brightness.

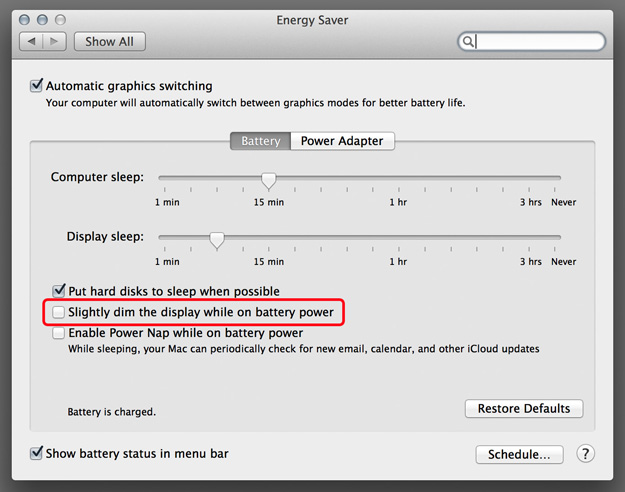
Another enemy of keeping the calibration intact is the display dimming preference of OS X – which tells the machine to slightly dim the display while running off of batteries. It might be useful for users not requiring color accuracy and consistency, but turn it off for calibrated displays (by default it’s on).

DisplayDimming2

In the next installment I’ll examine the differences between hardware and software calibration.

Monitor Calibration vs Profiling

The photographic industry uses these phrases somewhat interchangeably, but they are two completely different concepts. So in this post I’d like to shed some light on what is what. This is the first in a series of posts about the subject of monitor calibration.

Calibration is the process of bringing a device into a known working condition. In case of monitors it consists of setting the device’s black point, white point and tone reproduction curve (sometimes incorrectly called gamma). The exact values for the calibration parameters depend on the actual application, but let me explain what they really mean as well as what are their recommended values or value ranges.

The white point’s luminance controls how bright the display will be. One should choose a value according to the output’s intended viewing environment. 80 cd/m2 is widely used in the printing industry, but not each monitor is capable of reaching this luminance or working there without ill effects. Some recommend 100-120 cd/m2 for brighter working environments. Output is the king, so one should set the working environment to match the output’s needs. Note that values over 120 cd/m2 will cause eye fatigue pretty fast. Top end EIZO displays or even the displays in Retina MacBook Pros has no problem working at 80 cd/m2. Actually the MacBook’s display is a bit over 50% of its brightness range at 80 cd/m2.

The white point’s color temperature controls how blue or yellow whites will be. The printing standard is D50 (5003K), where all wavelengths are roughly equally present. This is a good match for natural white papers, but brighter papers, loaded with optical brighteners might ask for “bluer” white, with higher color temperature, such as D65 (6504K). Ideally one should measure the color temperature off the papers. Regular monitors, especially those with bluish LED backlight have a hard time reaching D50: the blue channel is lowered too much and posterization kicks is. But the Retina MacBook Pro for example can be used at D50.

The black point controls how blacks will be handled. Its luminance should be set to minimum to utilize the monitors black separation capability as much as possible. ColorEyes Display Pro – the monitor calibration software I use – has a unique setting controlling how blacks are rendered. Every output device, be it a display or a printer, plugs the shadows to some degree. Relative black rendering tells ColorEyes Display Pro to find the lowest value where there’s still detail in the blacks and create the profile to map 0/0/0 there. Actually most calibration/profiling apps do this. But this not just makes matching multiple monitors almost impossible, but also causes problems with print preparation, because printers also tend to plug deep shadow detail.

The other choice in ColorEyes Display Pro is absolute black, which maps 0/0/0 to the absolute black (you know, the proverbial black cat in an unlit coal mine, in the middle of a moonless night). It results in more precise profiles not to mention that it makes multi-monitor matching possible.

A fortunate coincidence that both my EIZO and my MacBook Pro’s Retina display start to plug shadows where my favorite Hahnemühle papers do (around 8/8/8, the EIZO being a bit better and the Retina a bit worse), so using absolute black rendering I can see on the monitor how the paper will behave.

Digital files represent image data quite differently than humans see. For a digital file (and also sensors) the brightest stop contains half of the numeric values usable at a given bit depth (e.g. 128 for a 8-bit file, 32768 for a 16-bit file). The second stop contains quarter of the values, and so on. This presents two problems: 1) darker parts of the image would get only a few different levels, resulting in posterization, 2) it would be quite difficult to work on these files due to the lack of “perceptual uniformity”, that is 128/128/128 is not twice as bright as 64/64/64. The role of the tone reproduction curve is to map file values into humanly “processable” values. Human perception follows a power-law; so using a single exponent can attain a surprisingly good approximation of the “ideal TRC” of human vision. This exponent is known as the gamma, and the mapping using the TRC is called gamma correction.

A gamma value of 2.2 gives a pretty good approximation of the ideal TRC, but plugs the shadows. To compensate for this, the sRGB TRC, which uses a 2.4 exponent combined with a linear section in the deep shadows, was invented (this is used as the TRC of Lightroom’s internal Melissa RGB working space). You could safely forget about gamma 1.8, a relic from the ages when Apple computers and printers used to have an internal gamma greater than 1.0. Well, the simple gamma TRC itself is a relic from times when computers were slow and storing and working with a few kilobytes of curve data was infeasible.

Nowadays we have a markedly better solution, called the L* curve. This is the most precise approximation of the ideal TRC, and doesn’t present a problem for today’s (and even yesterday’s) machines. So I highly recommend to use the L* TRC. I moved to a completely L*-based workflow (including RGB and gray working spaces) five years ago, and never looked back. But this is another story.

Profiling is the process of measuring the device’s color reproduction capabilities and creating an ICC profile file. In case of monitors it simply measures and stores the red/green/blue primaries and the color temperature of white. Well, the profile might also contain calibration curves (my ages old post explains this Apple invention in detail – its about Windows, but you’ll find useful information in the “Issue” section even if you happen to use a Mac).

Calibration and profiling walk hand in hand. There’s no point in calibrating a monitor without profiling it, and vice versa, profiling without prior calibration is an exercise in futility. Why big name measurement device manufacturers market low-end devices that are incapable of doing proper calibration is beyond me. Avoid these at all costs.

There’s an important consequence: one can’t freely change the monitor’s brightness and/or contrast after calibration, as it would invalidate the calibration and the profile built on top of it.

And I’ll discuss how OS X can be made a cooperating partner in keeping these constant in the next installment.