iPhone 11 UWA Camera : Disturbing Discoveries

After just spending a day’s worth with the iPhone 11 Pro ultra wide angle camera, I’ve discovered a few things everyone should be aware of. I’m rather tired of Apple’s half-assed approach to everything photography related. This is not a whining of a 20-something reviewer. This is from someone who wasted months of his life to transform Apple’s incomplete, amateurish APIs to something suitable for professional photo apps, and wrote exposure calculation, image encoding/decoding/display and color space transformation code along the way.

To anyone reading this at Apple: I’m open to provide you with consultancy to help get your act together and make a truly pro-level camera device / API.

No RAW

Take a look on any JPG file from the ultra wide camera. You’ll see heavy smearing and exaggerated chromatic aberration as you approach the corners. These are telltale signs of distortion correction going on (I have quite a lot of experience in this since I wrote the world’s first wide angle converter real-time distortion correction code on iOS for the Mark II Artist’s Viewfinder six years ago).

Which means that the laws of physics still apply, and supports my suspicion that the ultra wide angle camera in fact has a pretty awful tiny lens, with huge amount of distortion. And Apple doesn’t want to advertise this, so rather turned RAW capture completely off for this camera. Why? Leica, Nikon, Panasonic all do software distortion correction for expensive lenses, and the photographer at least have the freedom to correct it or leave the distortion in place for artistic purposes. (That I would never buy a 5 grand lens that require distortion correction is a tale for another day.)

The professional approach would be to provide RAW capture, and include distortion correction data inside the DNG so that RAW converters could pick it up (with the WarpRectilinear opcode).

2-3 Stop Vignetting

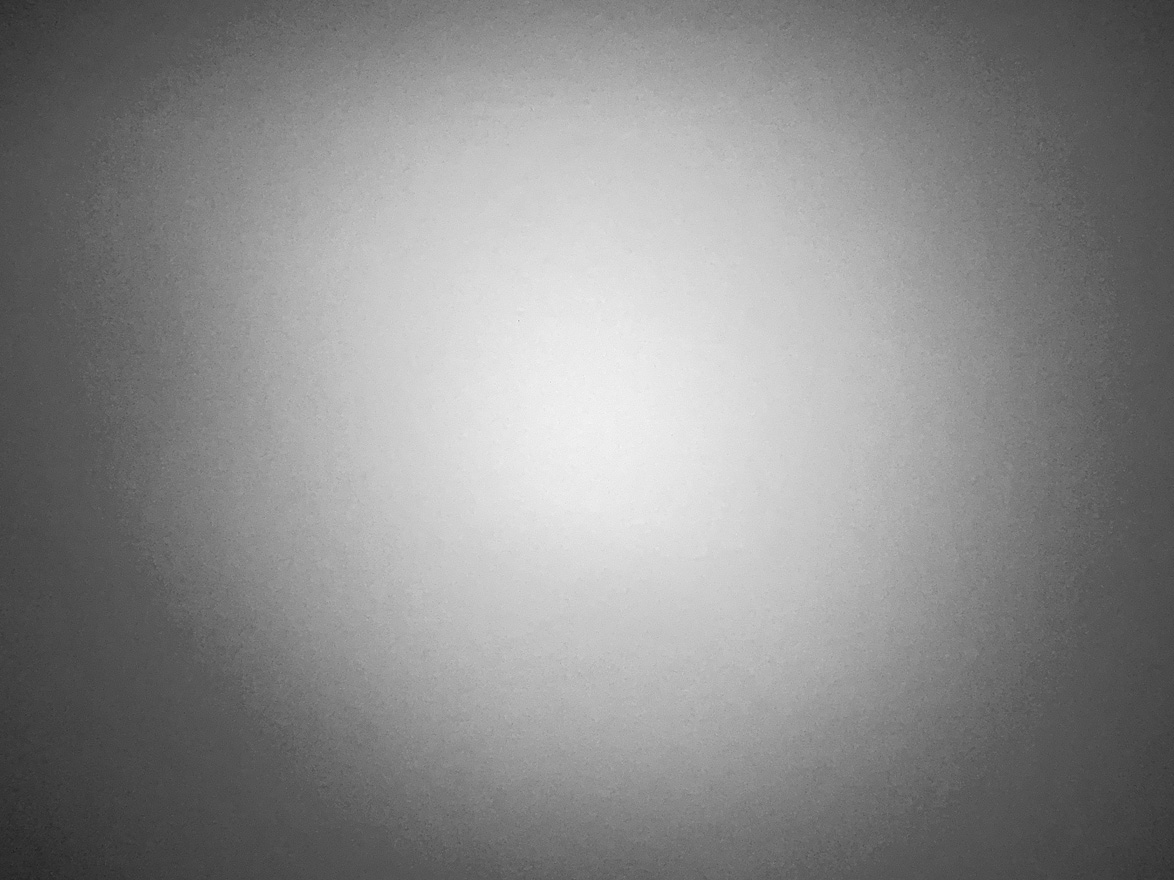
iPhone 11 Pro Max ultra wide camera vignetting

Now seriously. When one does distortion correction, why vignetting correction isn’t in place is beyond me. The above shot is just a wall shot under daylight, and not something suitable for exact measurements. I might do it later on, but currently this is enough to illustrate how much vignetting the image suffers from.

Again, the professional approach would be to correct this in JPG images and live video stream (or even better, provide an API to be able to control the correction), and include the necessary correction data inside the DNG files (FixVignetteRadial opcode).

No Focusing

This camera has a fixed focus lens. Read: no focusing of any kind. With such an ultra wide lens, the lack of focusing ability is mostly disguised by huge depth of field. But don’t expect to use it for ultra wide closeups.

Conclusion

Anyone touting this camera as a professional grade, DSLR (or even medium format) contender must live in a reality distortion field, powered by a huge marketing budget. Over-processed Apple JPGs suck. They always sucked. Not having proper RAW capture on the ultra wide camera is a huge drawback of the iPhone 11 series, hindering their usability for professional image capture.

  ☕ ☕ ☕

Did you enjoy this post? Consider buying me a coffee if so.

One Last Argument Against JPG

I’ve been teaching the benefits of shooting RAW (instead of JPG) for more than a decade. About a year ago, while developing the new display engine for Technical Camera and Kuuvik Capture 4, I did discover another strong reason why you should stop shooting JPG if you care about image quality.

Let me review the usual arguments first.

Limited, 8-bit depth. Digital cameras record at 12 to 16 bits per pixel. Even old ones and your iPhone are 12 bit devices, high-end digital backs are 16. Contemporary DSLR and mirrorless offerings record at 14 bits per pixel. Converting these high bit depth images back to 8 will have serious impact on dynamic range and color range. This is because the 256 possible steps in a JPG aren’t enough to describe a huge range of light and color. And then banding rears up its ugly head. For example, colorwise you are limited to the Adobe RGB color space, while your camera is capable of recording much more.

Fixed white balance. Once a JPG is created, white balance is fixed for good, and cannot be modified later on. You can tweak a little with hard Photoshop work, but it’s quite disastrous.

Lossy compression. The JPG format was designed to compress the hell out of image data. Consequently, you lose some data even on the highest compression quality setting. And digital cameras tend not to use the highest compression quality.

And here’s the last argument:

4:2:2 or 4:2:0 chroma subsampling. If you aren’t familiar with chroma subsampling, read the Wikipedia article first. All Canon and Nikon cameras I’ve seen files from use 4:2:2 subsampling, which means that the color information is halved horizontally. iPhone JPGs are even worse with 4:2:0 subsampling, that is, 3/4 of the color information is missing (you won’t notice it, because the heavy-handed over-processing in these files make them look like crap at actual pixels level anyway). As a comparison, the JPG Quarter HQ image quality setting in Technical Camera uses 4:4:4 chroma subsampling that preserves full color information at every pixel. These HQ files also use higher compression quality setting and are usually quite large.

As you see, JPG files are handicapped at every imaginable level. That’s fine for web display, but make this format totally unsuitable for image capture. Storage is dirt cheap these days, for example a high quality 32GB SanDisk Extreme Pro SD card sells for less than $15, and can store a thousand 26 megapixel images in my EOS RP. In my opinion even lossy RAW compression (such as C-RAW in new Canons) has zero significance in terms of storage. Go with the highest quality, lossless RAW. There will come a time when you’ll be grateful that you did.

Kuuvik Capture 4 : Image Display Enhancements

Kuuvik Capture 4.0 is now available on the Mac App Store. This is the first release in the version 4 series, and brings the first batch of enhancements to the app. The first batch, because instead of waiting for every single feature we planned for version 4 to be complete (and delaying the release significantly), we decided make new features available as they are ready, so you can enjoy their benefits as soon as possible.

Let’s begin discussing the new stuff with the display engine. My FastPath imaging engine, that provides highly optimized image decoding and display, debuted in Technical Camera. Later on the Mark II Artist’s Viewfinder received it. And now Kuuvik Capture joins the club. It provides up to 2x faster JPG display (including the JPG previews embedded into RAW files), plus massive memory savings: I had measured around 100 megabytes less GPU memory usage with 5DS R files, for example.

But the story doesn’t end here. In contrast to this lightning fast preview display, it seemed that RAW loading and decoding (that’s a prerequisite for the RAW histogram and RAW-based clipping warnings) takes forever. And we wanted that users could begin working on the images the instant they appear on the screen. So we made RAW data loading asynchronous, taking place in the background. There’s no more waiting for the “Loading” progress bar.

A circular progress indicator on the RAW histogram’s panel lets you know how the loading goes forward. With the exception of a few operations (such as image deletion and purging) you are allowed to do anything during RAW loading. If you move to another image or capture a new one, loading is automatically cancelled, so you don’t have to waste your time on waiting for something that will be instantly thrown away.

And there’s even more. RAW loading consumes a lot of energy, and there are situations when conserving battery is of paramount importance. Thus we added a new preference to be able to turn off automatic loading completely.

The default is to automatically load RAW data, so that both the RAW histogram and clipping warnings could work as expected. Well, there’s a little difference from previous versions: with the Prefer RAW clipping warning option you’ll see the processed warning layers until the ones generated from RAW data arrive. In previous versions these processed clipping warning layers were not displayed at all.

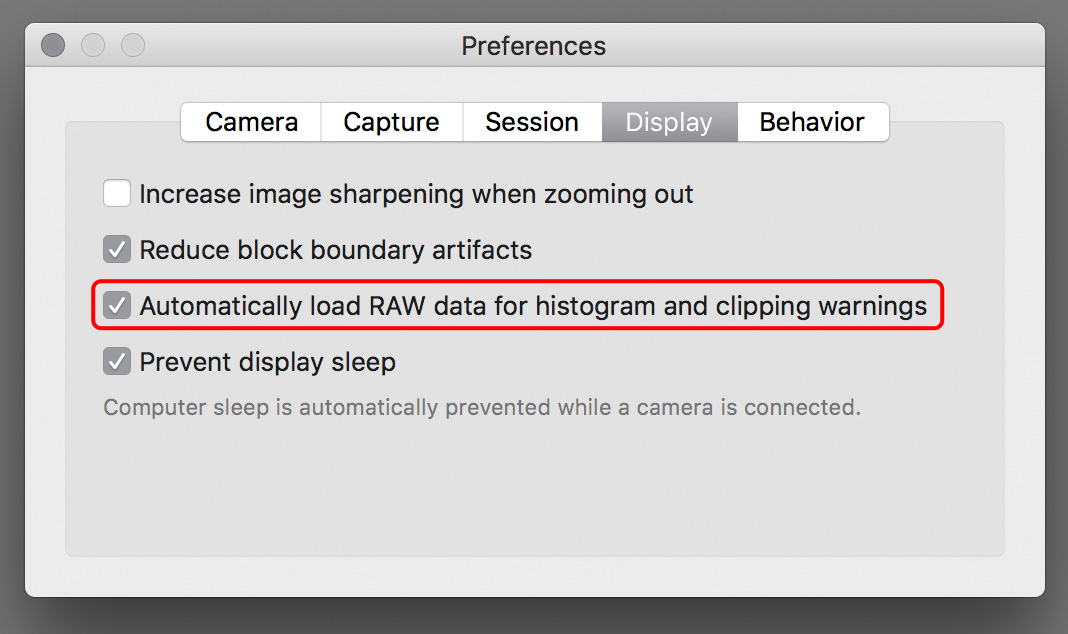
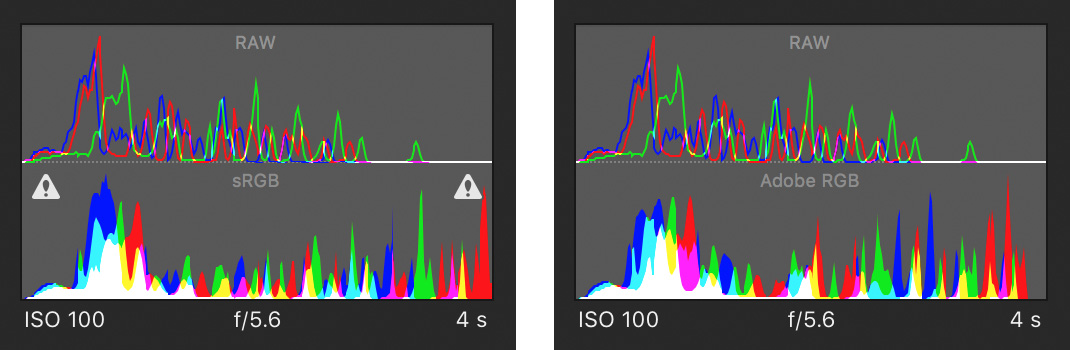
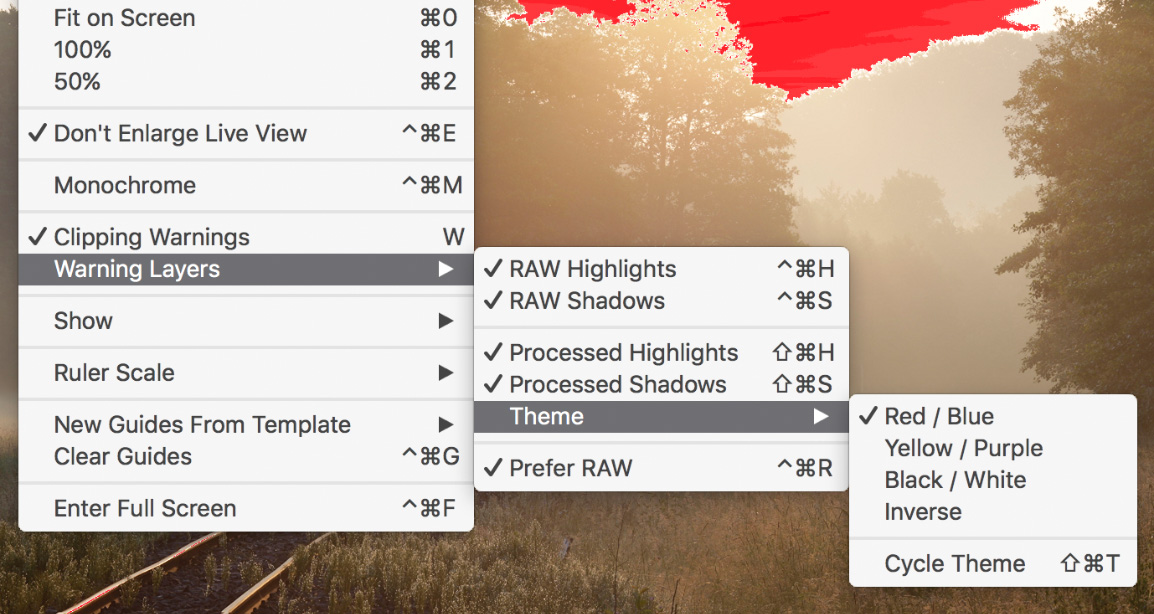
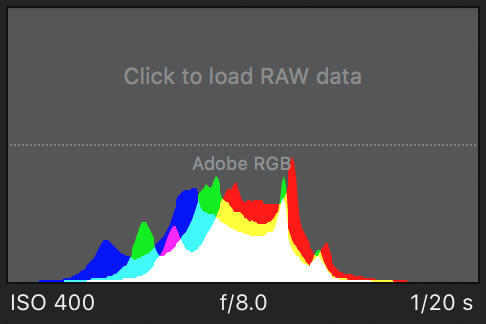
Should you need the histogram or the warning layers later on, you always have the option to load the RAW data manually. Just click the placeholder on the RAW histogram, or choose the Load RAW data command from the menu, or press Cmd+L.
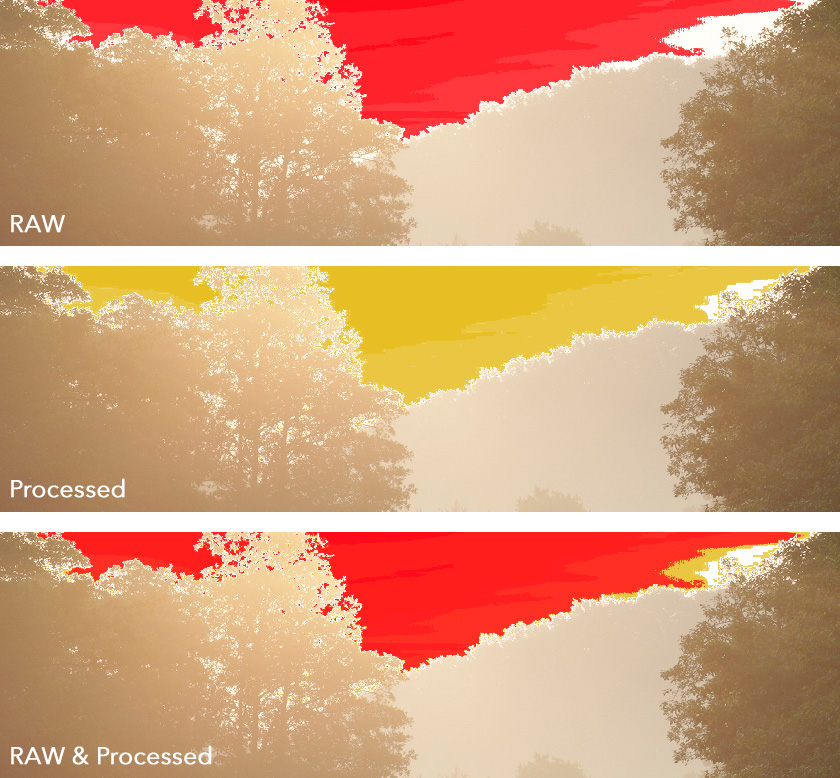
Power efficiency and speed were always cornerstone features of Kuuvik Capture. This new release brings both to a completely new level.

The last on the list of image display enhancements is support for images in color spaces other than sRGB and Adobe RGB. While images produced by Canon cameras are always in one of these two, images from other sources can be in others as well. For example JPG files produced by Technical Camera can be in the Display P3 color space. ProPhoto RGB and Display P3 are supported on macOS 10.11.2 or later, and arbitrary profiles on macOS 10.12 or later.

Kuuvik Capture 4.0 is available on the Mac App Store. It is a free update for users who purchased the app earlier from there. You can see the complete list of new features and changes in the release notes.

Introducing Technical Camera

I’m pleased to introduce my newest app, called Technical Camera. It is a still camera app for the conscious image maker. Why another camera app? Well, the main image from the app’s site may contain some clues.

Motivation

The story of Technical Camera began in the fall of 2015 (in a post I briefly mentioned that I’m working on a photo app). In the following years I did experiment a lot with different apps and photo taking features of iOS, and to say that I was frustrated is an understatement.

While I saw that the phones themselves has potential, each and every app fell short in one or more ways. Let me list the most problematic points:

1) Cluttered screens. The image (both the live view and the ones during playback) on a camera is a sacred area. Putting buttons, icons, sliders and other distracting ornaments on the image itself is a cardinal sin in my book. Especially since the iPhone display is so large with wast empty spaces around the camera’s 4:3 aspect ratio image.

2) Photos stores everything in bulk, you have to manually move every image into its album (in a rather twisted and backward way). Organizing your stuff is a royal pain this way.

3) Nobody needs 12 megapixel images when taking a picture of an electricity or gas meter. Large images when a low resolution would be sufficient are just a waste of time and network bandwidth (that is, money) and en masse has unnecessary environmental impact.

4) Apps made by developers who aren’t working photographers. This results in all kind of clumsy to downright misleading solutions and user interfaces.

These aren’t just from a photographer’s perspective. My better half Agnes complained about 2) and 3) for a very long time, and her most frequent use case is visual note-taking.

Technical Camera solves all these problems and also borrows technologies from our other professional apps (like real-time distortion correction for wide converter lenses from the Mark II Artist’s Viewfinder), to make something rather unique.

I’m going to explain how these things are accomplished and how to utilize Technical Camera to its maximum potential in posts coming. So it’s worth keeping an eye on my blog if you are looking for an app that transforms the mobile photography experience.

What it isn’t

I feel it important to discuss upfront what’s not included. This is a still photography app. No videos. No selfies. No digital processing in-camera, like automatically stitched panoramas, or lighting simulation. No AI. These are left out because we either have opposing views, or because the main focus of the app is making great still images.

Availability

Technical Camera is available for pre-oreder now on the App Store, at a 30% discounted price. It will be released on June 12.