Dual Pixel RAW and Kuuvik Capture

Dual Pixel RAW is Canon’s new invention that will see its first release with the EOS 5D Mark IV. There’s some vague marketing info floating around, but haven’t seen a concise description of these files yet. So while updating Kuuvik Capture’s (websitemy posts) RAW decoder to support the 5D Mark IV, I had a chance to dig deeper into Dual Pixel RAWs.

To understand the following discussion, you need to know how Canon’s Dual Pixel AF works, especially how these Dual Pixels are divided into two separate photodiodes. This article by Dave Etchells gives you a thorough explanation.

What is a Dual Pixel RAW file?

Normal CR2 files contain the following sections:

  • Metadata
  • Previews
  • RAW data

The DPRAW file is a CR2 file that contains one more additional section:

  • Metadata
  • Previews
  • RAW data
  • DPRAW data

This organization have a very important implication. Any RAW processing software that does support the normal 5D Mark IV files will be able to open DPRAWs. If the app is unable to interpret the DPRAW data part, it will simply ignore it and will work with the file as a normal RAW. There’s no risk or penalty in taking DPRAWs (besides the huge buffer drop from 21 to 7 frames).

The DPRAW file contains the normal RAW data section to make this compatibility possible, plus one side of each pixel in the DPRAW data section.

The RAW data section contains pixel values with the sum left and right sides of the photodiode, while the DPRAW section contains pixel values from just one side of each photodiode.

The RAW data section contains pixel values with the sum of left and right side photodiodes, while the DPRAW section contains pixel values from just one photodiode of the two.

But how do we get the other side of each pixel to let Dual Pixel aware processing apps do their tricks? It’s easy: since the RAW pixel value is the sum of left and right pixel sides, just subtract the DPRAW pixel value from the RAW pixel value.

This is an unusually clever implementation from Canon, where I’m used to see all kinds of inflexible hacks that look like as if they were designed in the 1980s.

Size-wise, DPRAW files are slightly less than double the size of normal RAWs (since metadata and preview images are stored only once).

How will Kuuvik Capture 2.5 handle DPRAWs?

Not being a RAW converter, Kuuvik Capture needs the RAW data for two purposes: the RAW histogram as well as shadow/highlight warnings (the image displayed on the screen comes from the preview embedded in each CR2 file). For these the RAW data section is totally sufficient, and the app will ignore the DPRAW data section if present in a CR2 file.

The app will display normal RAW and DPRAW files equally fast, but downloading DPRAW files from the camera will take almost twice as much time as normal RAW (because of their larger size).

I assume that there will be a possibility to switch the camera into DPRAW mode remotely (I can’t be sure until my rental unit arrives). If that is the case, then a new preference will let you specify whether you’d like to shoot RAWs or DPRAWs.

RAW File Bit Depth Changes with ISO

Let’s begin with the fact. The usable bit depth of your RAW file depends on the ISO used to shoot the image.

I discovered this while working on the RAW histogram feature in Kuuvik Capture. To make the RAW histogram usable, we have to scale the data coming from the RAW file. This scaling ensures that the left side of the histogram represents pure black and the right side represents pure white. Technically scaling is done by first subtracting the black level from each pixel, then mapping pixel data from the [0, white saturation] interval into the [0, 1] interval.

Black level is the value your sensor emits when no photons reach a given pixel. This is calculated utilizing a black masked area along the edges of the sensor (see my former post on this).

White saturation is the value from the given pixel when it’s completely full – that is more photons reaching the pixel will not generate a higher value. This depends on physical attributes of the sensor. We do a series of measurements for each sensor to determine its value. The higher the white saturation the more tones your RAW file contains.

What surprised me during the initial white saturation measurements is that with most of Canon’s cameras this value changed as I changed the ISO. Some cameras even present different white saturation in different exposure modes (Av and M for example).

The following graph shows the result from these measurements converted into usable bit depth for four cameras up to ISO 6400.

bit-depth-vs-iso-2For the mathematically inclined, usable bit depth is calculated with the formula:
\(\log_2 (w – b)\)

Where \(w\) is the white saturation and \(b\) is the black level.

The roughly 0.3 bit difference between the lowest and highest values doesn’t seem that large at first sight, but this means that you lose 15% of the tones at ISO 640 compared to ISO 800. To put it another way it’s a 1/3 stop difference.

Implications

Avoid non-full-stop ISOs.

The truth is that both ISO 500 and ISO 320 are exposed at ISO 400, putting a 1/3 stop “digital exposure compensation” value into the RAW file. For the ISO 320 setting this produces an overexposed image, which should be pulled down 1/3 stop. The downside is that you lose 1/3 stop of both tonal and dynamic range. The upside is that there will be less perceived noise, which can be helpful in some situations (and which is the basis of lots of false myths)

Avoid ISOs < 200 on crop-sensor Canons.

As you can see on the graph above, bit depth on these machines are less below ISO 200 than on or above it.

What about the 1D X?

Some of the 1-series bodies are not prone to the 1/3 stop bit depth loss. For example the 1D X starts to show this behavior at ISO 12800. The 1Ds Mark III produces the exact same bit depth at each ISO. And the 1D Mark IV works like the 5D Mark III.

So my practice is to use just full-stop ISOs and forget about ISO 100 on crop-sensor bodies.

The Adventure of the Mendacious Histogram

Digital exposure optimization is a controversial topic. Although the notion of “exposing to the right” is widespread, widely accepted with a large group of advocates, camera manufacturers “doesn’t seem to get it”. But there’s much more technical stuff behind this than simple ignorance. In this post I’ll shed some light on how complicated digital exposure optimization could be.

Let’s start with ETTR. Two of my masters, Michael Reichmann and Jeff Schewe had extensively written about the topic, so instead of replicating it I would encourage you to read the following articles and Jeff’s new book. It is imperative to grasp the idea so that you can understand the rest of the post.

  • Expose (to the) Right – The original article from 2003.
  • Optimizing Exposure – A rather utopistic view of the problem. Reminds me of Adams’ (Douglas, not Ansel) Total Perspective Vortex – as it extrapolates a whole universe not from a fairy cake, but from the fact that increasing exposure reduces shadow noise. Anyway, a good read on what would be really needed from a photographers point of view, even if its not possible with the current technology.
  • The Digital Negative – Jeff’s book collects the majority of information about digital exposure right in its first chapter.

To summarize: increasing exposure has advantages to the shadows and the amount of information retained in the RAW file. That’s great. But here comes the million dollar question: how much one should increase exposure being hundred percent confident that highlights aren’t blown or destroyed (and thus, keeping all the possible information)? You should read Ctein’s article on the dangers of ETTR regarding lost highlights.

I hope you are confused enough about whether to ETTR or not and how can you really assess over-exposure. Don’t be afraid, this is the where our adventure begins.

Before we embark on it, let me rephrase the question: as overexposure is terminal to the data (details) in the overexposed area, how can one avoid it with confidence? Regardless of whether you ETTR or not, this is important. Imagine a bright yellow flower for example. Overexposing one or more channels will destroy fine color variance – which is a bad thing (except if you will run the image through some ugly lo-fi filter, of course, in which case the things I’m writing about is totally unimportant to you). Also, what I’m writing about is for RAW shooters only. JPEG guys only get what they see, so these topics does not apply to them.

Let’s begin!

One Image – Three (Different) Histograms

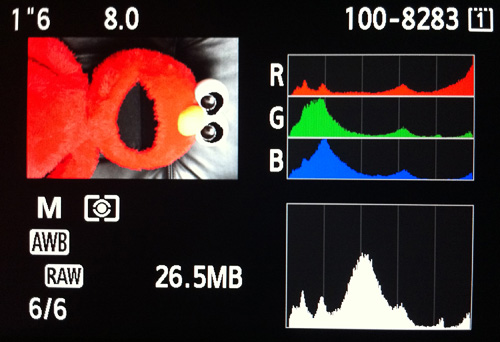
The histogram is the primary tool for assessing exposure on a digital camera. But what your camera shows has only a little resemblance to the RAW data recorded. This is because all JPEG settings, such as white balance, color space, sharpening, contrast, etc. influence the histogram display. As a result, the histogram on the LCD comes from the JPEG preview of your RAW file. In an ideal world, one could set the histogram into “RAW mode” which would instruct the camera to calculate the histogram from the RAW data instead of the JPEG preview.

Canon 5D III, Auto WB

The majority of the parameters mentioned above can be zeroed (like sharpening, contrast) on the camera. The problem-child is white balance, where we have little influence by default.

Take the image on the left, for example. The RGB histogram shows gross overexposure in the red channel, you can even see overexposure warning “blinkies” in Elmo’s eyes.

Based on the camera’s histogram one would lower the exposure to avoid overexposing Elmo’s… wait! Blinkies warn for overexposure in the eyes, not the red fur, even if the red channel was blown. Something isn’t kosher with this…

Histogram from RAW Data

On the right is a histogram generated from the same image with Kuuvik Capture utilizing gamma-corrected RAW data. As you can see reds are far from being overexposed. You can also see a different distribution in the RAW histogram, with the peaks are being at distinctly different places. This is because the RAW histogram in KCapture is not white balanced.

White balance is set by multiplying data coming from a channel with a number (the white balance coefficient) to “scale” it to reach the desired white point. It is represented by a four element vector (one number for each channel, in RGGB order). You can use exiftool to examine these coefficients, they are displayed as WB RGGB Levels As Shot. The actual values for the above image are: (2185, 1024, 1024, 1526). That is, you have to multiply the red channel by 2185/1024 = 2.13 to get the white balanced image. You can easily see from the RAW histogram that multiplying reds by 2.13 on this image will blow the channel out – in that white balance setting.

Sidebar: white balance is always represented as RGGB coefficients internally, not with color temperature/tint as RAW converters and cameras present this data to you. Color temperature is an “artificial” construct to handle these numbers in a more user-friendly way. And the way these coefficients are converted into color temperature is a proprietary process for each converter. This is why you get completely different white by using the same Kelvin value in different converters.

Now let’s take a look on what RAW converters, Adobe Camera RAW 7.3 to be exact, think about the same image (Capture One displays a similar one).

Histogram in ACR 7

Part of the black magic of RAW conversion is graceful handling of the roll-off into overexposure. The fact that a non-overexposed channel can be blown during white balancing is responsible for the converter’s ability to do highlight recovery. They are mostly taming the data that is blown only by the currently set white balance. As the common myth goes: RAW files have more headroom in the highlights. And as with most of the myths, there is truth lurking behind it: because the white balance is not fixed in RAW captures, converters have the ability to extract more information from it than you would be able to get from a JPEG, where clipped highlights (even if clipped by the current white balance setting) are lost forever.

Above I shown you the case when the JPEG histogram shows overexposure, while the RAW histogram doesn’t. It could happen the other way around, which is even more dangerous. I recommend you to read Alex Tutbalin’s article on white balancing problems for an example. Alex is the author of Libraw, the library Kuuvik Capture is also using for extracting RAW data from proprietary file formats, such as Canon’s CR2.

On Gamma Correction

If you read Alex’s article, you saw the Rawnalyze tool, and if you try both that and Kuuvik Capture, you’ll get different histograms. Why? Because what Rawnalyze displays is the rawest raw data possible. That is, it doesn’t map the camera’s black level to the left side and the maximum saturation level on a given ISO to the right of the histogram (in other words, it does not scale the data). In KCapture I wanted to make the RAW histogram to look familiar to photographers (including myself), so instead of blindly displaying the raw data the app does a little processing. The processing consists of scaling (so black is on the left and white is on the right instead of somewhere in the middle of the histogram), and gamma correction.

By default RAW data is linear, that is the highest exposure stop occupies the entire right half of the histogram, the next 1/4 of it, and so on. The result is that a linear RAW histogram pushes all the data to the left, and makes it hard to judge shadow exposure and see whether we have a clipping there. Instead KCapture corrects this data the same way it happens during RAW conversion: by applying a gamma curve to make exposure stops equal sized on the display.

Mapping Theory to Practice

Let’s draw some conclusions. First, 1) white balanced in-camera histograms are not suitable for checking overexposure. RAW histograms are markedly better in this, but 2) RAW histograms can only show physical overexposure of channel(s), and are blind to white balancing induced highlight clipping. Most of that clipping is curable in the converter utilizing some form of highlight recovery, however. The 3) final word on highlight clipping is said by the RAW converter after white balance has been set.

(2) is why I called Michael’s second article an utopia. When we wrote the specification for Kuuvik Capture back in December 2011, our goal was to implement ETTR optimization described in that article. It turned out rather quickly that you can’t do this unless you have the final white balance set – which will not happen until later in the process. And even if you can do this, you shouldn’t always ETTR. Sometimes artificially overexposed images will push the noise from the shadows into the sky (scroll down to the ETTR section in the linked article for an example). And even ETTR could be behind skies turning purple.

(3) is the real reason why camera manufacturers are unable to show the same histogram as your converter (unless they are using the same algorithms, of course – which is highly unlikely).

So how do I use this information in practice?

When I’m shooting tethered (which is the majority of cases when I do landscape work), I rely on Kuuvik Capture to check the physical exposure from RAW histograms. If your physical exposure is bad it won’t get any better during RAW conversion. What I look for here is potentially uncorrectable overexposure (non-specular highlights) and as a Canon shooter who’s cursed with muddy shadows, I check for underexposure. I usually push the exposure to the right when the shadows are in danger or when there’s plenty of room for the highlights.

Then I pass the image to Capture One for the final decision. Capture One 6 had some issues with highlight roll-off handling with the 5D3, so I had to back-off a bit from extreme highlights, but v7 fixes this problem (be sure to use the v7 process).

Free (that is, non-tethered) shooting is a different beast. One needs a trick to cancel the side effects of white balancing.

Unitary White Balance

Guillermo Luijk came up with the idea of UniWB in 2008. UniWB is basically a custom white balance that sets the WB coefficients to 1 (hence the name unitary). It could be useful in the field if you can live with the ugly green images (to avoid that I usually just use UniWB for exposure tuning and switch back to AWB for the real shot).

The real downside of UniWB was the tedious process of obtaining the magenta target image. Having control over the WB coefficients, you can obtain the UniWB setting in Kuuvik Capture just with two clicks: on the Set Unitary White Balance item on the Camera menu.

The Sensor vs the RAW File

Your camera’s sensor records a lot more than finally appears in your master TIFF file. Actually it might have more pixels than those appearing in the RAW file.

Last year I did a little research about this topic, and the following graphic shows the “big picture”. There are two distinct regions on the sensor: uncovered, regular pixels, and ones covered with a black mask. The black mask is used to determine the black level (i.e. how black is black with regards to thermal noise and sensor design).

One step of processing a RAW file is scaling – mapping all the values between the sensor’s black level and white saturation level into the 0-1 interval. Yes, the blackest black on a sensor is not represented by a zero readout from a pixel. For example, on a Canon 5D Mark II, which is a 14-bit camera and thus each pixel theoretically can be of any value between 0 and 16383, the black level is 1023 and white saturation level is 15600. So you lose a bit at each end.

How the black level is determined varies by vendor to vendor – or Canon vs everybody else. Canon puts the entire image into its RAW files (including the black masked pixels) so a RAW converter have the opportunity to calculate the black level from these pixels on its own. On every other camera I tested (a bunch of Nikons, Leicas, Sonys and Phase One backs) the camera determines the black level and subtracts it from every pixel. That is, the camera does the black half of scaling.

This have severe effect on some applications – astrophotography for example – where one creates multiple exposures and averages them. With a Canon RAW file and proper processing noise in the darkest tone will oscillate around the black level. So noise from multiple averaged exposures will cancel out. With black scaled files however, half of the noise oscillation is cut down and there are no negative values that cancel out positive ones around the black level. All in all, a Canon is theoretically better for averaging than any other camera.

But why the default crop is needed? Why don’t we get all the pixels from the active sensor area? Because RAW conversion algorithms need a startup area. In other words most RAW conversion methods produce ugly artifacts around the borders. So the solution is to simply crop these out.

  ☕ ☕ ☕

Did you enjoy this post? Consider buying me a coffee if so.