You might be wondering what those four (or eight) small corners are on Technical Camera screen shots. I’ve highlighted them on the following one.
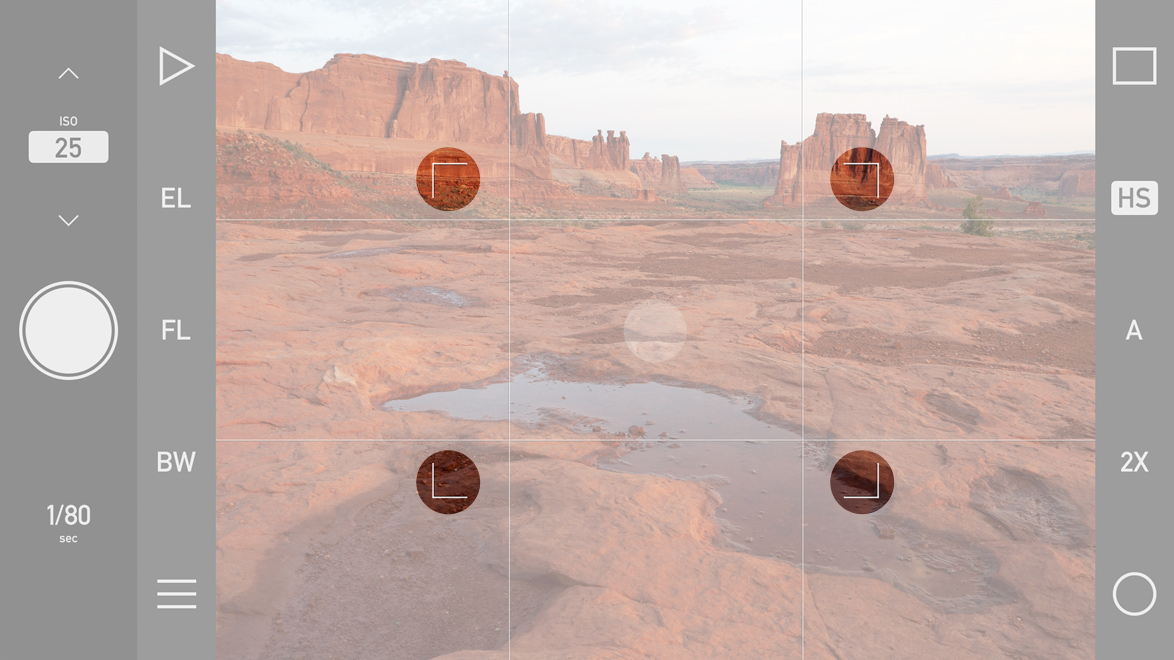
Framing Previsor corners showing what you’ll shoot with the telephoto camera
They belong to the tool called the Framing Previsor. This is something hasn’t been done before (this is the second world’s first in the app – I’ve already wrote about album specific image quality and geotagging settings). So let me explain in detail.
It takes a while for an iPhone to switch between the wide angle and the “telephoto” (it’s more a normal angle of view, but Apple calls it telephoto) camera. It is really annoying when you are in a hurry, because light is changing or the event is unfolding quickly. So the idea is to pre-visualize on the wider camera’s view what the longer one will capture, should you switch over to it. You can decide with a quick glance on the screen whether it’s worth switching over, or stay with the wide angle one.
While it seems simple, this feature requires a bunch of advanced stuff to do correctly. The big question is: where to put those corners? One can follow a naive approach and use the angle of view data iOS provides for each camera. Well, since this data only have loose connection with reality, the corners could be more than 10% off this way. Fortunately we have precise data for the majority of iOS devices from the Viewfinder project. We use a custom-built instrument to measure the real angle of view of phones and tablets to be able to precisely simulate different camera and lens combinations.
This data provides the foundation for the Framing Previsor. At the time of writing, we have lab measured data for iPhone 7 Plus and iPhone X. These will be in the app initially when it’s released on the 12th. We’re already working on the iPhone 8 Plus, and it will follow suit in a subsequent update (until that the app uses iOS provided data for this phone).
The Framing Previsor is turned on by default, so you’ll see the corners on dual camera phones or if you are in Wide Mode (more on this in a moment). It can be turned off and on via the Toggle Framing Previsor (FP) Smart Function Key or via screen options. To access screen options, just tap the rectangle icon in the corner (mimicking a screen).

Screen Options
Tap the icon with four corners to toggle the Framing Previsor.
While this feature was originally developed for dual camera devices, there’s a situation in which you’ll encounter it on single camera ones. In is Wide Mode.
Wide Mode, with its associated machinery, like real-time distortion correction, will be discussed in another post. But since I’m talking about the Framing Previsor now, it’s the right time to describe this situation. Let’s begin with a screen shot illustrating it.
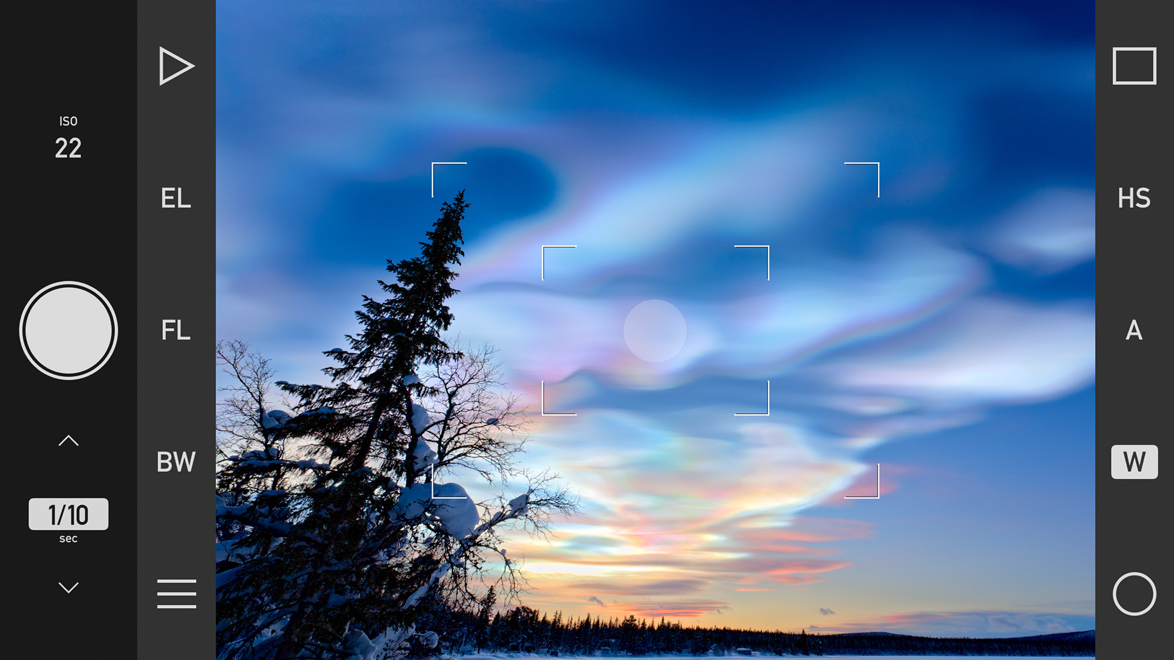
Framing Previsor in Wide Mode
There’s a 0.5x-class wide converter lens attached to the phone (roughly doubling the angle of view). Distortion correction is active, that’s why the tree isn’t bent. And you see eight corners instead of four. The outer four represent the regular wide angle camera of the phone, that is, when you remove the wide angle converter accessory lens. The inner four correspond to the telephoto camera’s angle of view.
On single camera devices the inner four will not be available of course. But the remaining ones will indicate what the shot will look like when you remove the converter lens.
The Framing Previsor works best at normal to infinity subject distances. The closer you focus, the larger the parallax error caused by the distance between the cameras will be. At close distances focus breathing also changes the apparent image size. These are optical laws, and since there’s no way to know the actual focusing distance on an iOS device, there’s no way to mitigate them.
Technical Camera is available for pre-oreder now on the App Store, at a 30% discounted price. It will be released on June 12.


