Kuuvik Capture 4.1 Supports the EOS R

Today is EOS R day. We’ve released ShutterCount 3.4 with EOS R support in the morning, and now I’m happy to announce that Kuuvik Capture 4.1 is also available on the Mac App Store with full Canon EOS R support.

The EOS R is a special camera – having the fastest multi-point live view among the whole Canon repertoire, it is eminently suitable for use with tilt/shift lenses or view cameras. Pictured below is the R on my Cambo Actus-G digital view camera.

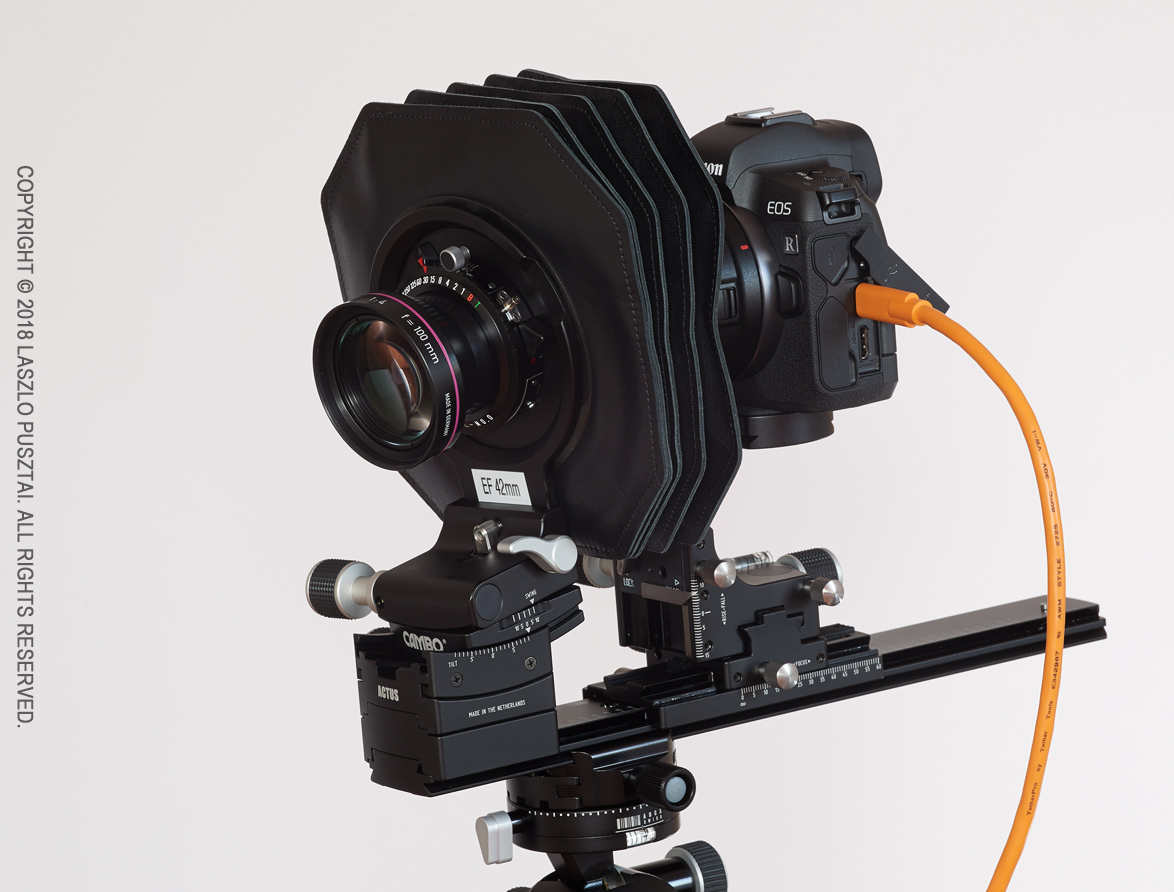
Canon EOS R on a Cambo Actus view camera

It’s not just the speedy multi-point live view that makes the R a great companion to the Actus-G, but the RF mount’s reduced flange focal distance (20mm instead of 44mm for the EF mount) allows you to use shorter lenses. A Rodenstock HR Digaron-S 60mm f/4 for example. Well, it will once Cambo starts selling an RF bayonet holder.

For those of you who aren’t aware of multi-point live view in Kuuvik Capture: it’s a unique feature (that is, no other app offers such a thing) allowing you to select up to three points on the live image and display them simultaneously in 5x magnification. An indispensable tool for product photographers.

Below is a screen shot of a the app showing multi-point live view in a typical scenario where you want to place the focal plane along the plane of the subject (the desk in this case).

Multi-point live view in action

It was shot with the Actus-G and a Rodenstock HR Digaron-S 180mm f/5.6 lens stopped down to f/8, with around 10 degrees of front tilt.

You can learn more about the multi-point live view in my free eBook, Kuuvik Capture Inside Out.

Besides EOS R support, there are a few fixes and support for macOS Mojave’s Dark Mode in this release.

Kuuvik Capture 4.1 is available on the Mac App Store. It is a free update for users who purchased the app earlier from there. You can see the complete list of new features and changes in the release notes.

Sea of Branches

This is the first real image made with my digital view camera setup. Just went out to get familiar with the camera, do image quality evaluations and some stitching tests. But during one of those stitching tests the left side of a tree captured my imagination.

Sea of Branches

Shot with the Cambo Actus-G, Rodenstock HR Digaron-S 100mm f/4 and Canon EOS 5DS R. A little front tilt, 15mm back fall and a few millimeters of shift to the left was used. The elegance of movements still blow my mind. Focusing was done in Kuuvik Capture.

A few words about the aforementioned stitching test. If you ever dreamed about extremely high resolution images that are pin sharp from corner to corner, this rig can easily deliver wonderful 100+ megapixel files.

Choosing Lenses for the Actus-G

Choosing lenses for the Cambo Actus-G isn’t trivial. Partly because the abundance of choices, and mostly because concrete numbers – based on which one can decide whether a lens will fit – are scarce. With this post I’m trying to shed some light on the problem, provide a few numbers and simple formulas for your own calculations. I’ll illustrate the concepts using large format view camera lenses (the Rodenstock HR Digaron-S 100mm f/4 in particular), because my goal is to use Rodenstock glass with the Actus. But will also mention how things apply to medium format lensboards (such as Mamiya and Pentax).

There are a couple of distances one needs to consider for a given configuration, depicted on the following image (with the bellows removed, of course).

Distances for a lens focused at infinity

Lens flange focal distance at infinity (a). This is the distance between the lens’ mounting flange and the sensor, when the lens is focused at infinity. The lens will not normally come closer to the sensor than this (focusing closer will pull the sensor away from the lens). Data sheets for large format lenses contain this number. For medium format lens boards, this number is the flange focal distance of the lens board’s mount.

Flange to lens end distance (b). The distance from the mounting flange to the end of the rear lens barrel for large format lenses. The number is available from manufacturer data sheets. For medium format lensboards, this is the distance from the mount to the rear end of the board. Unfortunately Cambo does not publish the thickness of their boards, but in general Hasselblad and Mamiya RB/RZ will work with DSLRs, while others require a mirrorless “back”.

Mount holder and mount thickness (d). It’s 11mm on the Actus-G for the AC-78E bayonet holder and Canon bayonet.

Camera flange focal distance (e). The lens mounting flange to sensor distance of your camera. 44mm for Canon EF, 26.7mm for Fuji G, 18mm for Sony E, and so on.

Lens to rear standard clearance (c). This is the important number that indicates whether a lens fits or not.

c = a – b – d – e

If it’s larger than zero, the lens will be able to reach infinity focus on the Actus. A negative value indicates that the lens is a no-go for the given setup (will have no infinity focus, but might work for closeups).

Simple? Well, there’s another caveat. Lens movements and even the bellows need some clearance. On the following image a white line indicates where the lens end would fall with no movements applied.

Clearance required for movements

This clearance depends on the diameter of the rear barrel, and may limit the amount of tilt/swing if (c) wasn’t too large to begin with. 8mm or more for (c) is a safe bet.

The following table summarizes values for Rodenstock HR Digaron lenses. Why those? Because Rodenstock is the only company still in the business of making large format view camera lenses, and because they seemed pretty good from the data sheets (my experience with the HR-S 100/4 confirms this). I assumed (d) being 11mm for Sony E and Fuji G mounts as well.

Using a Sony A7 camera will allow you to go as wide as 50mm (with limited movements) on the Actus-G. But don’t forget that you have shift, so stitching can be used to increase field of view. There’s a way to go wider with large format lenses, and that’s the Actus-DB2 with a digital back (and the associated problems with crosstalk and mazing artifacts with wide angles – a bag of worms I don’t want to open).

The original Actus also had a special rear standard with no rotation and with a fixed bellows that lets you use wides down to 32mm. But as mentioned in a former post, I found the non-geared movements of the original inadequate, and thus skipped that version. The numbers above refer to the Actus-G.

So it’s not a surprise that my first lens is the 100mm f/4. The next one is going to be the 180mm f/5.6, but that presents another aspect to think about. Maximum extension to be exact.

Maximum extension

Theoretical maximum extension (f) is the maximum distance between the lens’ mounting flange and the sensor, with the telescoping monorail fully extended and the focusing mechanism in the farthest position. Naturally it must be larger than (a).

f = monorail_length – 28 + d + e

The stock Actus-G monorail is 152mm long, the Actus-DB2 monorail is 174mm, and there are 300mm and 450mm options.

There’s theory, and then there’s practice. You might have noticed on the above image that the rear standard tilts backward a bit (check the bubble level). This is due to the flex between the monorail and the sliding base of the rear standard, as well as the flex between the sliding base and the focusing mechanism. To avoid the flexing, you want roughly 10mm more overlap between the monorail and the sliding base, and don’t want to pass the 50mm mark on the focusing scale. So the flex-less practical maximum extension is:

f_practical = monorail_length – 50 + d + e

Of course you can compensate for the backward tilt using a front tilt, but the extreme extension pictured above also puts undue stress on the parts of the camera, so I’d recommend to stay within the practical limit.

I bought the Actus-G with the DB2 monorail with the intention to provide enough extension for the HR Digaron-S 180mm f/5.6. In theory, it would allow 201mm, with ~23mm of focus travel over the 177.4mm flange focal distance of the lens. Well, this was before I discovered this flexing. My opinion now is that the HR-S 180 will need the 300mm monorail for better stability. I don’t regret getting the DB2 rail, since it makes my system more rigid with HR-S 100. As usual, stability needs sacrifices in terms of weight and ease of portability.

There is another way to increase extension by turning the swing mechanism 180 degrees and mounting the lensboard to the very front of the camera. It gives 45mm more, but it’s slow and inconvenient to do, and the zero swing marks are a bit off in the reversed position. I’d definitely choose a longer monorail over this. But it could come handy in case of emergency.

Note that you may also need a longer bellows as the 3-fold shipped with the camera extends only 120mm.

 — ooo —

That’s all regarding the “which lenses will fit” question. By now you know the requirements and the limits. This is where I stop today, movement limitations with Canon DSLRs being the topic I’m planning to explore in an upcoming post.

Product images were made with a Canon EOS-1D X Mark II and Zeiss Apo Sonnar 2/135 ZE lens. Focusing was done in my Kuuvik Capture app. Guides in Kuuvik Capture came in handy to make sure the camera alignment is square with the Actus.

  ☕ ☕ ☕

Did this post help you? Consider buying me a coffee if so.

Rodenstock HR Digaron-S 100/4 + 5DS R Crops

If you were wondering what kind of performance the Rodenstock HR Digaron-S 100mm f/4 lens is capable of with the Canon EOS 5DS R, here are two 100% (actual pixels) crops from my test shoots for your pixel peeping pleasure.

Click the image for 100% view on non-retina displays.

While the sRGB and JPG conversion kills some of the magic the files have, you can still see the stunning resolution and lovely rendering. Both files are straight out of Capture One 10. The lens is in the same league with my high-resolution Zeisses (28 and 55 Otuses, and 135 Apo Sonnar).

Click the image for 100% view on non-retina displays.

Aperture for both shots was somewhere between f/5.6 and f/7.1. The lens and the 5DS R were mounted to my Cambo Actus-G view camera. Focusing and capture was done in Kuuvik Capture.

These crops are from the 5-10mm vicinity of the image center, but you get the same quality to the edge of the 70mm advertised image circle.

The 70mm image circle allows for 15mm shift along the longer image side and 18mm along the shorter. There’s a 12mm-ish practical shifting limitation along the shorter image side with Canon DSLRs, however (more on this in a later post).

You can shift all the way to 22mm the Actus is capable of along the longer side – going well out of the advertised image circle. But you’ll start to lose edge/corner sharpness past 17-18mm. To put it in perspective: with 22mm horizontal shift the corners are comparable to what you get at 12mm shift with the Canon TS-E 24mm f/3.5L II. Impressive. Think about 150-180 megapixel stitches with this shifting potential.

  ☕ ☕ ☕

Did you enjoy this post? Consider buying me a coffee if so.