iOS 17 Breaks USB Camera Tethering

Update 12/6/2023: Although Apple informed us that: “There is no workaround Developer Technical Support can provide”, we found a solution that’s immune to the card contents enumeration bug described below. It is released in ShutterCount Mobile 6.5.1 and ShutterCount Pro Mobile 6.5.1.

It seems Apple will also fix it in iOS/iPadOS 17.2. Please update your software accordingly. The next update to Kuuvik Capture will also contain our solution – as well as many other exciting things.

– o –

While most professional users know that you should NEVER EVER install a dot zero version of any operating system on production devices, and that you have to evaluate all your apps on a new operating system before moving to it, I’m going to save you save some time by discussing why you should avoid updating to iOS/iPadOS 17 in case you rely on Kuuvik Capture or ShutterCount – or any other USB tethering/remote control app.

There are two separate issues. There are also workarounds for them, but that doesn’t mean they aren’t a pain in the ass.

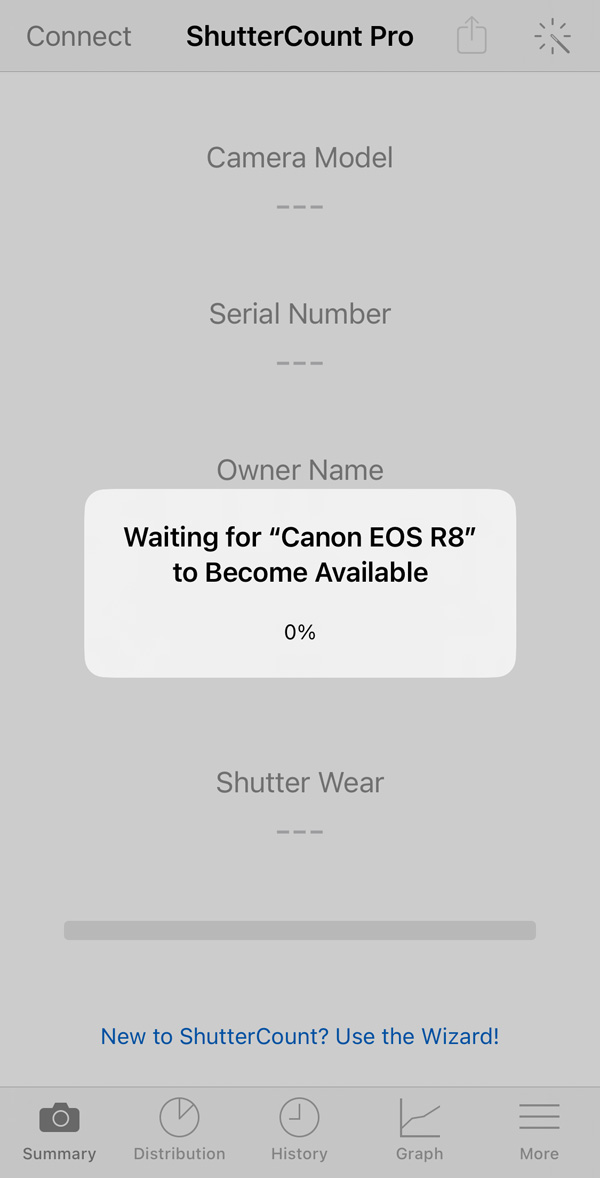
Card contents enumeration is stuck at 0% when there are no images on the card, or no card in the camera

Due to peculiarities of iOS USB tethering that Apple mandates, we must enumerate card contents before connecting to a Canon EOS camera. Otherwise the camera would almost certainly crash with an ERROR 70. But in iOS 17 that enumeration never completes when you have no card in the camera or have an empty card.

And you will be greeted with the stuck progress indicator that you see on the screen shot on the right, followed by an error message that the connection cannot be established.

The workaround is to have at least one image on the card, in which case iOS will be happy to go ahead with the connection.

Apple Lightning to USB Camera Adapter works only if you connect the USB cable to the adapter last

If you do not obey this rule, iOS 17 will not detect the camera at all. Not even in Photos, or in any other app.

That is, you must remember to do the follwing: 1) connect the adapter to your iPhone/iPad, 2) connect the USB cable to the camera, and lastly 3) connect the other end of the USB cable to the adapter.

Resetting Tethering-Related Privacy Permissions on a Mac

Apple’s ill-designed and negligently implemented USB tethering permission checking is responsible for 90% of the support requests we receive these days. In this post I’ll discuss how to reset these permissions to restore access to USB connected cameras.

It is ill-designed, because: a) Instead of a single, clearly defined permission, it asks users for two seemingly unrelated ones: “Photos” and “Removable Volumes” on a Mac; “Camera” and “Files and Folders” plus a third tethering confirmation prompt on iOS. This is untidy and confusing, and people tend to deny them causing trouble down the road. b) It grossly violates the “principle of least privilege” by granting apps access to resources they have nothing to do with, and even don’t need at all.

The negligent implementation is clear from the very existence of this post, as well as a former one describing how Apple’s buggy code caused months of headache, brand damage and extra support costs last year.

Before you ask, I have reported these things to Apple countless times, even offered my help, but they continue to show zero interest in cleaning up this steaming manure pile. It wouldn’t be a problem if we weren’t forced to use Apple’s frameworks for USB communication, but we are.

The privacy permissions database itself is also a fragile component that tends to get corrupted randomly. Fortunately there’s a tool called tccutil designed to manage the database. This is a command line tool, so launch Terminal before proceeding.

First, you are advised to reset permissions for a given app. The app is specified with its “bundle id”, a unique name that identifies it for macOS.

The command to use for our ShutterCount app is:

tccutil reset All com.direstudio.ShutterCount

For ShutterCount Pro:

tccutil reset All com.direstudio.ShutterCount.pro

For Kuuvik Capture 5:

tccutil reset All com.direstudio.KuuvikCapture.5

And for earlier Kuuvik Capture versions:

tccutil reset All com.direstudio.KuuvikCapture

Everything is case sensitive, so I recommend to copy and paste the command into Terminal (and of course press Enter at the end). I also recommend disconnecting your camera and rebooting your Mac before issuing the command.

If that doesn’t help, you can try resetting the database more aggressively with:

tccutil reset All
tccutil reset Photos
tccutil reset SystemPolicyRemovableVolumes

If the reset was successful, your Mac should prompt for Photos and Removable Volumes access the next time you launch the app and connect a camera via USB.

If these steps doesn’t resolve the problem then I would suggest sending a problem report from within the app: click Report a Problem in the Help menu. Then complete and send the email. I would strongly recommend that you also complain to the party responsible for the issue: Apple, via its product feedback form.

I would like to note that Wi-Fi / Ethernet connections are not affected, because those do not rely on Apple’s code, but are handled entirely by mine.

Big Sur Display ICC Profile Handling Bug

Before updating our production machines I always test a new macOS release (even point releases) on a dedicated test MacBook. Software-wise this notebook is a close match to productions ones.

After the upgrade to Big Sur 11.0.1 finished, I was greeted with this (don’t read the image’s title if you don’t like spoilers):

Spoiler: macOS Big Sur fails to properly use table-based v4 ICC profiles…

It was suspicious even during the upgrade that something wrong is going on: there was no difference between checked and unchecked states of the presented check boxes.

Now, I have installed Big Sur betas and even the final release on the very same MacBook on an external disk countless times, with no such issue.

It turned out pretty quickly that the cause is the custom ICC display profile. I do profile each display on production machines, as we’re doing color-critical work on them. And I also think that all monitors are color-important, so they have to be properly calibrated and profiled.

Interestingly, some older profiles exhibited this issue, others showed the regular Catalina “blue cursor” issue, while a few were OK. After an afternoon’s worth of debugging and work, here’s what I found.

  • With matrix-based profiles (v2 or v4) Big Sur fails to color-manage the cursor (mouse pointer, etc), which looks odd blue (D50 and 5300K are our standard color temperatures, so a 7000-8000K cursor stands out like a sore thumb). This is the exact same bug that plagued Catalina.
  • Big Sur is unable to handle v4 LUT-based profiles properly. The dock, the background, and most window manager stuff is totally washed out, as you can see on the screen grab. Interestingly, content in apps (like Safari) is OK, so I guess that this is just a Dock/window manager bug.
  • v2 LUT-based profiles work as expected! And this is the solution for now: use v2 profiles… In i1Profiler LUT-based profiles are called table-based.

Speaking of i1Profiler, I’m still using an oldish i1Pro v1 spectrophotometer, and the latest version of i1Profiler that supports this instrument is 3.1.1. I have found no issues with this version for display profiling on Big Sur (just don’t install the HASP drivers).

And the important takeaway: re-profile your monitor to create a v2 profile before upgrading, otherwise you won’t see your checkbox choices during the upgrade!

More to come on solving other issues to make Big Sur livable…

iOS 14 Breaks USB Tethering

WARNING: iOS and iPadOS 14 that is going to be released later today completely breaks USB camera remote control on iPad and iPhone.

Customers relying on USB connections for Kuuvik Capture and ShutterCount Mobile MUST NOT upgrade to iOS 14.

We had reported the problem to Apple on July 23, and it is still not yet resolved as of today despite our numerous attempts to get Apple to fix it. I will not add further comments right now, I think the facts speak for themselves, but I’m not amused. Not remotely amused.

Update (October 2): Apple confirmed that this is a bug in iOS 14, with no workaround, and they “anticipate a fix getting included in an upcoming iOS release”. Stay tuned.

Update (November 6): The just-released iOS 14.2 fixes the bug.

Preventing Photos Auto-Start

If you are a photographer using anything but an iPhone for your work, chances are that the Photos app drives you nuts. I mean its aggressive nature to jump on any media or camera connected. Although you can disable this auto-start for cameras one by one, CF and SD cards are still an issue, as there’s no way to disable the auto-start for them on the user interface.

So here’s the trick: disable it globally. Open Terminal and copy & paste the following commands:

On OS X 10.10 (Yosemite):

defaults -currentHost write com.apple.ImageCapture2 HotPlugActionPath -string ""

defaults -currentHost write com.apple.ImageCapture2 LastHotPlugActionPath -string ""

On OS X 10.11 (El Capitan):

defaults -currentHost write com.apple.ImageCapture disableHotPlug -bool YES

You may need to log out and back on for the changes to take effect.

Creating a Wi-Fi Access Point on OS X

With Kuuvik Capture 2.2 around the corner, I’m going to post a few short tutorials on wireless “tethering” setups. Yes, the wireless connection option will make a return in version 2.2!

So let’s start with a solution to one of the most aching issues.

Imagine the following situation: you are out in the field, photographing an old castle. You want to place the camera on a crane to photograph from a high vantage point. The crane is higher than your longest USB cable can reach, so wireless connection would be the most appropriate solution.

First obstacle: all Canon Wireless File Transmitters (both built-in ones and external bricks) require an existing network to connect to in EOS Utility mode. Yes, it’s utterly stupid, since in other modes they can operate as an access point and create their own network. But other modes simply suck in terms of remote control features.

Back to our example: there’s no phone coverage (for the Personal Hotspot trick), there are no nearby networks of any kind to connect to. You could create an ad-hoc wireless network on your Mac, but setup is complicated and error prone (needs manual TCP/IP configuration on both the computer an on the camera), and in the last few versions of OS X there’s no way to create a secure Wi-Fi network (another utter stupidity). The lack of security is a total showstopper, so this isn’t the appropriate way to make the connection work.

There’s a neat trick, however. OS X has a built-in Internet Sharing feature that practically creates a Wi-Fi access point to share an existing network connection. The next obstacle is that you need the network you want to share to be in the “connected” state (think cable plugged in both to the computer and into a router). Unfortunately the built-in loopback interface (which is always connected and provides access to the local computer only) is not accessible from the Network preference pane in System Preferences (one more stupidity).

The key to the trick is to make the loopback interface appear in the Network pane. Actually, it’s pretty straightforward: launch the Terminal app and copy & paste the following two commands (working on both Yosemite and El Capitan):

sudo networksetup -createnetworkservice Loopback lo0
sudo networksetup -setmanual Loopback 172.20.42.42 255.255.255.255

Enter your password to allow these modifications if OS X asks for it.

Now your Network preference pane should list the brand new Loopback service:

network-loopback

It’s still listed as “not connected”, but don’t worry, that’s just a bug.

Side note: if you use multiple “network locations”, you need to repeat the above commands for each location. If you just use the Automatic location, then you can move to the next step.

Go to the Sharing preference pane, and on the list of services click Internet Sharing. If the service is already on, turn it off. Choose the Loopback service as the one you want to share your connection from. And share to computers using Wi-Fi.

sharing-1

You can set up the shared Wi-Fi network (the network we’ll connect the camera to) by clicking the Wi-Fi Options button. Here is the Wi-Fi Options screen:

sharing-2

The network name is your computer’s name by default, but I’d recommend to enter a simple alphanumeric name (containing no special characters), as Canon cameras have issues with displaying characters outside of the simple letters and numbers range.

All other options are the usual Wi-Fi setup options. A few notes though. Channels 1-11 use the 2.4 GHz band, while 36-48 use the 5 GHz band. Transmitters in the 70D and 6D only operate on the 2.4 GHz band, while the external WFT-E7 brick operates on both. The 5 GHz band is faster and generally has less interference from other networks and appliances operating in the crowded 2.4 GHz band. For security, choose WPA2 Personal (the other option is None, which is unacceptable).

Once the Wi-Fi options are entered, you can start the sharing service. To do it, click the check box in front of its name in the list. OS X may ask to turn on your Wi-Fi radio if it was off, and will ask your confirmation to start the sharing service. After the service has been successfully started you’ll see a screen similar to the one below:

sharing-3

IMPORTANT: due to an OS X bug, your selection in the share from list may change to another (random) network service. So you must check whether it still shows the Loopback service after each start!

The Wi-Fi icon on the menu bar will change to the sharing icon once the sharing service is ready to accept connections.

sharing-on

And that’s it! Your personal access point is now ready. The steps to configure your camera will be discusses in an upcoming post.

  ☕ ☕ ☕

Did this post help you? Consider buying me a coffee if so.