Making the Matriarch Rear Keyboard Outs Accessible

Rear panel keyboard out placement on the Moog Matriarch is a royal pain for people who keep the synth in a crowded setting. For example, I have another synth (the Pittsburgh Modular Taiga) just above the Matriarch, and their stands are flush against a wall – you can see this arrangement in my former post. I came up with two solutions to address the issue.

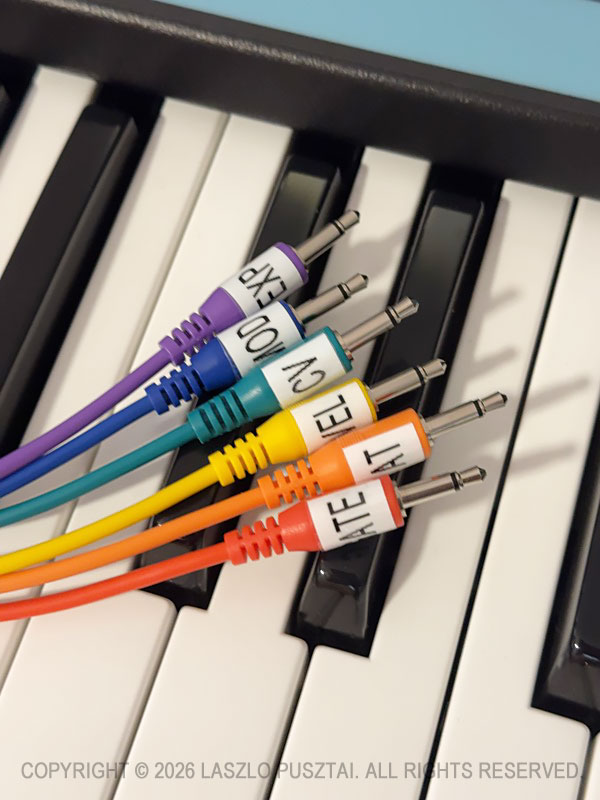
1) Permanently attached long patch cables

That is, plug a set of cables into the keyboard outputs and leave them there.

My choice is the Korg SQ-CABLE-6 set.

These are 75cm (29.5″) long. Despite being in color wavelength order, I prefer to have them labeled to make sure I grab the correct one.

When not in use, the free end of the bundle is laid over the sustain and expression pedal plugs sticking out from the rear panel. I have enough space between the synths to reach behind the Matriarch and grab the whole pack when needed.

I can even use these cables to patch into the Taiga.

But they are not long enough to reach some synth modules sitting on the nearby “shared corner” of my desk. Instead of longer cables – and the associated clutter – I use another solution for this scenario.

2) Routing keyboard outs to ARP/SEQ outs

If you happen to have a Grandmother, where the keyboard outs are in the front panel’s ARP/SEQ section, you probably tried to use the similar connectors on the Matriarch – only to realize that by default they only output anything when the arpeggiator or the sequencer is running.

Fortunately you can change this behavior with a global setting. The best way to do it is with my Mother Global Settings app.

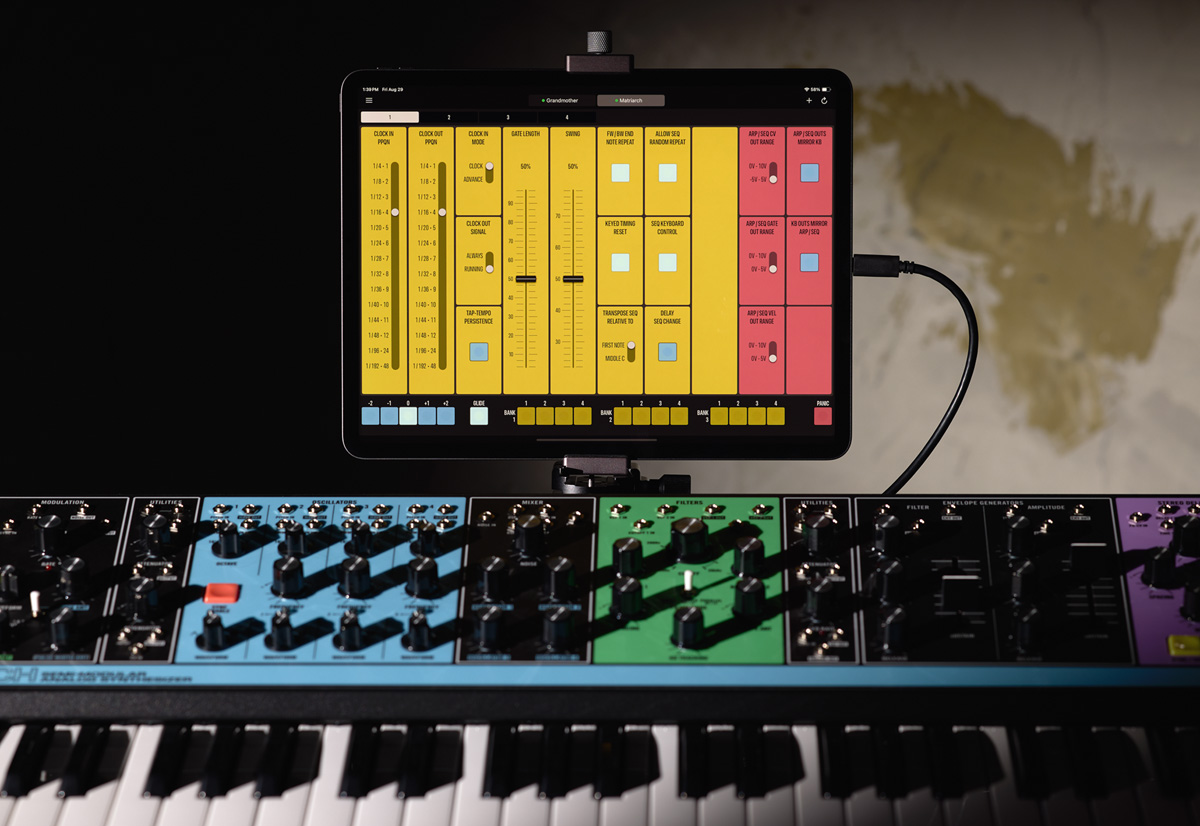
Highlighted on the following screen shot is the pair of settings that control the association between rear keyboard outputs and the connectors in the front panel’s ARP/SEQ section. Click the picture for a larger view.

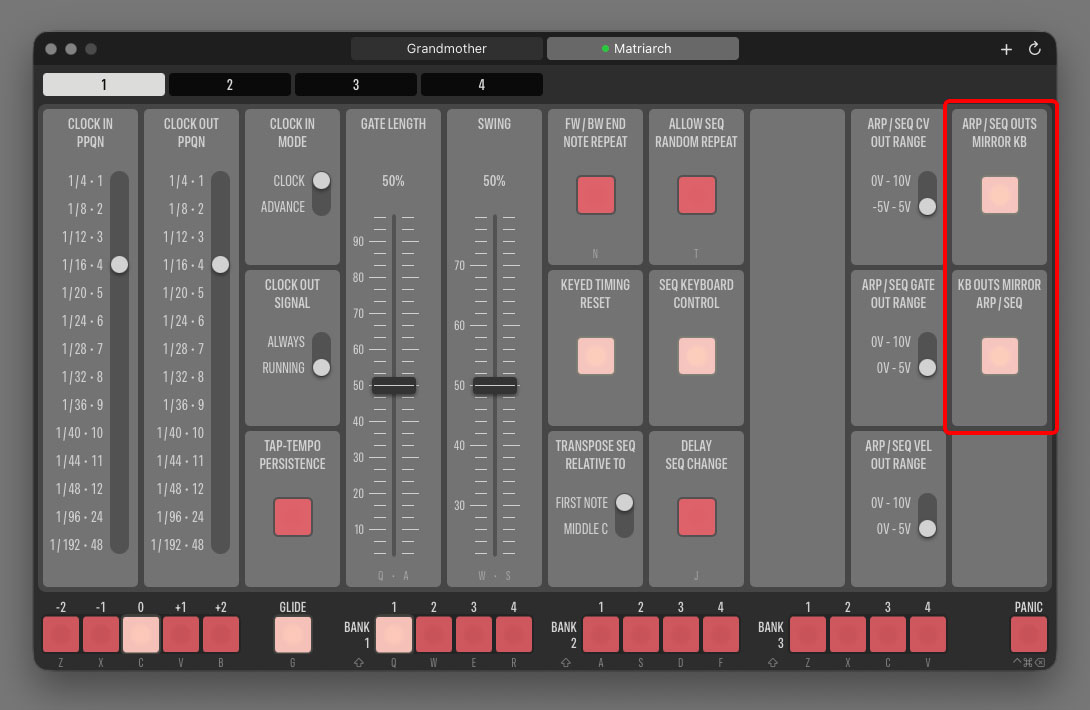
ARP/SEQ OUTS MIRROR KB is what we need here. It tells the synth to copy the logical signal of the rear CV, GATE and VEL connectors to the front panel’s CV OUT, GATE OUT and VEL OUT jacks when the apreggiator/sequencer IS NOT running.

The other setting, KB OUTS MIRROR ARP/SEQ, instruct the synth to copy the arpeggiator and sequencer logical signals to the rear keyboard jacks when the arpeggiator/sequencer IS running.

If you feel that the naming is a little backwards… We designed the app’s interface to resemble the nomenclature Moog uses in the Matriarch manual.

Signal copying is at the logical level, meaning that you can have different voltage output ranges for the original and the mirrored signal! You can set the actual voltage ranges for the ARP/SEQ outputs with the three switches next to the mirroring buttons. Voltage range settings for the rear outputs are on Page 2 in the app.

I like both mirroring settings to be turned on. Having a “my defaults” preset in Mother Global Settings makes resetting all synth settings – mirroring included – to my preferred values a breeze.

After making this setting adjustment, it’s pretty straightforward: just use the output jacks in the ARP/SEQ section. You can connect them to other jacks on the Matriarch, or to external gear.

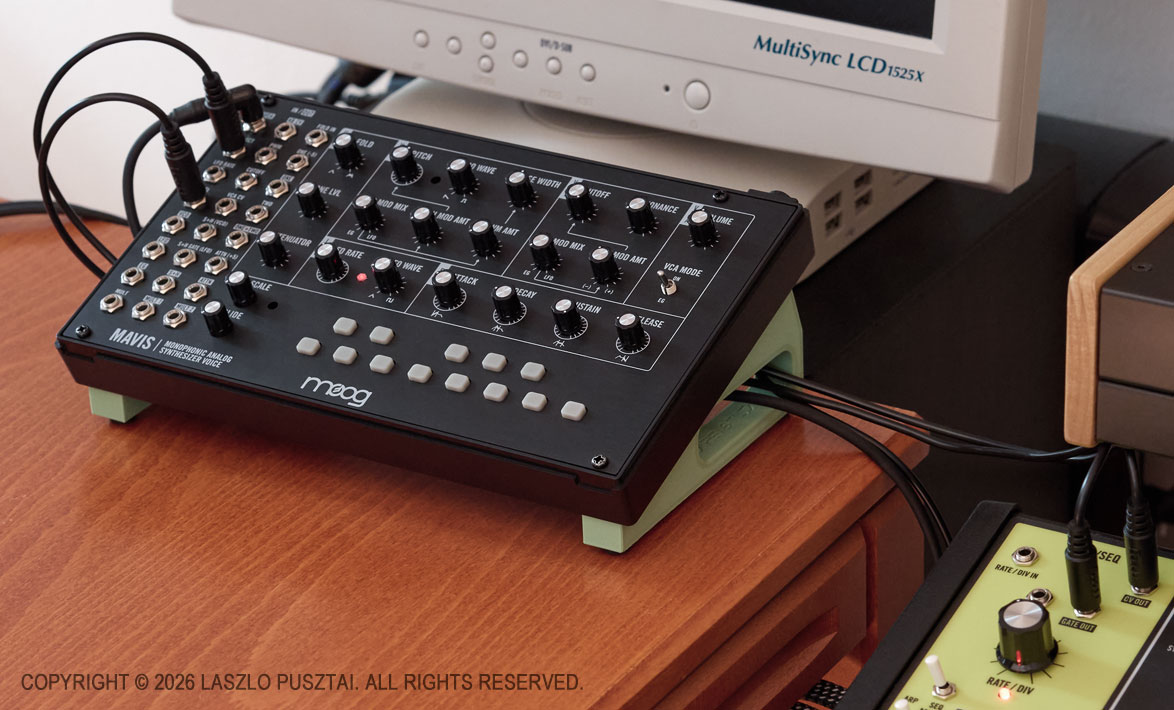
As you can see on the following picture, the ARP/SEQ jacks are close enough to the “shared corner” to be able to connect any desktop module with relatively short cable runs.

Read this if you are wondering what the green stand beneath the Mavis is

I do prefer to use the Matriarch as a keyboard for the Mavis and other Moog desktop synths, because unlike the majority of small MIDI/CV keyboards (Arturia KeyStep for example), it can output the Moog standard -5V to 5V range on the CV out jack. Well, the Grandmother can also do this, but my Matriarch has a proximity advantage: it sits next to my desk’s “shared corner” on one side, and to my Moog semi-modulars on the other.

So far, so good. But I had to fix another issue that heavily impacted the usability of the Matriarch as a CV/Gate keyboard controller, regardless of whether I used the rear or the front panel outputs. It will be discussed in my next post.

ShutterCount 7 Released

Preamble

This year’s macOS and iOS releases are my least favorites of all time. Apple’s 1984-esque push to make everything look like translucent goo that can’t stay put is one thing. Although it’s a big thing. It puts way more cognitive load on users as text on translucent surfaces can be extremely hard to read. The general lack of contrast also amplifies this. And unnecessary, battery-draining animations and lighting effects sometimes cause nausea. I find it very depleting to use these new operating system versions.

But these aside, the bigger issue is that the compatibility layer for apps built for previous operating system releases is severely broken, which forced us to move forward to goo-land.

Vive la Résistance!

Since we value our user’s time, and frown upon conformity, the decision was to push back. We do prioritize our design language and don’t want our apps look like ghosts. So we carefully examined each interface element and each use case to keep usability-compromising things out of the apps. There’s some degree of “blend-in” for a seamless user experience where appropriate – this reduces cognitive load. Sometimes the workarounds we applied to stock elements are subtle, but even those proved to significantly lessen the overall visual stress.

Our apps will definitely look different. But being different is a good thing.

Given the sheer amount of our apps, this is still a work in progress. We do release those we are satisfied with one-by-one. And here is the earliest bird…

ShutterCount 7

The most prominent change you’ll encounter is on the iPad. With the new windowing mode ShutterCount became strikingly similar to the Mac variant.

Menus are almost identical to the Mac – as well as keyboard shortcuts. If you are using the iPad with a keyboard and mouse, you’ll find the app quite easy to use. Combined with the fact that iPadOS has a much better USB camera connectivity than contemporary macOS, I wouldn’t be surprised to see iPadOS becoming the premier platform for this app.

The iOS variant retains the former interface even on the iPad. We don’t like to change things around for the sake of change. It upsets professional users. So now you have multiple ways to access the same features: the original touch-oriented ones plus through the menu bar.

Version 7 is a free update to all previous ShutterCount owners. New users can download it from the respective App Store.

Introducing Mother Global Settings

I started exploring the realm of electronic music a couple of years ago. And I was fortunate enough to dive into the depths of synthesis with a Moog Matriarch.

The Matriarch is still one of my favorites – and my most used synth by far. Besides its main function it serves as a controller (both MIDI and modular), and sometimes slips into the role of a guitar effect pedal.

In addition to what you can access on the panel, it sports 60+ (you read that right, more than sixty) hidden settings. The majority of which is accessible on the synth itself via a global setting editing mode clearly inspired by the Roland 303’s sequencer (a.k.a. the sequencer from hell), while you can only change the remaining few via MIDI. To add insult to injury, there is no way to check the current value of these settings.

So some important parameters – like arperggiator/sequencer gate length or swing – are a pain to change. Good luck trying to adjust swing with the built-in global setting editing mode while playing, for example.

Moog does not provide any software for the synth, and professional quality 3rd party options are pretty much nonexistent.

And this is where my story begins.

What we developed is a proper editor app for the Matriarch – and its sibling, the Grandmother. It works on Mac and iPad. The latter is eminently suitable to be used as a panel extension to the synth.

The app – Mother Global Settings – places all the hidden settings within reach with two clicks/taps maximum. Given the sheer number of settings, they are grouped into four pages in case of the Matriarch, and two pages in case of the Grandmother. Every single setting has its own button, switch or slider.

We also added a bunch of convenience controls – they are at the bottom of the screen. An octave switcher so you don’t have to fiddle with the synth’s switching. A button to instantly disable glide (while the pot remains at its current setting), a panic button, and sequence selector for the Matriarch.

Of course you can also save the global settings as presets to recall them as needed. Please note that these presets only include the hidden settings, so they are not “patches”.

The app is now available on Apple’s App Store for an introductory price.

Canon EOS R1 Support in ShutterCount and Kuuvik Capture

ShutterCount 6.7 and Kuuvik Capture 6.7 had been released on Friday with Canon EOS R1 support.

ShutterCount is a step-up from the camera’s rudimentary built-in shutter counter available in the menu: the app provides usage logging even in the standard version; but if you have the Live View Pack or ShutterCount Pro, then you’ll be able to see the number electronic shutter actuations as well on the Distribution Chart.

On the other hand, Kuuvik Capture is not simply a “step-up” from EOS Utility: its in a completely different universe. You’ll want to try this app if you do product photography or need to cull thousands of images (which the R1 will undoubtedly produce for you).

The updates for both apps are free for existing users. They are available in the respective (Mac and iOS) App Store.

Kuuvik Capture : macOS Integration Improvements

There are two macOS integration bits in latest Kuuvik Capture releases I haven’t talked about yet. They proved to be very valuable time savers in my own workflow.

Recents on the Dock Menu

This is available in Kuuvik Capture 6.6 and later. If you are like me, and keep Kuuvik Capture on the Dock, it is a lightning fast way to get into your recent sessions. As expected, it even works when Kuuvik Capture is running.

Note that only newly opened or created sessions are added to this list, previous recents are not migrated.

Left: recents menu on the Dock, right: service on Finder context menu

“Open in Kuuvik Capture 6” Service in Finder

To keep things simple, Kuuvik Capture sessions are regular folders. Beginning with version 6.5, the app adds a service to folders in Finder, which lets you open any session folder directly in Kuuvik Capture right from the Finder context menu.

This transformed my shoot ingest workflow substantially. Now I go into the storage location for the shoot, create a new folder in Finder, right click it and choose Open in Kuuvik Capture 6, then do a memory card import. Somehow I find it way faster and intuitive to create the folder for the shoot in Finder than doing the same in the New Session dialog in Kuuvik Capture.

Mark II Artist’s Viewfinder 7.6 Released

Version 7.6 of the Mark II Artist’s Viewfinder had been released about a month ago. It brings the usual updates for supporting new devices and new operating systems.

My previous post on Technical Camera updates – with the exception of highlight alert changes – also applies to Viewfinder.

But this time I’m bringing some sad news as well.

ALPA eFinder II Is No More

You may have noticed that we put eFinder II updates on hold about a year ago: we were waiting for ALPA to decide whether they are still interested in providing funds for the development of the ALPA-branded variant of our Viewfinder app.

The decision had been made recently: the ALPA eFinder II app is now officially discontinued and had been permanently removed from the App Store.

Important to note that this does not affect the ALPA eFinder Tools included in the Mark II Artist’s Viewfinder: the 3D level and the parallax/shift correction tool. These tools, or some variants of them, will continue to be available in the Viewfinder app for the foreseeable future.