Reinventing the Desktop Synthesizer Stand

After I bought a Moog Mavis about two years ago, I tried to find a desktop stand for it. And wasn’t remotely amused with what I found.

Typical desktop synth stands consist of a pair of wedges to hold the synth at an angle, with a lip at the front to prevent the device from sliding off the wedges. The wedges happen to be rather thin, so rods or similar constructs are used to connect the two to keep them upright.

This simple design has its places – I used it for the Hapax stand I built specifically for my studio, for example.

There are several issues with these stands, however.

First, the stand forms a separate entity from the synth. If you lift the device, the stand remains in place. For me this is a problem when shuffling things around. And don’t even think about routing cables trough a stand that is separate from the synth… Well, its fine until you try to move the whole conglomerate.

Second, the choice of materials. You can find metal stands – nice but heavy. Or cheap plastic ones. 3D printed variants typically use the cheap, weak, and not really temperature resistant PLA plastic. I found several reviews complaining about PLA parts breaking during assembly.

Third, they are unwieldy when assembled, taking up almost the same footprint as the synth, but have much higher total volume. Don’t dream of throwing them into a bag without disassembly. You can find ones that only consist of two wedges with no connection between them. They are compact, but positioning and keeping them upright can be an exercise in frustration.

What I wanted was a compact, lightweight solution, that attaches securely to the synth, so that I can move the device around with the stand in place as a single object. I would pretty much leave the stand attached all the time.

Given that there was no such commercially available product, I started prototyping several different designs.

I found that I can use the screw access holes at the bottom of the synth as mounting points. I was able to construct studs that, when inserted into these holes, provide enough frictional force to be able to keep stand legs in place.

You can see the design on the following image. For a fully animated version visit the Compact Stand page on my company’s web site.
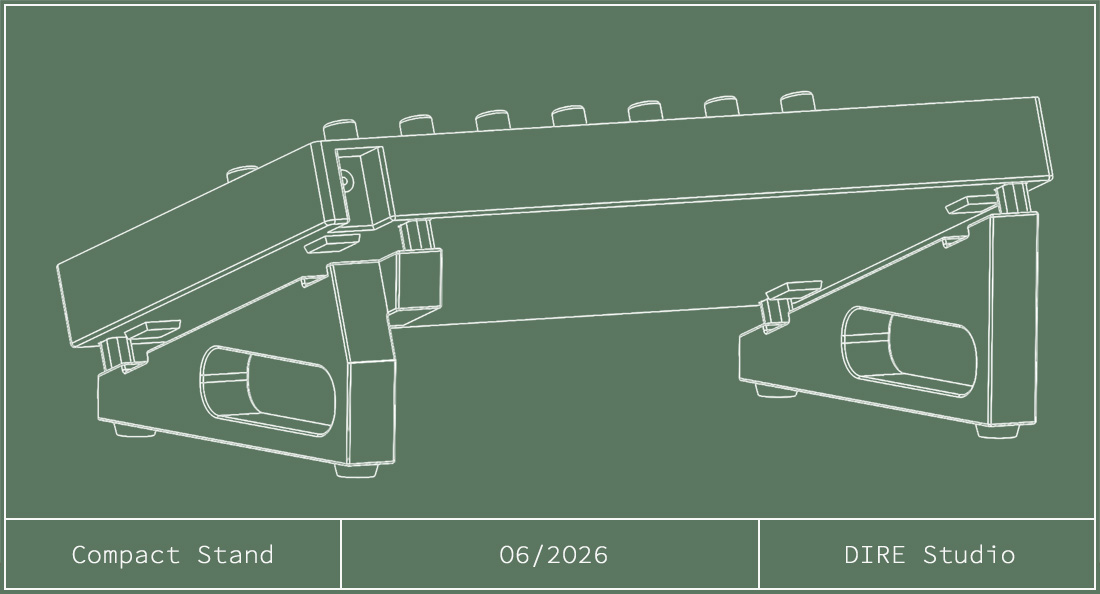
This attachment method allows you to securely mount the legs to the synth. They won’t fall out. Legs become part of the synth. But when needed, you just pull them out. No tools required. You don’t even have to assemble the stand. Just insert the two legs, and you’re good to go. They are also incredibly compact – hence the Compact Stand name.

Our Compact Stands are 3D printed. The material of choice is PETG, which is perfectly suitable for making mechanical parts.

Since my approach was completely different from anything on the market, I did apply for the appropriate intellectual property protections. This was a long process, just completing recently. So now I can publicly talk about my invention.

As I mentioned previously, we are in the process of building sales channels. In addition to the Moog Mavis, we also developed custom stands utilizing this mounting method for a bunch of Behringer synths and drum machines. If you are interested, please register on DIRE Studio’s web site.
Making the Matriarch Rear Keyboard Outs Accessible

Rear panel keyboard out placement on the Moog Matriarch is a royal pain for people who keep the synth in a crowded setting. For example, I have another synth (the Pittsburgh Modular Taiga) just above the Matriarch, and their stands are flush against a wall – you can see this arrangement in my former post. I came up with two solutions to address the issue.

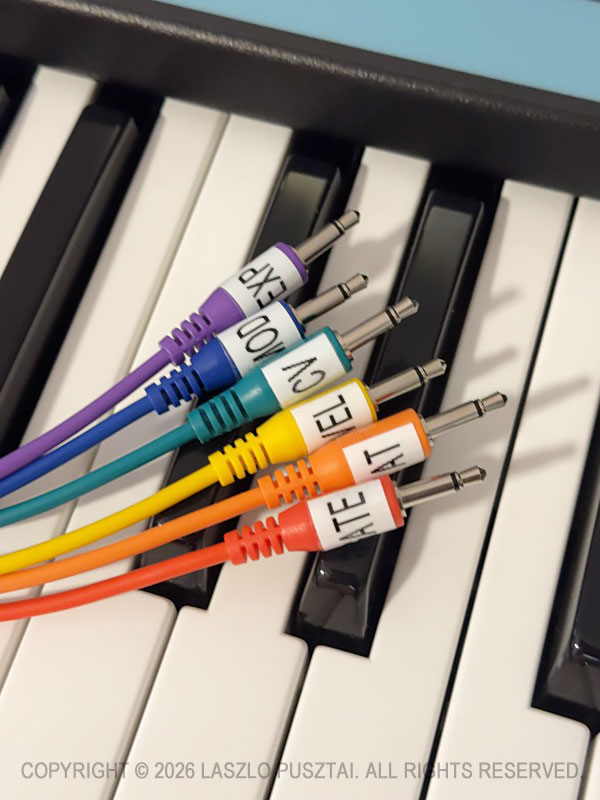
1) Permanently attached long patch cables
That is, plug a set of cables into the keyboard outputs and leave them there.

My choice is the Korg SQ-CABLE-6 set.

These are 75cm (29.5″) long. Despite being in color wavelength order, I prefer to have them labeled to make sure I grab the correct one.

When not in use, the free end of the bundle is laid over the sustain and expression pedal plugs sticking out from the rear panel. I have enough space between the synths to reach behind the Matriarch and grab the whole pack when needed.

I can even use these cables to patch into the Taiga.

But they are not long enough to reach some synth modules sitting on the nearby “shared corner” of my desk. Instead of longer cables – and the associated clutter – I use another solution for this scenario.

2) Routing keyboard outs to ARP/SEQ outs

If you happen to have a Grandmother, where the keyboard outs are in the front panel’s ARP/SEQ section, you probably tried to use the similar connectors on the Matriarch – only to realize that by default they only output anything when the arpeggiator or the sequencer is running.

Fortunately you can change this behavior with a global setting. The best way to do it is with my Mother Global Settings app.

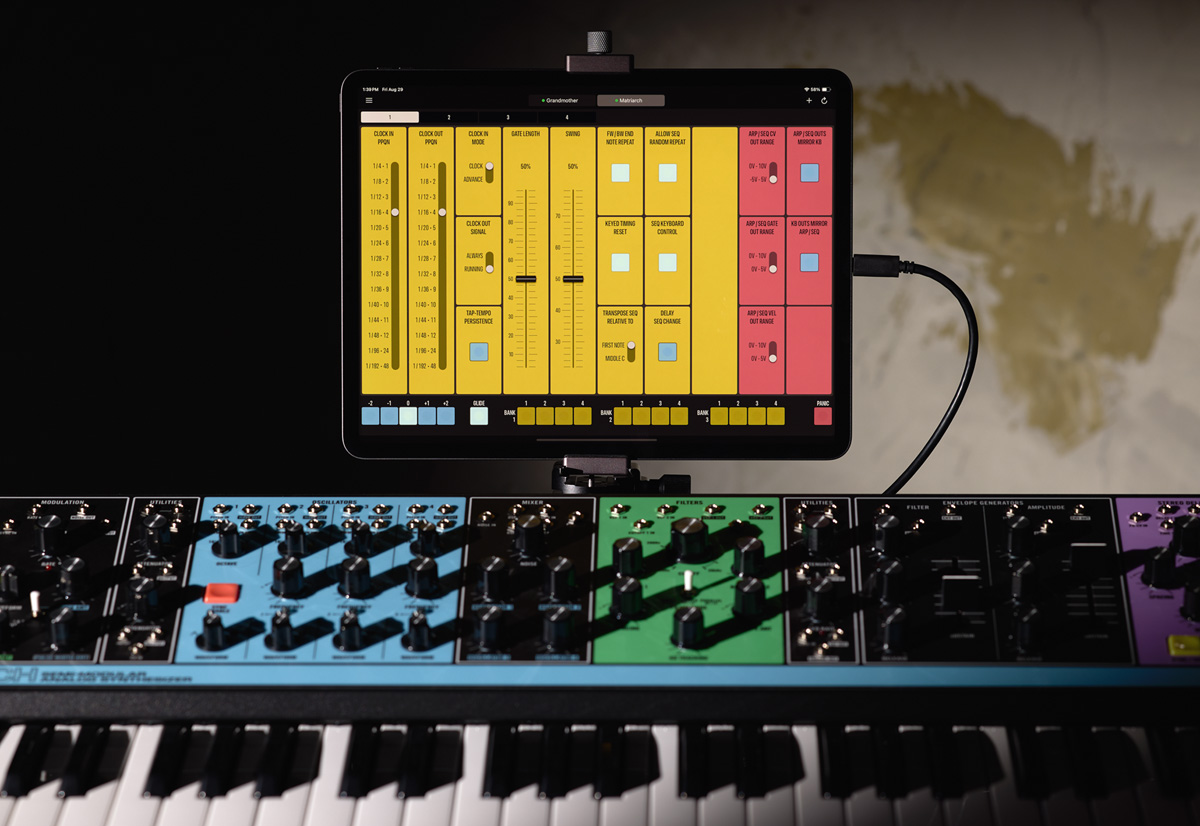
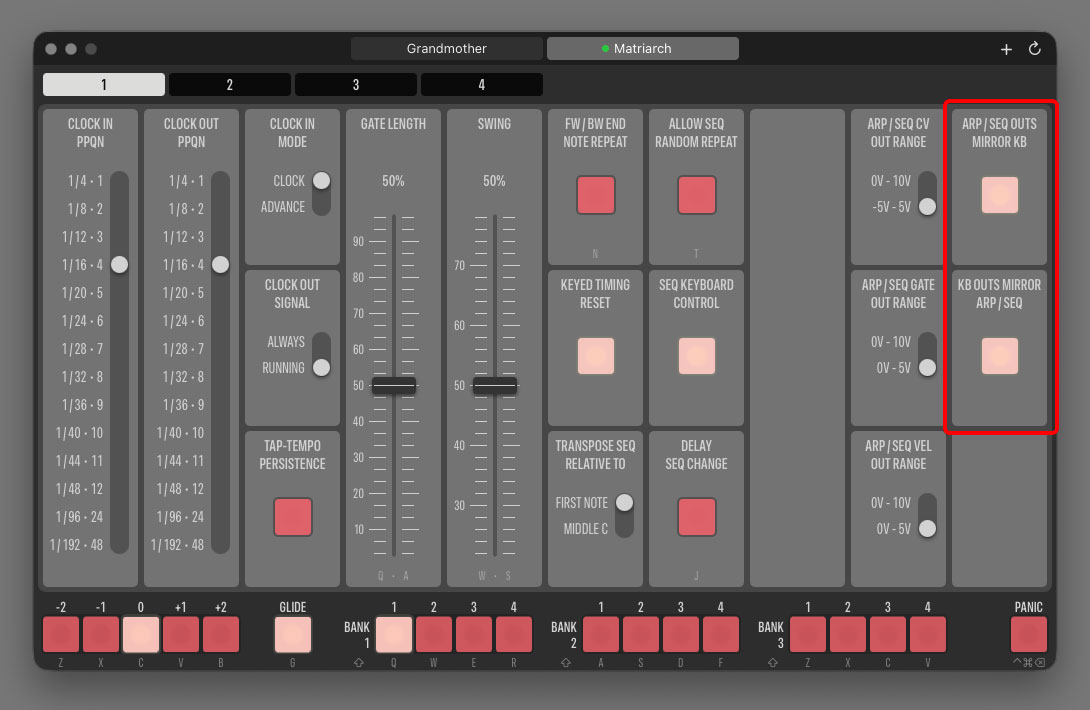
Highlighted on the following screen shot is the pair of settings that control the association between rear keyboard outputs and the connectors in the front panel’s ARP/SEQ section. Click the picture for a larger view.

ARP/SEQ OUTS MIRROR KB is what we need here. It tells the synth to copy the logical signal of the rear CV, GATE and VEL connectors to the front panel’s CV OUT, GATE OUT and VEL OUT jacks when the apreggiator/sequencer IS NOT running.

The other setting, KB OUTS MIRROR ARP/SEQ, instruct the synth to copy the arpeggiator and sequencer logical signals to the rear keyboard jacks when the arpeggiator/sequencer IS running.

If you feel that the naming is a little backwards… We designed the app’s interface to resemble the nomenclature Moog uses in the Matriarch manual.

Signal copying is at the logical level, meaning that you can have different voltage output ranges for the original and the mirrored signal! You can set the actual voltage ranges for the ARP/SEQ outputs with the three switches next to the mirroring buttons. Voltage range settings for the rear outputs are on Page 2 in the app.

I like both mirroring settings to be turned on. Having a “my defaults” preset in Mother Global Settings makes resetting all synth settings – mirroring included – to my preferred values a breeze.

After making this setting adjustment, it’s pretty straightforward: just use the output jacks in the ARP/SEQ section. You can connect them to other jacks on the Matriarch, or to external gear.

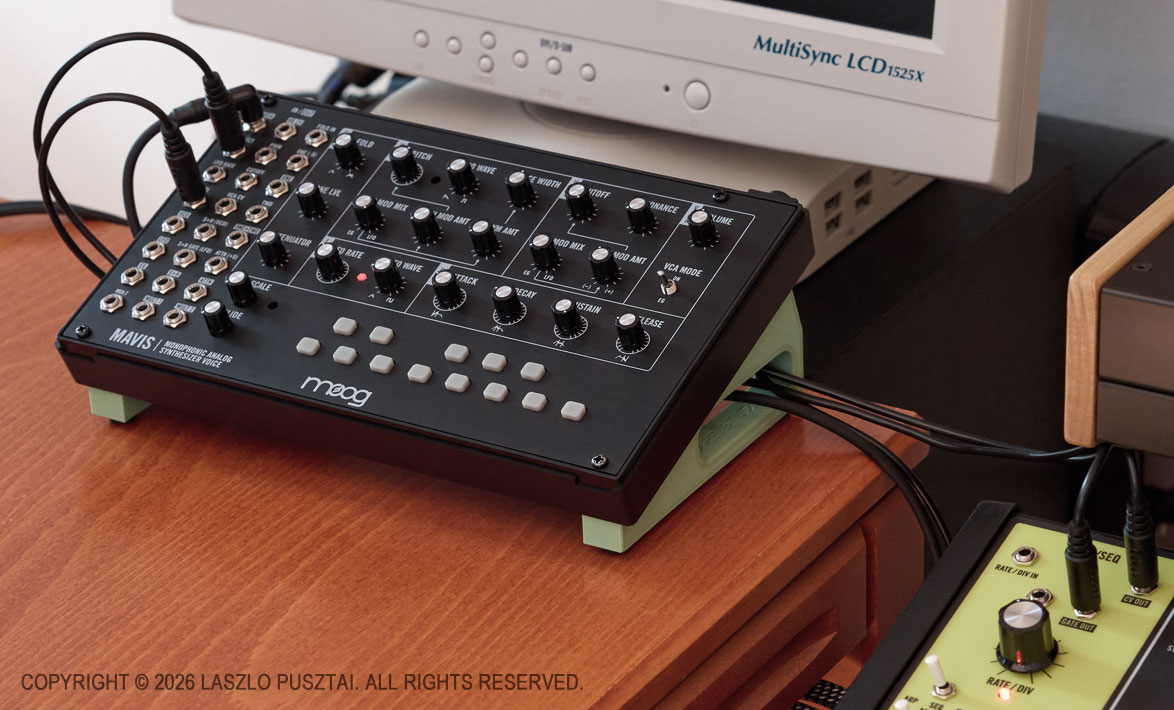
As you can see on the following picture, the ARP/SEQ jacks are close enough to the “shared corner” to be able to connect any desktop module with relatively short cable runs.

Read this if you are wondering what the green stand beneath the Mavis is

I do prefer to use the Matriarch as a keyboard for the Mavis and other Moog desktop synths, because unlike the majority of small MIDI/CV keyboards (Arturia KeyStep for example), it can output the Moog standard -5V to 5V range on the CV out jack. Well, the Grandmother can also do this, but my Matriarch has a proximity advantage: it sits next to my desk’s “shared corner” on one side, and to my Moog semi-modulars on the other.

So far, so good. But I had to fix another issue that heavily impacted the usability of the Matriarch as a CV/Gate keyboard controller, regardless of whether I used the rear or the front panel outputs. It will be discussed in my next post.

Compact Stand for Desktop Synthesizers

It Began With the Moog Mavis

There were three things constantly driving me nuts when I got my Mavis – my very first synth – back in 2024. The tiny pot shafts, of course. That I can’t see the pot labels when the device is lying flat. And the constant cable clutter when its connected to a controller or another synth.

The first one had been resolved by installing Moog’s – now discontinued – knob kit.

It became obvious rather quickly that I will need something to hold the Mavis at an angle to lift it out from the ergonomic swamp. Unfortunately none of the typical/generic synth module stands were able to make me happy.

Armed with a 3D printer, I was in a perfect position to come up with something new and better.

Let me introduce the Compact Stand.

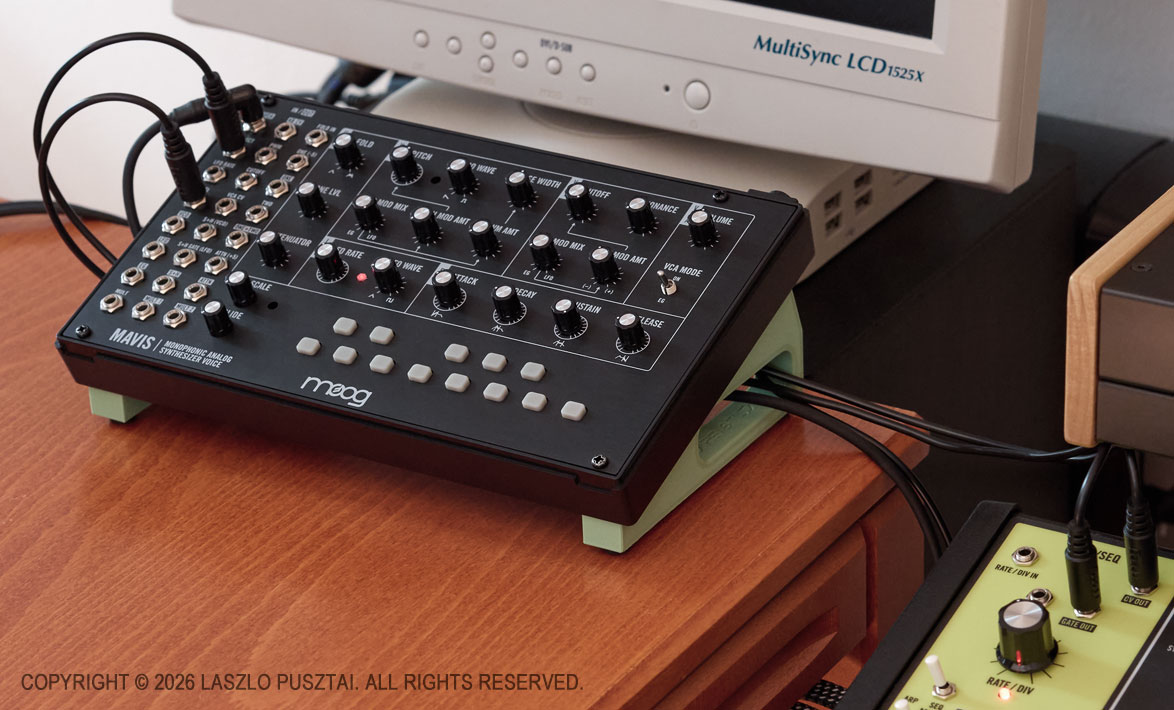
My Mavis in its typical place: sitting on a Compact Stand and connected to my Matriarch.

It attaches to the Mavis with a unique tool-less mounting method. It takes just a few seconds to install or remove it. Packs flat and takes up minimal space when removed.

The mounting is strong enough that the stand’s feet will not fall out. In fact, you can lift the synth by the feet and they will stay in place.

As you can see on the picture above, the holes in the feet function as a cable guide. This could reduce the overall footprint of the Mavis by allowing to route interconnect cables beneath the synth.

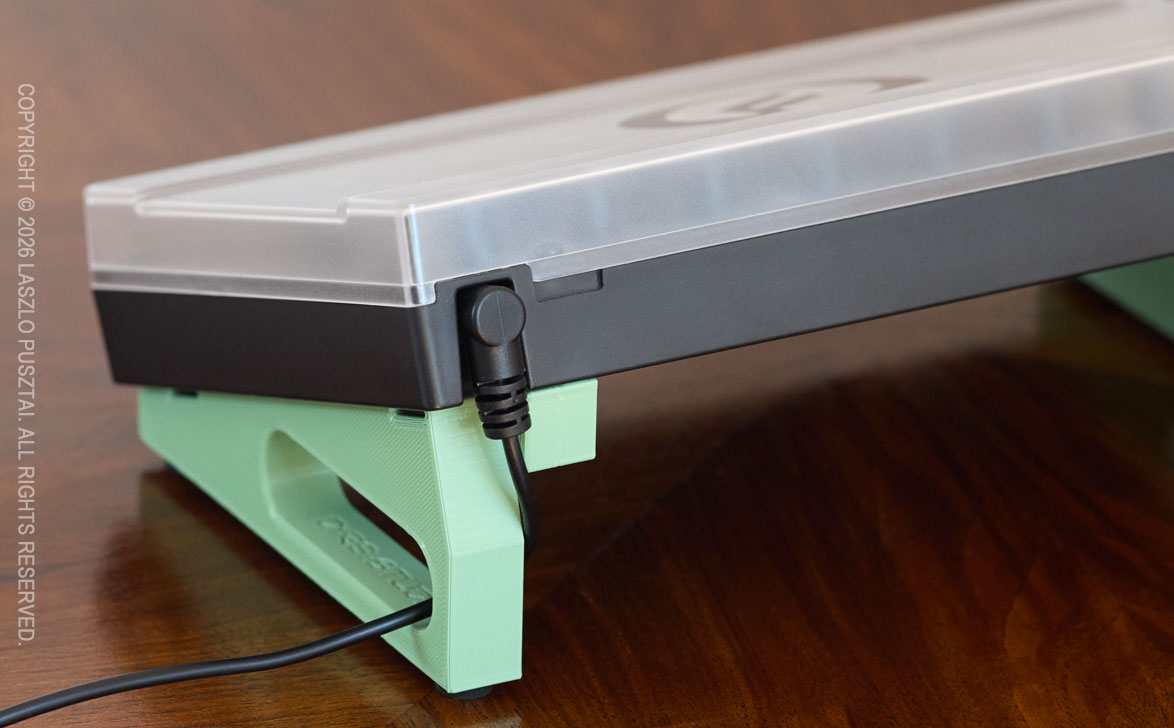
If you choose to use a right angle power connector, then there will be no additional space required behind the Mavis.

The stand allows you to use a right angle power connector and to put the cover on the Mavis.

Because the stand attaches to the bottom of the Mavis, there is nothing that would interfere with using the plastic dust cover.

Then Came the Behringers

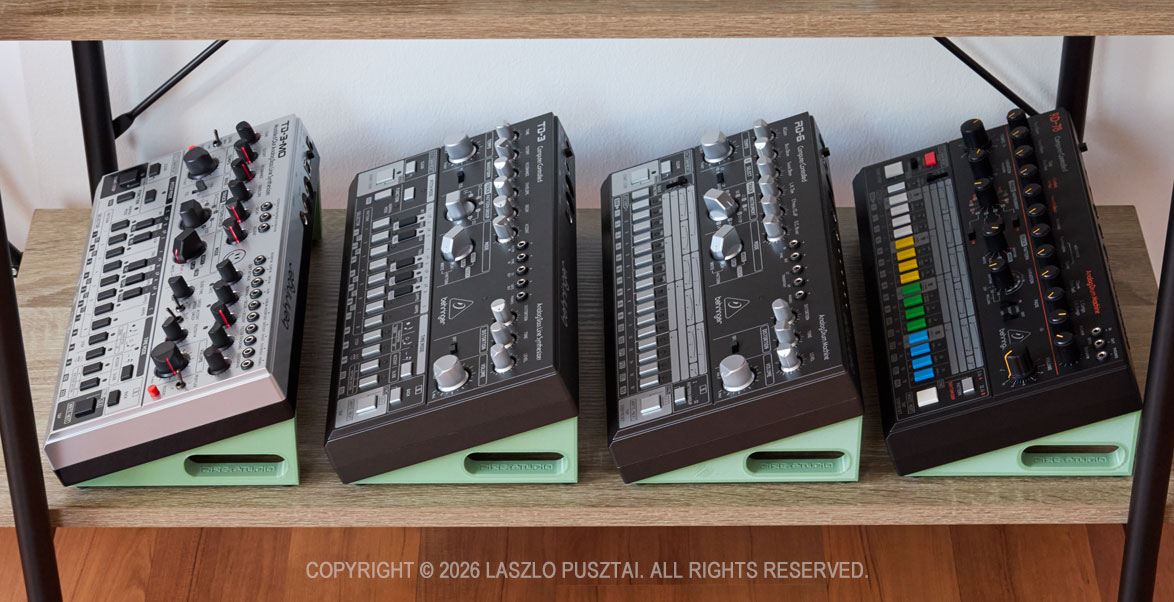
Last year I did discover Behringer’s Roland reissues/clones, and since I was in the middle of the Mavis stand design, I extended the concept and now have designs that support the TD-3, TD-3-MO, RD-6 and RD-78.

The slew of Behringer synths and drum machines on their dedicated stands.

While the attachment method is the same for all these, there are case differences so each Behringer have its dedicated stand model.

And the Korgs

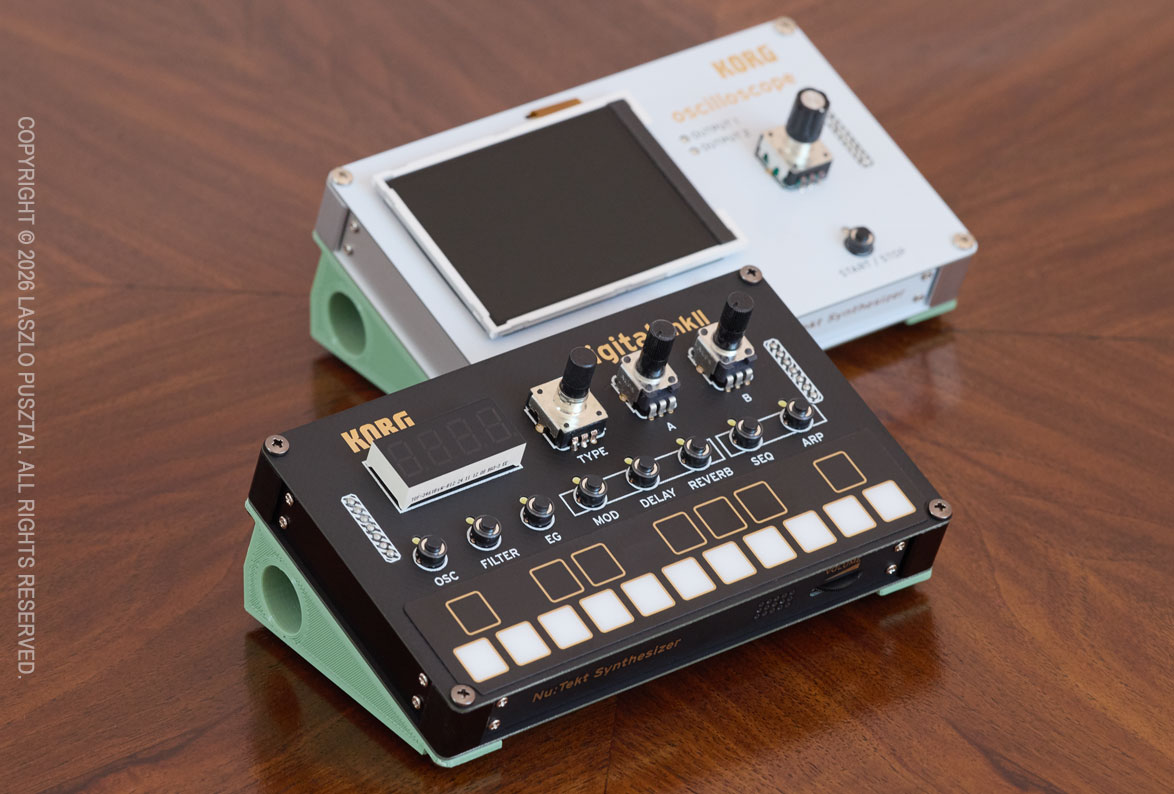
The Compact Stand family also includes a solution for Korg’s DIY kits: the NTS-1 MK II and the NTS-2.

The same stand variant is compatible with both NTS-1 MK II and NTS-2 from Korg.

These use screw-on feet, and the NTS’ default feet should be removed (if you attached it to begin with) before installation. The exact same Compact Stand model works with both Korgs.

Where Are We Now?

As you could guess from the pictures above, all these Compact Stand models are ready for manufacturing. We did obtain the necessary intellectual property protections. We did small production test runs. The stands will be distributed through my company, DIRE Studio.

What we have to work out are the actual sales channels.

But in the meantime, please register your interest and we’ll email you once the stands are available for purchase. Dealers who would like to carry the product are also encouraged to let us know.

Why Do You Need a Benchtop Oscilloscope?

Practitioners of “technical sport” arts couldn’t escape from the necessity of having a bunch of measurement devices to control the technical aspects of their craft. Electronic music (and frankly, any audio studio) is no different. We have a ton of those instruments from simple multimeters and SPL meters through spectrum analyzers and measurement microphones to oscilloscopes. They do not replace our ears of course, but open up additional dimensions of control.

From all those, oscilloscopes – save the measurements mics – represent the highest investment. Today I’m going to share a few stories where my scope saved the day. This might convince you to sink 800-1200 euros of your hard earned money into a professional benchtop oscilloscope instead of buying the 42nd synth module.

Just like the other measurement devices, oscilloscopes are here to help us in validation, calibration, debugging and reverse engineering. They show properties of electrical signals that no other device is capable of. And no, I do not consider the scope in your DAW to be a proper oscilloscope.

The unfortunate reality of widespread quality issues – both in terms of design and manufacturing – in the audio industry increases our burden of validating new devices as they arrive in the studio. The lack of proper documentation and the sheer amount of misinformation floating around just adds insult to the injury. The only way out of this situation is to measure, measure and measure. And a proper oscilloscope – as you will see in the following stories – provides invaluable help.

Story 1: UA Volt Interface Output Imbalance Issues

Back in the days when I started out, I just wanted a simple audio interface to drive my monitors and to have a nice-ish headphone amp for film editing. The third interface that I tried (as the first two failed miserably) was a Universal Audio Volt 1. I was a bit lazy to test everything out of the box as the excitement of having a good looking and good sounding interface was too high.

But as the initial excitement settled, something started to feel off: as if the right speaker was louder. And as if the right channel on my headphone was louder. The first thought that came into my mind was whether I have a hearing issue.

So I hooked up the outputs of the interface to my oscilloscope, started a test signal and … it turned out that there was 6-8dB L/R level disparity on both the speaker and headphone outs.

Since at that point synths started to congregate in the studio, I quickly ordered a Volt 476P – just to discover that is exhibits the exact same issue, although to a lesser extent. Plus a brutal linearity “dip” in the middle of the 3rd input channel pot.

Additional research showed that L/R level disparity is a well-known issue with UA Volt interfaces. So both interfaces went back to Amazon for a refund.

Story 2: Moog Matriarch ARP/SEQ Gate Length Calibration

Further down the road I developed a habit to measure everything. The first victim being my Matriarch. I have a large spreadsheet of the results – but that is a story for another day.

During that time I was also deeply involved with the development of the Mother Global Settings app, and noticed that the values I set for ARP/SEQ Gate Length do not produce the intended result on the GATE OUT jack.

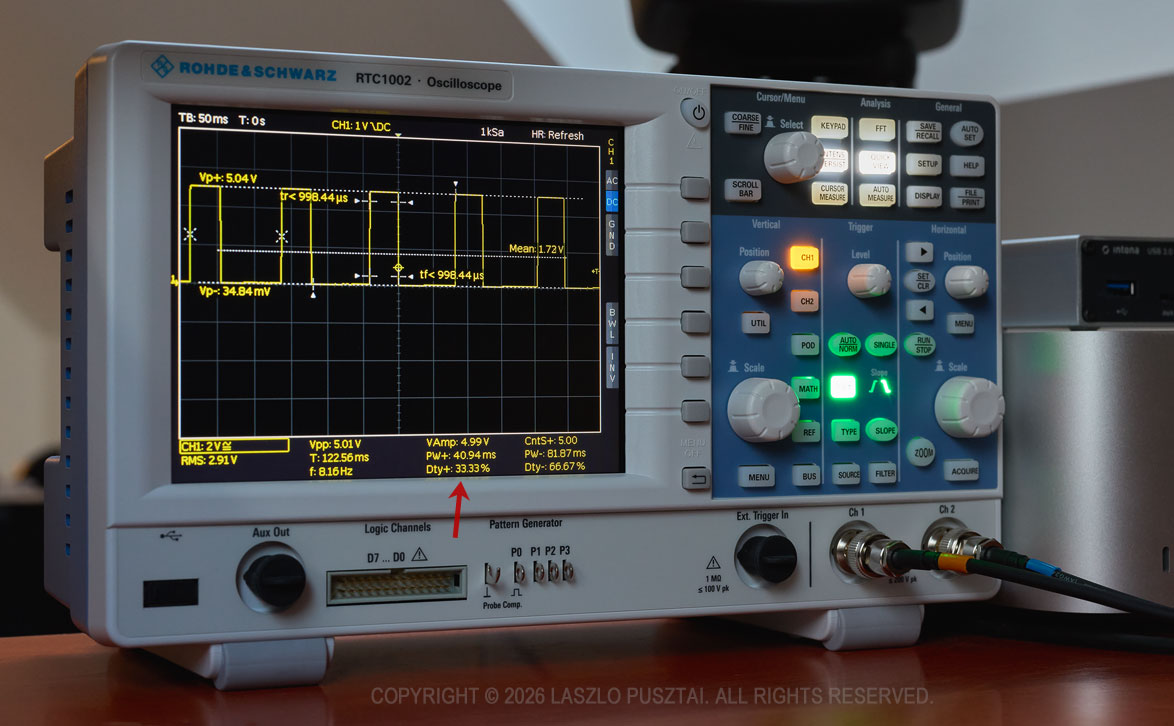
So I had to add a mapping curve to the app – for which the measurements were quite easy with my oscilloscope. The RTC1002 has a nice feature that analyzes the signal and I just had to watch the “Dty+” value to check for the precise duty cycle corresponding to the value sent to the synth. A red arrow on the picture below shows the calibrated duty cycle that you get out of the synth when you set gate length to 33% in the finished app.

My RTC1002 was used for the calibration of the Matriarch’s APR/SEQ gate length duty cycle for Mother Global Settings. Click for a larger image.

It took a few days to do the complete calibration along with the code in the app that makes use of the calibration data. It wouldn’t be possible without a proper oscilloscope.

Story 3: Walrus Audio Canvas Power HP+ Severe Ripple Noise

One of the main tasks of building my synth corner was clean power delivery. A significant issue with power is the ripple noise on the outputs of switching power supplies. It’s basically a sawtooth wave superimposed to the DC output of the power supply. It may have adverse effects on the sound quality of the powered device.

There is an entire cottage industry promising clean, isolated power supplies designed for guitar pedals, and a few manufacturers started to make ones that also provide 12V at 2-3A to power synths. One of those is the Canvas Power HP line from Walrus Audio.

The plan was to get two Canvas Power HP+ units to power my synths from the 12V 3A outputs, and effect units from the 9V outputs. So I started with one HP+ and measured all the outputs.

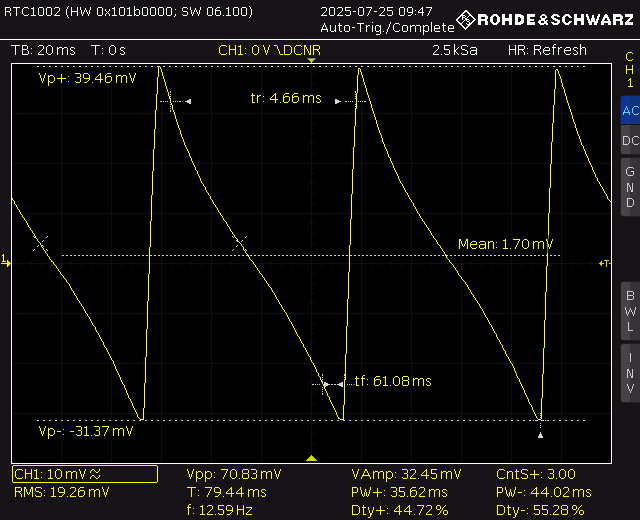
Ripple noise was around 0.7mV on all of the outputs except on the last one, where I got 100 times of that, 70.83mV. This is ten times more than what cheap Chinese power bricks produce. The oscilloscope clearly showed this, as you can see on the following picture.

Screen capture showing the excessive (70.83mV peak-to-peak, that is 100 times of what it should be) ripple noise on one of the Canvas Power HP+ outputs. Click for a larger image.

One of the neat features of the Rohde&Schwarz RC1002 is the ability to connect it to the network and use my web browser to save screen shots. Like the one above. I found that having professional documentation on issues like this dramatically cuts the hassle of communicating with the manufacturer’s or seller’s support.

Walrus Audio told me that it is a defective unit. Sent it back, waited a few months to get a replacement, and finally measured similar noise on the replacement power supply. It also turned out that it’s a shielding issue as when I wrapped the unit in aluminum foil the problem disappeared.

I concluded that it was enough, this product will not fit my needs, sent it back and switched to CIOKS DC7 power supplies.

A few weeks later Walrus Audio informed me that there was a problem with some batches, they tweaked the design, and while there was no recall, they can ship me a new unit. Well, it was too late. Plus I did discover another irritating problem (ultrasonic squealing) with the Canvas Power line that reinforced my decision to switch to CIOKS.

OK, I’m Gonna Get a Scope – Which One?

While they are not exactly cheap, all major oscilloscope manufacturers (such as Rohde&Schwarz, Tektronix, LeCroy, Keysight) offer affordable entry level, 50MHz bandwidth, benchtop models in the 800-1200 EUR range. 50MHz is plenty for audio use, and typically you can upgrade your scope later on with additional licenses if the need arises. There are also frequent educational and promotion discounts, so you may want to shop around a little. For example I bought my beefed up Rohde&Scwarz RTC1002 at a hefty 34% discount. I do not endorse or recommend Chinese offerings, regardless of how good value they might seem.

One of the reasons I went with the RTC1002 is that the R&S service center is a 30 minute drive from where I live. You will want to get your device recalibrated from time-to-time, with the fastest turnaround time possible.

And there are two “toy” offerings I would like to mention. These are simple, limited, but quite useful little devices. They may look like a toy, but punch well above their weight. But the benchtop models are much more precise, offer significantly more features, and way easier to use than the “toys”. You get what you pay for.

The first small scope is the one included with the Erica Synths Labor DIY kit. If you never heard of it, but have any interest in the electronic part of how synths work, go now and get one!

The second is Korg’s NTS-2.

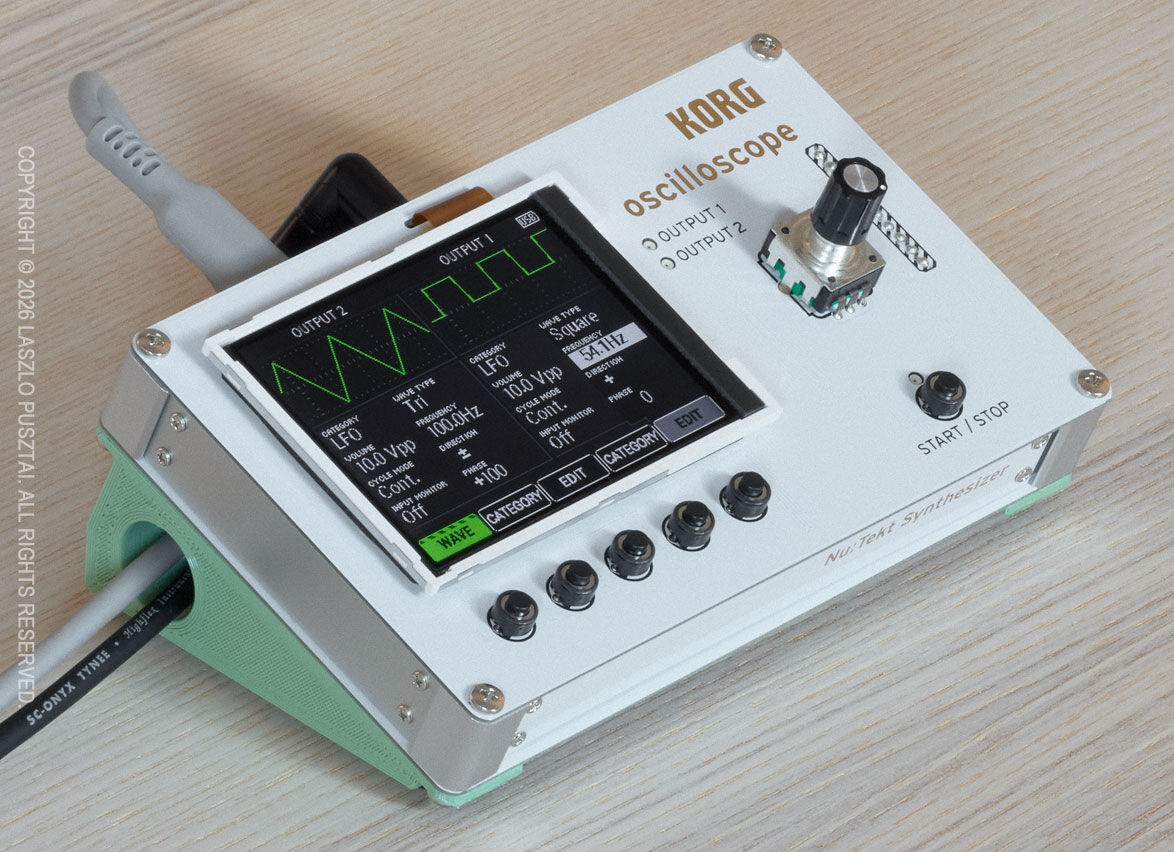
The Korg NTS-2 is a simple but useful “toy” scope and signal generator.

Sometimes I prefer this little guy compared to the big brother: when just a quick check is needed, it’s infinitely more convenient to grab a patch cable and connect this oscilloscope quickly than to find and route the appropriate BNC cables for the RTC1002.

Have you noticed the pistachio green stand-thingy below the NTS-2? This is not included with the device. This is a sneak peek. You’ll know more in my next post.

The Analog Synth Corner Hardware Is Ready

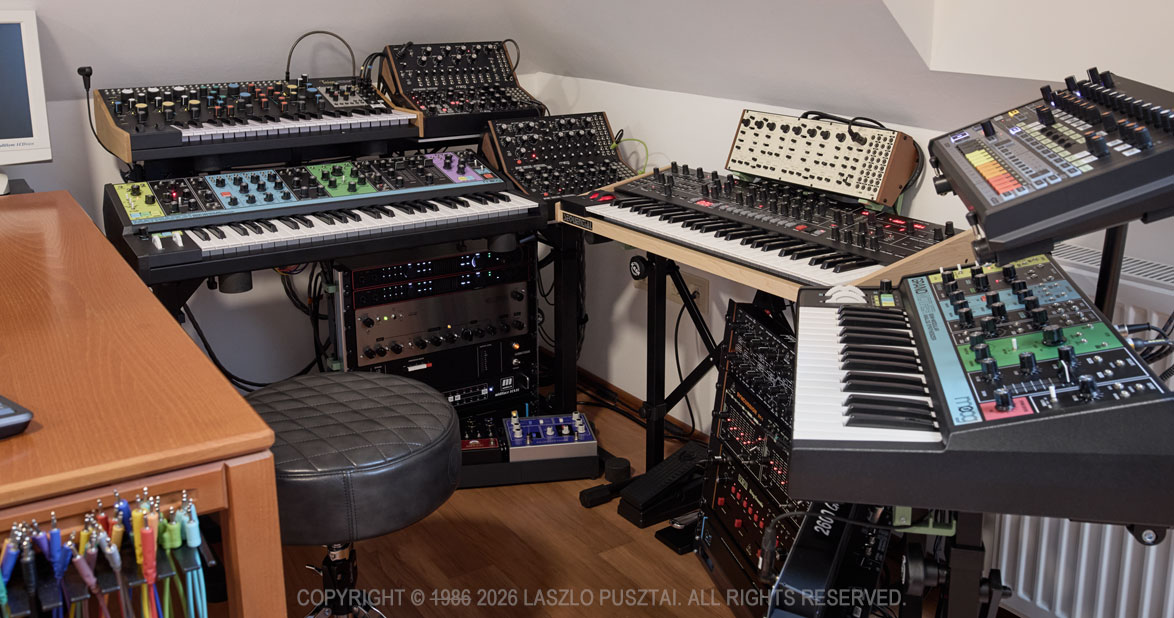
This slightly faded photograph from the eighties shows my just-completed analog synth corner in the studio.

The hardware is finally complete and functional – and ready to roll!

Well, okay, it’s not from the 80s, but the synth corner is nevertheless ready for fun.

It took me two years to arrive at this point. 19 months of which had been spent on procurement and evaluation of not just synths, but all the required support gear. In mid-January this year it was time to hit the workshop to begin making all the required parts and cabling. The final assembly and testing was completed earlier this week.

I do find “studio tours” an immensely useful source of tips and tricks, and I hope mine will help out somebody somewhere. During the project I had encountered quite a few interesting challenges that nobody seems to talk about. I’m planning to go into detail of these in subsequent posts – this is being a global overview.

My initial goal with the synth corner was just to make a sonic playground. But in matter of weeks it became clear that I will need to develop custom parts and software to fill the gaps I was unable to cover with off-the-shelf solutions… And you know what an entrepreneur does in a situation like this: starts to make a slew of products. The first of which, the Mother Global Settings app, is available since last fall. Several more will follow later this year.

I also wanted to limit the space allocated for the synths and associated gear. Mainly to be able to keep everything wired in all the time and within reach. The space limit also helped to avoid boundless gear acquisition to some degree.

Enough introduction, let’s get down to the real stuff! I’m going to talk about four of the six tenets I consider when building a studio – acoustic treatment and software will be covered in later posts sometime.

Power

How you power your audio gear will have significant impact on sound quality. Fortunately the house I’m living in have rather clean power and great grounding, but short outages are quite frequent. So everything – including my Mac and monitor – is connected to a CyberPower CP1500EPFCLD UPS. Using a UPS also guarantees that all the devices are connected to the same wall outlet, so I haven’t experienced even the slightest ground loop issue from the power side of things. The whole setup idles at around 250W, and I rarely if ever go over 50% of the CyberPower’s maximum load.

Three CIOKS DC7 isolated power supplies and a CRUX extension provide ultra-clean power for synths and pedals where they are appropriate. For more power-hungry stuff I’m using a bunch of Moog’s new power bricks – those that ship with new devices post InMusic acquisition. There are a few cases where I’m using the original power supply shipped with the product: like the Taiga requiring 15V and the RD-8 requiring 18V at a higher power draw than CIOKSes can reliably provide. Another oddball exception is the Wellspring: to have a five year warranty, the included power supply must be used. Fortunately it is a good one.

Audio

A pair of Focusrite Scarlett 18i20 4th gen audio interfaces provide me 16 channels of 24bit / 192kHz audio. I’m used to the wonderful and spacious sound that 192kHz recording can provide in my former field recording experience, so that was something I definitely wanted here. All my synths and effect units have 100% analog signal paths, and these interfaces allow me to keep all the nuances in their output. The Scarletts have always-on, pretty transparent preamps on each channel. This is a huge space and cost saver, as some of my synths have a weaker output and benefit from a little boost.

Unfortunately 16 channels isn’t that much. To alleviate this problem, the Behringer modules (in racks below the Trigon-6 and the Grandmother), are connected to the Taiga’s otherwise unused right channel through a Nano Modules MAR mixer hosted in the Taiga’s Eurorack bay. This also gives me the flexibility to patch some of these synths directly to override the Taiga’s channels bypassing the mixer when needed.

You may have noticed that I don’t have a centerpiece patch bay. The Scarletts have 4 front overrides, and combined with the MAR mixer, this provides me enough flexibility.

But what about the effects? – you might ask.

I have three digitally routed effect loops. The main stereo loop hosts a chorus, a phaser, a delay and a reverb – in this order. The second one is just for the Spectravox. And the third one is for ad-hoc connected guitar pedals. Routing is done in REAPER with the appropriate delay compensation. This gives me the flexibility to separately record dry and wet, and to send already recorded material to the effects. At 24bit / 192kHz I haven’t noticed any audible difference between this approach and a fully analog signal path.

Monitoring is done through a pair of Genelec 8030C speakers, connected to the Scarlett’s monitor output. So there’s no direct analog monitoring, but I actually prefer to hear what I’m going to work with later on.

In case I need a real string sound, my guitar gets wired to one of the front hi-z inputs of the Scarletts. I usually put guitar pedals between the Strat and the Scarlett.

And finally, the elephant in the room: cabling. I prefer to use Vovox’s sonorus protect and sonorus direct cables wherever I can. But they are quite stiff, expensive and ordering custom lengths can take months. As a result I started to make my own cables. I literally spent days on auditioning different materials, and finally settled on using some of Sommer Cable’s fine cables, such as the Spirit LLX, Spirit XS. Surprisingly, I prefer to have some synths connected via the Onyx Tynee – despite this one doesn’t have the expansive sound stage of the former ones. Plugwise Neutrik and Sommer Hicon only.

Control (MIDI)

A Miditech midiface 16×16 gives me 16 DIN inputs and 16 DIN outputs. Which is plenty right now. The interface has a low-latency USB3 connection directly to my Mac Studio. I avoid USB MIDI because it doesn’t provide galvanic isolation and is a source of lots of nasty noise.

On the cabling front, just like with audio, I use a cable that is appropriate for the task at hand. This means a mixture of Roland RMIDI-G, Cordial ED and self-made (Sommer Goblin cable with Neutrik REAN plugs) cables.

Stands and Racks

Several K&M Omega and 18826 stands form the base of the support. The racks are open frame MikroTik SolidRack 10s.

You may have noticed little pistachio green things here and there on the photo. They are the top on an iceberg: I have dozens of 3D printed and aluminum extension parts to these stands and racks. There are additional shelves (like the ones under the Moog modules), stiffener bars, cable guides, even a pedalboard. Some of these are general things that I’m thinking of bringing to the market, and some are manufactured to my specific use case.

One thing you won’t find in the synth corner is cable clutter. I’m allergic to it. A bunch of 3D printed cable holders and guides help me keep everything organized and to keep power, control and audio at a safe distance from each other to avoid interference.

Next Up…

There is one specific device, one that I consider being a must for anybody working with synths or other audio gear. It is the subject of my next post.

Another consequence of the synth corner hardware being ready is that I can now focus on the software projects waiting for this to happen. There are no less than four new apps I’m working on right now. This is going to be a fun / busy / interesting year!

Introducing Mother Global Settings

I started exploring the realm of electronic music a couple of years ago. And I was fortunate enough to dive into the depths of synthesis with a Moog Matriarch.

The Matriarch is still one of my favorites – and my most used synth by far. Besides its main function it serves as a controller (both MIDI and modular), and sometimes slips into the role of a guitar effect pedal.

In addition to what you can access on the panel, it sports 60+ (you read that right, more than sixty) hidden settings. The majority of which is accessible on the synth itself via a global setting editing mode clearly inspired by the Roland 303’s sequencer (a.k.a. the sequencer from hell), while you can only change the remaining few via MIDI. To add insult to injury, there is no way to check the current value of these settings.

So some important parameters – like arperggiator/sequencer gate length or swing – are a pain to change. Good luck trying to adjust swing with the built-in global setting editing mode while playing, for example.

Moog does not provide any software for the synth, and professional quality 3rd party options are pretty much nonexistent.

And this is where my story begins.

What we developed is a proper editor app for the Matriarch – and its sibling, the Grandmother. It works on Mac and iPad. The latter is eminently suitable to be used as a panel extension to the synth.

The app – Mother Global Settings – places all the hidden settings within reach with two clicks/taps maximum. Given the sheer number of settings, they are grouped into four pages in case of the Matriarch, and two pages in case of the Grandmother. Every single setting has its own button, switch or slider.

We also added a bunch of convenience controls – they are at the bottom of the screen. An octave switcher so you don’t have to fiddle with the synth’s switching. A button to instantly disable glide (while the pot remains at its current setting), a panic button, and sequence selector for the Matriarch.

Of course you can also save the global settings as presets to recall them as needed. Please note that these presets only include the hidden settings, so they are not “patches”.

The app is now available on Apple’s App Store for an introductory price.