Compact Stand for Desktop Synthesizers

It Began With the Moog Mavis

There were three things constantly driving me nuts when I got my Mavis – my very first synth – back in 2024. The tiny pot shafts, of course. That I can’t see the pot labels when the device is lying flat. And the constant cable clutter when its connected to a controller or another synth.

The first one had been resolved by installing Moog’s – now discontinued – knob kit.

It became obvious rather quickly that I will need something to hold the Mavis at an angle to lift it out from the ergonomic swamp. Unfortunately none of the typical/generic synth module stands were able to make me happy.

Armed with a 3D printer, I was in a perfect position to come up with something new and better.

Let me introduce the Compact Stand.

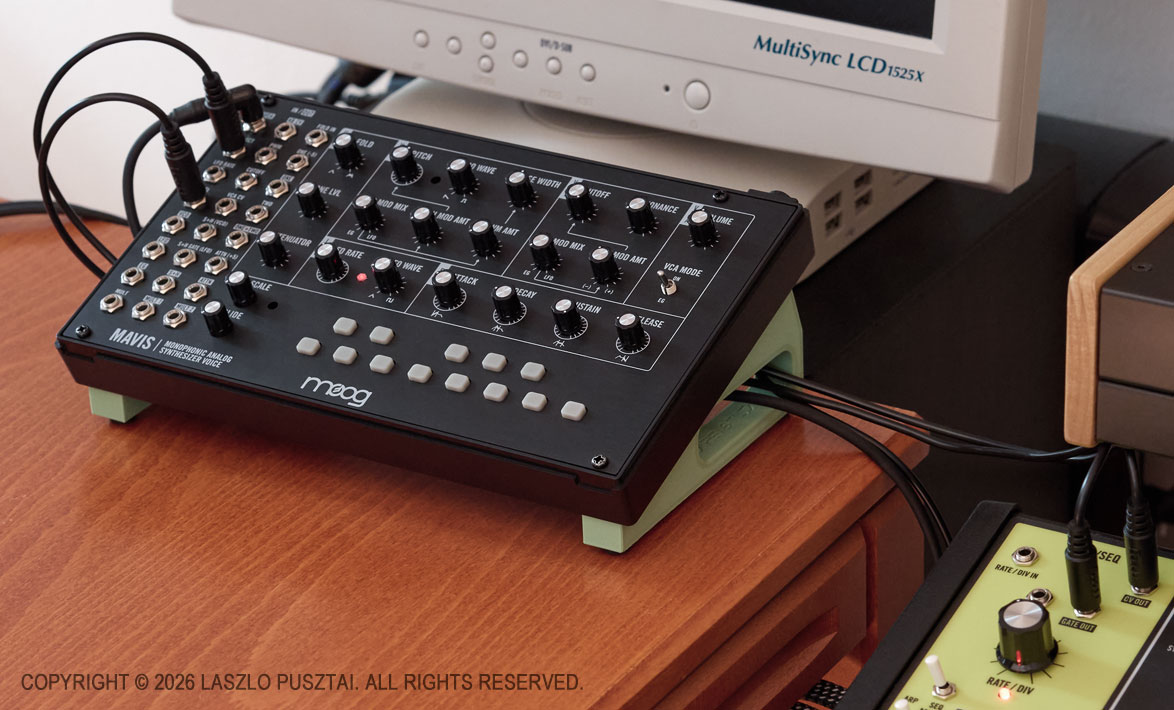
My Mavis in its typical place: sitting on a Compact Stand and connected to my Matriarch.

It attaches to the Mavis with a unique tool-less mounting method. It takes just a few seconds to install or remove it. Packs flat and takes up minimal space when removed.

The mounting is strong enough that the stand’s feet will not fall out. In fact, you can lift the synth by the feet and they will stay in place.

As you can see on the picture above, the holes in the feet function as a cable guide. This could reduce the overall footprint of the Mavis by allowing to route interconnect cables beneath the synth.

If you choose to use a right angle power connector, then there will be no additional space required behind the Mavis.

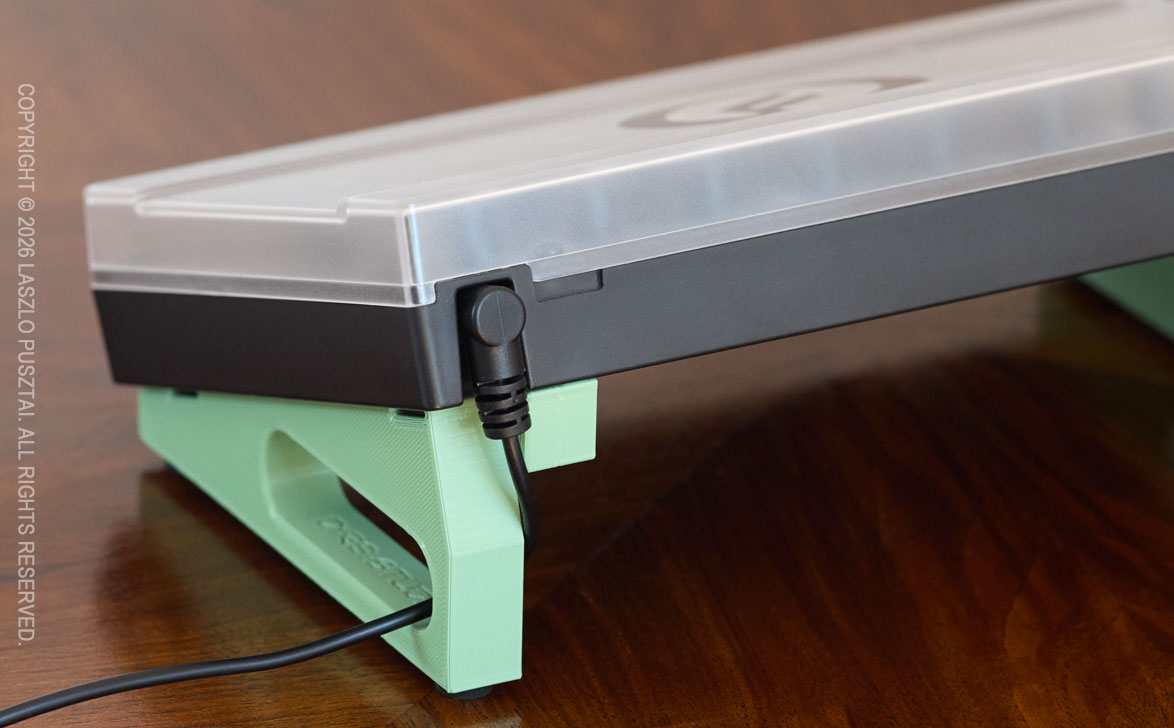
The stand allows you to use a right angle power connector and to put the cover on the Mavis.

Because the stand attaches to the bottom of the Mavis, there is nothing that would interfere with using the plastic dust cover.

Then Came the Behringers

Last year I did discover Behringer’s Roland reissues/clones, and since I was in the middle of the Mavis stand design, I extended the concept and now have designs that support the TD-3, TD-3-MO, RD-6 and RD-78.

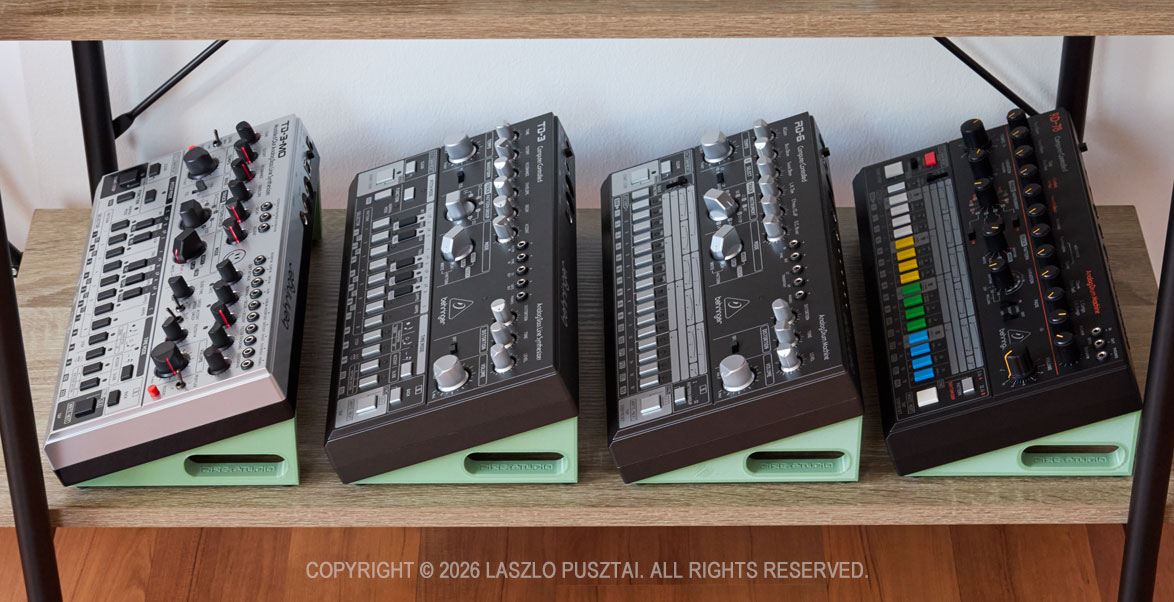
The slew of Behringer synths and drum machines on their dedicated stands.

While the attachment method is the same for all these, there are case differences so each Behringer have its dedicated stand model.

And the Korgs

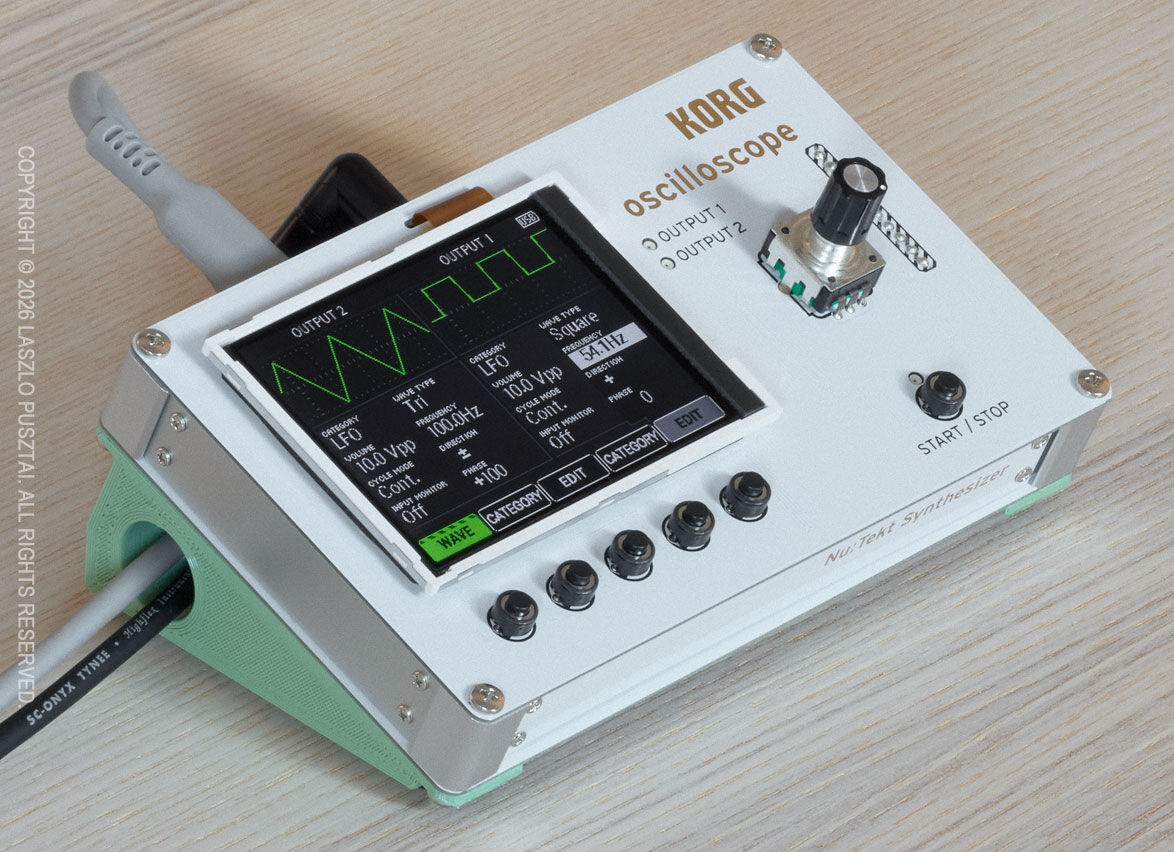
The Compact Stand family also includes a solution for Korg’s DIY kits: the NTS-1 MK II and the NTS-2.

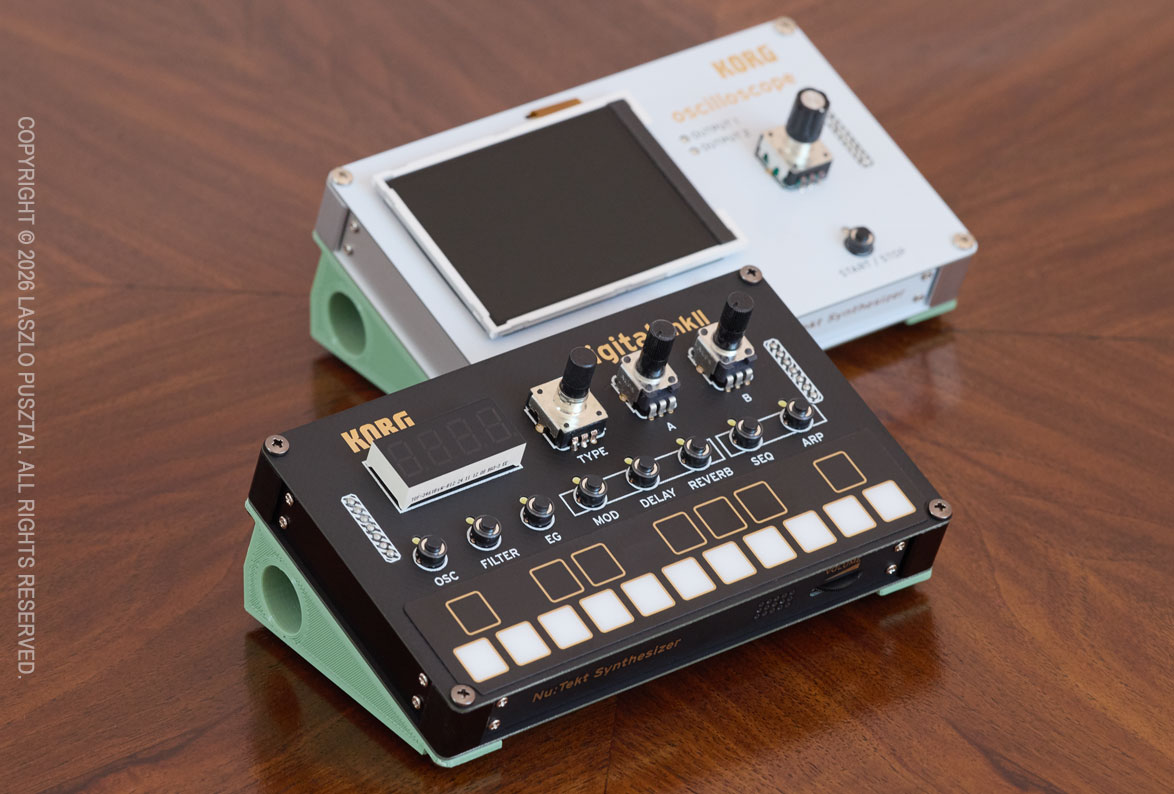
The same stand variant is compatible with both NTS-1 MK II and NTS-2 from Korg.

These use screw-on feet, and the NTS’ default feet should be removed (if you attached it to begin with) before installation. The exact same Compact Stand model works with both Korgs.

Where Are We Now?

I have a utility model (a patent-like intellectual property right) registration for the tool-less attachment method. I also hold a design registration for the visual appearance.

As you could guess from the pictures above, all these Compact Stand models are ready for manufacturing. We did small production test runs. The stands will be distributed through my company, DIRE Studio.

What we have to work out are the actual sales channels.

But in the meantime, you could register your interest and we’ll email you once the stands are available for purchase. Dealers who would like to carry the product are also encouraged to let us know.

Click here to register your interest – this link will open your default email app

This isn’t an email list subscription, so unless you start a discussion, we’ll email you only once. DIRE Studio’s privacy policy applies to these registration emails.

In the email please let us know which model(s) are you interested in, or if you would like to see a Compact Stand model for your favorite synth currently not included in the lineup.

Why Do You Need a Benchtop Oscilloscope?

Practitioners of “technical sport” arts couldn’t escape from the necessity of having a bunch of measurement devices to control the technical aspects of their craft. Electronic music (and frankly, any audio studio) is no different. We have a ton of those instruments from simple multimeters and SPL meters through spectrum analyzers and measurement microphones to oscilloscopes. They do not replace our ears of course, but open up additional dimensions of control.

From all those, oscilloscopes – save the measurements mics – represent the highest investment. Today I’m going to share a few stories where my scope saved the day. This might convince you to sink 800-1200 euros of your hard earned money into a professional benchtop oscilloscope instead of buying the 42nd synth module.

Just like the other measurement devices, oscilloscopes are here to help us in validation, calibration, debugging and reverse engineering. They show properties of electrical signals that no other device is capable of. And no, I do not consider the scope in your DAW to be a proper oscilloscope.

The unfortunate reality of widespread quality issues – both in terms of design and manufacturing – in the audio industry increases our burden of validating new devices as they arrive in the studio. The lack of proper documentation and the sheer amount of misinformation floating around just adds insult to the injury. The only way out of this situation is to measure, measure and measure. And a proper oscilloscope – as you will see in the following stories – provides invaluable help.

Story 1: UA Volt Interface Output Imbalance Issues

Back in the days when I started out, I just wanted a simple audio interface to drive my monitors and to have a nice-ish headphone amp for film editing. The third interface that I tried (as the first two failed miserably) was a Universal Audio Volt 1. I was a bit lazy to test everything out of the box as the excitement of having a good looking and good sounding interface was too high.

But as the initial excitement settled, something started to feel off: as if the right speaker was louder. And as if the right channel on my headphone was louder. The first thought that came into my mind was whether I have a hearing issue.

So I hooked up the outputs of the interface to my oscilloscope, started a test signal and … it turned out that there was 6-8dB L/R level disparity on both the speaker and headphone outs.

Since at that point synths started to congregate in the studio, I quickly ordered a Volt 476P – just to discover that is exhibits the exact same issue, although to a lesser extent. Plus a brutal linearity “dip” in the middle of the 3rd input channel pot.

Additional research showed that L/R level disparity is a well-known issue with UA Volt interfaces. So both interfaces went back to Amazon for a refund.

Story 2: Moog Matriarch ARP/SEQ Gate Length Calibration

Further down the road I developed a habit to measure everything. The first victim being my Matriarch. I have a large spreadsheet of the results – but that is a story for another day.

During that time I was also deeply involved with the development of the Mother Global Settings app, and noticed that the values I set for ARP/SEQ Gate Length do not produce the intended result on the GATE OUT jack.

So I had to add a mapping curve to the app – for which the measurements were quite easy with my oscilloscope. The RTC1002 has a nice feature that analyzes the signal and I just had to watch the “Dty+” value to check for the precise duty cycle corresponding to the value sent to the synth. A red arrow on the picture below shows the calibrated duty cycle that you get out of the synth when you set gate length to 33% in the finished app.

My RTC1002 was used for the calibration of the Matriarch’s APR/SEQ gate length duty cycle for Mother Global Settings. Click for a larger image.

It took a few days to do the complete calibration along with the code in the app that makes use of the calibration data. It wouldn’t be possible without a proper oscilloscope.

Story 3: Walrus Audio Canvas Power HP+ Severe Ripple Noise

One of the main tasks of building my synth corner was clean power delivery. A significant issue with power is the ripple noise on the outputs of switching power supplies. It’s basically a sawtooth wave superimposed to the DC output of the power supply. It may have adverse effects on the sound quality of the powered device.

There is an entire cottage industry promising clean, isolated power supplies designed for guitar pedals, and a few manufacturers started to make ones that also provide 12V at 2-3A to power synths. One of those is the Canvas Power HP line from Walrus Audio.

The plan was to get two Canvas Power HP+ units to power my synths from the 12V 3A outputs, and effect units from the 9V outputs. So I started with one HP+ and measured all the outputs.

Ripple noise was around 0.7mV on all of the outputs except on the last one, where I got 100 times of that, 70.83mV. This is ten times more than what cheap Chinese power bricks produce. The oscilloscope clearly showed this, as you can see on the following picture.

Screen capture showing the excessive (70.83mV peak-to-peak, that is 100 times of what it should be) ripple noise on one of the Canvas Power HP+ outputs. Click for a larger image.

One of the neat features of the Rohde&Schwarz RC1002 is the ability to connect it to the network and use my web browser to save screen shots. Like the one above. I found that having professional documentation on issues like this dramatically cuts the hassle of communicating with the manufacturer’s or seller’s support.

Walrus Audio told me that it is a defective unit. Sent it back, waited a few months to get a replacement, and finally measured similar noise on the replacement power supply. It also turned out that it’s a shielding issue as when I wrapped the unit in aluminum foil the problem disappeared.

I concluded that it was enough, this product will not fit my needs, sent it back and switched to CIOKS DC7 power supplies.

A few weeks later Walrus Audio informed me that there was a problem with some batches, they tweaked the design, and while there was no recall, they can ship me a new unit. Well, it was too late. Plus I did discover another irritating problem (ultrasonic squealing) with the Canvas Power line that reinforced my decision to switch to CIOKS.

OK, I’m Gonna Get a Scope – Which One?

While they are not exactly cheap, all major oscilloscope manufacturers (such as Rohde&Schwarz, Tektronix, LeCroy, Keysight) offer affordable entry level, 50MHz bandwidth, benchtop models in the 800-1200 EUR range. 50MHz is plenty for audio use, and typically you can upgrade your scope later on with additional licenses if the need arises. There are also frequent educational and promotion discounts, so you may want to shop around a little. For example I bought my beefed up Rohde&Scwarz RTC1002 at a hefty 34% discount. I do not endorse or recommend Chinese offerings, regardless of how good value they might seem.

One of the reasons I went with the RTC1002 is that the R&S service center is a 30 minute drive from where I live. You will want to get your device recalibrated from time-to-time, with the fastest turnaround time possible.

And there are two “toy” offerings I would like to mention. These are simple, limited, but quite useful little devices. They may look like a toy, but punch well above their weight. But the benchtop models are much more precise, offer significantly more features, and way easier to use than the “toys”. You get what you pay for.

The first small scope is the one included with the Erica Synths Labor DIY kit. If you never heard of it, but have any interest in the electronic part of how synths work, go now and get one!

The second is Korg’s NTS-2.

The Korg NTS-2 is a simple but useful “toy” scope and signal generator.

Sometimes I prefer this little guy compared to the big brother: when just a quick check is needed, it’s infinitely more convenient to grab a patch cable and connect this oscilloscope quickly than to find and route the appropriate BNC cables for the RTC1002.

Have you noticed the pistachio green stand-thingy below the NTS-2? This is not included with the device. This is a sneak peek. You’ll know more in my next post.