The EOS R Diary : RF 50mm f/1.2L USM

As I did mention in the first installment of this diary, one of my reasons to get an EOS R was the RF 50mm f/1.2L USM lens. You might have read in other reviews that it’s worth to buy an EOS R just to be able to use this lens. Well, this isn’t an exaggeration. On my subjective lens quality scale it scores great.

My subjective lens quality scale have eight levels: awful, weak, mediocre, decent, good, great, excellent, and exceptional. To put you in perspective, I consider the Zeiss Otus 1.4/28 and Rodenstock HR Digaron-S 100mm f/4 to be exceptional. The Zeiss Otus 1.4/55, the Zeiss Apo Sonnar 2/135 and Rodenstock HR Digaron-S 180mm f/5.6 are excellent. The Canon EF 400mm f/4 DO IS II USM and EF 500mm f/4L IS II USM scores great. And the Canon EF 35mm f/2 IS USM gets a good rating. Keep in mind that these are subjective ratings, and sometimes a lens moves from one class to another in my view. But generally everything at great or above have very good image quality and is a joy to use.

Compared to the Otus 1.4/55

The 50/1.2 is roughly as big, as heavy and almost as expensive (2000 vs 2700 EUR net) as the Otus 1.4/55 – one of my all time favorite lenses. Let’s first see why I think that the Otus is a better choice if you don’t need autofocus.
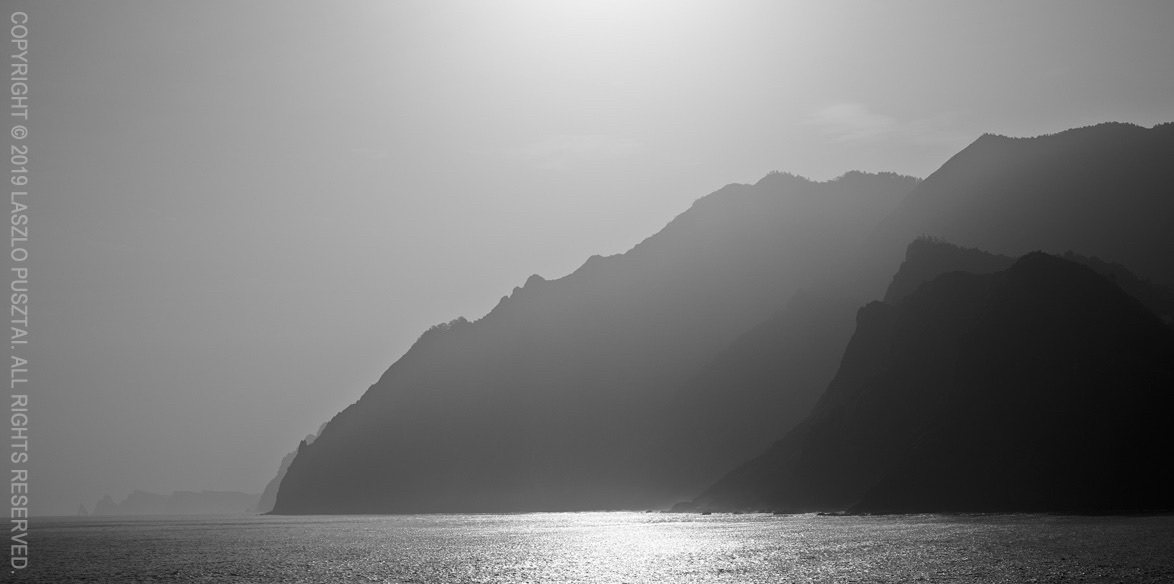
Must be careful with strong backlighting

Two things. Well, actually three. The first is that the 50/1.2 is rather susceptible to flare, while you can basically shoot into the Sun with the Otus with zero flaring. It was quite shocking to realize this after all those years spent with flare resistant Zeiss glass. So you have to be careful when shooting backlit scenes with the 50/1.2. But this explains the oversized lens hood…

The second is very strong vignetting. It is easily correctable in post-processing, though. But keep in mind that vignetting is visible even at f/8.

Last, and maybe most importantly, the 50/1.2 breathes like hell. This practically renders the lens unusable for near-to-far focus bracketing. In comparison, the Otus breathes way less, but still exhibits some image size change.

Focus breathing refers to the image size change when focusing distance changes. All lenses breathe by default – unless they are corrected for it. The 50/1.2 doesn’t seem to be corrected much.

Why Does One Want the 50/1.2?

Simply put, this is the finest 50mm autofocus lens I have ever used. Focus acquisition is quick, despite the motor has to move 340g of glass and metal around. But this snappiness is not a surprise since the the focusing motor is borrowed from the new 400 and 600mm super telephoto lenses. The only issue is that Dual Pixel AF systems are totally blind to horizontal detail, and you’ll have problems focusing on the edge between the ocean and the sky, for example.

Of course one wants an f/1.2 lens for bokeh. And the 50/1.2 will not disappoint here. Although depth of field is razor thin, and you’ll end up stopping down a bit. But in any case, out of focus areas are rendered in a creamy smooth way, with nice transition between sharp and unsharp. This reminds me how German glass renders, and not typical for Canon. Out of focus areas are also free from contamination (colored haze, chromatic aberration, etc).
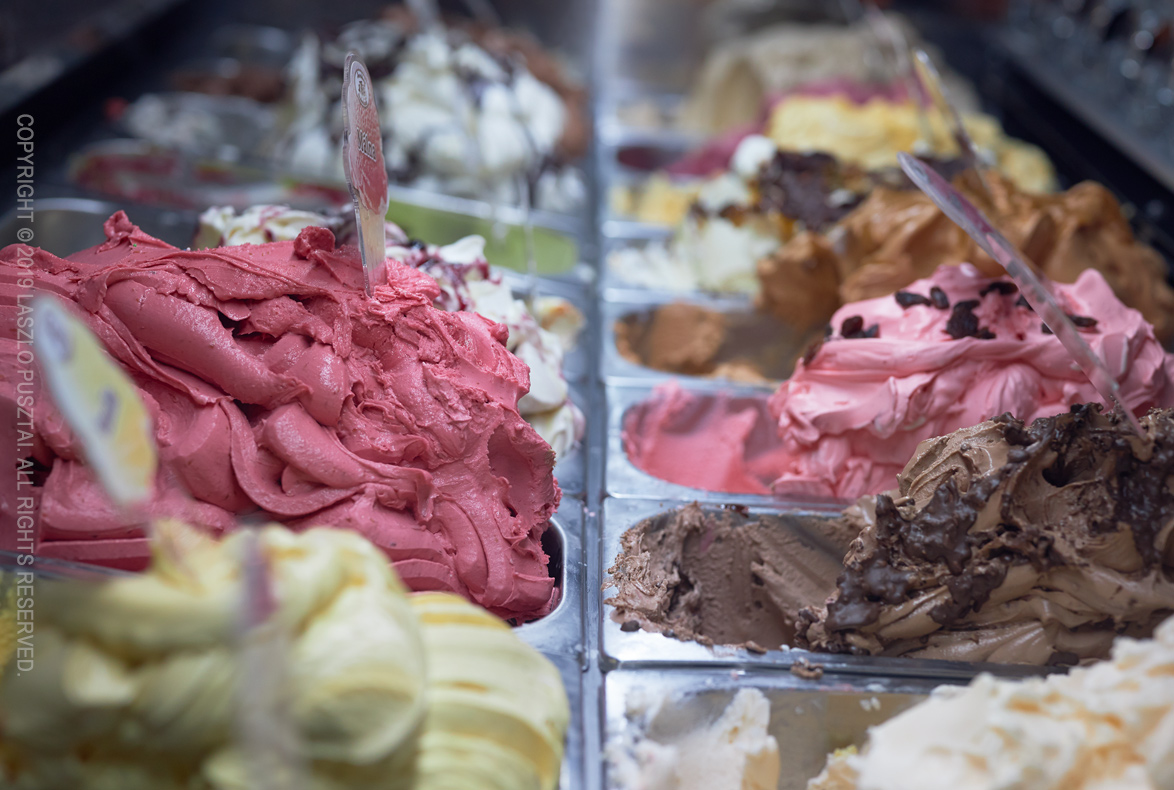
Nice creamy bokeh

The image above was shot for my favorite confectionery, and shows not just the beautiful bokeh, but the high degree of freedom from aberrations (look at how the metal bowls are rendered, despite being shot through the side glass of the fridge and under spiky, cold fluorescent light).

This freedom from aberrations is what I want in a lens these days. This ensures a transparent, airy rendering of the scene. Just the way I see it.

Colorwise the 50/1.2 has bit warmer atmosphere than I would prefer (like the 500/4). I do prefer the colder images Zeiss glass produces. I sincerely hope that Canon will finally introduce some consistency into how its lenses render. The Zeisses I use are consistent, but Canons are all over the place. The 50/1.2 would be a good reference rendering style for future Canon lenses.

With that said, I do like the images from this lens. They look natural and are full of detail. And yes, we arrived to one of the prominent features of the 50/1.2 – its high resolving power. While the EOS R isn’t a very high resolution camera, the 50/1.2 is in the same league as the Otus 55 and HR Digaron-W 70 on this body. Image field also seems to be rather flat (unlike the Otus, and most Zeiss lenses, where you should be very careful with focus placement).

The following image is just a handheld shot, with no tripod and focusing at the center. It had to be corrected for vignetting, though. It was shot at f/8, as the EOS R is a medium resolution camera and you don’t have to worry about diffraction. Which makes the EOS R and 50/1.2 combination a very easy to shoot one.

Natural color and plenty of detail

Construction and Handling

It is a large lens. Thicker than the Otus 55 because of the focus motor. Thicker than it would be convenient even for my large hands. But you’ll get used to it. I did. And the lens hood is humongous… At least it’s a constant diameter design, so no extra space is needed for the hood in your bag.

Fortunately inner focusing is employed here, as I have severe aversion to protruding lens designs. But the front of the lens is not weather sealed, meaning that a 77mm protector is advised to be used is inclement weather conditions.

Speaking of inclement weather. My very first shot with the Otus happened on a cold November morning. My hand literally froze to the lens (and I was wearing a light glove). So the use of plastic as the exterior is very welcome on the 50/1.2.

As I did mention in my EOS R customization post, focus ring rotation behavior on my EOS R (ill-named as sensitivity in the menu) is linked to rotation degree, resulting in 360 degree focus ring rotation, which is quite nice for manual focusing. I still think that rotation speed sensitive behavior is useless.

It’s Almost Always in My Bag

When I shoot from a car or boat, and have capacity to carry a secondary bag, then the 50/1.2 and the EOS R comes with me. It was rather surprising, since the 5DS R and Otus combo is a much better one. Well, except that the R system is way easier to shoot, and reach for it when I have no inclination to set up a “proper” camera.

All in all, if you can live with its shortcomings, the Canon RF 50mm f/1.2L USM could be a very nice and high performance addition to a serious photographer’s toolkit.

  ☕ ☕ ☕

Did you enjoy this post? Consider buying me a coffee if so.
Canon EOS RP : My New Toy Camera

Previously held by the Canon EOS 100D (aka Rebel SL1), the toy camera is a special position in my photographic arsenal. The toy camera has to be small, light, relatively inexpensive, but simultaneously required to be a full featured camera, with at least decent image quality, suitable for a minimum of 30x45cm print size. And it must be a camera that’s a joy to shoot with.

The toy camera slots below my travel camera. I reach for it when even a lightweight travel system is too much. It’s always used in a no tripod, single lens configuration (I’ll refer to that single lens as the toy lens). It comes with me on short trips and sometimes on daily walks. When I anticipate good opportunities and want something significantly better than a smartphone camera.

For a very long time there weren’t any serious contenders for this position. But the RP took over quickly and effortlessly.

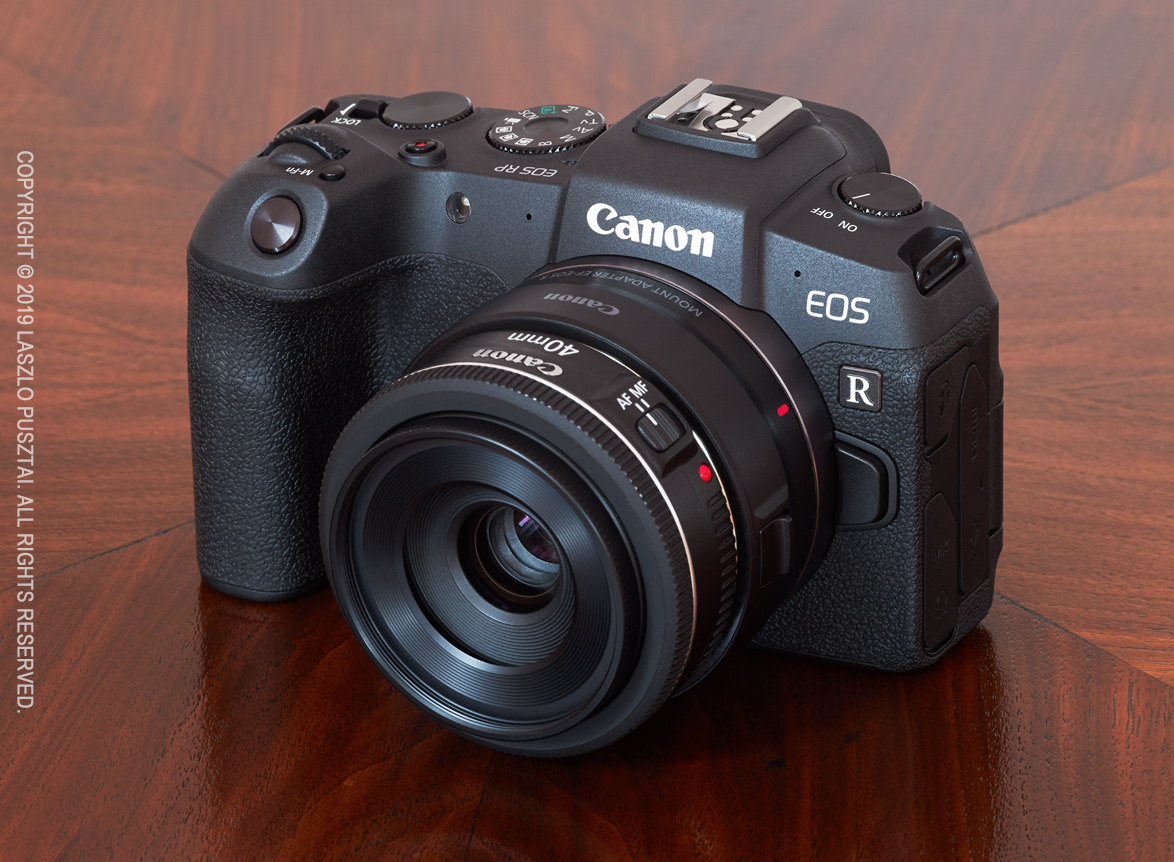
The EOS RP with the smallest and lightest “RF” lens: the EF 40mm f/2.8 STM on the EF-RF adapter

Originally I had been quite reluctant to get one, and honestly, I would completely ignore this camera if we hadn’t needed one for software development purposes. Then, as usual, I brought it with me on a few shoots, and the unexpected happened. I realized that:

The RP is an interface design masterpiece

Saint-Exupéry phrased what I consider one of the most important ideas every designer should internalize:

“Perfection is achieved, not when there is nothing more to add, but when there is nothing left to take away.”

Being a perfectionist, I strive to live along this line. This is not just reflected in our apps, but we also constantly in the process of slimming down our daily lives, cutting the unnecessary. The unnecessary, which only bogs you down in the long run.

Being a perfectionist requires effort and courage. It’s much easier to litter a camera with tons of stuff (customizable buttons for example) fearing what some half-educated reviewer or user might say. The designer has to analyze what’s really needed, and be brave to leave the unnecessary out. All the while keeping an eye on important things, because taking too much away could seriously impair usability.

I leave it to the reader as an exercise to analyze contemporary camera designs and decide which ones are littered with an overly huge number of (mostly customizable) controls and which ones are practically useless because the designer went too far with removing stuff. Canon does it mostly right (that’s one of the reasons I still shoot Canon), with occasional bad moves (like the direct print button, Wi-Fi button and the M-Fn bar) that tend to die out quickly.

The RP is one quick control dial closer to perfection for its use case (light travel/all around camera) than the 100D was, and also one M-Fn bar closer than the R.

Higher end Canons have two control dials (the main dials and the quick control dial). Lower end (Rebel) Canons have one dial (the main dial) and a button to switch the dial between two modes. They also either have a joystick or a 4/8-way controller, but never both. Since the joystick and the n-way controller have pretty much equivalent functionality, I agree with this approach. Adding a joystick along an n-way controller just increases ambiguity, and I consider it a bad choice. Yet so many people whine about the absence of a joystick on the EOS R…

The RP inherited the extensive (but not over the top) pro level customization capabilities of the EOS R, so it was pretty easy to configure everything the way I like. No button or dial left unused, and no function I need left unassigned. It’s pretty much perfect. The only difference from the R’s configuration is the AF point selection button. On the R it cycles focusing modes, but on the RP this function isn’t assignable to the button. So I left it on default, meaning that the AF point selection button is the entry point for both focusing mode selection and live view zooming. A little more button presses, but still not a big deal, as they are both infrequently used functions.

Both the control layout and the body shape contribute to great ergonomics and comfort, outclassing the 6D Mark II easily. I’m not a fan of the combined quick control dial/n-way controller solution on the mid-range Canons, and the RP definitely feels to be in a league above the mid-range offerings.

Build quality

Strong plastic over a metal core (sensor chamber). It’s rigid enough where precision counts, and the plastic shell guarantees that your fingers will not freeze onto the camera on cold November dawns. It’s also not the squeaky plastic that you may be familiar with on the 5D Mark II or M50. This was a really pleasant surprise.

I suspect that this construction is more than enough to dissipate the heat generated by still capture. Video might be different. But as I mentioned numerous times, I don’t shoot video, and if I did, I would get a real, proper video camera. And not blame an otherwise great $1300 full frame still camera that it can’t cook my dinner and can’t record cinema-grade 4k footage for hours in the summer heat.

The shutter button was another surprise. I grown to hate clicky shutter buttons (featured on all entry level Canons). So when I pressed the shutter on the RP for the first time, I started smiling. Both the half and full press positions are detected with a Hall effect sensor (or similar), so there’s no clicky noise, just like on my 1/5/7 series cameras, and on the EOS R.

Not all is rosy though. You notice the first sign of cost cutting with the fold-out LCD. The hinge is rather wobbly, noticeably so even in the fully closed position. And lacking any sealing gaskets, the battery/card door is clicking. This is caused by the tiny play (0.2mm or so) in the door’s lock and the spring that pops the door open. I might get used to it.

What bothers me the most is the image quality on the back LCD. For some reason, the edges of characters and icons are not solid, but have a pixelated/jagged appearance. I did notice this on the M50 for the first time, and now on the RP. It only affects the back LCD, the viewfinder is fine. Moreover, the screen looks gorgeous during firmware updates, so it’s not a hardware issue. Whether its just a marketing tactic to make the camera look and feel cheaper, or have a real technological reason behind it (some sort of power saving and/or heat dissipation technique) is unknown at this point. I’m not an expert in LCD drivers, so if anyone have a clue, please let me know.

Battery life

Well, power saving techniques are a question of life and death when you have a large sensor and a tiny battery. The RP performs a tad better than the M50, with a considerably larger sensor and a fractionally larger battery.

Eco mode is highly recommended, though. I did a few 4-hour sessions, with Eco mode on, and the battery indicator after 200-250 frames still reported full (meaning it was more than 50%) in each session. I did recharge the battery after each session. Nevertheless, I consider a second battery a must.

To be continued…

I had a pessimistic point of view when I started working with the camera. But the RP managed to get more attention and love. The transition happened after opening a few files in Photoshop, and seeing what this tiny little thing is capable of. For less than $1500 (including the EF 40mm f/2.8 pancake).

I know that the sensor is from the 6D Mark II (with slightly modified microlenses), the LCD is shared with several models, and the viewfinder is the same as the M50’s, but still, it’s hard to believe that Canon makes any direct profit on this camera. I sincerely hope it does.

In the right hands the RP is significantly more capable than the price, the spec sheet, a few reviews, and the cat & dog (not to mention New Orleans cemetery) pictures on some online outlets would suggest.

As soon as Capture One starts supporting the RP I will be in a position to comment on image quality of the toy camera + toy lens system, which I’m sure most of you are interested in. I did a few comparisons with Adobe Camera Raw converted files, and they look roughly as one would expect. Day and night better than what the 100D (and even the much newer M50 + EF-M 22/2 combo) produced, but far from what you get with an 5DS R + Zeiss/Rodenstock combination.

Fun tip: downsized to 6.5 megapixels (1/4 size), you get gorgeous, lively images…

I would not buy the RP as a serious main camera. And it’s totally unsuitable for sports/action/birding. There are much better options for those. But as a take everywhere and enjoy playing with camera, whose images can print nicely at 40x60cm, it’s absolutely great. Assuming that you pair it with appropriate lenses. But that’s a topic of another discussion.

Building the “Travel” Tripod

A tripod is, and always was, an essential part of my kit. Capturing high resolution images for large prints demand stable support. Not to mention its importance as a compositional tool. While I’m absolutely satisfied with my “standard” tripod (a Gitzo GT3532LS with an Arca-Swiss d4 Classic geared head), there are occasions when either its size or its weight becomes prohibitive. So I was searching for the ideal lightweight support for a couple of years now.

My requirements were very strict, and no dedicated (means weak and short) travel or lightweight tripod satisfied it. My “travel” tripod has to be sturdy enough to support the Canon EOS 5DS R with a short tele, like the Zeiss Apo-Sonnar 2/135, in extreme conditions (strong wind, icy surfaces, etc). It must fit into cabin baggage (practically 53cm or shorter closed length). It has to be 130cm or higher when fully extended. The head must be geared (one doesn’t want to go back to imprecise and frustrating ballheads after years of shooting with an Arca d4 or Cube). And it should be around 2kg, head included.

Sounds pretty impossible? Well, you can’t buy such a thing off the shelf. You have to build it. And like any good tripod, it will be expensive. But like any good tripod, it will last a few decades.

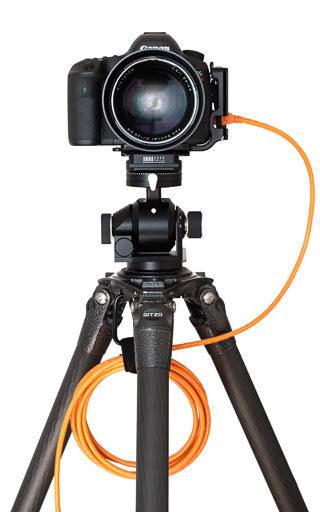
Let me show the finished product first.

Gitzo GT2542 + Markins TH-230 + Arca-Swiss p0 Hybrid

Specs: 51cm closed (without head), 131cm fully extended (without head), weighs 1420g (tripod) + 615g (head) = 2035g, sturdier and dampens vibrations faster than my previous lightweight solution (a Gitzo GT2532S with the Arca p0 Hybrid head).

Actually, vibration dampening performance is halfway between the Gitzo GT3532LS and GT2532S Systematic tripods. To measure it, mounted my 500mm directly on the tripods (with no head), knocked one of the legs, and timed in 16x magnified live view how fast did all vibrations die. For the GT3532LS I got around 1.3-1.4 seconds. For the GT2532S, it was around 2 seconds. My “travel” tripod produced 1.6-1.7 seconds. Pretty impressive.

The operation

The Gitzo Mountaineer GT2542 does have pretty good legs, with specs close to my requirements. I’m looking at Gitzo, RRS and Novoflex offerings when it comes to tripods, and there isn’t another one that’s tall enough fully extended while short enough when closed.

But unfortunately Mountaineer tripods have a center column. Center columns are a work of the devil in my book. So it had to go. There were a couple of options here. You can just remove the center column and leave the head platform. Or better, you can remove the column and the platform, and install a Markins tripod base. Or even better, you can throw out the entire top spider and replace it with Markins’ new TH-230 tripod hub.

I chose the third option, because Markins markets this solutions as a way to reduce vibrations by 30%, and because of the potential ~200g weight reduction. While I hadn’t measured the original tripod’s performance, a quick test showed noticeably improved vibration reduction with the TH-230. And the actual weight saving is 300g.

It took about five minutes to remove the legs and attach them to the Markins spider. Markins even have a video showing the process.

By default the head mounting bolt tends to come loose as you change heads, so I had to apply a little bit of removable threadlocker to make it stick in the TH-230 (I had Vibra-Tite Blue 121 at hand, but Loctite Blue 242 will also do).

Unexpected things

I’m surprised how well machined the TH-230 is. It’s superior to even Gitzo’s craftsmanship. The military green (officially called natural green) color of the hub is a bit out of place, but not too disturbing. And finally, the legs spread a little wider with the TH-230.

The latter has a consequence that the fully extended tripod is 6.5cm shorter than it was with the Gitzo spider, despite the 4cm difference in the Markins and Gitzo spider heights (measures from leg tops to head mounting platform). So you lose 2.5cm here, but gain a tiny bit of stability in exchange.

Since I haven’t used a 4 section tripod for more than a decade, I was a bit shocked to experience how slow it is to extend and collapse the tripod. Exactly 50% more than a 3 section one (9 locks vs 6). This is the price you pay for compactness.

The head

It is my good old Arca-Swiss p0 Hybrid with classic (screw) clamp. It had been modified to remove those annoying top panorama unit detents, and is serving me for about two years now. I’m going to share my thoughts on and experience with the head soon.

I ended up using the p0 Hybrid not only because I already had it, but also because the other option (an Arca L60 plus an additional leveling base, such as a Novoflex MagicBalance) would a) increase total system weight, b) limit the movement range and c) reduce the maximum load capacity of the system.

Bottom line

Bought the Gitzo Mountaineer GT2542 for 540 EUR net (not including VAT), and the TH-230 for 190 EUR net. The p0 Hybrid sells for about 740 EUR net these days. Not inexpensive, but I would call it a fair price for the performance you get.

I’m pretty excited to put the “travel” tripod through its paces. It’s small and light enough to bring it with me not just when I hike with the 5DS R, but also to lug along the EOS R when just traveling casually.

  ☕ ☕ ☕

Did you enjoy this post? Consider buying me a coffee if so.

The EOS R Diary : Kirk L Bracket

I use L brackets for basically every camera I have (the only exception is the 7D Mark II, because I haven’t found a bracket that isn’t unwieldy). The first one that became available for the EOS R was Kirk’s BL-R, so I ordered it immediately. Some 5 weeks later, in early January, the bracket finally arrived.

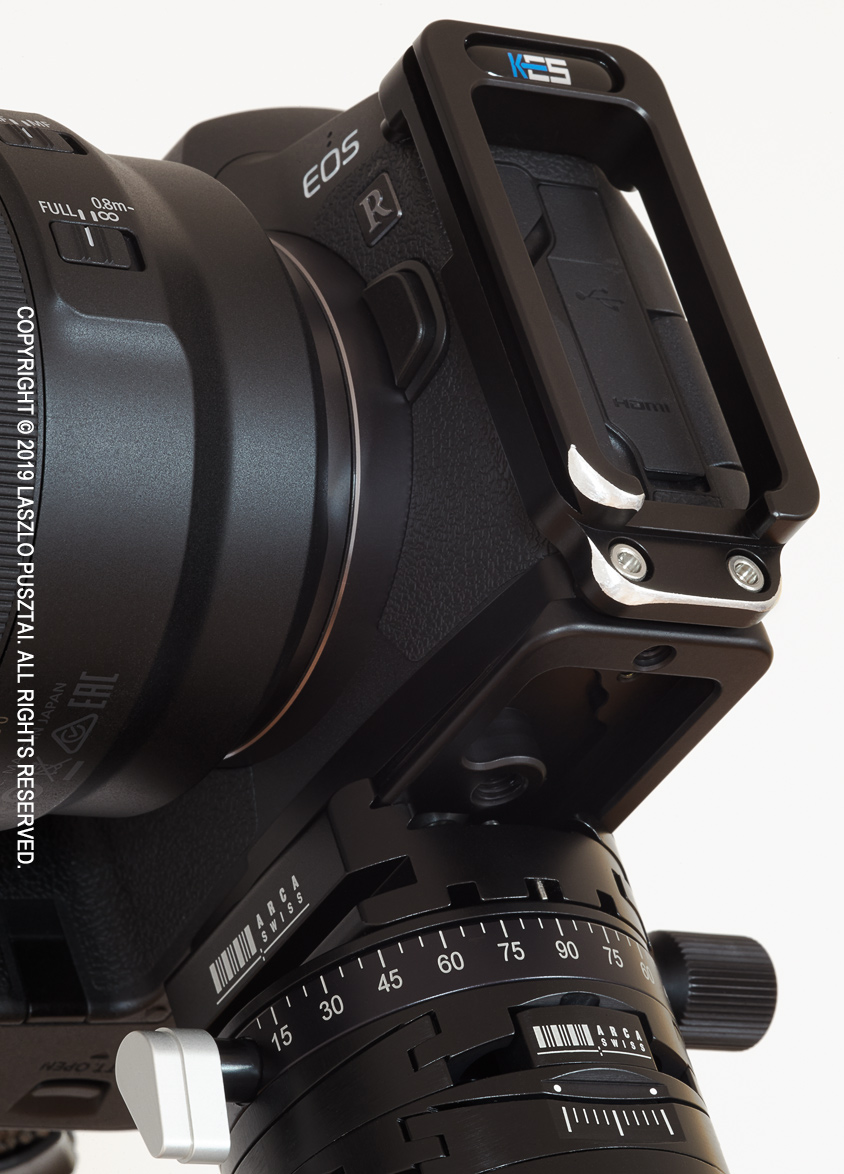
It is a lightweight and slim bracket, but I had to carry out a few modifications to fix its shortcomings. You can see the completed version on the following image.

Customized Kirk BL-R bracket

First and foremost, had to round some corners that tend to punch a hole in your palm if you handhold the camera with the bracket installed. Once mounted, I almost never remove the bracket, so this is a big issue for me. It’s the same design flaw that plagues Kirk’s 5D3/5DS/5DSR bracket, and the very same fix: file off the offending sharp corners.

Another problem with the vertical arm is the posts designed to support the top of the bracket. Both of these posts supposed to touch the metal of the camera body, and I’m sure they will leave scuff marks. “Fortunately” one of them doesn’t even touch the metal (there’s a half mm gap). So I placed little gaffer tape pods on the end of both posts (more on the one that didn’t reach the camera). Now they do safely what they intended to do. I would expect Kirk to come up with a design where a large post rests on the rubber cover. There would be plenty of space for that, just above the port covers.

And lastly, removed the hex wrench and its holder mechanism from the base plate. I don’t see a point in including a wrench within a plate, but this seems to be the current “innovation”. This shaved off 9g, and the bracket now weighs a mere 82g. Almost half of the weight of my 5DS R bracket…

With these modifications in place, the BL-R performs very well. It adds a welcome weight to the camera, making it balance much better with the large and heavy RF 50/1.2 lens.

Speaking of large and heavy lenses. I expect upcoming high-end RF lenses also to be large and heavy, and would have loved to see a bracket with dual attachment points, just like Kirk’s 5D3/5DS/5DSR bracket. The bracket on my 5DS R is rock solid, with no movement of any kind, which cannot be said for any of the single attachment point brackets I’ve tried. Yes, the problem lies in the camera’s mounting screw, which allows for tiny little, but still noticeable movement. And I still have vivid memories of what happened when the tripod screw got ripped off from my 1D Mark II.

I would only recommend the BL-R bracket if Kirk fixes the aforementioned shortcomings. Or if you are willing to follow my path and fix them for yourself. For $120, the bracket isn’t expensive. But buying it for $120 and spending a few hours on making it usable turns it into an expensive piece of gear.

The Digital View Camera Adventure Has Begun

I have been closely following the advancements of the technical camera marketplace for quite a few years. This is partly because of the connections I made in the industry thanks to my Mark II Artist’s Viewfinder app, and partly because of my personal interest in the topic. It’s easy to judge how much camera movements fascinate me from the sheer number of view camera books on my shelf.

Despite these, I only ventured into the world of perspective control as far as using tilt/shift lenses. Why? Cost, bulk and general immatureness of digital view camera solutions were the main factors. But recently a few products worth considering emerged, Cambo’s Actus family being my favorite.

Before anyone asks, “pancake” cameras are not my cup of tea. I prefer “monorail” cameras. My view camera must use the 5DS R as the recording device – I give medium format digital backs a few more years to evolve.

I have been thinking about buying an Actus for a while, but was hesitant because it lacked a few important features (geared shift for example). While the Actus-DB2 is spot-on, it’s digital back only (you know, the few more years to evolve).

Then I got a newsletter showing off the new Actus-GFX. It was almost perfect, so I immediately emailed Cambo asking if it’s possible to get the “almost” part out of the picture: build a customized Actus-GFX for me. The answer was a resounding yes, and within a week my camera began to took shape.

My one-lens wonder: custom Cambo Actus-G + Rodenstock HR Digaron-S 100mm f/4 + Canon EOS 5DS R.

The camera shown above has an Actus-G base – a special version of the GFX without the Fuji G mount. The monorail is borrowed from the Actus-DB2 – because it’s 22mm longer than the G’s. The AC-78E bayonet holder holds a Canon EF bayonet. When the time of a digital back comes, I just have to add the rear standard and bellows from the DB2, other parts are exactly the same. I like future-proof systems.

One of my gripes with the original Actus was that back fall, portrait camera orientation and an L bracket attached to the camera didn’t play well together. In other words I would have to remove the L bracket or live with limited fall range. But the Actus-G, with its elevated standards, is a completely different story.

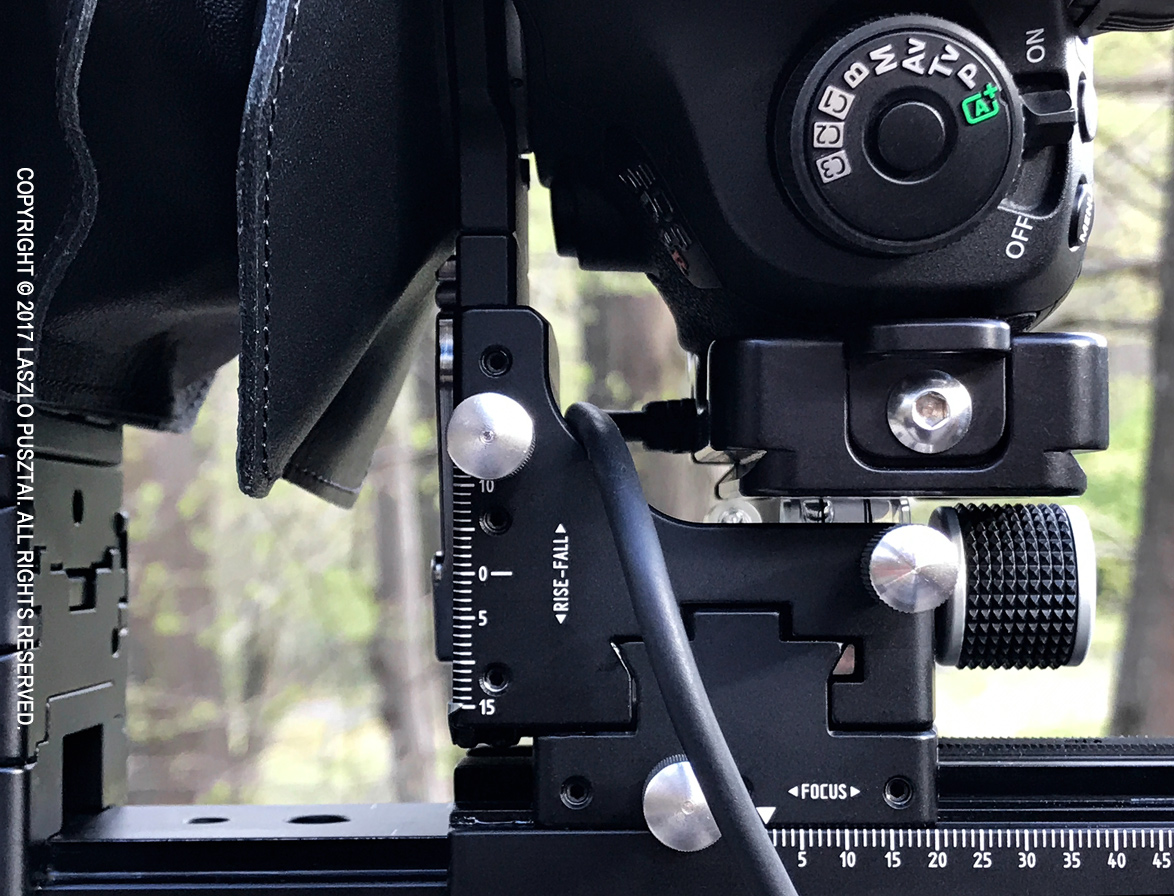
The L bracket and remote release fits even at maximum back fall.

The above quick iPhone grab shows the camera at maximum fall. Well, it’s 0.3mm shy of maximum, but practically that doesn’t matter. Even the cable release fits without issues. A right-angle USB cable is required for tethering, and of course you have to lift the camera to be able to rotate it.

Speaking of movements, the front standard has 10 degree down, 9 degree up tilt and full 360 degree swing. The rear standard’s horizontal shift is +/-21mm (the scale goes to 20). For some reason the rise/fall labels are reversed (maybe they refer to the equivalent front standard movements?), but that doesn’t change the fact that you can shift 15mm down and 12mm up.

And it leads us to one sorely missing feature on the Actus-G: a rise/fall indicator. There’s a scale, but there’s no position indicator. It’s easy to fix (by gluing a 0.5mm stainless steel lip to the up/down moving part – as I did), but Cambo seriously overlooked this. The Actus-DB2 has an indicator on the other hand. Hope it will be fixed with future revisions of the camera.

The rise/fall indicator modification up close.

Tilt/swing gears are self-locking, but rise/fall/shift/focus utilize rack-and-pinion gears and separate tension/lock screws (that you can see on the image above, for example).

Let’s briefly talk about the lens and that yellow cable, as I plan to dedicate entire posts to these topics.

I wanted to start out with just one lens, avoiding wasting a huge pile of money if the system turns out something I don’t like. I turned out to be love at first use – thanks to the camera itself as well as the stunning Rodenstock HR Digaron-S 100mm f/4 lens. According to the MTF charts, this is the best of the HR Digaron range, and I expected it to approach my Zeiss Otuses and Apo Sonnar 2/135. But I wasn’t prepared for something that surpasses the 2/135 (with which I did a direct comparison). Slightly better resolution, free of vignetting, and a very flat field (unlike the 2/135), and a large enough image circle for shifting and thus high stitching potential. Absolutely stunning. Rendering is a bit different from the Zeiss-look I love so much, but quite like it.

Another reason I chose the HR-S 100 is that it has a large enough focal flange distance and short rear element to work well with the deep EF mount. Lens compatibility is a huge topic, best discussed in a later post.

I shoot tethered most of the time, and the Actus is no exception. I will have to replace my TetherPro USB cable with the right-angle connector version, though. Placing the plane of focus with Kuuvik Capture‘s multi-point live view feature is a piece of cake. The feature was designed to help the focusing process of tilt/shift lenses and view cameras taking advantage of the Scheimpflug principle. I’m putting together a demonstration of the Actus/5DS R/multi-point live view combination, so stay tuned!

  ☕ ☕ ☕

Did you enjoy this post? Consider buying me a coffee if so.
Canon EOS-1D X Mark II Review – Part 2

This is the second installment of my ongoing EOS-1D X Mark II review. You can read Part 1 here. My other posts comparing effective reach of the 1D X II with the 7D II and focus drive speed of different cameras including the 1D X II may also be useful for you.

Dynamic range

You may already saw at the usual camera testing sites that the 1D X Mark II has a dynamic range that’s practically identical to the competition, so “Canon is back in the game”. While this is true, let me approach the topic of dynamic range from another angle. Which is prints. I know that only a few of us print anything at all, and that may explain the number of people obsessed with the extreme dynamic range of today’s sensors. But in reality it is a double-edged sword.

Ink on paper has about 6 or 7 stops of dynamic range, so if you have anything with more range, you may need to be careful when preparing the prints to keep pleasing tonal relationships and prevent posterization. Too much contrast after setting the black and white points could also be an issue that needs to be mitigated. So the saying “be careful what you wish for – you may get it” is really holds in this situation.

Puffin Portrait at Látrabjarg

Puffin Portrait at Látrabjarg

Of course it helps in exposing naturally high dynamic range subjects, like the blacks and whites of puffins. But the dynamic range collapses quickly with increasing ISO, so you may not have that much to work with.

All in all, the 1D X Mark II is state of the art, but I had no complaints about the 5DS R either.

High ISO

As I mentioned in Part 1, I print large, and thus resolution is an important aspect of all images I keep. And despite the hype (may I call it marketing bullshit?) of the camera seeing in the dark in those extremely high ISOs, I consider 6400 the maximum usable ISO. Fine details are starting to get eradicated at 3200, though. The only use I have for the higher values is for preparing long exposure compositions.

I use the camera a lot with the 500mm f/4L IS II and the 2x III teleconverter, and my base ISO in this case is 800 – resulting in very clean images. The following image was taken with this combo at ISO 3200 during the Icelandic summer night.

Redshank at Night

Redshank at Night

RAW file bit depth changes a little with ISO changes. You get the highest usable bit depth (13.81 out of the theoretical maximum of 14) between ISO 125 and 200. At ISO 100, you get 13.71 bits, and 13.65 bits between ISO 320 and 51200. Higher bit depth meaning better tonal separation. I still have a habit to only use whole stop ISOs to avoid the ill-effects of digital compensation when using third stop values. At low ISOs (100 and 200) you have to make a tradeoff between dynamic range (better at ISO 100) or bit depth (better at ISO 200) based on what you photograph.

CFast 2.0 image corruption

Firmware 1.0.2 has been released yesterday to address the possible image corruption with SanDisk CFast 2.0 cards. I also experienced a corruption on my Lexar 3500x card. It looked different than the SanDisk issue, the image was cut after a few kilobytes. I don’t know whether the culprit was the card or the camera, but installed firmware 1.0.2 nonetheless. Should the problem happen again, I’ll let you know.

Resolving fine details

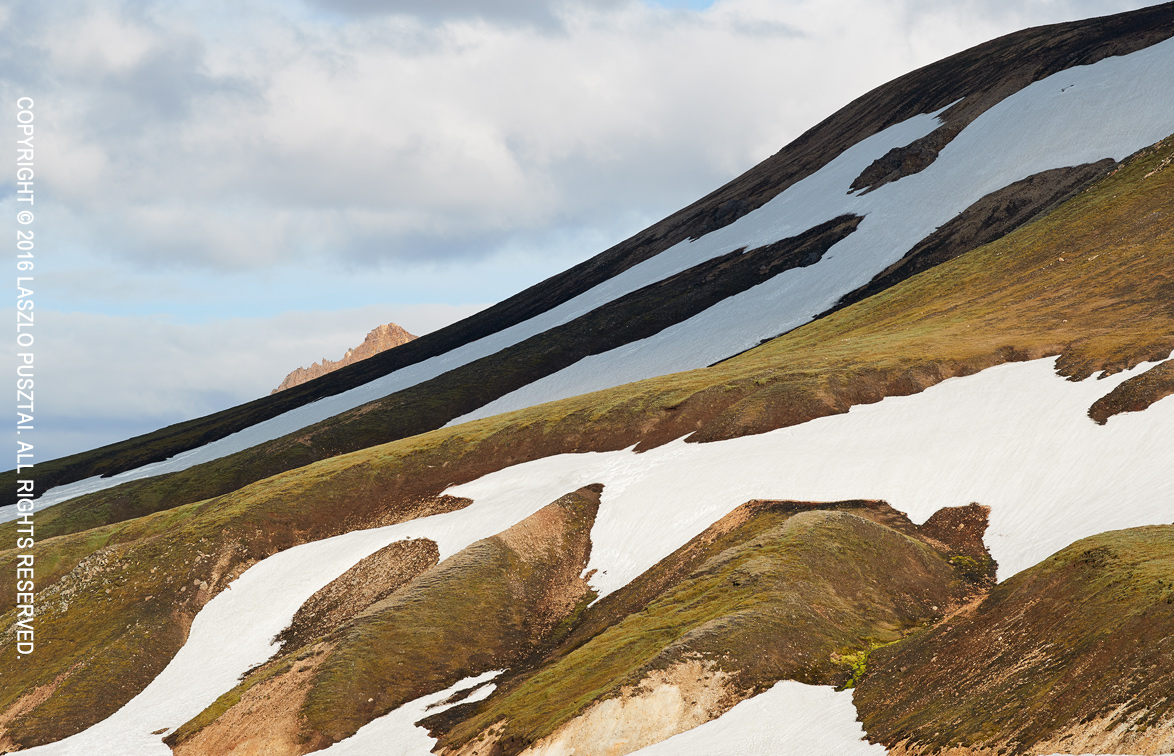
While shooting a couple of long exposure images, picked up the 1D X Mark II with the Zeiss Apo Sonnar T* 2/135 lens to make some detail shots, just like the following one. Handheld, since the tripod was already occupied by the 5DS R.

Landmannalaugar Detail

Landmannalaugar Detail

The camera is prominently useful for landscape work. While not in the realms of the 5DS R in terms of sheer resolving power, the images are full of fine details. It seems that Canon opted for a weaker anti-aliasing filter in this case (unlike my old 1D Mark II, which had a pretty strong blurring filter).

Due to the relatively low resolution, less shooting discipline is required. Shooting a 135mm manual focus lens handheld is not a problem (something I failed to do successfully with the 5DS R quite a few times). It is also less demanding on lens quality (although using high quality glass pays off), and you can stop down to f/11 without diffraction becoming an issue. All these add up to a more casual shooting experience than the 5DS R.

So I arrived to a very interesting point. While both the 5DS R and the 1D X Mark II have their strengths in different areas, and I prefer to choose them based on these strengths for each image, the other one could do almost as well. I would be in deep trouble if I could keep only one of them.

To be continued…