A Year with the Canon EF 500mm f/4L IS II USM

I’m using the “new” 500mm Canon for slightly more than a year now, so it’s time to share my opinions on it. During the last year I had posted a bunch of images made with this lens attached to various camera bodies (1D X Mark II, 5DS R, 5D Mark III, 7D Mark II), which further illustrate the capabilities of this gem.

Why upgrade?

I had used the Mark I version for 10 years, and it was a stellar performer, so why I decided to upgrade to the Mark II? For two reasons: weight and image quality. Let’s begin with the latter. When I tried the old 500 plus the 1.4x III extender on the 7D Mark II for the first time, I thought that something went wrong with the lens. After making several successful astrophotos during the winter of 2014-15 (using the bare lens), the lack of sharpness I encountered with the extender was discouraging. So much that I stopped using this combination completely, and ordered the Mark II after a week or so.

Once the Mark II arrived, I had the opportunity to compare it with the old one – and man, it makes a huge difference on high resolution cameras! The Mark II with the 1.4x III attached is sharper than the old one with no extender. And it doesn’t stop here. The following image pretty much summarizes the quality of images one could expect from the 500mm f/4L IS II.

tbd

Singing

Richer colors, and complete lack of the “busy background” that was a signature of the old lens + teleconverter combinations. The transition from sharp to unsharp areas is pretty fast, just like with my Zeisses. Images coming out from the contemporary Canon super-telephotos (300 II/400 II/400 DO II/500 II/600 II) are stunning. There’s no point in talking more about image quality, since they offer the best money can buy. But there are other important aspects to discuss.

Like size and weight. The Mark II is about 800g lighter than the Mark I. This is a huge difference. I can put an additional TS-E 24mm or Zeiss 2.8/15 in the bag and still have the same total weight as before. Thinking about size/weight/reach is an important factor when you select a super-tele.

Why 500mm?

When it comes to birding, the longer is almost always better. My reasoning to get the 500mm originally, and to stick with the same focal length when upgrading to the Mark II, was the following. 300mm is too short. The 400/2.8 II is too large and heavy for the focal length. The 600 II is a great lens, but… Well, I have a rule that everything I bring into the field (with the exception of the tripod and the MacBook Air) must fit into my Gura Gear Bataflae 32L backpack. And the 600 doesn’t fit – at least with my other gear already in the bag.

bbb

Black Tern Looking for Bugs

Sometimes I long for the 600, like when shooting the image above, but with high resolution cameras I have the freedom to crop a bit. The 400 DO II is also a great lightweight lens, but a bit short considering the locations and birds I photograph. This leaves the 500. Long enough (especially with teleconverters) for my needs, small enough to fit into the bag, light enough to handhold for extended periods of time (at least with smaller bodies like the 5DS R and 7D Mark II, with the 1D X Mark II it’s on the fence of being too heavy). The wider angle of view (compared to the 600) provides a little protection against inadvertently cut wings and feet, and it’s easier on the tracking mount (both in terms of weight and tracking accuracy) when shooting the heavens above. Not to mention that you can buy the 500 plus a Zeiss 2.8/15 from the price of the 600…

Handling

Mark II super-teles are less front-heavy than the old ones (partly due to the removal of the protective glass from the front). So you think they are lighter than they really are. With the 1D X Mark II the balance point is under the lens collar, but with smaller bodies it’s right under the focusing ring. Which is problematic if you are handholding the lens – you need to be extra careful not to turn the ring.

I really like that the focusing range selector has been moved out of the central switchboard to the neck of the lens. It’s much easier accessible place when the lens is mounted on a gimbal.

Proper technique is important with all long lenses, and the 500 is no exception. But you also need to watch for air turbulence. I’m serious. Astronomers are long aware of the fact that hot air bubbles or even wind gusts can influence telescope image quality. For example on a cold fall morning on a lake, just an hour after sunrise the air is so turbulent that you can’t make a sharp image of anything more than 20-30m away. It’s not a showstopper, just something one needs to be aware of.

Focusing is quick and accurate (if you did your homework and had properly micro-adjusted the AF), but adding teleconverters could slow focusing down. I’d recommend to check out my AF drive speed comparison with different camera bodies.

Overall, the lens is a dream to use. On tripod or off, it just works the way expected.

Accessorize!

There are a few things I immediately replace on/add to a super-tele. First I add a LensCoat. But I don’t put all the pieces on – leaving the focusing ring and the lens collar out. I prefer to focus with the original ring, and don’t like the sticky tape on the collar. This also makes my lens unique, and can easily tell which is mine when shooting with friends.

The second thing is a custom lens foot. I wrote about the 4th Generations Design foot (and a few other accessories) in a previous piece, and albeit a different one, I use a 4GD foot on the Mark II. This time the CRX-5L (the “low” version). It fits nicely, and also allows storing the hood in the reversed position. Speaking of the reversed hood and storing the lens. The Don Zeck cap I bought for the old 500 works nicely with the new one.

sdf

5DS R + 500mm f/4L IS II + 1.4x III on a Skimmer Ground Pod and Mongoose M3.6 Head

Another piece of equipment I grown to love is the Skimmer Ground Pod. I use it when photographing from a boat or otherwise need to be close to the ground. You can see on the picture above the complete rig I used for photographing great crested grebes last fall. What’s the camo thingy around the lens? It’s the part of my ghillie suit that normally goes over the gun.

The only thing I don’t like about the Mark II (well, besides the balance point being under the focusing ring) is that Canon does not include a screw-on filter holder any more. The lens comes with a gel holder, which I can’t use to mount my light pollution suppression filter for astro work. For this kind of price I’d expect Canon to include both with the lens, but had to purchase it separately (it’s somewhat hard to find: you’ll need the 52WII holder).

Conclusion

I always loved the old 500, and love the Mark II even more. You get splendid images, huge versatility (did I mention that I also use it for long lens landscapes a lot?) in a light, travel-friendly package. If you can afford (or want to lug around) only one super-telephoto lens, this is the one to buy. Highly recommended.

  ☕ ☕ ☕

Did you enjoy this post? Consider buying me a coffee if so.

Canon EOS-1D X Mark II Review – Part 1

The Canon EOS-1D X Mark II is a huge topic, so I decided to slice the review. I also don’t want to reiterate specs or things that you can find on popular photography sites, instead I’m going to talk about aspects that are important to me.

So first of all let me put all I’m going to write into context.

I buy cameras for two purposes: as development and test hardware for my Kuuvik Capture and ShutterCount apps, and of course to take pictures. While I have two bodies in my bag, three or four additional cameras are sitting on the shelf to cover each and every firmware variant and operation paradigm Canon produced since 2008. Well, who said developing software is a cheap undertaking?

This gives me a great freedom to try different bodies and put those into the bag that fit my photographic needs the best possible way. But at the end of the day I make a living using these cameras, this way or that, so all of them should contribute to the bottom line.

There was only one missing piece in this set: a 1-series camera. I loved and used a 1D Mark II for 8 years or so, but skipped the following generations. The Mark III generation because of the autofocus issue, and because I still think they are the worst digital EOS-1 bodies ever made (you may disagree, but I’m sure you haven’t spent any time developing for them in this case). Just mentioning the 1Ds Mark III gives my better half the shivers… And the Mark IV because we needed funding for other things that time.

Then the 5D Mark III came along, and I haven’t felt the urge to purchase a 1D X for myself. For neither purpose. We started using loaner and rental units for development and testing. As time passed, things started to look less rosy: arranging rentals and loaners could be time consuming and costly (not to mention that they almost always screw up our schedule), so the decision to get a 1D X Mark II was made well before even the camera was announced. We just didn’t want to invest in outgoing technology and waited.

On the photography front, my main interests are landscapes and birds, with a bit of architecture and product photography spread along the way. My photographs either end up in commercial use or in large fine art prints, and high resolution is an advantage in both cases.

My A camera is an EOS 5DS R, which I found to be a great choice for everything I photograph. Yes, I could use a few more frames per second and faster buffer write speeds, but the camera proved to be perfectly usable even for action. Before the 1D X Mark II arrived, the B camera was a 7D Mark II. But because the images coming out of the 5DS R are way better, I haven’t used the 7D for months. Now the 1D X Mark II is the B camera, and I’m curious how it performs.

Ok, with this background let me begin discussing the 1D X Mark II.

Oh, one more thing. Since I have no financial interest in talking you into buying a camera (unlike most of the review sites), I’ll be honest. Just like with a friend talking about the 1D X Mark II over a drink.

TL; DR

It is a good camera, image quality is among the best I’ve seen from Canon (surpassed only by the 5DS R). There are some quirks and stuff that bugs me, though. Some of them can be worked around, but you’ll need to live with others. As always, if you fancy buying this beast, I’d recommend to rent it first to see whether it fits your working style and needs.

Lovely colors – even at higher ISOs

This is something you’ll notice even on the camera’s LCD (on which all images look disturbingly soft in 100% magnification, just like they did with the 1D Mark II).

Long Lens Landscape. 1D X Mark II with 500mm f/4L IS II + 1.4x III

Long Lens Landscape. 1D X Mark II with 500mm f/4L IS II + 1.4x III.

The image above was shot at ISO 1600, and it looks gorgeous on a wide gamut monitor. Sadly, part of the depth and brilliance of colors was lost when I converted it to sRGB for web display.

CFast 2.0 is really fast

You really want to use a CFast card with this camera. But be sure to get a fast one. I’m using a 64GB Lexar Professional 3500x card. Not because of the capacity (32GB would be my preferred choice for a 20 megapixel camera), but because of the 445 MB/s write speed. Smaller cards (including the 64GB SanDisk bundled with the camera) usually have lower write speeds around 240 MB/s. This is hugely important: with the faster cards you have virtually no buffer limit when shooting RAW. The 170 frames limit mentioned in the tech specs is what you get with the slower cards.

But be aware that moving images at this speed generates a lot of heat. The card, and even the camera’s grip becomes hot after extended use.

Being a young technology, CFast 2.0 could cause some compatibility headaches. I selected the 3500x card based on Lexar’s compatibility chart – while the 1D X Mark II is not listed explicitly at the time of writing, it seems that only 3500x cards are compatible with Canon cameras. For downloading images, I use Lexar’s Professional Workflow CR2 CFast reader (the one that has a Thunderbolt port in addition to USB3).

$650 for a power supply and coupler?!?

Someone at Canon has clearly lost his medicine. The AC adapter sells for $400 and the dummy battery for additional $250. To put you in perspective: you can buy a good laboratory-grade power supply for $400. And asking $250 for a dummy battery is outright arrogant. While writing my apps, I prefer to power the cameras from AC power, but these prices are simply unacceptable. Fortunately the good old ACK-E4 adapter made for previous 1-series cameras (around $95) works perfectly. The only downside is that you are limited to 8 fps.

The return of red AF point illumination

For this camera Canon (almost) returned to their former AF point illumination system, where AF points are red, while all other information in the viewfinder is black. You may remember my post about the irritating and unusable illumination system found in the 1DX/5D3/7D2/5DSR, so this is a big relief for me.

But the system is still far from being perfect. The red illumination is too bright (no option to make it dimmer, only brighter), which is rather distracting in some situations. And the inability to switch it back to black is something beyond me.

Cleaner shadows

I’m not the kind of guy who tries to fix badly underexposed images in post with an 5-stop push, but you know, sometimes I screw up. And having the ability to rescue otherwise good images is always appreciated. The image below was a grab shot of a purple heron flying overhead, without paying attention to compensate for the bleak sky – resulting in an underexposed bird.

Purple heron. 1D X Mark II with 500mm f/4L IS II and 1.4x III teleconverter. ISO 400, pushed 3 stops.

Purple Heron. 1D X Mark II with 500mm f/4L IS II + 1.4x III. ISO 400, pushed 3 stops.

A 3-stop push was used, and there is no visible color deterioration and noise even in the dark parts under the wings and body – something that was a stretch for older Canons. It was shot at ISO 400 (my base birding ISO).

A few missing functions

There’s no intervalometer and bulb timer. The shutter count feature is also missing from the external interface (although it’s available in the system information menu). And you can’t set bracketing from the menu. With the exception of the shutter count feature I can’t understand why Canon left these out, despite all their current cameras have them.

Well, you can use Kuuvik Capture for executing exposure sequences and bulb timer, in a more user friendly and effective way than Canon was ever able to implement these, so I’m not really complaining.

Remote release socket on the “right” side

Finally! This is something I wanted for more than a decade. I tend to use L brackets on all my cameras, and the N3 socket is something that needed to be worked around with these brackets – resulting in unwieldy left sides. Unfortunately both Kirk and RRS sell the same 1DX plate for the Mark I and II, but I still hope that some company will make a sleek bracket for the Mark II.

Since the tripod screw was ripped out from my 1D Mark II, I don’t trust single point bracket attachments. Kirk’s two-point attachment for their 5D Mark III/S/SR plate (reviewed here) is way better. Unfortunately there’s no such thing as a sleek 1DX plate with two attachment points, so I’m sticking with a normal plate. Especially because this is a B/wildlife/action camera and not planned to be routinely used tripod mounted with heavy lenses like the Otus 1.4/28 – with the 500mm it’s going to be mounted by the lens.

The USB sleep bug

This is a serious issue if you are planning to use the camera tethered.

If your computer goes to sleep while the camera is plugged in, you’ll permanently lose the connection – until the camera is powered off and back on. This happens with each and every tethering app. And there’s no workaround. Hopefully the bug is in the firmware and not in the USB hardware. All previous EOS cameras I used to date work as expected in this regard.

Continue to Part 2

The Ultimate Photographer’s Flashlight

As I find myself under dark skies quite often, I carry not one but two flashlights in my bag. One of them is a Petzl Zipka headlamp, used for close range work, such as setting up the camera or finding something in the bag. But there are several other usage scenarios that a headlamp won’t fit into: navigation while you are getting to a location or walking home, searching, warding off uninvited visitors (be they curious humans or hungry animals), and even light painting.

I used several different sized flashlights with different feature sets during the last decade (I’m using the Zipka for more than a decade and it’s still running off of the original batteries), but more than a year ago I found a light that is quite possibly the ultimate in features and durability.

Enter the Nitecore SRT7

The high-end of the flashlight business in dominated by Chinese companies. But these are not the usual low-quality knock-off products you might associate with China. They are top of the class both in design and in manufacturing (the SRT7 is so simple and elegant that it could even carry an Apple logo).

Nitecore is one of these manufacturers, with some unique features in their lights. First of all, the SRT7 is part of their tactical offerings. Nowadays I tend to gravitate towards tactical and military products because of their durability and well thought out features. Not that I would need pistol magazine stabilizers in my pants’s pockets or uninterrupted light during shotgun recoil for a flashlight… Well, actually those magazine holders are pretty darn useful for holding various items…

The Nitecore SRT7 flashlight

The Nitecore SRT7 flashlight

You can see the light above. It is waterproof, shock proof (I exercise both features regularly) and in all aspects built like a tank. It feels well balanced in my hand, and have enough grip on the surface even when wearing heavy gloves.

Along with a very powerful white LED (960 lumens – easily outshines my car’s headlights), you have three colored LEDs: a red, a green, and a blue one. I was interested in the red one when I bought the lamp, and use it heavily during astrophotography. Never used the blue or the green one. The white LED in on the cool side.

But it’s user interface is why I bought it in the first place. It consists of a switch, a rotating ring and a LED. The switch is on the tail of the lamp, and is used to cut power off completely, so that it won’t drain the battery while sitting in the bag. The red LED starts to flash when the battery is starting to run out of juice. The ring is the centerpiece of the user interface.

It is used to switch between the different modes, as well as to continuously adjust the light’s brightness. The continuous adjustment is smooth, with good perceptual uniformity. Turn the ring to the right to increase brightness. At the end of the scale is a “turbo” mode as well as a stroboscope mode (the latter can be useful in self-defense situations). Turn the ring to the left to access the red, green, blue, police-like red/blue flashing and beacon modes. It’s that simple.

Powering the flashlight

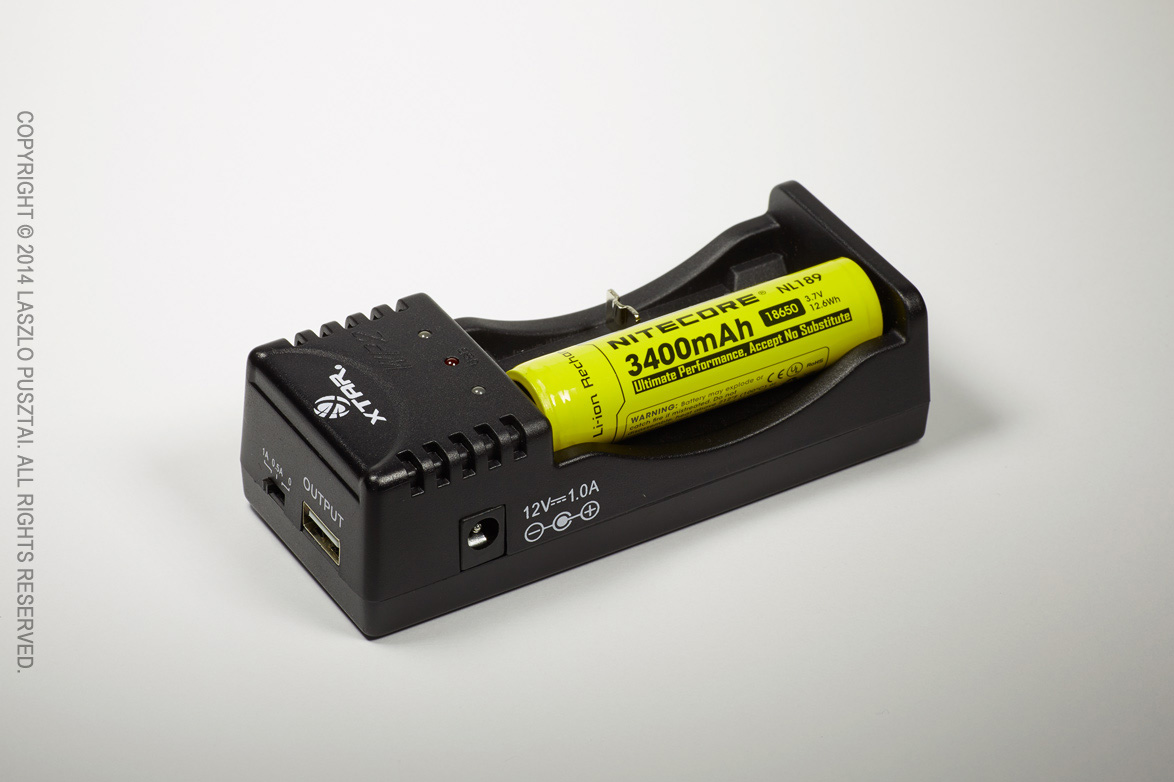
The SRT7 can be powered with two CR123 lithium batteries or with a rechargeable 18650 battery. The latter is a standard industrial battery type with added protection circuitry – and is a quite common flashlight power source among Chinese manufacturers. I bought two Nitecore NL189 3400mAh batteries along with the lamp.

18650 battery in an Xtar WP2 II charger

18650 battery in an Xtar WP2 II charger

I’m using an Xtar WP2 II charger for those, as it can provide 1A charging current (compared to the 0.5A of most other chargers). The 1A current is well within the battery’s specifications, and I don’t like to wait for batteries to charge…

This charger has another neat feature: you can turn it into a power source to charge any USB-connected device (such as emergency recharging your phone). The output is a standard 500mA USB port.

Conclusion

It’s hard to add anything else for a flashlight – it’s just a flashlight. Albeit a good one. Highly recommended.

Leica Monovid 8×20 Review

I have been using a small rubberized 10×25 Canon binocular since I began photographing birds. As part of my ongoing camera bag weight reduction project I wanted something to replace the Canon – something that’s smaller, lighter and optically better.

Why a monocular?

Well, for two reasons, which are the following three: weight, size and because there’s no need for constant diopter adjustment that drives me crazy with most binoculars. I can work much faster with a monocular than with a bino – and speed is important to me because I use these kind of instruments for quick glances. It is a bit trickier to hold monoculars steady, and you need to look through them perfectly on-axis (like a riflescope) to avoid “blacking out”.

Why Leica?

I spent an entire weekend on researching the subject of monoculars. Man, there are tons of cheap monos out there! But they were ruled out pretty fast as I wanted something that’s small, light and has great optics.

5D3_1417_8082

Leica Monovid with the optional neck strap

This left only two choices: Zeiss and Leica. I’m not a huge fan on push-pull focusing used on Zeiss monos, so I bought a Lecia Monovid three months ago. For about $500 it’s definitely not a cheap one, but lives up to my high expectations.

In use

Build quality is first class. The focusing ring is smooth but have enough resistance to allow precise and quick focusing. Unfortunately focusing ring rotation is just the opposite of my Canon lenses (have to turn counter-clockwise to focus closer). You can easily grip both the tube and the focusing ring.

While we are at focusing. My preferred holding method that provides both steady image and easy focusing is the following: hold the Monovid in my left hand, between the tips of my index/middle/ring fingers (above the tube) and thumb (below the tube), and rest my hand on my forehead and nose. And focus with my right hand.

It is waterproof, nitrogen filled to prevent fogging and lenses have dirt and water repellent coating. But you get only an eyepiece cup. I would like to have a front lens cover too (actually it’s not a big deal as it usually hangs from my neck). Well, another missing thing is a neck strap. You receive a hand strap in the package, but I found the neck strap to be invaluable.

Most importantly, it is very good optically. The image is bright and with high contrast. My Canon produces a bit hazy view, and the Leica is much better. Colors are rich and deep. On the negative side, it has pronounced pincushion distortion and slight chromatic aberration towards the edges. All in all, it is a pleasure to look through the Monovid.

Minimum focusing distance is 1.8m – which is more than enough for me. But there’s a close-up lens in the box which reduces the MFD to 25cm. This lens (along with the supplied leather case) usually sits in the drawer. For those interested, the case has a belt loop and you can screw in the close-up lens into the case’s lid.

Conclusion

The Monovid weighs about 1/3 of my former Canon bino, for 3x the price… But it definitely worth the steeper price. It’s compact, lightweight, has superb image quality, and built in a way that lasts generations. Highly recommended.

  ☕ ☕ ☕

Did you enjoy this post? Consider buying me a coffee if so.

Bataflae 32L – Is It The Ultimate Photo Backpack?

Like most photographers, I had many photo bags over the years. But only a few of those were truly great. In this post I’ll tell you about my reasons to get, and my initial experiences with what I consider the ultimate photo backpack for my needs: the Gura Gear Bataflae 32L.

My Bag Story

My first camera carrying solution was a Canon gadget bag. With a huge red “steal me” kind of logo on the side. It was awful, but was able to carry the D60 and a single lens.

Later on as my lens collection grew I needed a larger bag, and made my first mistake: bought a Lowepro DryZone 200 backpack. It was heavy and it was painful to get access to the main compartment – not to mention that I rarely shoot in an environment where I need a totally waterproof bag. It was an overkill for me. So I sold it just to fund my second mistake: a Lowepro Stealth Reporter 650W. Although it was good when shooting from the car, I realized that this was a mistake while hiking to the Delicate Arch. My conclusion was that I would definitely prefer a backpack to shoulder bags.

The next bag, which is one of those I consider to be a great one, was the Lowepro Mini Trekker (which had been discontinued since then). It was able to hold all my gear those days, as you can see on the picture below.

My Lowepro Mini Trekker in 2004

Lowepro Mini Trekker in 2004

It was a lightweight backpack, with only one downside: wasn’t able to carry a notebook computer. So an upgrade to its bigger brother, the (also discontinued) CompuTrekker AW was a logical step. The brother was also a bit more spacious, so 1-seriers bodies put less stress on the zipper.

Over the years I hauled the CompuTrekker around the globe from Antarctica to Iceland and it served rather well. In it I was routinely carrying: 1D Mark II and 5D (Mark II) cameras; 17-40 f/4L, 24-70 f/2.8L, 70-200 f/2.8L IS and 400 f/5.6L lenses; 1.4x and 2x teleconverters plus both extension tubes in the main compartment. A flash with its external power pack and cables, batteries, and a GPS in the outer pocket. An up to 14″ notebook in its dedicated compartment. I was truly happy with this backpack. Really. So much that I thought I found the ultimate carrying solution.

More Lenses Need More Space

The bag problem resurfaced with the arrival of the 500 f/4L IS. It was huge, just used it for birding, and a separate pack seemed a good solution – mostly because I didn’t want to part with the CompuTrekker. I ended up using a Kinesis L311 long lens case to store and carry it for seven years. Yes, this way I had to carry two bags, but was happy with them – and still have fond memories of this combo.

Until – guess what – my next lens purchase, which was the TS-E 24/3.5L II. I thought that I would carry the TS-E along with the zooms, so I would need a bigger pack again. At that time (late 2011) the best solution seemed to be the Lowepro Pro Trekker 400AW. I got one, and my DryZone memories came back… It is an expedition quality pack, that would definitely withstand lots of abuse – an overkill for my needs. And that toughness comes with a price – it weighs 3.3kg empty. Despite the weight used this pack for two years.

To be honest, I regret buying it: I don’t hike that much with photo gear, so its hiking-oriented features seen no use during those two years. What made my situation even worse is that I replaced my zooms with primes, and the Pro Trekker was half-empty. Even the old Mini Trekker would be too big for those. Putting the 500 f/4L IS into the bag wasn’t an option, as its divider structure didn’t allow that. All this resulted in thinking about replacing the Pro Trekker with a backpack more suitable for my current needs.

Enter the Bataflae

Recently I came across Gura Gear’s new Bataflae product line. One of my friends has a Gura Gear Kiboko, so I knew their quality and design. I didn’t like the butterfly-only opening design of the Kiboko, but the Bataflae promised full opening (which is a must if you want to carry a notebook). My last concern was the configurability of the strap system. The Pro Trekker being excellent in this regard, I had fears that I will not able to configure the Bataflae for my body size, resulting in some rather painful experiences.

After two weekends of measurements, thinking and hesitation I decided to get the biggest Bataflae, the 32L, in black. Although I think the gray one looks better, “black makes your bag look thinner”, which is a huge plus during air travel.

Man, this bag is a pleasant surprise. The experience is kind of getting your first Mac(Book) Pro or Gitzo Systematic tripod: it is so well though out and solves your problems so genuinely, that there’s no going back.  Now I can believe those raving reviews.

It’s Bigger Inside

The empty bag is a tad smaller on the outside than the Pro Trekker, but swallows way more gear. This is because of the divider structure (two huge compartments in the Bataflae vs. three smaller in the Pro Trekker), the slightly taller side walls and the thinner dividers.

And the Bataflae today

Gura Gear Bataflae 32L today

On the right is a picture of my fully packed Bataflae. The left side compartment holds the 5D Mark III and the 650D; 24 f/2.8 IS, TS-E 24 f/3.5L II, 40 f/2.8, 50 f/1.4, 100 f/2, 135 f/2L  lenses with their hoods; 1.4x II and 2x III teleconverters and extension tubes; 600EX flash under the hoods; and a few filters tucked under the 24/2.8.

In the right side compartment is the 500 f/4L IS (after the weight reduction treatment it went through last winter); extension cord and battery pack (under the 500) for the flash; and to my biggest surprise I was able to find a place for the Mongoose M3.6 head – which clearly show how deep is the bag.

As you can see I still have plenty of free space.

Pockets on the flap are large and easily accessible (as they were on the CompuTrekker – much better than the Pro Trekker). These and the outer pockets hold all those small gadgets such as batteries, remote switches, shoulder straps, cleaning supplies, and so on.

My fully loaded bag weighs just shy of 16kg. Honestly, I’m not really calibrated to carry more on my back.

Carrying Comfort

All my worries vanished the instant I put the bag on my back. Despite the less padded strap, it feels more comfortable than the Pro Trekker – even fully loaded. There’s only one difference between the strap systems of the two bags: you can’t adjust the Bataflae to your torso’s length (here the PackJack tool of the Pro Trekker is a plus). Fortunately the 32L Bataflae fits me just perfectly, so there’s no height adjustment necessary (this was one of the reasons I went with the largest one).

A rather nice addition to the strap system are the strap keepers: small velcro strips with which you can get rid of those dangling straps.

Quite a few reviews of the Bataflae tout how easy it is to strap a tripod to the bag (you can do it two ways – to the side and to the back). Well… This is bullshit in my opinion. Yes, you can strap a toothpick-legged tripod to it, but I’m completely sure that if you buy this kind of bag then your gear demands heavyweight support. I have a Gitzo 3532LS with an Arca Swiss Z1sp head, and would never-ever strap it to this bag. Even if the elastic pouches on the sides could withstand the tripod’s weight (which I doubt), it would protrude too much above the bag (and my head). So I still carry my tripod separately.

Working from the Bag

99 percent of time I work from my bag in the following situations:

  • The bag is on the back seat of a car. Usually I’m sharing the car with another photographer, who also puts his/her bag on the back seat. I found opening larger backpacks (like the Pro Trekker) to be problematic in these cases, while the smaller CompuTrekker was just fine – there’s a top flap collision when both of us try to open the bags. The butterfly opening here is a big help.
  • On a smallish boat, sometimes shared with others. The butterfly opening here helps to keep a small equipment footprint, leaving room for other supplies (food/water) and also for my legs. It is also great to have the bag half-closed but accessible all the time, as accidents can happen (from birds dumping their load on the boat and the bag, to larger fishes jumping into the boat – both happened to me).
  • Out in the field, where I must put down the bag on whatever ground happens to be there. I don’t know about you, but I really hate to put a wet or muddy pack on my back, so previously I carried a piece or nylon or closed cell foam sheet to lay under the bag. The Bataflae has a detached rain cover, which can be used as a ground cloth for this exact purpose – and can also be lost because it’s detached. Anyway, I will still bring a cheap piece of nylon sheet as a ground cloth, not risking to lose or damage the expensive cover/sheet of the Bataflae. In this case the butterfly opening is a plus too, as reduces the equipment footprint and hides the bag’s content from passersby.

To summarize: I find the butterfly opening a truly usable feature that makes my life much easier. Actually I use full opening in just one situation: when I carry a notebook.

Where to Put a Notebook?

There’s no dedicated notebook compartment, so what to do? Of course you can carry a dedicated notebook bag (as a personal item while traveling by air, for example). But there’s a more compact method, one that I started to use back in the Pro Trekker days.

Observation: there’s no ideal place for a notebook compartment on a photo backpack. If one places the compartment to the back, then the whole weight of the bag’s content will push on the laptop’s lid when the pack is laid on its back. I had some display panel damage from this in the past. Or one can place the compartment on the outside of the front flap, just like the Pro Trekker does. This also has drawbacks: the notebook can hit the ground if you quickly open the flap, and the laptop’s weight will act on a longer level arm, so you will feel it heavier.

To counteract these I started to put the notebook inside the main compartment (within its sleeve, of course). It is even easier to do this with the Bataflae, because the higher walls leave enough clearance for my sleeved MacBook Pro.

Conclusion

As you might have noticed: I really like the Bataflae. On the level I liked the CompuTrekker. But what will I do when I get more gear? Well, as I can’t carry more than 20kg (backpack, tripod, notebook combined), something will have to leave the bag.

All in all: I highly recommend the Bataflae 32L.

Kirk L-Plate for the 5D Mark III

Got my Kirk BL-5DIII plate on Tuesday, and would like to share some thoughts about it. It’s a good design with some oversights.

Pros:

  • You can buy it right now. The RRS plate for the 5D3 is still backordered. Shipping to Hungary was also $27 less with this plate than it would be for the RRS. Both plates cost $140.
  • I really appreciate the second locking point at the strap loop. My 1D2 fell off from its RRS plate a few years back. The plate was on the 1D2 for a few years, and the thread in the tripod screw socket suddenly gave up. Fortunately the losses were just a remote switch and the EUR 70-80 repair cost of the socket. All in all, having a second mounting point could prevent this. This is a big plus.
  • It is light. Feels lighter than RRS plates.
  • I prefer its form factor compared to the RRS plate.

Cons:

  • The base of the plate around the screw does not fit flush against the camera body. There’s no precise locking point when you tighten the screw. I suspect that I could tear out the socket if I over-tighten. I definitely prefer RRS and Wimberley plates in this regard.
  • The front of the plate tends to punch a hole in your hand if you happen to handhold your camera. It is a major oversight! It was a painful discovery on my part, so I immediately reached for a file and rounded the offending corner. But this should be done by Kirk!

“Custom” Rounded Corner

Overall I’m satisfied with the plate, and would give it 3.5/5 stars.