The EOS R Diary : Whys

This is the first installment of what I plan to be a long(ish) series of posts about my experience with the Canon EOS R system. Yes, while I’m not a big fan of mirrorless in general, I bought an EOS R along with an RF 50mm f/1.2L USM lens. Why?

First and foremost for software development and testing purposes. ShutterCount was the first and as far as I know still the only app that can read the shutter counter of the R (plus the M50). Kuuvik Capture provides tethered shooting support for the EOS R for macOS Mojave users as well (Canon’s own software is not supported on Mojave).

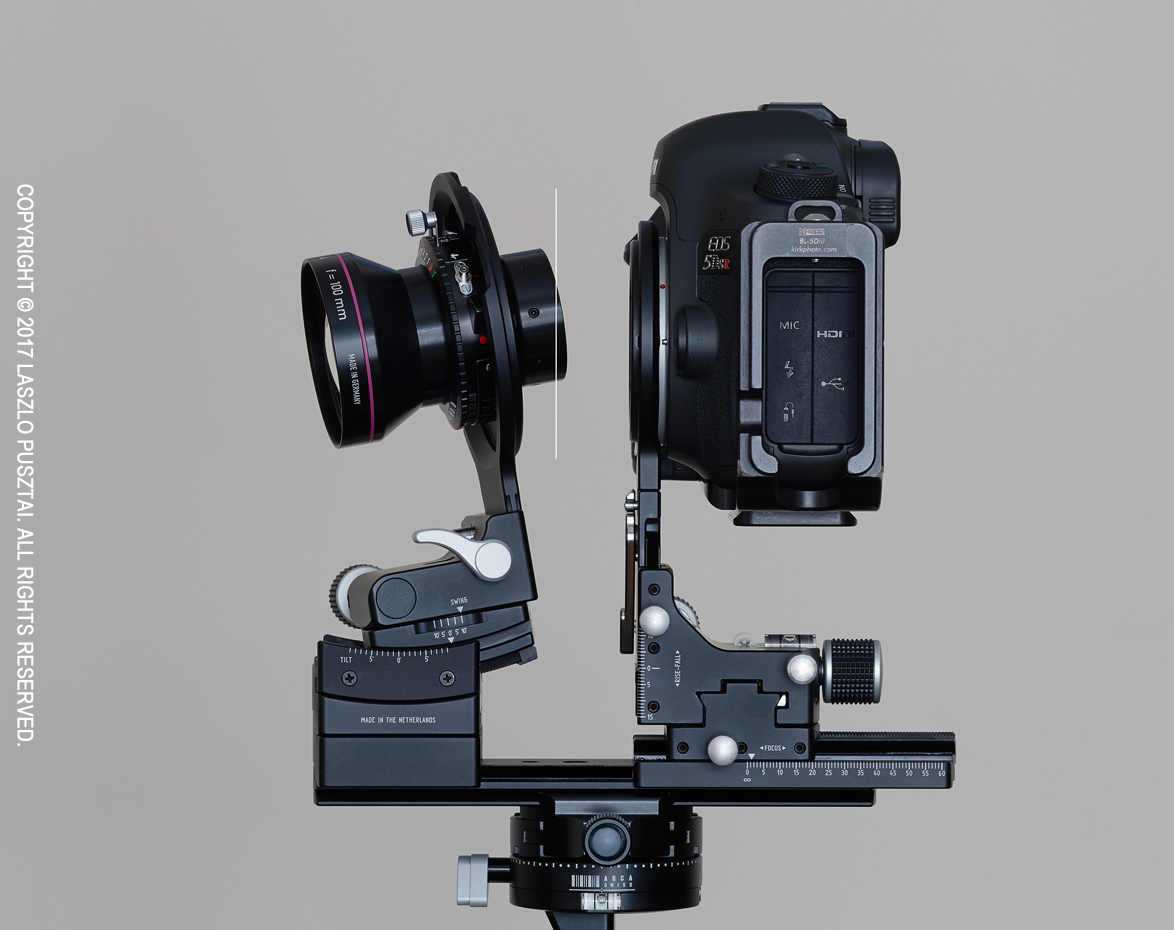
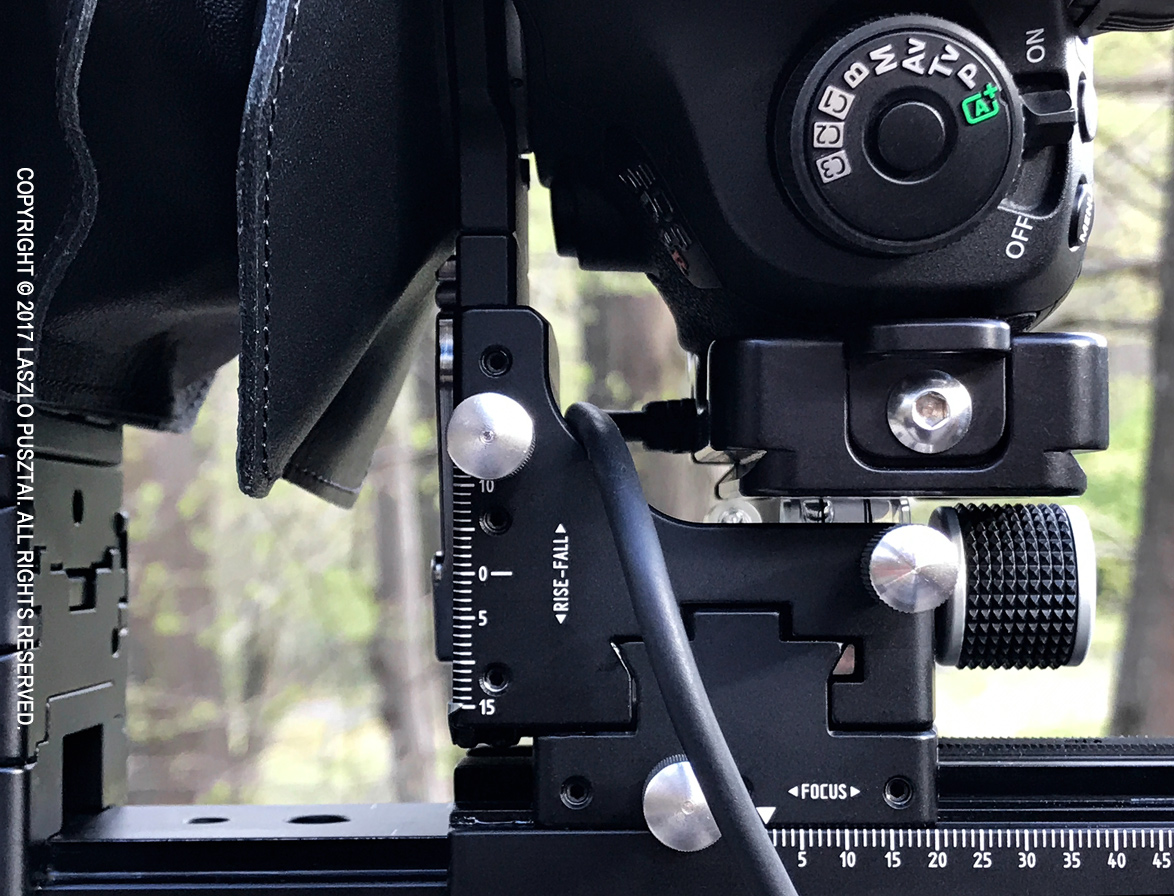
And there’s another reason. I have been looking for a camera system that requires less disciplined technique than my 5DS R plus Zeiss/Rodenstock glass for a very long time. For those occasions where spending half an hour on a single frame isn’t feasible (think travel, for example). What the 5DS R produces is pure magic, but sometimes I would love to stop down beyond f/7.1 or have auto-focus.

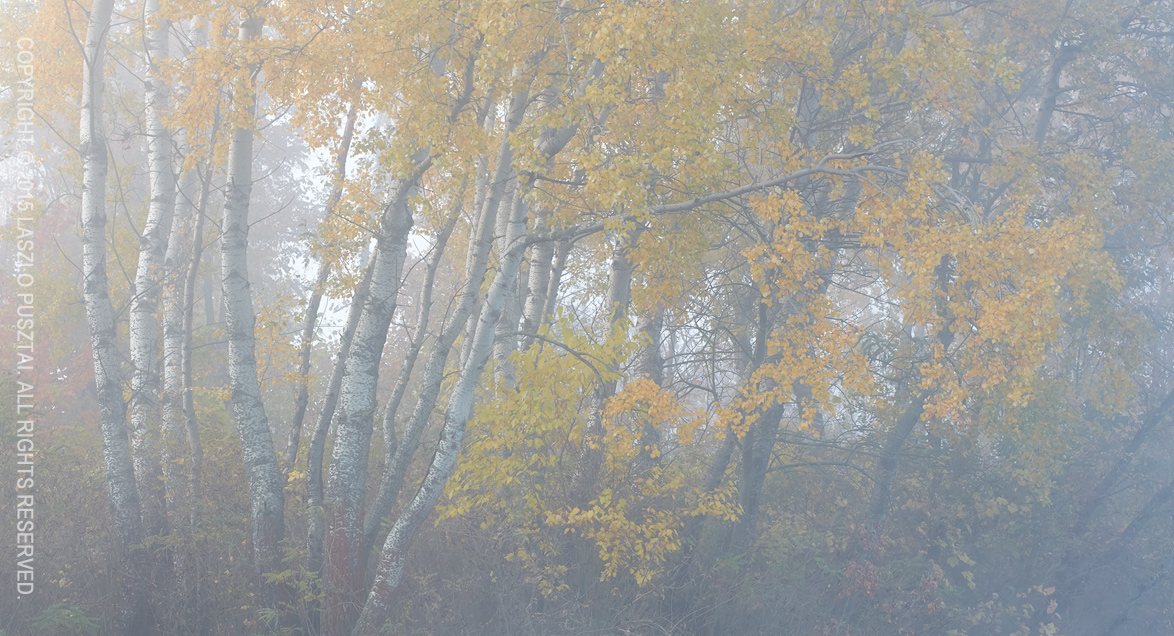
November Sun – EOS R + RF 50/1.2

I had tried many options: APS-C, full frame, medium format. From Canon, Nikon, Sony, Fuji and Hasselblad. And they all failed. Either in the image quality department, or I just gave up amidst frustration because of their awkward user interfaces.

Regarding image quality, I look at the whole imaging chain. The EOS R, with the RF 50/1.2 and Capture One as the RAW converter is capable of producing excellent image quality. (Lesser RAW converters, such as Lightroom or DPP, produce lamentable results, so everything I say here refers to Capture One converted files.) No, it’s not in the league of a Zeiss Otus or a Rodenstock HR-Digaron on the 5DS R, but close enough so I don’t regret leaving the big boys at home.

The freedom those larger pixels and AF brings is charming. I do warn people longing for high resolution cameras that it’s hard work to use them properly. The R’s full frame sensor with 30 megapixels is a little more than what I would consider as an easy-to-shoot camera, but still manageable. And the resulting images can be printed quite large.

As you probably guessed, I like the camera. It won’t replace any of my DSLRs, but already opened up new possibilities, and hope it will do even more in the future.

This brings me to the next why.

Based on the exorbitant amount of negativity on the net about the R you may think it’s a bad camera. Well, from my experience it’s clear that, to put it mildly, most of those reviewers aren’t on the top of their craft. And all this darkness irritates the hell out of me. I expect Canon to make the paying customer (me) happy. I don’t care if the professional we-know-everything-better haters aren’t happy.

Each camera offers a feature set for its target audience. If it’s not for you, then move on, choose another one that fits your needs better. Finding workarounds and solutions to make a system a better fit for one’s needs is a sign of intelligence. Yet I seldom run into constructive and helpful writings. The stupid mud-slinging that goes on and on is a sign of arrogance. Honestly, some of those guys should seek immediate medical assistance.

With that said, if I had been in charge of leading the camera’s development, there are things I would definitely have done differently. But as someone who does user interface design for more than three decades, I can understand the motivation behind most of the team’s decisions. And as someone who knows way more about the internal working of Canon cameras than any of the regular reviewers, I’m confident that in the upcoming diary entries I will be able to shed light on the whys of the EOS R.

That’s for the introduction, next time I’ll discuss camera customization. Homework: download the camera’s user manual and read chapter 5 and chapter 7.

Choosing Lenses for the Actus-G

Choosing lenses for the Cambo Actus-G isn’t trivial. Partly because the abundance of choices, and mostly because concrete numbers – based on which one can decide whether a lens will fit – are scarce. With this post I’m trying to shed some light on the problem, provide a few numbers and simple formulas for your own calculations. I’ll illustrate the concepts using large format view camera lenses (the Rodenstock HR Digaron-S 100mm f/4 in particular), because my goal is to use Rodenstock glass with the Actus. But will also mention how things apply to medium format lensboards (such as Mamiya and Pentax).

There are a couple of distances one needs to consider for a given configuration, depicted on the following image (with the bellows removed, of course).

Distances for a lens focused at infinity

Lens flange focal distance at infinity (a). This is the distance between the lens’ mounting flange and the sensor, when the lens is focused at infinity. The lens will not normally come closer to the sensor than this (focusing closer will pull the sensor away from the lens). Data sheets for large format lenses contain this number. For medium format lens boards, this number is the flange focal distance of the lens board’s mount.

Flange to lens end distance (b). The distance from the mounting flange to the end of the rear lens barrel for large format lenses. The number is available from manufacturer data sheets. For medium format lensboards, this is the distance from the mount to the rear end of the board. Unfortunately Cambo does not publish the thickness of their boards, but in general Hasselblad and Mamiya RB/RZ will work with DSLRs, while others require a mirrorless “back”.

Mount holder and mount thickness (d). It’s 11mm on the Actus-G for the AC-78E bayonet holder and Canon bayonet.

Camera flange focal distance (e). The lens mounting flange to sensor distance of your camera. 44mm for Canon EF, 26.7mm for Fuji G, 18mm for Sony E, and so on.

Lens to rear standard clearance (c). This is the important number that indicates whether a lens fits or not.

c = a – b – d – e

If it’s larger than zero, the lens will be able to reach infinity focus on the Actus. A negative value indicates that the lens is a no-go for the given setup (will have no infinity focus, but might work for closeups).

Simple? Well, there’s another caveat. Lens movements and even the bellows need some clearance. On the following image a white line indicates where the lens end would fall with no movements applied.

Clearance required for movements

This clearance depends on the diameter of the rear barrel, and may limit the amount of tilt/swing if (c) wasn’t too large to begin with. 8mm or more for (c) is a safe bet.

The following table summarizes values for Rodenstock HR Digaron lenses. Why those? Because Rodenstock is the only company still in the business of making large format view camera lenses, and because they seemed pretty good from the data sheets (my experience with the HR-S 100/4 confirms this). I assumed (d) being 11mm for Sony E and Fuji G mounts as well.

Using a Sony A7 camera will allow you to go as wide as 50mm (with limited movements) on the Actus-G. But don’t forget that you have shift, so stitching can be used to increase field of view. There’s a way to go wider with large format lenses, and that’s the Actus-DB2 with a digital back (and the associated problems with crosstalk and mazing artifacts with wide angles – a bag of worms I don’t want to open).

The original Actus also had a special rear standard with no rotation and with a fixed bellows that lets you use wides down to 32mm. But as mentioned in a former post, I found the non-geared movements of the original inadequate, and thus skipped that version. The numbers above refer to the Actus-G.

So it’s not a surprise that my first lens is the 100mm f/4. The next one is going to be the 180mm f/5.6, but that presents another aspect to think about. Maximum extension to be exact.

Maximum extension

Theoretical maximum extension (f) is the maximum distance between the lens’ mounting flange and the sensor, with the telescoping monorail fully extended and the focusing mechanism in the farthest position. Naturally it must be larger than (a).

f = monorail_length – 28 + d + e

The stock Actus-G monorail is 152mm long, the Actus-DB2 monorail is 174mm, and there are 300mm and 450mm options.

There’s theory, and then there’s practice. You might have noticed on the above image that the rear standard tilts backward a bit (check the bubble level). This is due to the flex between the monorail and the sliding base of the rear standard, as well as the flex between the sliding base and the focusing mechanism. To avoid the flexing, you want roughly 10mm more overlap between the monorail and the sliding base, and don’t want to pass the 50mm mark on the focusing scale. So the flex-less practical maximum extension is:

f_practical = monorail_length – 50 + d + e

Of course you can compensate for the backward tilt using a front tilt, but the extreme extension pictured above also puts undue stress on the parts of the camera, so I’d recommend to stay within the practical limit.

I bought the Actus-G with the DB2 monorail with the intention to provide enough extension for the HR Digaron-S 180mm f/5.6. In theory, it would allow 201mm, with ~23mm of focus travel over the 177.4mm flange focal distance of the lens. Well, this was before I discovered this flexing. My opinion now is that the HR-S 180 will need the 300mm monorail for better stability. I don’t regret getting the DB2 rail, since it makes my system more rigid with HR-S 100. As usual, stability needs sacrifices in terms of weight and ease of portability.

There is another way to increase extension by turning the swing mechanism 180 degrees and mounting the lensboard to the very front of the camera. It gives 45mm more, but it’s slow and inconvenient to do, and the zero swing marks are a bit off in the reversed position. I’d definitely choose a longer monorail over this. But it could come handy in case of emergency.

Note that you may also need a longer bellows as the 3-fold shipped with the camera extends only 120mm.

 — ooo —

That’s all regarding the “which lenses will fit” question. By now you know the requirements and the limits. This is where I stop today, movement limitations with Canon DSLRs being the topic I’m planning to explore in an upcoming post.

Product images were made with a Canon EOS-1D X Mark II and Zeiss Apo Sonnar 2/135 ZE lens. Focusing was done in my Kuuvik Capture app. Guides in Kuuvik Capture came in handy to make sure the camera alignment is square with the Actus.

  ☕ ☕ ☕

Did this post help you? Consider buying me a coffee if so.

Rodenstock HR Digaron-S 100/4 + 5DS R Crops

If you were wondering what kind of performance the Rodenstock HR Digaron-S 100mm f/4 lens is capable of with the Canon EOS 5DS R, here are two 100% (actual pixels) crops from my test shoots for your pixel peeping pleasure.

Click the image for 100% view on non-retina displays.

While the sRGB and JPG conversion kills some of the magic the files have, you can still see the stunning resolution and lovely rendering. Both files are straight out of Capture One 10. The lens is in the same league with my high-resolution Zeisses (28 and 55 Otuses, and 135 Apo Sonnar).

Click the image for 100% view on non-retina displays.

Aperture for both shots was somewhere between f/5.6 and f/7.1. The lens and the 5DS R were mounted to my Cambo Actus-G view camera. Focusing and capture was done in Kuuvik Capture.

These crops are from the 5-10mm vicinity of the image center, but you get the same quality to the edge of the 70mm advertised image circle.

The 70mm image circle allows for 15mm shift along the longer image side and 18mm along the shorter. There’s a 12mm-ish practical shifting limitation along the shorter image side with Canon DSLRs, however (more on this in a later post).

You can shift all the way to 22mm the Actus is capable of along the longer side – going well out of the advertised image circle. But you’ll start to lose edge/corner sharpness past 17-18mm. To put it in perspective: with 22mm horizontal shift the corners are comparable to what you get at 12mm shift with the Canon TS-E 24mm f/3.5L II. Impressive. Think about 150-180 megapixel stitches with this shifting potential.

  ☕ ☕ ☕

Did you enjoy this post? Consider buying me a coffee if so.

The Digital View Camera Adventure Has Begun

I have been closely following the advancements of the technical camera marketplace for quite a few years. This is partly because of the connections I made in the industry thanks to my Mark II Artist’s Viewfinder app, and partly because of my personal interest in the topic. It’s easy to judge how much camera movements fascinate me from the sheer number of view camera books on my shelf.

Despite these, I only ventured into the world of perspective control as far as using tilt/shift lenses. Why? Cost, bulk and general immatureness of digital view camera solutions were the main factors. But recently a few products worth considering emerged, Cambo’s Actus family being my favorite.

Before anyone asks, “pancake” cameras are not my cup of tea. I prefer “monorail” cameras. My view camera must use the 5DS R as the recording device – I give medium format digital backs a few more years to evolve.

I have been thinking about buying an Actus for a while, but was hesitant because it lacked a few important features (geared shift for example). While the Actus-DB2 is spot-on, it’s digital back only (you know, the few more years to evolve).

Then I got a newsletter showing off the new Actus-GFX. It was almost perfect, so I immediately emailed Cambo asking if it’s possible to get the “almost” part out of the picture: build a customized Actus-GFX for me. The answer was a resounding yes, and within a week my camera began to took shape.

My one-lens wonder: custom Cambo Actus-G + Rodenstock HR Digaron-S 100mm f/4 + Canon EOS 5DS R.

The camera shown above has an Actus-G base – a special version of the GFX without the Fuji G mount. The monorail is borrowed from the Actus-DB2 – because it’s 22mm longer than the G’s. The AC-78E bayonet holder holds a Canon EF bayonet. When the time of a digital back comes, I just have to add the rear standard and bellows from the DB2, other parts are exactly the same. I like future-proof systems.

One of my gripes with the original Actus was that back fall, portrait camera orientation and an L bracket attached to the camera didn’t play well together. In other words I would have to remove the L bracket or live with limited fall range. But the Actus-G, with its elevated standards, is a completely different story.

The L bracket and remote release fits even at maximum back fall.

The above quick iPhone grab shows the camera at maximum fall. Well, it’s 0.3mm shy of maximum, but practically that doesn’t matter. Even the cable release fits without issues. A right-angle USB cable is required for tethering, and of course you have to lift the camera to be able to rotate it.

Speaking of movements, the front standard has 10 degree down, 9 degree up tilt and full 360 degree swing. The rear standard’s horizontal shift is +/-21mm (the scale goes to 20). For some reason the rise/fall labels are reversed (maybe they refer to the equivalent front standard movements?), but that doesn’t change the fact that you can shift 15mm down and 12mm up.

And it leads us to one sorely missing feature on the Actus-G: a rise/fall indicator. There’s a scale, but there’s no position indicator. It’s easy to fix (by gluing a 0.5mm stainless steel lip to the up/down moving part – as I did), but Cambo seriously overlooked this. The Actus-DB2 has an indicator on the other hand. Hope it will be fixed with future revisions of the camera.

The rise/fall indicator modification up close.

Tilt/swing gears are self-locking, but rise/fall/shift/focus utilize rack-and-pinion gears and separate tension/lock screws (that you can see on the image above, for example).

Let’s briefly talk about the lens and that yellow cable, as I plan to dedicate entire posts to these topics.

I wanted to start out with just one lens, avoiding wasting a huge pile of money if the system turns out something I don’t like. I turned out to be love at first use – thanks to the camera itself as well as the stunning Rodenstock HR Digaron-S 100mm f/4 lens. According to the MTF charts, this is the best of the HR Digaron range, and I expected it to approach my Zeiss Otuses and Apo Sonnar 2/135. But I wasn’t prepared for something that surpasses the 2/135 (with which I did a direct comparison). Slightly better resolution, free of vignetting, and a very flat field (unlike the 2/135), and a large enough image circle for shifting and thus high stitching potential. Absolutely stunning. Rendering is a bit different from the Zeiss-look I love so much, but quite like it.

Another reason I chose the HR-S 100 is that it has a large enough focal flange distance and short rear element to work well with the deep EF mount. Lens compatibility is a huge topic, best discussed in a later post.

I shoot tethered most of the time, and the Actus is no exception. I will have to replace my TetherPro USB cable with the right-angle connector version, though. Placing the plane of focus with Kuuvik Capture‘s multi-point live view feature is a piece of cake. The feature was designed to help the focusing process of tilt/shift lenses and view cameras taking advantage of the Scheimpflug principle. I’m putting together a demonstration of the Actus/5DS R/multi-point live view combination, so stay tuned!

  ☕ ☕ ☕

Did you enjoy this post? Consider buying me a coffee if so.

A Year with Zeiss Lenses

More than a year had passed since I started migrating to Zeiss lenses – and I still couldn’t be happier. This, together with the Canon 5DS R completely transformed how I approach my subjects. The resulting files reflect what I see and how I see it. Every time. No additional frills that need to be edited out in post.

Fall Morning

Fall Morning

No matter if I work slowly and deliberately under a dark cloth, tethered to a MacBook Air, or – as it was the case with the above image – shooting handheld from a moving boat. The images are always stunning. I’ve never been so satisfied with any photographic equipment. These words shouldn’t be taken lightly – I’m an extremely hard-to-please man.

The only thing I miss with this setup is movements. A few degrees of tilt/swing here and there, plus a couple of millimeters rise/fall/shift could save the day sometimes. Well, if you think that I’m exploring the possibilities in this area, you are right. But more on my findings later.

Making the Canon 5D Mark IV Soup

The following is a satirical look on how Canon designed the Canon EOS 5D Mark IV – followed by a little more serious discussion.

Sitting on the old, weathered coffee table in my office, the camera is waiting for the validation tests for Kuuvik Capture 2.5

Sitting on the old, weathered coffee table in my office, the camera is waiting for the validation tests for Kuuvik Capture 2.5. It makes a killer combo with the EF 35mm f/2 IS lens, just like the 5D Mark III did.

Ok, so let’s begin with the ingredients:

The recipe is pretty straightforward, anybody having access to these quality ingredients can cook it after a few years of making soups like this.

Take the EOS 5DS R, and replace the sensor with a new one based on the current generation design with on-chip ADC (like the ones in the 80D and 1D X Mark II). Since the sensor is a bit smaller resolution than the one it replaces, frame rate can be increased a bit. Peel the 7D Mark II and add its weather sealing and a slightly modified version of the AF point selector switch to the bowl.

Crush the 1D X Mark II, but be careful that both the GPS unit and the AF sensor remain unharmed, we’ll need them. Unfortunately crushing the body will destroy the red AF point illumination and the CFast card slot, so there’s no chance to improve our soup with those extremely fine parts. Yes, use the GPS unit from the 1D X II, since the 7D II’s unit has a digital compass, and that might cause disorientation and dizziness even in small doses.

Cut the 80D in half, pull out the touchscreen and the Wi-Fi. But be extremely careful to clean the Wi-Fi thoroughly, otherwise the soup will taste like crap. Add these to the bowl. Season to taste with Dual Pixel RAW.

— ooo —

Tech companies (and Canon is no exception, just like us) love to reuse existing components in new products. This greatly improves return on investment (good for the company) and reliability (good for the customer).

The 5D Mark IV is a premier example of smart cooking from these components. It’s a serious upgrade for anyone using the 5D Mark III and doesn’t need high resolution or high frame rate. That is, a highly versatile generalist camera.

But since I own and love a 5DS R and a 1D X Mark II, this soup is not for me. I have been using a high res + high speed combination for years, and I prefer it to a single generalist camera, or even a pair of those cameras (I had a 5D Mark III for years, but life is much better now).

Stringent Look - Canon EOS 5D Mark III with EF 500mm f/4L IS USM + 1.4x III

Stringent Look – Canon EOS 5D Mark III with EF 500mm f/4L IS USM + 1.4x III

Photos in this post were made with the 5D Mark III years ago – despite having a rental body for adding it to Kuuvik Capture, I had no time to go out and shoot (not to mention that the weather was dull). But since the Mark IV is s direct replacement of the Mark III, they illustrate the kind of images I usually make with a body like this.

There are things that I really miss, however:

  • CFast 2.0. The 1D X Mark II showed that they are in a completely different league in speed and user experience compared to CF. With CFast the Mark IV’s smallish buffer (21 shots) would not be an issue at all.
  • UHS-II for the SD card slot. UHS-II would be a lower cost alternative to CFast 2.0 (but still faster than CompactFlash: speed ratings are 633x for UHS-I, 1066x for CF, 2000x for UHS-II, 3500x for CFast).
  • USB Type-C socket. The USB3 Micro-B socket the Mark IV (and all USB3 Canons) uses is the worst connector plug I ever saw (only Apple’s 30-pin dock connector comes close). Fragile, hard to insert properly with cold fingers, etc, etc. Canon (and everyone) should use the reversible USB3 Type-C plug these days. With A-to-C cables for legacy computers only having an A socket.
  • Red AF point illumination. See my former opinion about the crappy solution used in every contemporary Canon except the 1D X Mark II.
  • Usable Wi-Fi. The 5D Mark IV shares the snail-like Wi-Fi implementation of the 6D/70D/80D. Come on Canon, 9MB/s peak transfer speed over 802.11n for a 30mp camera? In 2016? To make things worse, you can’t use a much faster WFT-E7 external transmitter to speed up wireless tethering.
Window Remnants - Canon EOS 5D Mark III with EF 50mm f/1.4 USM

Window Remnants – Canon EOS 5D Mark III with EF 50mm f/1.4 USM

Would I recommend it to a friend?

It boils down to a pair of points: if you need ultra high resolution and are willing to spend a small fortune on lenses that actually can deliver the resolution, then no. In this case get a 5DS R, which is prominently usable even for birding. Or if you need a high-fps camera, then don’t fret about the Mark IV’s frame rate, go get a 1D X or 7D II for yourself.

But in all other cases I can recommend the Canon EOS 5D Mark IV – it’s a really nice camera and a joy to use. Well, it’s not a surprise as all professional Canons I happened to use since (and including) the 5D Mark III were exceptional tools. And I totally agree with Canon’s philosophy to please actual photographers and not tech journalists and bloggers (you know, the kind harshly complaining about “lack of innovation”).

Shameless plug

If you are upgrading from an older camera, such as the 5D Mark II, 5D Mark III or either 7D, you’ll probably need my ShutterCount app to let the buyer know how many shutter actuations your old camera has.