Artist’s Viewfinder 6.3 Released

Continuing today’s iOS 13 compatibility updates, version 6.3 of the Mark II Artist’s Viewfinder is now available on the App Store. It brings full iOS 13 support (again, you must update to this version if you are using iOS 13). Dark Mode is supported in the menu, but the main screen’s color theme is still controlled with the Toolbar Theme preference in the menu.

Along a few new cameras, there’s a notable new feature: Zoom to Active Frame.

Once it’s turned on in the menu, double or triple tapping a frame will not just set the mask or highlight, but will also zoom to the active frame so that it fits the screen (that is, the whole active frame becomes visible, at the largest possible size where the whole frame is on the screen). Clearing the mask or highlight will change the zoom level back to where it was before activating the frame (the original zoom level). There are a few things to keep in mind, though.

If the active frame is too small (it would need a higher zoom level than the maximum possible) or too large (smaller zoom level than possible), then it may not fit the whole screen. This may happen with long telephoto or ultra wide lenses.


Viewfinder forgets the original zoom level (and will not revert to it when the mask or highlight is cleared) if you:

  • 
manually change the zoom level after the app zoomed into the active frame;
  • switch between the wide and tele cameras on the phone; or
  • toggle Wide Mode.

When you activate another frame while still in a previously activated one, the display will change to reflect your new activation. The original zoom level will not change in this case, so clearing the active frame will bring you back to the zoom level used before the first frame activation.

Optical image stabilization and exposure simulation described in my previous posts for Technical Camera are also present in this app (since they share the underlying capture engine).

The Viewfinder Handbook was also updated to reflect the new features.

This update is free for existing users. New users can purchase the app in the App Store.

Technical Camera 1.4 : Exposure Simulation

Technical Camera did support longer exposures (up to a given device’s capabilities, which is usually in the 0.5s-1s range) from day one. And live view frame rate followed the exposure time, resulting in substantial lag when longer exposures were used.

To resolve this issue, version 1.4 introduces exposure simulation.

It works exactly the same way your regular camera’s live view does: we simulate the brightness of longer exposures by increasing ISO instead of dropping the shutter speed. The result is a fluid, high frame rate live view feed under all circumstances.

There’s a limitation, though, that you should be aware of. When light levels drop, simulation may end up showing a darker image when the actual (non-simulated) exposure would also use a very high ISO. Practically this isn’t a big deal, since very high ISOs are unusable on a phone.

Update 10/2/2019: While it’s a version 1.5 feature, the exposure simulation warning should also be mentioned here. It appears when the simulation can no longer show the actual exposure, because it hit the high ISO limit.

In this case an orange dot starts to blink once a second.

Exposure simulation is always on, no way to disable it.

Version 1.4 is a free update for existing Technical Camera owners. New users can purchase the app in the App Store.

Technical Camera 1.4 : Optical Image Stabilization

The latest update to Technical Camera is now available on the App Store. Version 1.4 fully supports iOS 13, so anybody upgrading tomorrow to Apple’s newest operating system will be able to continue to use the app. This includes support for Dark Mode in the menu.

But there are two other prominent features in this version, one of which is the ability to utilize optical image stabilizers found in newer iPhone cameras.

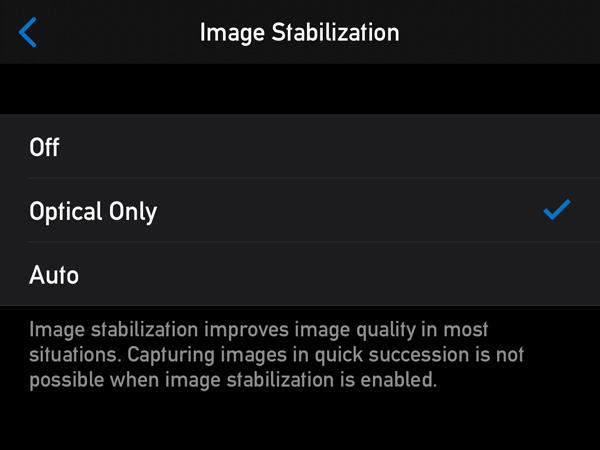
We’ve added a new Optical Only option to the Image Stabilization preference. Honestly, I was never a big fan of Apple’s digital image stabilization (used when Auto is selected), so that’s why we have this option now.

Optical stabilization is available at any shutter speed, as well as when shooting RAW. I routinely shoot one second long exposures handheld at ISO 25 with the wide angle camera on my iPhone XS Max, and the results are pretty good.

Auto stabilization has also been updated. By default it tries to use the digital/optical combined stabilization you are familiar with. But in cases where digital stabilization is not available (such as in case of RAW captures or at shutter speeds longer than 1/20s) it will switch to optical only stabilization. Well, if the currently selected camera supports it.

Starting with this version, manually set ISO and shutter speed values are retained when you exit and relaunch the app. So you can now set ISO 25 and optical only stabilization to have the highest quality RAW captures, and forget about it. Only increasing ISO when needed. This elevates image quality by a huge margin compared to higher ISO captures, and is exactly what I do.

The update is free for existing Technical Camera owners. New users can purchase the app in the App Store.

The EOS R Diary : RF 50mm f/1.2L USM

As I did mention in the first installment of this diary, one of my reasons to get an EOS R was the RF 50mm f/1.2L USM lens. You might have read in other reviews that it’s worth to buy an EOS R just to be able to use this lens. Well, this isn’t an exaggeration. On my subjective lens quality scale it scores great.

My subjective lens quality scale have eight levels: awful, weak, mediocre, decent, good, great, excellent, and exceptional. To put you in perspective, I consider the Zeiss Otus 1.4/28 and Rodenstock HR Digaron-S 100mm f/4 to be exceptional. The Zeiss Otus 1.4/55, the Zeiss Apo Sonnar 2/135 and Rodenstock HR Digaron-S 180mm f/5.6 are excellent. The Canon EF 400mm f/4 DO IS II USM and EF 500mm f/4L IS II USM scores great. And the Canon EF 35mm f/2 IS USM gets a good rating. Keep in mind that these are subjective ratings, and sometimes a lens moves from one class to another in my view. But generally everything at great or above have very good image quality and is a joy to use.

Compared to the Otus 1.4/55

The 50/1.2 is roughly as big, as heavy and almost as expensive (2000 vs 2700 EUR net) as the Otus 1.4/55 – one of my all time favorite lenses. Let’s first see why I think that the Otus is a better choice if you don’t need autofocus.

Must be careful with strong backlighting

Two things. Well, actually three. The first is that the 50/1.2 is rather susceptible to flare, while you can basically shoot into the Sun with the Otus with zero flaring. It was quite shocking to realize this after all those years spent with flare resistant Zeiss glass. So you have to be careful when shooting backlit scenes with the 50/1.2. But this explains the oversized lens hood…

The second is very strong vignetting. It is easily correctable in post-processing, though. But keep in mind that vignetting is visible even at f/8.

Last, and maybe most importantly, the 50/1.2 breathes like hell. This practically renders the lens unusable for near-to-far focus bracketing. In comparison, the Otus breathes way less, but still exhibits some image size change.

Focus breathing refers to the image size change when focusing distance changes. All lenses breathe by default – unless they are corrected for it. The 50/1.2 doesn’t seem to be corrected much.

Why Does One Want the 50/1.2?

Simply put, this is the finest 50mm autofocus lens I have ever used. Focus acquisition is quick, despite the motor has to move 340g of glass and metal around. But this snappiness is not a surprise since the the focusing motor is borrowed from the new 400 and 600mm super telephoto lenses. The only issue is that Dual Pixel AF systems are totally blind to horizontal detail, and you’ll have problems focusing on the edge between the ocean and the sky, for example.

Of course one wants an f/1.2 lens for bokeh. And the 50/1.2 will not disappoint here. Although depth of field is razor thin, and you’ll end up stopping down a bit. But in any case, out of focus areas are rendered in a creamy smooth way, with nice transition between sharp and unsharp. This reminds me how German glass renders, and not typical for Canon. Out of focus areas are also free from contamination (colored haze, chromatic aberration, etc).

Nice creamy bokeh

The image above was shot for my favorite confectionery, and shows not just the beautiful bokeh, but the high degree of freedom from aberrations (look at how the metal bowls are rendered, despite being shot through the side glass of the fridge and under spiky, cold fluorescent light).

This freedom from aberrations is what I want in a lens these days. This ensures a transparent, airy rendering of the scene. Just the way I see it.

Colorwise the 50/1.2 has bit warmer atmosphere than I would prefer (like the 500/4). I do prefer the colder images Zeiss glass produces. I sincerely hope that Canon will finally introduce some consistency into how its lenses render. The Zeisses I use are consistent, but Canons are all over the place. The 50/1.2 would be a good reference rendering style for future Canon lenses.

With that said, I do like the images from this lens. They look natural and are full of detail. And yes, we arrived to one of the prominent features of the 50/1.2 – its high resolving power. While the EOS R isn’t a very high resolution camera, the 50/1.2 is in the same league as the Otus 55 and HR Digaron-W 70 on this body. Image field also seems to be rather flat (unlike the Otus, and most Zeiss lenses, where you should be very careful with focus placement).

The following image is just a handheld shot, with no tripod and focusing at the center. It had to be corrected for vignetting, though. It was shot at f/8, as the EOS R is a medium resolution camera and you don’t have to worry about diffraction. Which makes the EOS R and 50/1.2 combination a very easy to shoot one.

Natural color and plenty of detail

Construction and Handling

It is a large lens. Thicker than the Otus 55 because of the focus motor. Thicker than it would be convenient even for my large hands. But you’ll get used to it. I did. And the lens hood is humongous… At least it’s a constant diameter design, so no extra space is needed for the hood in your bag.

Fortunately inner focusing is employed here, as I have severe aversion to protruding lens designs. But the front of the lens is not weather sealed, meaning that a 77mm protector is advised to be used is inclement weather conditions.

Speaking of inclement weather. My very first shot with the Otus happened on a cold November morning. My hand literally froze to the lens (and I was wearing a light glove). So the use of plastic as the exterior is very welcome on the 50/1.2.

As I did mention in my EOS R customization post, focus ring rotation behavior on my EOS R (ill-named as sensitivity in the menu) is linked to rotation degree, resulting in 360 degree focus ring rotation, which is quite nice for manual focusing. I still think that rotation speed sensitive behavior is useless.

It’s Almost Always in My Bag

When I shoot from a car or boat, and have capacity to carry a secondary bag, then the 50/1.2 and the EOS R comes with me. It was rather surprising, since the 5DS R and Otus combo is a much better one. Well, except that the R system is way easier to shoot, and reach for it when I have no inclination to set up a “proper” camera.

All in all, if you can live with its shortcomings, the Canon RF 50mm f/1.2L USM could be a very nice and high performance addition to a serious photographer’s toolkit.

  ☕ ☕ ☕

Did you enjoy this post? Consider buying me a coffee if so.

Kuuvik Capture and ShutterCount Updates

A minor update has been released to my Kuuvik Capture and ShutterCount apps. It fixes a camera detection bug that can surface with a specific Mac configuration (the iOS version of ShutterCount is not affected). The bug was originally discovered in Kuuvik Capture, but since these apps share the same tethering engine, it could also cause a problem for ShutterCount users.

The version numbers of the corrected apps are: 4.3.2 for Kuuvik Capture and 4.0.2 for ShutterCount and ShutterCount Pro. The updates are available through the Mac App Store.

This update also raises the minimum required macOS version to 10.10 for ShutterCount, so it is now the same as Kuuvik Capture’s requirement.

Artist’s Viewfinder 6.2 Released

Version 6.2 of the Mark II Artist’s Viewfinder is now available on the App Store. This is mainly a camera database update, with adding support for the default copyright template (a feature now available in all our apps).

With the default copyright template, you just have to type in your name into the Artist Name field, and the app will generate a copyright info template for you. The format is described in my post that introduced the feature for the first time.

Other that this, the usual slew of newly released cameras were added to the database. Plus the Real Lenses feature now includes ALPA’s just released Switar cine optics and all Hasselblad X and H mount lenses. For the complete list of new stuff I’d recommend to check out the release notes.

The Viewfinder Handbook was also updated, and the PDF is now a 25% smaller download thanks to my move from Adobe InDesign to Affinity Publisher.

This update is free for existing users. New users can purchase the app in the App Store.