Notes on CFexpress

I’m gearing up for the arrival of the Canon EOS-1D X Mark III, and the first thing to consider was memory cards. My goal was to find the fastest card with the smallest size. At the moment 64GB is my preferred cards size with CF/CFast/SD, but since 64GB CFexpress cards are much slower than 128GB, I went ahead and bought a 128GB SanDisk Extreme Pro. Since a camera is a good month away, I did some preliminary testing with computer transfers.

USB 3.1 Gen 2 is Not Fast Enough

When it comes to USB, manufacturers always advertise physical link speeds, which is rather misleading to the customer. For example USB 3.0 and 3.1 Gen 1 is advertised being 5Gb/s, but the usable data link speed is just 4Gb/s (or 500MB/s) since it uses a 8-bit to 10-bit encoding to have a desired balance of 0 and 1 bits on the wire. USB 3.1 Gen 2 is a bit better with 128 to 132 encoding, so the data link speed is 1.21GB/s (and NOT 1.25).

Every single CFexpress card is advertised to have at least “up to” 1.5GB/s read speed. So if you want to utilize the highest possible download speed of a CFexpress card, you need something faster than USB 3.1 Gen 2. The sole option at the time of writing is Thunderbolt 3.

To continue the never-ending stream of marketing lies, Thunderbolt 3 is usually advertised as a 40Gb/s line. Thunderbolt carries up to 4 PCI Express 3.0 lanes, plus video. So the maximum data link speed is 3.94GB/s (and NOT 5GB/s), period. This may be even lower if you connect your reader to a Thunderbolt 3 port whose controller is shared with your monitor(s), or depending on the actual controller chip to port mapping. But if you don’t connect a high resolution monitor to the same controller as the reader, you are guaranteed to have 2 PCI Express lanes, which is 1.97GB/s. CFexpress also uses 2 PCIe 3.0 lanes, so this is a perfect match. Bingo, go for a Thunderbolt 3 reader!

While quite a few companies are selling their (as we learned by now) inadequately slow USB readers, there’s only one Thunderbolt 3 device. The big and heavy AFT Blackjet TX-1CXQ. It is much larger and heavier than my ProGrade Digital CF & SD reader, not to mention the minuscule Wise WA-CR05 CFast reader I use (both of these are USB 3.1 Gen 2 readers, which is mandatory to utilize a full bandwidth of a CFast card). So I bought the Blackjet.

“Up To”…

On paper the 128GB SanDisk sports up to 1.7GB/s read and 1.2GB/s write speeds. Of course you have to deduct bandwidth consumed by file system and block device access protocol overhead, so you’ll get smaller numbers in real world scenarios.

I did measure average read speed around 1.45-1.47GB/s, which is acceptable compared to the advertised 1.7GB/s. Oh yes, you’ll need a rather fast PCIe SSD in your computer to be able to download these cards at full speed. Plus macOS 10.13 or later is required to work with CFexpress cards.

Write speed is a completely different story, however. Blackmagic Disk Speed Test measured speeds fluctuating between 800 and 1100MB/s, and it suddenly dropped to 430MB/s.

Head scratching, and consulting with both AFT and SanDisk (AFT’s support is first class, but I’m still waiting for SanDisk to reply)… Switching benchmark software to AJA System Test Lite… And presto, the truth started to reveal itself.

The following is a write graph generated by AJA System Test. Just ignore “frame numbers”, as since it was a 4GB write test, vertical blue lines indicate gigabyte boundaries.

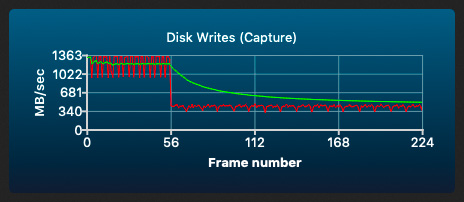
So the card is quite speedy with 1.1-1.2GB/s average for the first gigabyte, then drops to 430MB/s. This might be thermal throttling, but since it always happens after the first gigabyte, it might well be due to the internal architecture of the card. I don’t know, and still waiting for SanDisk to comment. This is the first time I saw such a thing with a memory card.

If you let the card sit idle and cool down a bit, you’ll again get 1.1-1.2GB/s for the first gigabyte. But if you keep pushing data, it will stay at 430MB/s. For short bursts, say 256MB or so, with a little time between them, write speed stays around 1.1-1.2GB/s.

But how much write speed do you actually need? The CFast cards I’m using in the 1D X Mark II have 400-410MB/s average write speed, and I can shoot RAW continuously until the card is full. CFast and CFexpress card prices are almost identical (although the 128GB CFexpress SanDisk is significantly cheaper than the CFast). So for less money, I get 3x faster download speed, with a little bit faster worst case and almost 3x faster best case write speed.

I’m going to use the 1D X Mark III almost exclusively for stills. 1GB is about 40 images = 2 seconds at 20fps before throttling kicks in (not counting the camera’s buffer). It may fare very well, but video guys might need to look elsewhere. Larger cards, more suited for RAW video footage, might also behave differently.

What About Other Brands?

Finding a trusted memory card vendor isn’t an easy task. During the last 18 years I grown to trust SanDisk (used lots of CF cards from them and still are my favorite SD card vendor), and Lexar for CF and CFast before they went Chinese with unknown quality. I don’t buy anything from Sony given how they ignore customer security (think firmware updates requiring root permissions). I have zero experience with Delkin, ProGrade or Wise cards, and a little bit reluctant to begin experimenting with expensive cards.

So it’s basically SanDisk only at the moment. Canon is also pushing SanDisk, so I suspect that these products were tested together and will provide the promised performance. The above results did cast a little shadow on this, but only time and further in-camera testing will tell. I’ll let you know.

  ☕ ☕ ☕

Did this post help you? Consider buying me a coffee if so.

Kuuvik Capture 4.5 : CR3 and M6 II Support

Version 4.5 of Kuuvik Capture, my premium Canon tethering app, is now available on the Mac App Store. Besides the usual camera support updates (this time for the M6 Mark II and EOS Ra), there are a few noteworthy things.

RAW Histogram and Exposure Warnings for CR3 Files

Proper support is finally here for Canon’s new RAW format. Initially I wasn’t a fan of the new format as it wastes a lot of space for unnecessary things (like duplicated metadata parts and an embedded, smaller resolution RAW image), but there’s one single feature that changed my view entirely. And this is the actual organization of the RAW image data.

My biggest gripe with the CR2 format is that the RAW data must be processed serially, on a single processor. No matter how many cores you have in your machine. But CR3 allows parallel processing! My very first CR3 decoder is roughly 2.3x faster compared to a same megapixel CR2 (EOS R vs 5D Mark IV, 0.22s vs 0.51s on my 8-core 2019 MacBook Pro). And I’m investigating architectural changes in Kuuvik Capture to allow extracting even more of the inherent parallelism in the new format.

Please note that like with sRaw/mRaw CR2, Kuuvik Capture doesn’t support the RAW histogram and exposure warnings for lossy compressed C-RAW CR3 files. I don’t think that in the age of dirt cheap storage, trading a little space for increased processing time and lower quality does worth it.

New Sequence Controller

Until now, exposure sequences were controlled by a variant of the original Kuuvik Capture 1 controller. But we had recently discovered a situation where actual exposure values could slip, resulting in two identical frames. Unfortunately the cause was the app’s architecture interfering with Canon’s exposure control mechanism, and the only solution was to completely rewrite the sequence controller.

The new code also allowed to resolve a long-time issue with the inability to stop sequences while the app waits between intervalometer shots. And there’s another pretty neat thing coming in a future release!

Tethering on macOS Catalina 10.15.2 and Later

Simply put: Apple made a huge mess, so we added extensive in-app guidance about what (seemingly unrelated Photos and Removable Volumes) access permissions you have to grant to ensure that macOS lets the app communicate with USB connected cameras. Failure to do so will prevent the app from doing its job.

Of course we had filed a bug report to Apple, proposing the way that it should be done: macOS should ask for a Tethering access permission. Their current solution is not just misleading, but poses a security risk as users must grant much wider permissions than it would be necessary, grossly violating the principle of least privilege. This is a prime example that security done the wrong way actually results in a less secure system… Just sayin’… If anyone at Apple happens to listen.

Availability

The update can be downloaded from the Mac App Store free of charge for existing Kuuvik Capture 2+ users. My eBook was also updated to reflect the changes in this release.

There’s one thing you must be aware of, though: the app now requires macOS 10.12 or later. This change allowed us to modernize parts of the code, and to get rid of the OpenCV dependency, which was only used for one purpose: resizing the RAW exposure warning layer on some old Macs. Removing it reduced the app’s size by 35%, to a mere 5.3MB. In comparison, Canon’s EOS Utility is a 75MB behemoth.

ShutterCount 4.3 Released

The latest update to my ShutterCount app is now available on the iOS and Mac App Stores.

Camera-wise, this release brings Canon EOS M6 Mark II and EOS Ra support.

Apple totally messed up tethering with macOS Catalina 10.15.2, so we added extensive in-app guidance about what (seemingly unrelated) permissions you have to grant to ensure that macOS lets the app communicate with USB connected cameras. Failure to do so will prevent the app from doing its job.

And there are revised icons for Pro editions on both platforms.

The update is free for existing users on both iOS and macOS. New users can purchase the app in the respective App Store.

Enjoy, and have a happy new year!

Technical Camera 1.6 : Keeping the Lowest ISO

Technical Camera 1.6 introduced a new option, Keep Lowest ISO. But let’s start with a little background information.

Multiple cameras on an iPhone usually have different ISO ranges. For example on the iPhone 11 Pro Max, the ultra wide camera’s ISO range is 21-2010, while the wide camera’s range is 32-3070. The telephoto camera is capable of ISO values identical to the ultra wide.

The difference on the high end of these ranges doesn’t really matter as everything above ISO 400 tends to produce unacceptable results for serious photography, and ISOs above 1600 are pretty much useless.

But the low end is different. You have to use the lowest ISO possible to get the highest image quality. And switching between cameras having a different lowest ISO value in manual ISO mode was a bit of a pain, as you had to adjust the manually set value every time.

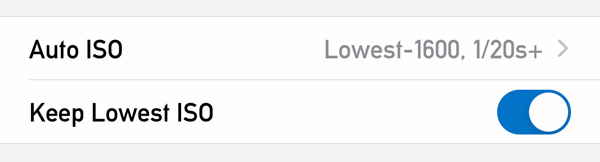
This is no longer the case in version 1.6. If you turn the Keep Lowest ISO option on in the menu, the app will automatically set the lowest possible ISO on the camera you switched to, given that you had the lowest ISO set on the camera you’re switching from. Please note that this works only in manual ISO mode. And that’s it. A pretty simple but highly effective feature for those pursuing the highest possible image quality even in mobile photography.

Artist’s Viewfinder 6.5 Released with iPhone 11 Ultra Wide Camera Support

Version 6.5 of the Mark II Artist’s Viewfinder is now available on the App Store. This release brings long-awaited iPhone 11 ultra wide camera support.

We did face two serious challenges with the new phones.

First, despite being ordered on September 13, our iPhone 11 Pro and 11 Pro Max was delivered only on October 16. At first, the estimated delivery date was October 1, which had suddenly slipped to October 25.

After a series of rather angry phone calls, we finally got the devices on the 16th. As I mentioned earlier, Apple doesn’t treat developers equally in each country, putting us at serious competitive disadvantage, and causing excess costs. This is an ongoing issue since we started this business a decade ago, and I’m not going to dissemble it any more.

Second, the ultra wide camera “out of the box” turned out to be grossly inadequate for the task. To begin with, its angle of view differs between live view and taken pictures. And to add insult to injury, Apple’s distortion correction leaves heavy barrel distortion. Unacceptable things for a precision instrument like Artist’s Viewfinder.

Fortunately we have proven, mature distortion correction technology since 2013, so disabling Apple’s stuff and rolling out our own resolved the issue. But at this point we had to buy an iPhone 11 too, just to profile the ultra wide camera…

So after two and a half weeks of hard work the app is ready, and I’m pleased with the results. The ultra wide camera works like a 0.5x-class converter lens and can simulate a 15mm lens on the 35mm format (a 14mm is slightly clipped), or the Rodenstock HR Digaron-S 23mm f/5.6 with a 40x54mm back.

Marketing folks tend to live in an alternate universe where math is distorted. Apple markets the iPhone 11 as having a 13mm and 26mm equivalent (in 35mm terms) camera. The reality is that in 35mm terms, the horizontal (longer side) angles are equivalent to 14.5mm and 28mm lenses. Maybe they are comparing the diagonal angles, which although let them show shorter focal lengths because of the aspect ratio difference (2:3 vs 3:4), is misleading. It’s just like when Canon marketed a 6000×4000 pixel camera having 24.3 megapixels… Where the hell that 0.3 megapixels are coming from? (Well, maybe from the inactive sensor area being included in the megapixels number, but its still cheesy.)

Sorry, I had to vent… Now back on track.

Just like a regular wide converter, the ultra wide camera can be activated with the WIDE icon on the Quick Control Screen or via the Toggle Wide Mode function assigned to a Smart Function Key.

RAW capture, optical image stabilization and focusing is not available with the ultra wide camera due to hardware limitations.

Using external accessory lenses with iPhone 11 models is not supported. You don’t need one, just mention it for the sake of completeness.

The Viewfinder Handbook was also updated to reflect the new features.

This update is free for existing users. New users can purchase the app in the App Store.

Technical Camera 1.6 : The Ultra Wide Camera

The most heavily touted feature of the iPhone 11 series is the ultra wide camera. Don’t get me wrong, it is a useful tool, but disappointment is guaranteed if you blindly believe the marketing spiel.

Why? Because the ultra wide camera isn’t a first class citizen on the iPhone. It can’t shoot RAW, doesn’t have optical image stabilization, has no focusing of any kind and has severe distortion that is only partially corrected by iOS. You may wish to read my former post for more details.

It was a real challenge to make this thing live up to the quality demands of Technical Camera and to the high expectations of its users. There are a few aspect we can’t change, because hardware is given. But fortunately, I’m a seasoned expert in the correction of the most annoying of its properties: distortion.

Time to show off…

Technical Camera distortion correction compared

There’s no need to talk a lot about it. Technical Camera can give you a well corrected, almost perfectly rectilinear image, while the built-in camera app – and most others – simply can’t. This is where six and a half years of experience shows. So if you shoot buildings, interiors, or anything else where barrel distortion is a problem, then you will appreciate my app.

The apparent image quality difference which comes through even at this small size is partly attributable to the ability to use manual ISO in Technical Camera. The above image was shot at ISO 200, while Apple’s Camera app used ISO 1250.

Live view in Technical Camera shows you exactly what you get in the final picture, so you can frame your shot precisely. Apple’s camera app captures a little wider (and more distorted) image than its live view shows.

On the positive side, the ultra wide camera provides better image quality than any wide converter accessory lens I’ve ever created a distortion correction profile for. You still get corner smearing, so I do recommend to use a lower resolution image quality setting, such as JPG Quarter HQ with this camera.

Speaking of image quality settings…

If you happen to use an album that has RAW set as the image quality, and subsequently switch to the ultra wide camera, the app will warn you that since that camera can’t shoot RAW, JPG will be used instead. You can also choose to hide this warning. But don’t worry, it can be restored with the Warnings screen in the menu.

OK, but how do you switch to the ultra wide camera? There are two ways. You can use the WIDE icon on the Camera Options screen (which can be displayed by tapping the circle icon in the corner of the main screen). Tap the WIDE icon again to return to the default wide angle camera. Alternatively, you can set up a Smart Function Key with the Toggle Wide Mode function (the exact same way you do with a wide converter accessory lens). The latter method is what I use personally.

Version 1.6 is a free update for existing Technical Camera owners. New users can purchase the app in the App Store.