Performance is a feature. This is something I take very seriously and strive to maintain the highest performance and power efficiency possible. In this post I’ll show the huge gains attainable with carefully crafted code, and hopefully shed some light on why one wants to spend money on Kuuvik Capture, despite Canon has a free tethering app. Well, if the myriad features wouldn’t be enough reason…
What you are going to see is the comparison of processor utilization and power consumption during a live view session between Kuuvik Capture and EOS Utility. Live view is one of my favorite performance test cases, since the continuous picture stream stresses image decoding and display components.
Let’s begin with the processor utilization figures. They were obtained with Activity Monitor on my Mid-2012 15″ Retina MacBook Pro (2.6GHz, 16GB, dual graphics) running macOS 10.12.6. The camera was a Canon EOS 7D Mark II, connected via USB 3. All tests used the same scene under the same lighting and same exposure. Live view windows were maximized to occupy as much screen real estate as they possibly could. 100% means one of the processor cores is fully utilized, 200% means two cores, etc. Since the values oscillate a bit, what I show is an average of several minutes.

Kuuvik Capture had sharpening, focus peaking and clipping warnings enabled, while EOS Utility have no such features at all.
OK, it’s a brutal difference, but how does this translate to battery life? Power consumption was measured with coconutBattery 3.4. Again, you see an average of several minutes.

The orange line at 10 watts is the idle power consumption of my MacBook Pro (you know, display, SSD and stuff when the computer does nothing useful).
Live view in EOS Utility burns through your battery in less than half of the time that it would last with Kuuvik Capture.
And if you turn off sharpening, focus peaking and real-time clipping warnings in Kuuvik Capture (just to be fair), it’s power consumption drops to a mere 16 watts. This is at the level of lightweight web browsing with Safari.
In real world situations it means that you could work all day on a single charge with Kuuvik Capture. A happy user recently told me that one day he forgot the charger at home, and had to do the whole-day architecture shoot on battery. His 13″ MacBook Air not just accomplished that, but it had some charge left at the end of the day.
Performance and power consumption are important for those who would like to tether their cameras away from power. And for those who care about our planet. We invest a lot into optimizing performance and efficiency, and the above figures reflect all that effort – and make me incredibly proud.
Kuuvik Capture 3.3 is available on the Mac App Store. It is a free update for users who purchased the app earlier from there. You can see the complete list of new features and changes in the release notes.


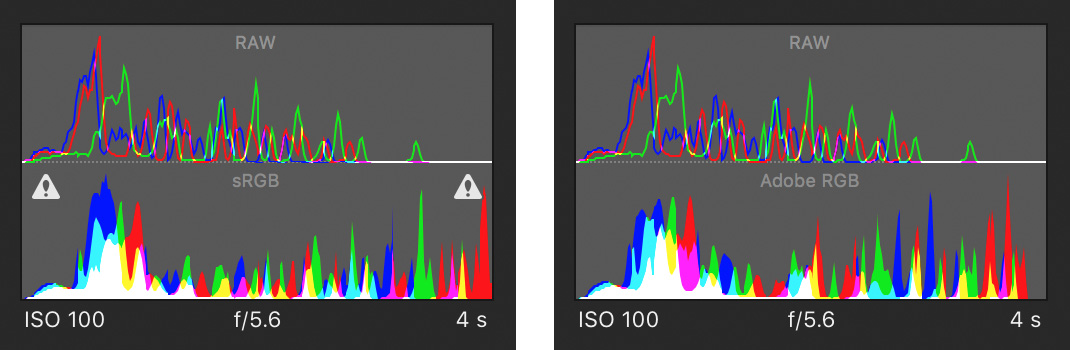
 So version 3.2 sports a new Dual Histogram tool to show Kuuvik Capture’s RAW histogram along the usual one generated from processed data.