Kuuvik Capture 2 Beta 2: Performance

As Beta 2 of Kuuvik Capture 2 is nearing completion, I felt it’s time to talk about the incredible performance improvements of the product.

Beta 2 switches away from Canon’s EOS SDK in favor of my EOS Extensions library. EOS Extensions powers ShutterCount since its first day, and now Kuuvik Capture uses a heavily expanded version.

This change brings several improvements to the app. It is now 64-bit, sports a more fluid WiFi pairing experience, and occupies less than 10% of the disk space needed for Beta 1. But the most prominent improvements are in the energy consumption and processing speed areas.

Let’s jump right in. The following chart shows the relative energy consumption of the Beta 1 and the Beta 2 (as well as Canon’s EOS Utility for reference) while running live view. The Beta 1 figure is roughly the same as Kuuvik Capture 1 was.

All performance figures are calculated from measurements done on my 2012 15″ Retina MacBook Pro, and may change in the final product – but I think they are pretty much indicative of what you could expect.

kc2b2-energyimpact

Even the previous Kuuvik Capture incarnations were no slouch, but the improvement in Beta 2 is huge. It’s energy impact (which is a number OS X calculates mostly based on CPU utilization) is a tad less than 40% of EOS Utility! Actual energy consumption may be a little different as other parts of the system also draw power, but I would realistically expect 2x longer battery life on my MacBook than what’s possible with EOS Utility.

Also take into account that Beta 2 does a lot more number chrunching during live view than even the pervious beta: it’s output is visually better and now always color manages the live view stream. Because of the latter, the color management section has been removed from Preferences.

I mentioned that Kuuvik Capture 2 ditched libraw (an open-source RAW processing library), and now uses my own code. I cited some 2.2x processing speed improvements then. I’ve hand-optimized the RAW decoder in EOS Extensions, and image processing is now up to 5x faster than Kuuvik Capture 1.

kc2b2-processingtime

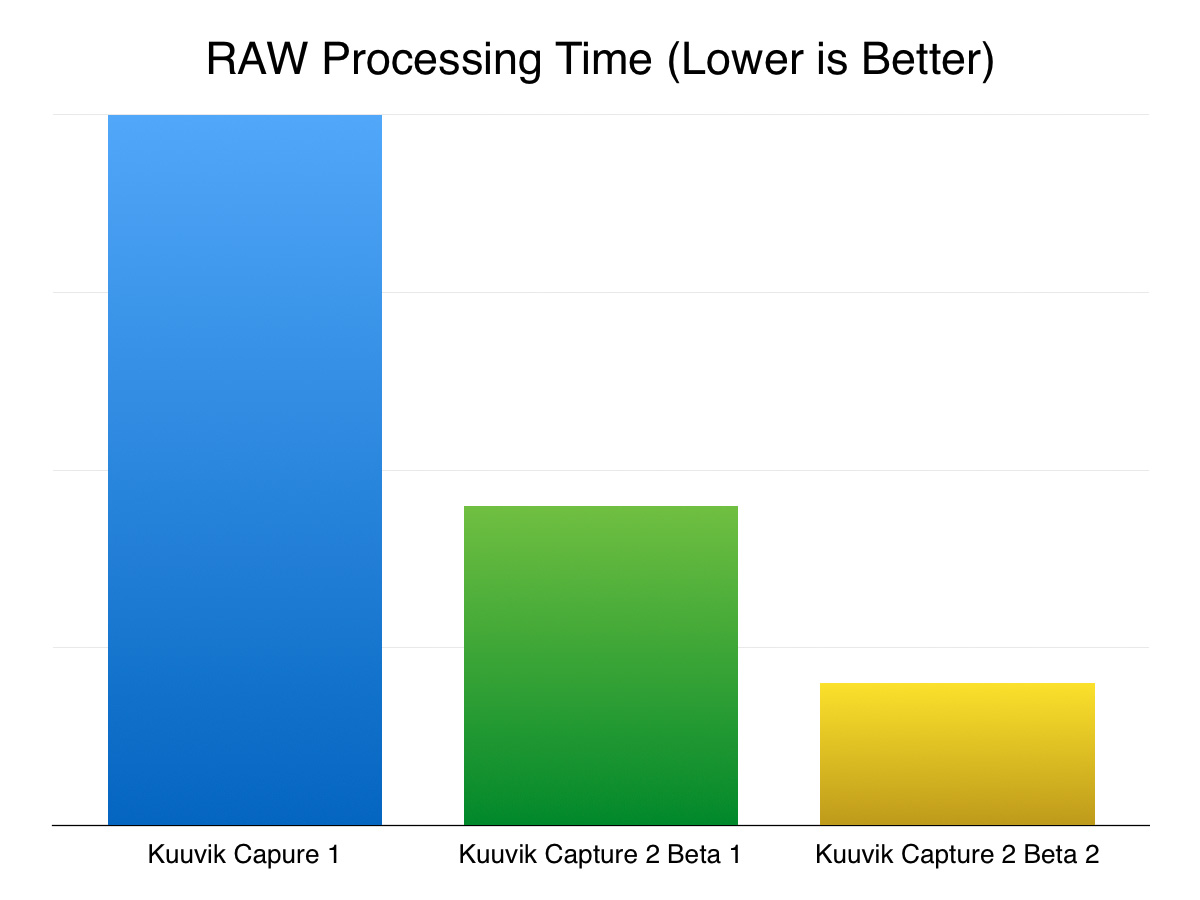
In other words, the Beta 2 loads and processes a huge 5DS R file on my MacBook Pro in about 1.6 seconds.

Yes, Kuuvik Capture 2 will support the 5DS and 5DS R. Raw decoding support is complete, and the cameras will be characterized and enabled as soon as my 5DS R arrives.

We have a few places left in the Kuuvik Capture 2 beta program. If you would like to participate, please download and complete the Beta Application and NDA form, and send it back to beta@direstudio.com. If your application is accepted, you will receive download instructions within a couple of days.

Kuuvik Capture 2 Beta Available

The first beta build of Kuuvik Capture 2 is now available. If you would like to participate in the beta, please download and complete the Beta Application and NDA form, and send it back to beta@direstudio.com.

Seating is limited, so we can’t guarantee that every applicant will be chosen as a beta tester. If your application is accepted, you will receive download instructions within a couple of days.

kc2-2

The above screen shot shows the updated black & white peaking mode. What’s new here is the way black & white conversion is done. It handles reds significantly better. For the technically inclined, we are now using HDTV-like luminance calculation, while the old version used SDTV-like calculation.

For the complete list of what’s new in version 2, please refer to my former post.

Kuuvik Capture 2 Coming This Summer

On 30th of April I had completed the acquisition of Kuuvik Capture. Although I was the original author, pecuniary rights (to sell and make money out of it) belonged to Kuuvik Digital. Now I’m the owner and my company – DIRE Studio – will distribute the app.

Alongside the business part of the acquisition, I have been actively working on a new version during the last couple of months. And now I’m pleased to announce Kuuvik Capture 2.

kc2

Here’s a quick laundry list of what’s new. Check out my post about what’s new in the Beta 2!

I plan to post on these in detail in the coming weeks.

Kuuvik Capture 2 is planned to be available in the Mac App Store. That is, there will be no limit on the number of cameras you can use with the app. And you will be able to use the app on all your Macs.

A closed group, application only beta will be available soon. I’ll post on how to apply when we are ready to begin.

The Giant Pac-Man

Photographing partial solar eclipses usually isn’t that rewarding. A yellow disk covered partially with a black disk. Nothing to write home about. But today’s eclipse was different: a lone Sunspot (actually two, in region 2303) turned the Sun into a giant Pac-Man.

Partial Solar Eclipse with Sunspot 2303

Partial Solar Eclipse with Sunspot Region 2303

Not being rewarding doesn’t mean that it’s without any challenges, though. A special filter is needed to protect the lens, the sensor and – most importantly – the photographer’s eye. And the filter must be mounted in front of the lens.

The filter I have is a piece of thin metal foil mounted in an aluminum ring. It was made for my former 70-200/2.8 zoom some 7-8 years ago.

IMG_2966-c

Sun filter on the 500mm f/4

But I wanted to use my 500mm f/4 with a 2x teleconverter on a 7D Mark II today to make the Sun large on the image.

Somehow I had to mount the filter onto the much larger front ring of the 500. Cardboard and gaffer tape to the rescue! The adapter ring was completed in about 20 minutes and worked perfectly.

I lost about 4cm clear aperture this way, but that isn’t a problem when photographing the Sun. You still have plenty of light and contrast.

Another challenge was focusing. The turbulent air made it hard for the AF to catch the best focus. So I tethered the 7D Mark II to my 11″ MacBook Air and fired up Kuuvik Capture to do the focusing. And it was also a joy to watch the event unfolding on a notebook screen.

Note that I had been using a special build of Kuuvik Capture with 7D Mark II support – the currently selling one doesn’t support this camera. A privilege for being the developer of the app :)

RAW File Bit Depth Changes with ISO

Let’s begin with the fact. The usable bit depth of your RAW file depends on the ISO used to shoot the image.

I discovered this while working on the RAW histogram feature in Kuuvik Capture. To make the RAW histogram usable, we have to scale the data coming from the RAW file. This scaling ensures that the left side of the histogram represents pure black and the right side represents pure white. Technically scaling is done by first subtracting the black level from each pixel, then mapping pixel data from the [0, white saturation] interval into the [0, 1] interval.

Black level is the value your sensor emits when no photons reach a given pixel. This is calculated utilizing a black masked area along the edges of the sensor (see my former post on this).

White saturation is the value from the given pixel when it’s completely full – that is more photons reaching the pixel will not generate a higher value. This depends on physical attributes of the sensor. We do a series of measurements for each sensor to determine its value. The higher the white saturation the more tones your RAW file contains.

What surprised me during the initial white saturation measurements is that with most of Canon’s cameras this value changed as I changed the ISO. Some cameras even present different white saturation in different exposure modes (Av and M for example).

The following graph shows the result from these measurements converted into usable bit depth for four cameras up to ISO 6400.

bit-depth-vs-iso-2For the mathematically inclined, usable bit depth is calculated with the formula:

\(\log_2 (w – b)\)

Where \(w\) is the white saturation and \(b\) is the black level.

The roughly 0.3 bit difference between the lowest and highest values doesn’t seem that large at first sight, but this means that you lose 15% of the tones at ISO 640 compared to ISO 800. To put it another way it’s a 1/3 stop difference.

Implications

Avoid non-full-stop ISOs.

The truth is that both ISO 500 and ISO 320 are exposed at ISO 400, putting a 1/3 stop “digital exposure compensation” value into the RAW file. For the ISO 320 setting this produces an overexposed image, which should be pulled down 1/3 stop. The downside is that you lose 1/3 stop of both tonal and dynamic range. The upside is that there will be less perceived noise, which can be helpful in some situations (and which is the basis of lots of false myths)

Avoid ISOs < 200 on crop-sensor Canons.

As you can see on the graph above, bit depth on these machines are less below ISO 200 than on or above it.

What about the 1D X?

Some of the 1-series bodies are not prone to the 1/3 stop bit depth loss. For example the 1D X starts to show this behavior at ISO 12800. The 1Ds Mark III produces the exact same bit depth at each ISO. And the 1D Mark IV works like the 5D Mark III.

So my practice is to use just full-stop ISOs and forget about ISO 100 on crop-sensor bodies.

Focus Bracketing Comes in Kuuvik Capture 1.1

kc-focus-bracketToday I practically finished the focus bracketing feature in Kuuvik Capture. Of course it has to pass our rigorous testing procedure, but the features are considered final.

Speaking of the features. You can drive focus starting from either the closest or from the farthest point, in small/medium/large sized steps. What those steps mean is camera body and lens specific (a totally arbitrary value actually), so you have to test it before starting the bracket. Hint: Command + arrow in live view mode drives focus by small steps, while Command + Shift + arrow drives it in medium steps.

You can expose up to 30 images in a focus bracketed sequence. It can also be combined with mirror lock-up and the intervalometer, as usual. At the end of the sequence we try to focus your lens back to the starting position, but don’t rely on it if you need accurate positioning – some lenses are really crappy in this regard and are unable to drive focus by the same amount back and forth.

kc-15-bracketWe have also changed the maximum number of shots you can expose in other bracketing modes to 15. As you can see on the bracketing monitor, this number is usually more than the exposure range your camera is capable of, but some of you requested it, so we added it.

Version 1.1 is in private beta right now, and it is planned to be release early July. It will be a free upgrade for current Kuuvik Capture users.