Kuuvik Capture 2.1 Released

Version 2.1 of Kuuvik Capture is now available on the Mac App Store. This update brings a handful of new features and a few fixes. Let’s start with the new features.
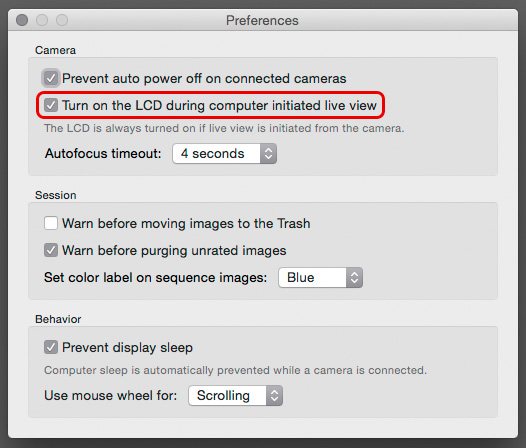
kc21prefsFirst, a new preference is added to control whether the camera’s LCD is turned on when you start live view from within Kuuvik Capture.

If you turn this preference off, the camera’s LCD will remain turned off to conserve battery. But you can turn the LCD on any time with the live view button on the camera.

When you start live view directly on the camera, it’s LCD will turn on regardless of this preference (chances are that you engaged live view on the camera because you want to look at the LCD).

Upon user request, the number of focus bracketing steps had been increased from 30 to 100. And I’ve added hot keys to the Purge Unrated (Cmd-P) and Purge Unrated and Decrease Rating (Shift-Cmd-P) culling commands.

The bug fixes are the following:

  • Live view is now automatically stopped when changing lenses or when the camera is disconnected.
  • Live view navigator zoom labels now display “6x” and “16x” for the EOS 5DS and 5DS R. The navigator frame’s size is also corrected to reflect these zoom levels.
  • ISO 16000 now can be set from Kuuvik Capture on the EOS 7D Mark II, even if using full stop ISOs is set on the camera. This is in line with the camera’s behavior.

Version 2.1 is a free update for existing Kuuvik Capture 2 owners.

Kuuvik Capture 2 Beta 2 Released

We’ve come a long way since the Beta 1, with some significant departures from how Kuuvik Capture worked in the past. I bet you’ll spot the single most important new feature on the screen shot below.

kc2b2-with-ib

Graphical Image Browser

Session management has been completely rewritten for this beta. It became way simpler, as sessions are now just simple folders. And Kuuvik Capture now lets you quickly browse the contents of the session folder with the help of the Image Browser. You can rate the images with 1 to 5 stars, color label them, and sort according to your preference. Industry-standard XMP metadata files provide workflow integration with XMP-aware RAW converter apps, such as Adobe Lightroom and Capture One. (Well, in theory it should work with Capture One, but my fellow colleagues at Phase One screwed up their XMP parser and 99% of the time can’t load a well-formed XMP. Either ours or Lightroom’s. Even worse, if you enable Full Sync in Capture One, it would corrupt the XMP file… So Capture One is declared incompatible until they fix this.)

As a side effect, Kuuvik Capture can now be used to quickly cull a large number of images. Actually, this was one of the motivations to create the Image Browser. I want Kuuvik Capture to fully and seamlessly support my workflow.

I usually have a mix of images taken with Kuuvik Capture and my cameras alone, so I needed the ability to work on them together. When I’m birding, it’s now uncommon that I return with 2000 images from a single afternoon shoot – 90% of which goes to the trash. But culling with full-featured RAW converters was slow and painful. Now I can sweep through those 2000 images in roughly 1.5 hours – with all the help of the usual Kuuvik Capture tools like sharpening and focus peaking!

Positive Selection Culling

Contrary to the usual “throw out the bad ones one-by-one”, Kuuvik Capture sports a “mark the best & ditch the rest” concept of image culling. During the years, I found the negative approach (throwing out the bad ones) impact my creative process in a very bad way: I’ve been concentrating on the bad images, instead of the standouts. It was a kind of mental torture for me (not surprisingly, I had a huge pile of un-culled or partly culled shoots).

With Kuuvik Capture, I just give stars to the best images, to those that I really like (and those whose technical properties are also good). Then ask the app to trash the others. You also have the option to decrease star rating of remaining images (and start the process all over again). It’s simple, intuitive, and fosters positive thinking about the good images.

Multi-Touch Gestures

This beta also introduces a host of multi-touch gestures. Besides the usual, standard zooming and panning of images, we now support 90 degree image rotation with the flick-rotate gesture (it’s like trying to quickly rotate the image, and Kuuvik Capture detects the direction and rotates the image by 90 degrees).

In live view you can also flick-zoom (both in and out).

Built for the Canon EOS 5DS and 5DS R

The app has been designed and optimized to work with the huge images from the new 50-megapixel bodies. While it’s fast working with them, it became lightning fast on smaller (22 or less megapixel) images. The long delay between beta 1 and beta 2 is partly attributable to this process, as I had to replace a few slow, leaking and generally problematic frameworks with my own implementations. So the complete display engine is new, including the sharpening and peaking filters that now work properly on Retina displays.

Other New Features from the Beta 1

  • Streamlined user interface to give more screen space to your images and to support the new MacBook.
  • New raw decoding engine which is up to 5x faster than the open source library used previously. And consumes way less memory in the process.
  • Improved image display quality.
  • Improved focus peaking visibility in some situations.
  • Exposure information for the currently displayed image below the histogram.
  • RAW label to show when the histogram is generated from raw data (instead of white balanced ‘jpeg’ data).
  • Session information can be overlaid on the displayed image.
  • 11 new guide templates, including golden ratio, a dense 30×20 grid and several aspect ratio lines, such as 1:1, 5:4, 16:9.
  • Selectable guideline color.
  • Color pickers for both peaking and guides allow you to set the opacity.
  • A new menu item and hot key to cycle peaking color presets (yellow, white, green, magenta). Cycling also include your chosen custom peaking color if there’s one.
  • All panels (not just the Navigator) can be quickly revealed.
  • Event Log to notify you about problems that may influence your shoot (such as inability to write to the download folder or interference with other concurrently running remote control apps).

What’s Not In There?

Due to the sheer amount of change in the most basic parts of the app (camera communication, display, sessions), we had to drop two features from version 2.0. First, testing revealed that OS X’s PTP-IP implementation (that was used to drive the cameras through WiFi and Ethernet after dropping Canon’s SDK) tends to corrupt data under heavy load. So I removed network camera support until I roll out my own PTP-IP code.

Second, support for the 1Ds Mark III has been removed as it needs to be operated completely different from modern cameras. We will re-add support as we can put our hands on a 1Ds Mark III for a few days, and only if there’s demand for it (given the limited feature set that camera supports). The 1Ds Mark III is supported in the final release.

Availability

Beta 2 will be released to registered beta testers during the next day. This beta represents the final feature set for version 2.0, and if everything goes as planned, it will be released in the Mac App Store as soon as Apple approves it.

Canon WFT-E7 First Impressions

There are situations when you need remote camera control. No, I’m not speaking about the “let’s control the camera from an iPad two meters away” kind of pointless exercises, I’m talking about real needs. Think about cameras mounted on the roof of the stadium, situations where you would scare wildlife away with your presence, or downright dangerous places where you don’t want to spend more time than absolutely necessary.

I bought Canon’s Wireless File Transmitter WFT-E7(B) to assist in implementing some of my photographic ideas, and also to develop network (both wired and wireless) tethering support for Kuuvik Capture. While it’s clear that Canon’s transmitters are not standing in the forefront of today’s technology, if you could live with their quirks and limitations, then they could do the job well.

The Pricing Issue

Well, I paid 520 EUR (roughly $675, excluding taxes) for the WFT. Although this is some $175 less than the list price, it is pretty expensive. The bill of materials for this device is hardly more than $50, so this asking price is a bit irritating. As a comparison: an Apple Airport Extreme base station that packs comparable amount of software costs $179. Considering the functionality of the WFT, my opinion is that Canon could sell huge amounts of these at $199 or even at $299. But the $849 list price is simply unrealistic.

The bad news is if you need full, 100% USB-equivalent remote control functionality, then you have to swallow the price, and buy the device. There are some products, such as Camranger, that offer partial solutions, but you need a WFT for the whole thing.

Integrated Wi-Fi (and WFT software) on the 6D certainly points to a good direction, and I hope more cameras with integrated WFTs will follow. This is how it should be done in 2013.

The Hardware

When the first wireless transmitters had appeared for Canons, they were ugly bricks that connected to the camera with a cable, but in exchange they supported multiple cameras. Then Canon made their mind, and started to sell dedicated transmitters for each camera model (think 5D2 and 7D). With the WFT-E7, the ugly brick returns. In theory it will support future cameras, but I found no sign on the Net whether it works with anything except the 5D3. I plan to investigate this in the near future.

Its exterior finish acts like a dust magnet, and also files off small skin particles of your hand, so it’s a challenge to keep it clean.

Mounting the WFT is another challenge. I’m using Arca-Swiss compatible tripod heads/plates, so screwing the WFT under my camera is not an option. As a short term solution I simply attached a keyring to the supplied neoprene case, and hung the device on my tripod hook. In the long term the keyring will be replaced with a carabiner that will attach to that hole on the tripod base. Canon packages two cables with the device: one is too short and the other one is too long for me. This is why I reel up and velcro the longer cable to the case.

The good news is that the WFT is powered by the same LP-E6 battery that powers the 5D3.

Operating Modes

You can choose from the following operating modes (which are mutually exclusive):

  • Remote camera control (EOS Utility).
  • WFT Server, which is a web-based remote control facility.
  • You can upload your shots to an FTP server.
  • Show your images on a DLNA compatible TV set.
  • Can sync time between cameras.

The only mode that gives you full remote control is the EOS Utility mode. This is what I’m using, so will skip the others.

Network Configuration

This is the first quirk. For some unknown reason, the device can’t operate as an access point. So you either connect it to an existing network; bring your own access point (another box, batteries, etc); or create and use an ad-hoc Wi-Fi network (which can work only in “g” speed, and its WEP encryption isn’t something considered secure). This is a major oversight on a $675 device.

I won’t talk about basic network configuration, because you can find pretty good and detailed guides at Canon’s Digital Learning Center. I will, however, talk about another quirk: pairing.

Pairing

To control a WFT-equipped camera, you have to pair it to the computer and application you plan to use it from (I’ll call this computer/application pair an endpoint).

You must configure your networks settings on the 5D3 using the Connection wizard. No matter how experienced you are in IP network configuration, this is the only way you can get your WFT to do the pairing at the end.

Below is a screenshot of the network camera manager in the private beta version of Kuuvik Capture 1.1 showing my paired (and connected) 5D Mark III.

Network camera manger in Kuuvik Capture 1.1 beta

Network camera manager in Kuuvik Capture 1.1 beta

Working with the WFT

This is the best part: once paired and connected, you can forget about the WFT. Everything looks and works as if your camera was connected via USB. Yes, Wi-Fi can be slow (especially ad-hoc “g” speed networks), so large RAW file downloads can take a while. But otherwise the functionality is completely identical.

You only have to pair your WFT to Kuuvik Capture once, but you must watch for the connection sequence later on. WFTs advertise themselves on the network using Bonjour. When you turn on a paired WFT, it will advertise itself for a minute. During this time Kuuvik Capture (or another software) must connect to it. If the camera does not receive a connection request within a minute, it will shut down the WFT! From this point on things become pretty stochastic. Sometimes after a while the camera turn the WFT on again, sometimes you have to disable and re-enable EOS Utility mode on the camera to retry the connection.

The recommended sequence is:

  • Start Kuuvik Capture.
  • Turn on the paired camera. It might need half a minute or so to start advertising itself. When it appears in Bonjour, Kuuvik Capture will automatically connect to it.

Conclusion

During the last few weeks of testing the WFT-E7 worked as expected – offering stable, completely USB-equivalent connection. I don’t have a reason no to be satisfied with it. I just try not to think about its price.

Oh, I’m sure 6D owners will break into a smile seeing the ugly brick hanging under my tripod…

  ☕ ☕ ☕

Did you enjoy this post? Consider buying me a coffee if so.