Technical Camera 1.6 : The Ultra Wide Camera

The most heavily touted feature of the iPhone 11 series is the ultra wide camera. Don’t get me wrong, it is a useful tool, but disappointment is guaranteed if you blindly believe the marketing spiel.

Why? Because the ultra wide camera isn’t a first class citizen on the iPhone. It can’t shoot RAW, doesn’t have optical image stabilization, has no focusing of any kind and has severe distortion that is only partially corrected by iOS. You may wish to read my former post for more details.

It was a real challenge to make this thing live up to the quality demands of Technical Camera and to the high expectations of its users. There are a few aspect we can’t change, because hardware is given. But fortunately, I’m a seasoned expert in the correction of the most annoying of its properties: distortion.

Time to show off…

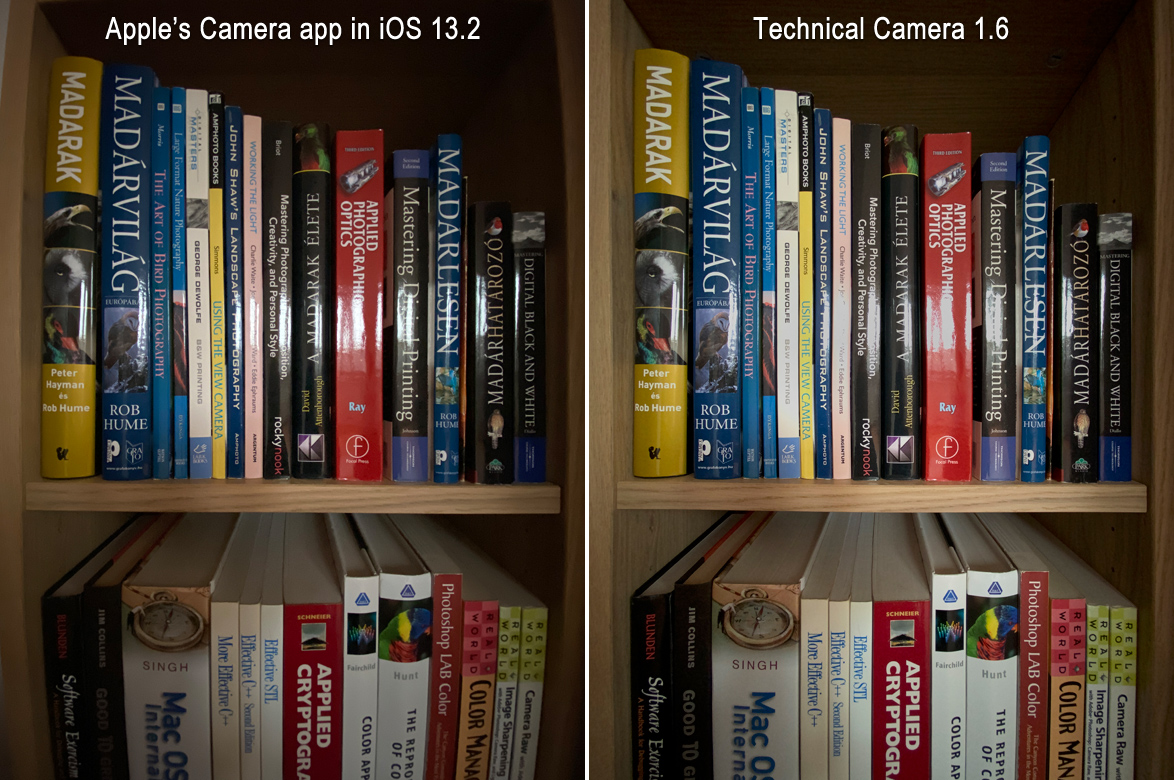
Technical Camera distortion correction compared

There’s no need to talk a lot about it. Technical Camera can give you a well corrected, almost perfectly rectilinear image, while the built-in camera app – and most others – simply can’t. This is where six and a half years of experience shows. So if you shoot buildings, interiors, or anything else where barrel distortion is a problem, then you will appreciate my app.

The apparent image quality difference which comes through even at this small size is partly attributable to the ability to use manual ISO in Technical Camera. The above image was shot at ISO 200, while Apple’s Camera app used ISO 1250.

Live view in Technical Camera shows you exactly what you get in the final picture, so you can frame your shot precisely. Apple’s camera app captures a little wider (and more distorted) image than its live view shows.

On the positive side, the ultra wide camera provides better image quality than any wide converter accessory lens I’ve ever created a distortion correction profile for. You still get corner smearing, so I do recommend to use a lower resolution image quality setting, such as JPG Quarter HQ with this camera.

Speaking of image quality settings…

If you happen to use an album that has RAW set as the image quality, and subsequently switch to the ultra wide camera, the app will warn you that since that camera can’t shoot RAW, JPG will be used instead. You can also choose to hide this warning. But don’t worry, it can be restored with the Warnings screen in the menu.

OK, but how do you switch to the ultra wide camera? There are two ways. You can use the WIDE icon on the Camera Options screen (which can be displayed by tapping the circle icon in the corner of the main screen). Tap the WIDE icon again to return to the default wide angle camera. Alternatively, you can set up a Smart Function Key with the Toggle Wide Mode function (the exact same way you do with a wide converter accessory lens). The latter method is what I use personally.

Version 1.6 is a free update for existing Technical Camera owners. New users can purchase the app in the App Store.

Tech Camera and Artist’s Viewfinder Updates

Technical Camera 1.5 and Mark II Artist’s Viewfinder 6.4 are now available on the App Store.

Both apps add support for the new 10.2″ iPad screen size, and resolve a bunch of issues on iOS 13. Artist’s Viewfinder also gains support for a few new cameras.

Technical Camera sports a new feature that didn’t make into the previous version: the exposure simulation warning. Since it belongs to exposure simulation, I’ve described it in that post.

These updates are free for existing users.

Technical Camera 1.4 : Exposure Simulation

Technical Camera did support longer exposures (up to a given device’s capabilities, which is usually in the 0.5s-1s range) from day one. And live view frame rate followed the exposure time, resulting in substantial lag when longer exposures were used.

To resolve this issue, version 1.4 introduces exposure simulation.

It works exactly the same way your regular camera’s live view does: we simulate the brightness of longer exposures by increasing ISO instead of dropping the shutter speed. The result is a fluid, high frame rate live view feed under all circumstances.

There’s a limitation, though, that you should be aware of. When light levels drop, simulation may end up showing a darker image when the actual (non-simulated) exposure would also use a very high ISO. Practically this isn’t a big deal, since very high ISOs are unusable on a phone.

Update 10/2/2019: While it’s a version 1.5 feature, the exposure simulation warning should also be mentioned here. It appears when the simulation can no longer show the actual exposure, because it hit the high ISO limit.

In this case an orange dot starts to blink once a second.

Exposure simulation is always on, no way to disable it.

Version 1.4 is a free update for existing Technical Camera owners. New users can purchase the app in the App Store.

Technical Camera 1.4 : Optical Image Stabilization

The latest update to Technical Camera is now available on the App Store. Version 1.4 fully supports iOS 13, so anybody upgrading tomorrow to Apple’s newest operating system will be able to continue to use the app. This includes support for Dark Mode in the menu.

But there are two other prominent features in this version, one of which is the ability to utilize optical image stabilizers found in newer iPhone cameras.

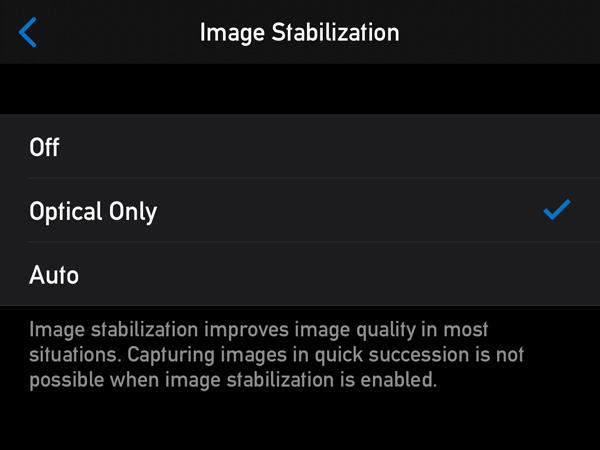
We’ve added a new Optical Only option to the Image Stabilization preference. Honestly, I was never a big fan of Apple’s digital image stabilization (used when Auto is selected), so that’s why we have this option now.

Optical stabilization is available at any shutter speed, as well as when shooting RAW. I routinely shoot one second long exposures handheld at ISO 25 with the wide angle camera on my iPhone XS Max, and the results are pretty good.

Auto stabilization has also been updated. By default it tries to use the digital/optical combined stabilization you are familiar with. But in cases where digital stabilization is not available (such as in case of RAW captures or at shutter speeds longer than 1/20s) it will switch to optical only stabilization. Well, if the currently selected camera supports it.

Starting with this version, manually set ISO and shutter speed values are retained when you exit and relaunch the app. So you can now set ISO 25 and optical only stabilization to have the highest quality RAW captures, and forget about it. Only increasing ISO when needed. This elevates image quality by a huge margin compared to higher ISO captures, and is exactly what I do.

The update is free for existing Technical Camera owners. New users can purchase the app in the App Store.

Technical Camera 1.1 Released

Version 1.1 of Technical Camera is now available on the App Store. This is a device support update, bringing optimized screen layout for the whole iPhone X series, including the new XS Max/XR screen size.

We’ve also fixed a few bugs, and added two wide converter profiles as discussed in the release notes.

This is a free update for existing Technical Camera owners. New users can purchase the app in the App Store.

Technical Camera : Focusing

Technical Camera provides there focusing modes: Continuous AF (the default), Single AF, and Manual Focusing.

In automatic modes focus is calculated for the AF point (the whitish circle, marked with 2 on the screen shot below), which you can move by tapping the screen at the desired position.

Focusing controls

In Continuous AF the app continuously updates focus. The focusing/focus lock key (indicated with 1 on the screen shot) displays FL in this case (as in Focus Lock). Tapping the function key will lock focus, which will be re-engaged again when the lock is turned off by tapping the key again.

In Single AF mode (which you activate by turning off the Continuous AF option in the menu) focusing is only engaged if you tap the screen to relocate the AF point; or tap the focusing/focus lock key (which changes its title to AF in this focusing mode).

You can hide the AF point when focusing is not in progress if the circle happens to interfere with your vision. Just set the Show AF Point preference in the menu to During AF Only.

Manual Focus is initiated by the vertical drag gesture. The gesture is described in the Exposure Control post, so if you haven’t done so, I recommend you to read it now. In Continuous AF mode it activates focus lock as soon as the beginning of the gesture is detected (that is you tap and hold the side of the screen assigned to manual focusing). You need to re-engage Continuous AF by turning the lock off.

There are two things that become active during the focusing vertical drag gesture: focus peaking and the focusing distance indicator. Both will turn off as soon as you lift your finger from the screen.

The screen shot above shows how the app looks during manual focusing. Black and white mode is also active, because it’s easier to see the colored peaking this way. In real life black and white mode is not turned on automatically during manual focusing.

You can choose the color of peaking via the menu, since no single color suits all situations. The available choices are green (the default), yellow, white and magenta. And of course peaking can be disabled completely.

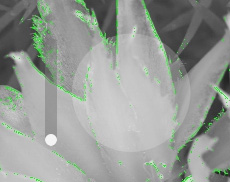
The focusing indicator is the vertical bar displayed on the left side of the AF point (see the magnified screen shot on the right).

The white dot in the track indicates the position: the higher the point the farther the camera is focusing. There’s no scale, though. Apple warns developers that the distance values iOS provides can’t be mapped to actual distances in meters or feet, so a scale is missing for this reason.

As parting tip, let me share how I use manual focusing. Lifting your finger from the screen might change the device’s position and thus the focusing distance. To avoid this situation, you can take a picture while your finger is on the screen during manual focusing. I usually do the focusing with my right index finger, and tap the shutter button with my left thumb.