Technical Camera : Wide Converter Support

There are occasions when the iPhone camera is not wide enough. A handful of companies (Moment, olloclip, Schneider, Zeiss – just to name  a few) realized that this is an issue, and started making converter lenses that let you shoot wider. These lenses fall into two categories: 1) well corrected for distortion – like the Moment or Zeiss, and 2) uncorrected.

With the latter group you have severe barrel distortion. We started experimenting with these lenses for use with the Mark II Artist’s Viewfinder back in 2013. The barrel distortion basically made them unusable for simulation purposes, so we came up with a solution that’s unmatched even five years later. Maybe because it needs a lot of effort and is quite costly to implement.

The technology behind the solution is real-time distortion correction, and the associated thing in both Artist’s Viewfinder and Technical Camera is Wide Mode.

Let me show it in action before going deeper (veteran Artist’s Viewfinder users can skip this, as it’s exactly the same thing you’re used to in that app).

The top/left half of the image is what you get when attaching an uncorrected converter lens. The lower/right half is what you’ll end up after turning on Wide Mode.

This kind of correction is really important if you want to take architecture or real estate pictures – it may separate an amateurish looking image from a professional looking one.

Since distortion correction is done in software, edges of the resulting image may become soft. This is more pronounced with wider (0.5x-class) converter lenses. One possible mitigation (depending on planned image use) is using JPG Half or JPG Quarter image size for your album.

To use a converter lens with Technical Camera, you need to tell the app which lens you are using with the Wide Converter item in the menu. This will select the appropriate correction profile and conversion factor. We make dedicated profiles for each supported converter/phone combination (this is why it’s a costly endeavor). The list of profiles is continuously expanding, so if you miss something, please let us know.

We also measure the exact conversion factor for the profiles (which is usually more conservative that manufacturers tend to advertise). In Technical Camera this number is used for displaying Framing Previsor corners correctly.

But since we can’t cover every single lens on the market, there’s another neat thing: you can create a “custom converter” yourself. Since the process is exactly same for both apps, I’m not going to replicate here what I wrote about this feature when it was introduced in Artist’s Viewfinder – but I recommend you to read that post.

Ok, you have a converter selected. The lens is already attached to the phone. What’s next?

You have to activate Wide Mode. This is done with either the WIDE icon among camera options (accessed by tapping the circle icon in the corner – shown below).

Wide Mode icon on Camera Options

Or by assigning the Toggle Wide Mode (W) function to a Smart Function Key and operating that key.

That’s it. Until you turn Wide Mode off, the viewfinder, saved JPG images, and even preview images saved in RAW files will be distortion corrected.

All functions (exposure, focus, etc) operate the same way in Wide Mode, with the exception of digital zooming, which is disabled.

Technical Camera is available for pre-oreder now on the App Store, at a 30% discounted price. It will be released tomorrow.

Technical Camera : The Framing Previsor

You might be wondering what those four (or eight) small corners are on Technical Camera screen shots. I’ve highlighted them on the following one.

Framing Previsor corners showing what you’ll shoot with the telephoto camera

They belong to the tool called the Framing Previsor. This is something hasn’t been done before (this is the second world’s first in the app – I’ve already wrote about album specific image quality and geotagging settings). So let me explain in detail.

It takes a while for an iPhone to switch between the wide angle and the “telephoto” (it’s more a normal angle of view, but Apple calls it telephoto) camera. It is really annoying when you are in a hurry, because light is changing or the event is unfolding quickly. So the idea is to pre-visualize on the wider camera’s view what the longer one will capture, should you switch over to it. You can decide with a quick glance on the screen whether it’s worth switching over, or stay with the wide angle one.

While it seems simple, this feature requires a bunch of advanced stuff to do correctly. The big question is: where to put those corners? One can follow a naive approach and use the angle of view data iOS provides for each camera. Well, since this data only have loose connection with reality, the corners could be more than 10% off this way. Fortunately we have precise data for the majority of iOS devices from the Viewfinder project. We use a custom-built instrument to measure the real angle of view of phones and tablets to be able to precisely simulate different camera and lens combinations.

This data provides the foundation for the Framing Previsor. At the time of writing, we have lab measured data for iPhone 7 Plus and iPhone X. These will be in the app initially when it’s released on the 12th. We’re already working on the iPhone 8 Plus, and it will follow suit in a subsequent update (until that the app uses iOS provided data for this phone).

The Framing Previsor is turned on by default, so you’ll see the corners on dual camera phones or if you are in Wide Mode (more on this in a moment). It can be turned off and on via the Toggle Framing Previsor (FP) Smart Function Key or via screen options. To access screen options, just tap the rectangle icon in the corner (mimicking a screen).

Screen Options

Tap the icon with four corners to toggle the Framing Previsor.

While this feature was originally developed for dual camera devices, there’s a situation in which you’ll encounter it on single camera ones. In is Wide Mode.

Wide Mode, with its associated machinery, like real-time distortion correction, will be discussed in another post. But since I’m talking about the Framing Previsor now, it’s the right time to describe this situation. Let’s begin with a screen shot illustrating it.

Framing Previsor in Wide Mode

There’s a 0.5x-class wide converter lens attached to the phone (roughly doubling the angle of view). Distortion correction is active, that’s why the tree isn’t bent. And you see eight corners instead of four. The outer four represent the regular wide angle camera of the phone, that is, when you remove the wide angle converter accessory lens. The inner four correspond to the telephoto camera’s angle of view.

On single camera devices the inner four will not be available of course. But the remaining ones will indicate what the shot will look like when you remove the converter lens.

The Framing Previsor works best at normal to infinity subject distances. The closer you focus, the larger the parallax error caused by the distance between the cameras will be. At close distances focus breathing also changes the apparent image size. These are optical laws, and since there’s no way to know the actual focusing distance on an iOS device, there’s no way to mitigate them.

Technical Camera is available for pre-oreder now on the App Store, at a 30% discounted price. It will be released on June 12.

Technical Camera : Smart Function Keys

We introduced Smart Function Keys with version 5.2 of the Mark II Artist’s Viewfinder. In Technical Camera they learned a new trick.

Smart Function Keys are customizable buttons on the app’s main screen. They are not only labeled with the abbreviation of the assigned function, but also show the state of the function. Black and White Mode is on? The BW key will indicate it. Want to quickly toggle the grid on and off? Just use the G key.

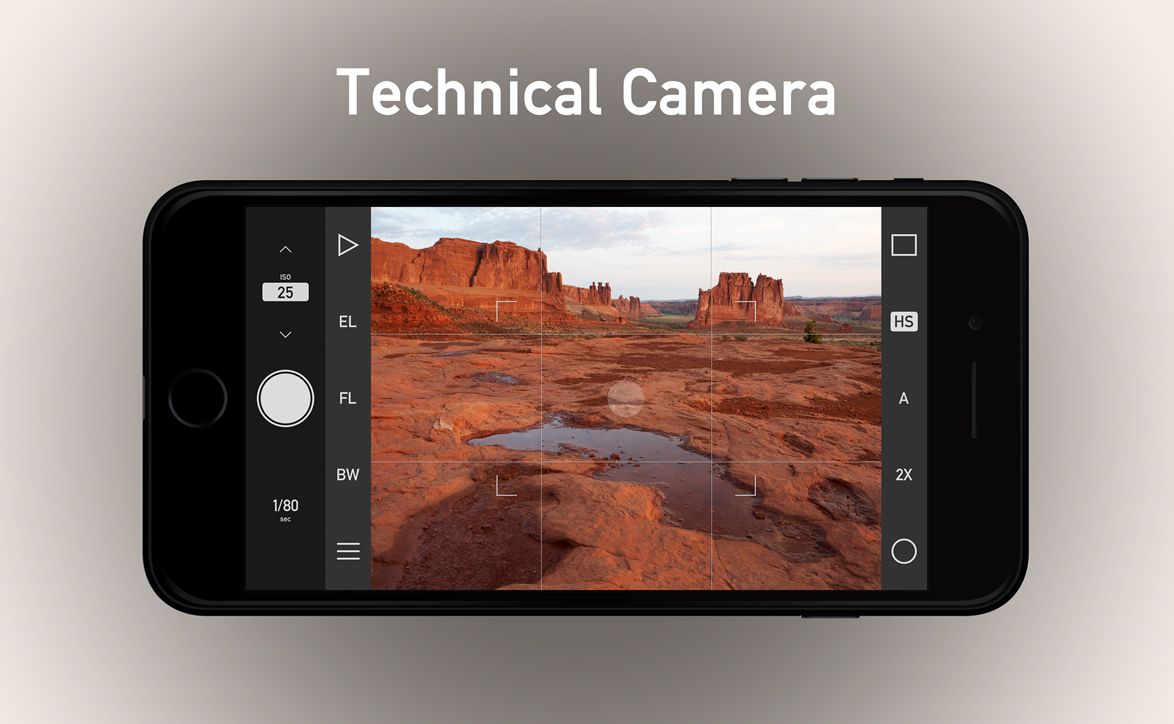
There are four Smart Function Keys in Technical Camera, shown on the following screen shot.

Smart Function Key Locations

Unlike in the Mark II Artist’s Viewfinder, EL and FL keys cannot be overridden in the app.

When a key’s associated function is active, the key’s label is shown on a white rounded rectangle (like HS on the above screen shot). In case the associated function is not available for some reason, the key will be grayed out.

Here’s the complete list of functions you can assign to each of these keys:

  • Switch Tele/Wide Cameras (2X) – available only on dual-camera devices. The key indicates an active function when the tele camera is in use.
  • Toggle Wide Mode (W) – you must set up a wide converter in the menu before using this key.
  • Toggle Black & White Mode (BW)
  • Toggle Grid Display (G) – it will toggle between the currently selected grid and no grid.
  • Toggle Framing Previsor (FP)
  • Toggle Highlight & Shadow Alert (HS)
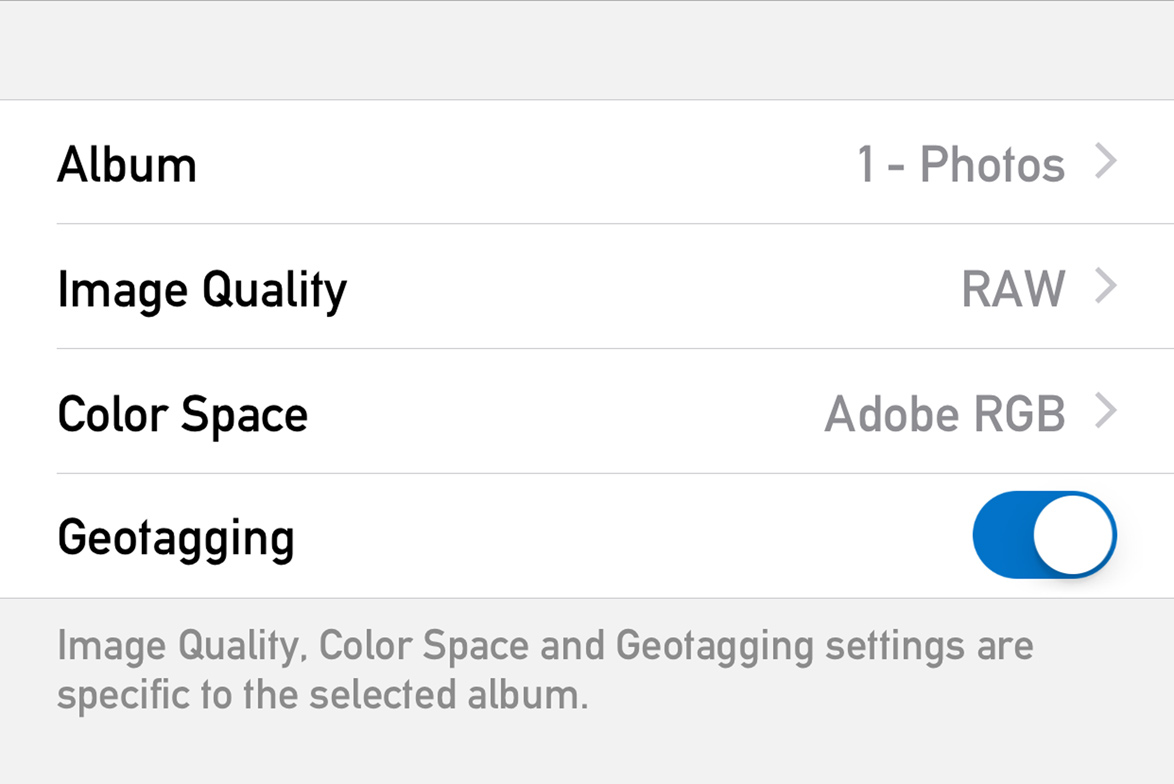
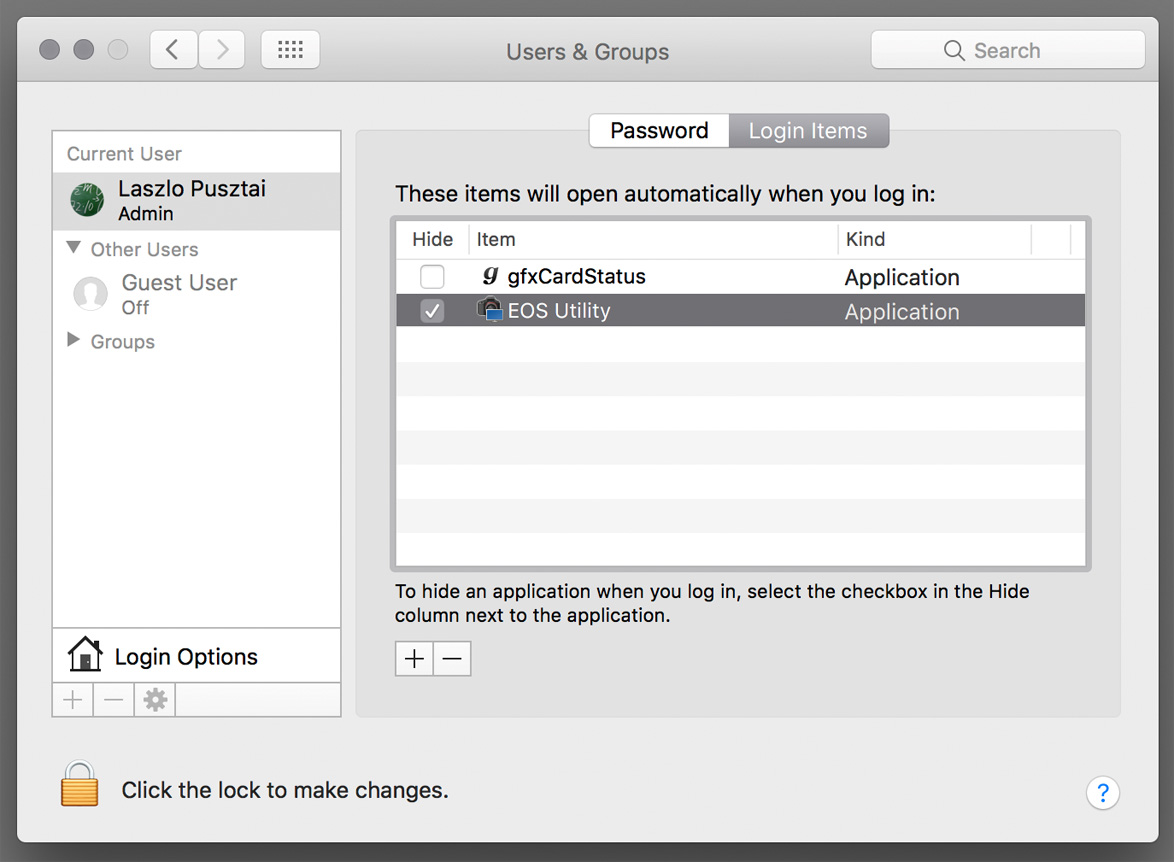
  • Quick Album Change (A)

The app ships with a predefined set of keys, but you can always change the assignment with the Smart Function Keys preference in the menu.

What’s described until this point is exactly the same the Mark II Artist’s Viewfinder handles these keys (the assignable functions are different, of course).

The new trick is that if you press and hold a Smart Function Key for a second, it will bring up the given key’s assignment screen. You don’t have to memorize which number corresponds to a given key, just press and hold it for a second.

Technical Camera is available for pre-oreder now on the App Store, at a 30% discounted price. It will be released on June 12.

Technical Camera : Auto ISO

Technical Camera features auto ISO capabilities usually found on higher-end cameras, and are unique in a mobile photography app. Auto ISO is active during fully automatic exposure and even when you set the shutter speed manually.

The following screen shot shows its configuration screen.

Auto ISO Configuration

You specify the allowed range with Minimum ISO and Maximum ISO. The range for minimum is 25-400 plus Lowest, and for maximum it is 50-1600 plus Highest. Both in whole stop increments. But wait, what Lowest and Highest means?

Let’s take my iPhone 7 Plus for example. The native ISO range for the wide angle camera is 22-1760, for the telephoto 20-1210. These values do not fall onto whole stop boundaries. Lowest and Highest are a way to use the ends of the native ISO range. So if you set minimum to Lowest on the 7 Plus, then the auto ISO algorithm will use ISO 22 as minimum for the wide camera and ISO 20 for the telephoto. This gives a slight quality advantage over using the whole stop ISO 25 value.

Speaking of the auto ISO algorithm, it is different for fully automatic and manual shutter speed modes. In the latter, it simply keeps the ISO value within the specified range. But in fully automatic mode two additional settings come into play. With Minimum Shutter Speed you can specify the preferred slowest shutter speed. The app will begin increasing ISO from the minimum when light is low and this shutter speed is reached. If there’s enough light to work at minimum ISO, then we’ll begin to increase the shutter speed. That is, the algorithm maintains the lowest ISO possible (to avoid higher ISO noise). The range for the shutter speed minimum is 1/20 – 1/4000 seconds, in full stop increments. Given the very short focal length of the iPhone /iPad lenses, 1/20s is hand-holdable without an issue.

But why isn’t that minimum even lower? The answer is screen refresh rate. With an 1/5s exposure you can’t keep a 20-30fps refresh rate, it will drop to 1/5s. And not just that, but exposure calculation and response to lighting changes also becomes slower. That’s why we chose the 1/20s default – as a good practical balance.

There’s a trick, however. By turning on Allow Slower Speeds the app will lengthen exposures beyond 1/20s in case the maximum ISO is reached. This could be very handy in low light situations.

Don’t be afraid to experiment with these settings, since you can always reset them to factory defaults with Reset to Defaults.

Technical Camera is available for pre-oreder now on the App Store, at a 30% discounted price. It will be released on June 12.

Technical Camera : Exposure Control

Technical Camera supports a wide range of exposure control tools, covering everything from full auto to full manual.  In this post I’m going to explain all of them, plus the preferences that alter how these controls behave.

Auto Exposure with Compensation

By default the app is in full automatic exposure mode. Technical Camera determines the ISO and shutter speed to use based on its Auto ISO settings (which is an extensive topic in itself, and thus a subject of another post – for now treat it as a black box that automagically sets your exposure).

But even in this automatic mode, you have the option to override the result of the exposure calculation and brighten or darken the image using exposure compensation.

Exposure compensation is one of the two functions that utilizes the vertical drag gesture. That is, tap and hold, then move up or down. Do the vertical drag on the left side of the screen, and you’ll control compensation. Do it on the right side, and you’ll control manual focus.

Vertical Drag Areas

These areas are orientation sensitive, so the left side always refers to the left half of the screen.

The Vertical Drag preference in the menu allows you to switch the sides (so that manual focus is on the left), or designate the whole screen solely for compensation or focus (but you’ll lose the other function in these cases).

A number reflecting the current exposure compensation value is displayed next to the AF point. The number is dimmed when the drag gesture ends. Compensation range is +/-5 stops, in 1/3 stop increments.

To quickly reset compensation back to 0, press and hold the screen on the exposure compensation area for a second.

Exposure Lock

Tapping the EL key immediately locks the exposure at the current value. Auto exposure calculation will not take place while the lock is active, but changing compensation is allowed

The EL Locks WB preference in the menu controls whether white balance is also locked with the exposure.

Manual Parameter Setting

You can set the ISO and shutter speed manually if you wish. Aperture is fixed on all iOS devices at the time of writing, so there’s no way to change that. Technical Camera will continue to calculate exposure if you set one of the parameters to a fixed value (that is, it will calculate the other one automatically). You’ll have full manual exposure if you set both parameters manually.

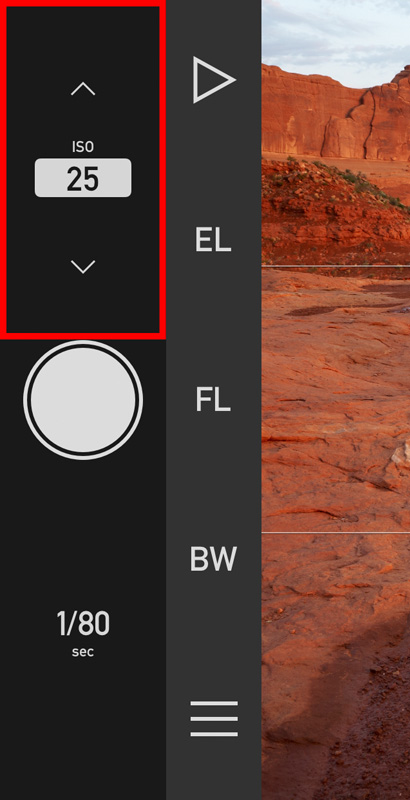
The app continuously displays the metered ISO and shutter speed value next to the shutter button. Tap the displayed number, and you’ll enter manual setting mode for that. For example manual ISO setting is shown on the left.

Manual setting generally happens in 1/3 stop values. The current value is rounded to a 1/3 stop value at the time you enter manual setting mode. I said generally, because in case of ISO some devices have lowest and highest values that does not fall onto 1/3 stops. For example ISO 22 on the low end. In this case these values will be also available.

Tap the displayed number again to turn off manual setting mode for that parameter. Automatic exposure calculation will take over immediately.

The arrows next to the number can be used to increase or decrease it. Tapping the arrow above (or on the right side in portrait orientation) of the ISO control will increase the ISO. Tapping the arrow below (or on the left side) will decrease it.

But there’s a neater way to accomplish this. The entire area around the number (marked with a red rectangle on the screen shot) acts as a touch pad: tap and drag on this area to change it continuously. On iPhone 7/7+ or newer you’ll even have haptic feedback so it feels like operating a real dial. Since the number is under your finger in this case, the app also displays it in the middle of the screen.

The shutter speed “dial” is a bit different. The reason is that there are two kind of people: those who prefer that the shutter speed dial increase the shutter speed in the up/right direction, and those who prefer that it should add more light in the up/right direction. Having the wrong behavior usually drives people nuts. So Technical Camera lets you choose between them with the Shutter Speed Direction preference in the menu.

Availability

Technical Camera is available for pre-oreder now on the App Store, at a 30% discounted price. It will be released on June 12.

Technical Camera : Albums With a Purpose

One of the cornerstones – maybe the most important – of Technical Camera is its album handling. While the app still uses Photos for its image storage (keeping its iCloud sync and myriad other features), what is does is quite different from what you are used to. Instead of pouring everything into All Photos and require either you or artificial intelligence to navigate huge piles of accumulated images, Technical Camera always shoots into a well defined album. That is, the image captured is separated from the rest the very moment you press the shutter.

That well defined album is something you create for your specific purpose. Purposes could include different shooting locations, different projects you are working on (like a 4×4 build or your new garden), or – courtesy of my better half – the things you need in everyday household management: well-tried/favorite stuff, garage sale, recipes, meter readings, shopping list, and so on. I guess you grasped the idea by now.

The end-product of these purposes is quite different. For example I usually don’t want to reveal my home’s location in images uploaded to buy&sell forums, so in the past either had to manually disable location services before taking the image or manually remove the GPS coordinates later. And then there’s the question of high megapixel images. They are a blessing when you want a decent print, but are a curse when you need to transfer them quickly, for example via satellite line to your news agency.  Similarly, wide color is a great thing until you encounter a photo printer that’s unable to handle it resulting in 1500 awful-looking vacation prints.

You can define your albums with the first few items of the app’s menu.

My album for RAW images

I tend to begin my most used album names with a number, so that they will be on the top of the (alphabetically ordered) album list. Here I set image quality to RAW, and want wide color capture, preserving the most information. Adobe’s DNG specification does not support Apple’s Display P3 color space, so use Adobe RGB here (more on this issue in a later post). Note that color space selection is available only on devices capable of shooting wide color images.

Super tiny 800×600 images for visual notes

Another album of mine is the visual notes. I need the smallest possible size for this purpose, with no geotagging and the smallest color space.

Stop here for a moment. These images are just 460k pixel, and in real life they tend to be up to 20x smaller in size than regular JPG files produced by the same device. Which equals to 20x less data going through your mobile connection if they are shared. That is, 20x less cost (for this part of your data usage). These tiny image go through quite fast even if you exhausted your data allowance and your transfer speed gets limited.

Or even the recipient of your image has limited bandwidth. I heard people complaining that their data allowance was completely used up by “friends” sending large unsolicited images…

So you have a bunch of albums created for your chosen purposes. How do you access them quickly? I almost always know the moment I pick up the phone to take a photo which album should be used. But since mind reading is not part of the iOS feature set, there needs to be a way to choose the album, preferably faster than going into the menu. Technical Camera has two features to facilitate the quick album switch.

One of them is the “A” Smart Function Key. It is part of the default Smart Function Key assignment. Tap it, tap the name of the album, and done. When Technical Camera starts it will display the name of the currently chosen album for a short time. Same in case of album changes, so you can always be sure where your images are going. The other is home screen quick actions.

Home screen quick actions

Here the app lists the three last recently used albums, plus you can go directly to the album chooser if the album you want ran off the list.

There’s one last thing I’d like to mention. The app creates an album named Technical Camera when you run it for the first time. It is safe to delete this album after you created your owns. You can delete an album from the Photos. You can even delete the Technical Camera album in Photos, but the app will re-create it if that was the last album you used. If you want to get rid of it, select another album in the app, then delete it. Please note that the Technical Camera album remains listed in the album chooser even if it’s not present in Photos any more. This is because it is a fallback/last resort album in case all others are deleted.

Technical Camera is available for pre-oreder now on the App Store, at a 30% discounted price. It will be released on June 12.